Sunday, 28 January 2018

Prima Zella Teal......pt 2...Enjoy Every Moment.


Hi There

It's Anita today and I have my last post for the month. I have been using up the rest of my Zella Teal papers and stickers from my Design Team Kit for this month. Such yummy papers with lovely colours and the addition of holographic elements that really capture the light and shimmer and change colour beautifully.


I decided to use another photo from our Silver Wedding Anniversary Road trip from last year, this time from our visit to Aysgarth Falls, happy memories of a wonderful day.

The page is based on a sheet of 'Offset Dot' and then a slightly cut down sheet of 'Floral Stories' which I flipped over and used the spotty reverse side. I dribbled some blobs of Cosmic Shimmer Mists in 2 colours and then blew them randomly across the page in different directions.


I popped a length of white cotton lace across the page and made a couple of loopy embellishments out of aqua coloured twine.
Next came a sheet of 'Live Loudly' which has lots of different little elements and sayings on in various shapes and sizes. I cut out a variety of them and created a border up the right hand side of the page popping some of them up on foam pads and leaving some flat to the page.


I also had a small sheet of 'Word Stickers' in my kit, so used a few of them in various places and also added a scattering of pearls and gems ( I LOVE a bit of bling on my pages!)


I think this has to be my new favourite collection from Prima....... such a pretty colourway and lovely designs.

Thanks for looking today and don't forget to pop along to the shop for all your stash requirements, lots of new goodies coming in all the time.....and of course, lots of favourites and best sellers always available in the shop too.

Warmest wishes
Anita xx

Wednesday, 24 January 2018

Kaisercraft - Wandering Ivy - part 2

Hello, Lynn here with my second layout using Wandering Ivy papers from Kaisercraft. I have chosen another photo from Emily's autumn wedding.


My base layer is a sheet of sage Bazzill cardstock, I didn't gut the card this time as I needed a firm base for the wooden planks. The paper chosen for the background is called 'Panelling' I cut all the wooden planks apart, distressed them, inked the edges and then stuck them to the base card in much the same arrangement as they were. Before sticking the two horizontal planks I wrapped some fine jute twine around the paper and stuck them with dimensional glue.


The pretty floral paper is called 'Blue Posy' I cut this to about 7.5" deep and 10.5" wide. The edges were distressed as before. The photo was mounted onto some distressed Kraft Bazzill. As for my first layout I used some of the embellishments sent to me by Papermaze, and others from my stash. I also used the same set of Thinlit dies - Festive Greens for all the leaves and pinecones.


For the decoration above and below the floral paper I cut two strips using a Sizzix Sizzlit Decorative Strip called 'Fanciful Border'. These were also cut from the Kraft Bazzill. Then I used embossing powders to give them an aged metallic look. I chose platinum, Verdigris and bronze from my stash. There are lots of embossing powders available in the shop.
The blue lacy border and the hidden clock faces were taken from the Wandering Ivy Sticker Sheet.


Thanks for looking.
Lynn x

Monday, 22 January 2018

Wild Adventure with Photoplay Boys Rule

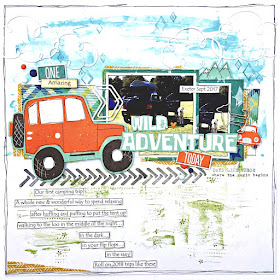
Hi Tracee with you today to share a layout I created with the super cute collection by Photoplay called Boys Rule.

Wild Adventure tracee provis papermaze photoplay boys rule

I am creating an album with pictures from our first camping trip, it was such fun even when the rain was tap tapping on our tent. Luckily we arrived in sunshine, good job for first time tent erecting!


I created a grungy background simply by using my palette knife to scrap the paint across the page. I dug into my stamps cupboard and came up with quite a few to use.
Since scrapping 8 x 8 at my friends last summer I have become addicted, I cut the car from the Mr Awesome sheet and it became a large element on my smaller page. I then went to town fussy cutting other images from the papers.
I used the wood veneer "Amazing" and the paperclips from the goody bag that came with my DT kit.


I hope you have a Happy Scrappy day and for this page and all your scrappy needs please head over to the shop


Wednesday, 17 January 2018

Echo Park - I'd rather be Crafting

Happy New Year to you all!
It's Anna here today, for my first post of 2018. This month I have been working with Echo Park's I'd rather be Crafting collection.
It's perfect for scrapbooking all of your crafting adventures! There are many crafting details throughout the collection, including scrapbooking tools, planners, cameras, buttons, scissors, wool etc.


I decided to create a project life layout for my first post, this is something that I haven't done for a post for while. Although I still use them in my albums regularly.
I used a Design C Project Life page, so I needed 6 6x4 cards to fill it. I trimmed down some cardstock to 6x4 size to use as background cards as well as a couple of the 6x4 journaling cards from the collection.


I have used quite a few pictures on this layout, this is something that love about using project life pages. I often use them alongside traditional 12x12 pages, so I can add extra pictures and information about a particular event.


I cut out lots of the images from the patterned papers, including flowers, words (which include 'create', 'scrapbook' and 'memories'), cameras and even a trimmer!


I used this layout to document a scrapbooking weekend, I love that there is a collection that enables us to document our scrapbooking and various other crafts.


All of the items I used are available to purchase from the shop and you can see the new Echo Park collections here.


Thanks for looking!
Anna
X

Monday, 15 January 2018

Little things

My first scrapbook page of 2018, and using Blue Fern Studios Chesterville collection.. Its a very dark collection and has a very mixed media vibe about it. On this page i have  used very little paper, mainly my background piece which i have added lots of mixed media to
Firstly i have prepared my keswick paper with transparent gesso and left to one side to air dry,
My focal point is the chipboard notebook frame from Blue Fern Studios to this i have added distress oxides in iced spruce, and them stamped with a clear script stamp from kaiser craft. then added a layer of transparent gesso and set aside to air dry. Once dry i added more inks and mists and set aside.


Back to my page i added some structure paste through a stencil and once dry layered on inks and mists. Placed my back and white photo in the frame and adhered to my page and added strips of paper from the same collection to the right hand side of the frame and some Tim Holtz letter stickers, and  die cue some snowflakes and added to 3 corners of my page.


Added an acrylic title i had amongst my own stash, photo strip, metal embellishments and cotton. Some extra stamping  to areas


close ups


Friday, 12 January 2018

Our first crop of 2018!

It may have been 6 weeks since our last crop, but they have flown by... and already here we are with the first crop of 2018!
It may be grey and dull outside, but this month's kit uses bright colours from Simple Stories Summer Days papers, with a hint of Pixie Powder...


We're at our usual venue, Otley Village Hall with tea, coffee and homemade cakes and a great selection of punches & dies for you to use.  Plus, as it's our January sale, there's 20% off anything you buy in the shop.  Just drop us an email if you'd like to come along :)

Wednesday, 10 January 2018

Kaisercraft - Wandering Ivy

Hello and happy new year to you all, Lynn here with a layout made using the Wandering Ivy collection from Kaisercraft.

When I received my design team package for January and found these beautiful, rustic papers and a package of embellishments I just knew they would be ideal for presenting some of the photos from my daughter's wedding.


I selected just one sheet of paper from the collection for this layout - 'Ivy Wall'. The majority of the paper is white-washed wood effect paper with ivy tumbling from the top. I decided to cluster three circular photos from the ceremony itself near the top. The hop bines in the photo are reflected well in the printed ivy.


The flowers in my kit were also perfect as Emily chose green and white / cream for her flowers.
I used some 'Avocado' Bazzill to cut leaves, these were scraps from her wedding invitations. I also added in some dark brown Bazzill scraps for the pine cones. All the greenery and pinecones were cut using a Sizzix (Tim Holtz Alterations) Thinlits set 'Festive Greens', suitable for a lot more than Christmas.


The wooden birds and 'Today' word as well as the tiny letter stickers were also in the kit.


The little cluster at the bottom right of the page, was created with other bits from the kit, lace, tag, glittery half pearls, tiny gold doily and metal name plate. I added some rub-on letters for the month from my stash and I used some dies to cut numbers. I also added some jute twine.

Thanks for looking
Lynn x

Friday, 5 January 2018

Zella Teal.........from Prima

Hello There, it's Anita with you today for my first post of 2018 and I would like to wish you a very Happy New Year!

I am chuffed to bits to have been able to work with this stunning new collection from Prima, Zella Teal. Its a gorgeous colour palette of beautiful blues and aqua's...... a sprinkling of  browns and some truly gorgeous holographic features that are dazzling when they capture the light.


The papers are all double sided......and that is where the problem lies.....both sides ARE GORGEOUS!!   Which to choose???  Buy 2 of each sheet....problem solved ;)

I decided to use a photo from 2010....a family holiday in Buckinghamshire. We visited Windsor for the day and after a lovely walk around we went on a boat trip down the Thames. This photo is one of my eldest daughter's favourites and I felt the Zella Teal papers were just right for it.


I based the page on a sheet of Live Loudly, which has a beautiful spray of flowers in 2 opposite corners.


I cut a couple of posies from a sheet of Zella Teal, including the gorgeous holographic leaves and accents . They really glow when they catch the light. I raised these up on foam pads to create dimension


I normally square cut the photo mats, but I wanted a softer edge this time so I tore the cardstock mat, leaving a feathery edge. I also used a couple of different Cosmic Shimmer Mists on the page, squirting large drops, creating a pool of ink and then blowing it out in different directions.


I also used a small 6 x 6 inch stencil I had in my stash ( not sure of make or design) and spread some Sparkle Medium through it. This stays raised when it is dry and adds some texture and dimension to the page.


I finished off my page by adding a few random half pearls and gems here and there across the layout and adding some paper blossoms and also some butterflies that I had printed off the internet onto cardstock.


I think this collection will be high on my list of favourites.....I will definately be needing some more!!

Why not pop over to the shop and have a good look around, there are so many *needful* things there xx

Warmest wishes
Anita xx