Wednesday, 30 May 2018

A Sweet Summer with Doodlebug

 Bright colours always appeal to me, and Doodlebug's Sweet Summer collection is full of them!  I was especially drawn to the Cabana Stripe paper, as I love rainbow colours.  I only used two strips of this though, either side of the layout.


The centre of the layout has a main rectangle of Punch Plaid, then various other small pieces from the collection, and a length of My Love washi tape, (although it's from the So Punny range, the rainbow hearts go so well!)  To frame the photo, I cut the borders from two of the 3x4 cards on the Summer Sprinkles paper, cutting the green one in half to stretch behind the photo.  

The die-cuts come from the Chit Chat pack - it's full of speech bubbles, words and phrases - the words Summer in the title comes from it.  For the word 'smiles' I stuck three small tags together and then used Doodlebug's Abigail alphabet stickers. 
 

 The letter stickers showing the date are from Webster's Pages, and I finished off the layout with a mixture of glitter sprinkles and Nuvo Crystal drops.  

The Sweet Summer collection is ideal for all your summer photos, full of sunny colours, with cocktails, lollies, palm trees and lots of other summer icons - take a look at it all here :)


Monday, 28 May 2018

Wise Words....... Misty Mountains from Kaisercraft.

Hello there it's Anita with you today and I would like to wish you a very happy Bank Holiday Monday !
For my last post of this month I have used some of the delicious Misty Mountains papers from Kaisercraft. This collection is full of soft, delicate pinks, mauves and stronger indigo's and combines a mix of florals, agates, marbled designs and some lovely quotes too!


I decided to scraplift a layout I originally made back in January which you can see here as I wanted to make use of several of the quotes and I really enjoyed making the original one.


I used just 3 of the collection for this layout of myself and our eldest daughter as a baby. I loved all the quotes and felt they would be perfect words of advice to give someone so special. Sheets used were
Divine
Marbled
Light Leaks
I also used a sheet of Blackberry cardstock.
The centre was gutted out from the sheet of Marbled and put the small gutted piece to one side.
The sheet of Light Leaks was trimmed down to 11.5 inch square and then tilted slightly and placed onto the Marbled sheet, I then just trimmed the overhanging areas off.
The photograph was double matted onto Blackberry cardstock and then onto the gutted piece of Marbled.


I also matted a few of the quotes and cut the title from the cardstock using Sizzix Noveau Alphabet.
Using a Distress Stain in Dusty Concord I dabbed some splats in various points on the page. There is a huge variety of colours in the Distress Stain dept in the shop, so many gorgeous colours to choose from! Some of the quotes were stuck flat to the the page and others were raised on foam pads and overlapping each other and the layout was finished with the addition of various sized sequins, some fine cut lilac raffia strands and a crystal heart cabochon.
Here are a few more close ups.


Once again Kaisercraft have created another gorgeous quality range to add to their ever growing collections. For the other new collections by them on the shop site please look here

Wishing you a super Bank Holiday Monday, hope you will find some time for yourself to get crafting!

Warmest wishes
Anita xx

Friday, 25 May 2018

May Crop

So, the monthly crop has come around again!  We are at Otley Village Hall again tomorrow, starting at 10am, with homemade cakes currently being baked :)  Our crop kit is bright and summery, featuring papers from Jillibean Soup...  


If you'd like to join us, drop me an email - there will be refreshments available, a range of dies & punches for you to use and a discount in the shop!  

Wednesday, 23 May 2018

Carta Bella Spring Market

Hello. Karen here with my second project this month using Carta Bella's beautiful Spring Market collection.


Although I didn't actually use the Rainboots patterned paper on my layout I loved the flower filled wellies printed on the paper and this was the inspiration for a layout featuring a photo of my daughter about to play in some puddles.


I die cut, using a cut file from the Silhouette Studio, a pair of wellies from the pink patterned paper. I backed the open parts with the reverse side of the Wreath Decor paper and some green Bazzill cardstock. If you don't have access to a die cutting machine you could instead find a picture of some wellies on the internet (colouring pages are ideal) and use that as a template to hand cut some wellies.


I trimmed a sheet of Garden Gingham paper to roughly 11.5", distressed the edged and matted this onto a sheet of deep pink Bazzill cardstock. I machine stitched round two of the edges using gold thread.

So that my photo could be tucked underneath some of the flowers printed on the Garden Gingham paper, I sliced round the edges of some of the flowers using a craft knife.


My wellies were stuck on the right side of the page and were 'filled' with lots of flowers and leaves  which were fussy cut from the Market Floral paper. Some of the flowers were popped-up on 3D foam and sequins were added to the centres of the flowers for extra interest.


To complete my layout I used a mixture of die cut letters and some stickers from Simple Stores collections for my title which was a quote found on Pinterest.


Thank you for looking. Please do have a look at this collection and all the other lovely goodies at the Papermaze shop - you won't be disappointed. Karen x

Monday, 21 May 2018

May Papermaze Kit

Every month Vanessa and her team put together a popular scrapbooking kit, carefully selecting papers from a variety of current collections, together with coordinating cardstock and embellishments. These kits are designed for you to create your own layouts and so do not contain any instructions.

Occasionally people have said they would like some ideas to go with the kit to help in making a start. So I thought it would be a good idea to do a couple of blog posts showing some things I made with the pretty May kit and hope this will inspire you. 

For the first post using the May Kit (available on line and in the shop from today), I have created two layouts.


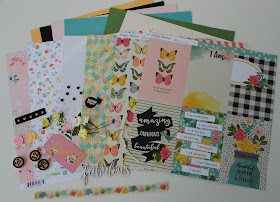
This month the kit contains:
6 Sheets double-sided patterned paper:
Vertical Elements - I AM... collection - Simple Stories
Choosing Happiness - I AM... collection - Simple Stories
So Amazing - Fleur collection - Kaisercraft
Beginnings Four - Beginnings collection - Authentique
Whim - Let Your Heart Decide - Pink Fresh Studio
Flower Child - Dear Lizzy Stay Colourful collection -American Crafts


Cardstock:
6 sheets Bazzill, 2 sheets with the original kit Guacamole and Cfream Puff
4 sheets with the additional cardstock which has been selected to go with the kit, Glow, Black, Whirlpool, and Pinkini.


showing reverse side of papers
Embellishments:
laser-cut word (exclusive to Papermaze), 2 wax seals, Prima Lavender tag, 3 wooden bingo tiles, strip Dusty Attic chipboard, 3 pearls, Heidi Swapp speech bubble, 2 ribbon roses, 3 paper flowers, 10 dewdrops, 12" washi tape.


The embellishments
I love the way the kit encourages you to mix papers from different companies in the same project, rather than always reaching for papers from the same collection.

As I have just moved house most of my craft materials are still packed as we are busy preparing a craft room. So I have created these layout with a minimum of tools and equipment. Also we had no internet for two weeks and the computers are only just set up so I have been depending on a box of photos I had to hand. 

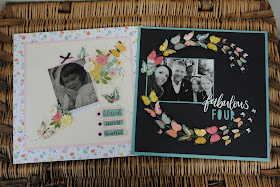
So this first layout uses mostly materials from the kit and an old 1963 photo of myself.


The wide border was made with a gutted sheet of Flower Child paper, layered up with the Pinkini and Cream Puff cardstock. I also gutted the pink cardstock to give me enough for a photo mat, and all the tags. My journalling is written on a scrap of Cream Puff, mounted onto the Pinkini and made into a tag, which pulls out from under the photo with a thin ribbon bow.

I trimmed the photo with a piece of lace from my stash. The flowers were cut from the
Vertical Elements - I AM... sheet. I added these by sticking with adhesive in some places and raising other parts with 3D foam sticky pads. I added the three paper flowers from the kit. The wording was cut from the same sheet of patterned paper and made into three little tags using scraps from the same cardstock as before, I left room for a black dew drop on each tag.

The butterflies were cut from the Choosing Happiness paper. I made antenna and bodies for the butterflies using black embroidery thread. Once everything was in place I embellished with some Nuvo Crystal Drops.


For my second layout, I was inspired by a post I spotted on NĹ‘iCsizma blog.  This time I chose a photo of my nephew and his family.  


Using whirlpool Bazzill, I gutted the 12" x 12" sheet giving me spare card for later. Then I trimmed the black cardstock to 11.5" x 11.5" and mounted this centrally over the whirlpool. I matted my photo and cut the word 'FOUR' using some of the whirlpool card.

With pencil I sketched an incomplete circle in broken lines where I wanted the butterflies to sit. I used a white gel pen to go over these once I was happy, then stuck my photo into position on the page. 

Then came the fussy cutting of butterflies from the Choosing Happiness sheet. From the incomplete butterflies around the edges of the sheet I punched some butterflies using the Martha Stewart 3 in 1 butterfly punch. These were arranged and stuck into place along the bodies. The larger butterflies have 3D foam sticky pads under the wings to raise them up off the page.

The word 'fabulous' is the laser-cut word from the kit which I embossed with white powder, the 'FOUR' was cut with a Sizzix Thinlits die -  Paper Cuts Alphabet.

To finish off I added a little Stickles to some of the wings for a little sparkle. 

Although I have created two layouts, I have plenty of paper, card and embellishments left so I will be back early next month with some more. Meanwhile the kit is available to purchase from today.

Thanks for looking
Lynn x

Friday, 18 May 2018

Simple Stories ~ Hello Summer #2

Hello all and welcome back to the Papermaze blog. It's Anna with you today, to share my second layout using the Simple Stories Hello Summer collection. I have really enjoyed using this collection, which is so bright and fun. I don't think my photos quite do it justice! You can see what I have been working with this month and my first layout using this collection from earlier in the month here. So my second layout is below...


This time, I based my layout around the 4x4 elements. I chose two of the cards that I wanted to use and chose another two that I probably wouldn't use, so therefore could use the patterned paper on the reverse. I chose the strawberry image, which coordinated well with my photographs and the ''good vibes'' wording. I decided to cut these words out from the 4x4 card. I then cut out a boarder from another of the 4x4 cards to frame the words. I also did some sewing down two sides of the boarder.


I mounted my photographs on to the reverse of the two cards that I chose not to use, making use of the floral pattern on the reverse. I then mounted all four 4x4 cards onto some cardstock.
I cut out a couple of the speech bubbles from the Life Is Good paper, some flowers from the Paradise Found paper. I layered them together along with a doily, word stickers and enamel dots.
I also added a thin boarder around the edge of the layout using the of the reverse of the Paradise Found paper.


Thanks for looking! Have a great weekend!
Anna
X

Thursday, 17 May 2018

Inspire your Imagination with Echo Park - Imagine That (boy)

Hi Tracee with you today sharing a 3rd project created with the wonderful Imagine That boy collection by Echo park. It seems I can't stop being inspired by this lovely collection. I have created a girls page (here), a boys page (here) and today my page is all about my doggies, extremely versatile collection.


Imagination tracee provis papermaze echo park imagine that boy

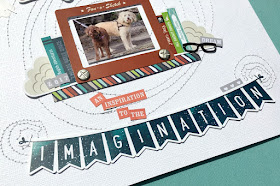
Whilst this page is all about my dogs this is the only layout of the three that I haven't used one of the dogs from the collection, don't know how that happened! I was inspired by the bookends sticker, as in my photo Rodney & Peggy look like 2 bookends.

Imagination tracee provis papermaze echo park imagine that boy 01

When I saw the aeroplanes on the combo sticker sheet I really wanted to use them, I can be very literal in my scrapping, in that every element on my page has to be related to the picture or title in some way this can be very annoying as it stops me using certain elements I love. This time I crept out of that comfort zone and added the plane sticker as I felt it represented freedom, hmm maybe the less I share about my scrapping process the better!
I used the frame from another sticker to add some little word stickers that were in my kit, they are made by My Minds Eye. Once again I went stitching crazy for some interest behind my photo.


Imagination tracee provis papermaze echo park imagine that boy 02

I really wanted to use the long Imagination sticker but as my page is only 8 x 8 it was rather large and when I placed it down it looked like it was just floating on the page, I added more stitched circles and a couple of staples and it looks much better.


Imagination tracee provis papermaze echo park imagine that boy 03

On this whole page I only used one small strip of patterned paper underneath the photo frame, I cut the bookends sticker in half and tucked it either side of the etch a sketch frame. Some screw head brads finished it off and added more silver to go with the staples in the vellum clouds.

I have 3 completed pages using this collection and I still have a ton of bits left, the combo sticker sheet has been used on every page and there is still more left! 


Plenty more for personal pages as you can see!
For this and all your scrappy needs please head over to the shop


Monday, 14 May 2018

Magical Memories - Creating a Mini Book - With Video

 
Hello!!  It's Lisa here.
The one that loves Disney!!


It's me and these gorgeous Echo Park - Wish Upon A Star papers on this blog today.
I do love this collection, It's so much and perfect for Disney projects.
 
 
I have a video of how I made this Mini Book here, so you can see it being created.
 
And if you'd like to see the Echo Park collection....it's here : )

 
I love making Mini Books. For me the key is keeping it simple and not over thinking.
Having everything that coordinates is an instant help. It saves so much time finding materials to use. 
 
 
I love having layers, so I enjoy cutting my papers to different sizes to create these layers.
It adds so much interest to a book. 

 
I trimmed my photos off and included large white borders and used these borders for my journaling.


You don't have to always include photos on every page when making a mini book. Sometimes when papers are so fun, you can just leave them as they are.

 
I'm so happy with this Mini Book and it came together so easily.
I really hope you enjoy the video. I had so much fun creating.
Thanks, Lisa x
 

Friday, 11 May 2018

Time for tea...

For my post this month I wanted to do something other than a scrapbooking page. I love making cards and altered items so wanted to have a play around with something different.

I have made a few of these before on a wooden tag and a canvas. But this one is made just for me!

First off I bought a wooden chopping block. It is not very tall or wide and will look perfect on the wall in my kitchen. This wasn't very expensive, I got this for £3.50! I chose this wooden colour as I knew I wanted to paint it white which meant when I distressed it you would be able to see the wood colour underneath.


This took two coats to cover and dried really quickly.

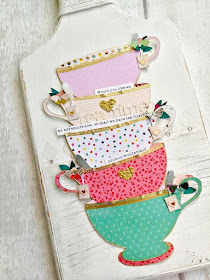
I then printed out the outline of a cup from the internet and cut it out. Really quick and easy....and then came the fun part...choosing the papers for the teacups.

I went with a mixture of the Dear Lizzy Stay colourful and Paige Evans >>>>>>

The two are really bright and colourful collections and actually work really well together.
Below is the template I used.


Then you cut off the top of the cup to make it look like you can see the inside.


Then you stack them on top of each other, like the photo below. I cut up some gold washi tape 


and used it to add a building edge of the teacups. I also added some gold paint for the trim and used a gold pen around the handles.

I also cut up some gold glitter paper for a decoration on a few of the cups.

I like to have the cups sitting on something to ground them to the background. I like to use woodgrain as a back ground to mimic a wooden table. 

Because I love adding lots of details to the things I made, I couldn't resist adding some little teabags hanging over the top.

So I cut up little rectangles and added little hearts. This paper from the Paige Evans line was perfect for this. I turned over my heart punch to punch round the heart on the paper....perfect outline.


The little teabags looked like this. To add them to the cups I used cross stitching floss.


To add a little decoration to the side of the cups I cut out the moths from this paper to add to each handle.


While I was waiting for inspiration to kick in ( couldn't think of what else to do ) I decided to sand down the edges of the board to age it.

I just used some nail files to rough up the edges...


And then the edges look like this...


To jazz up the handle a bit I added some string that I had in the kitchen.


I also added some silver card for the spoons.
I also cut up this paper for flowers and used the to add a little bit more decoration to the cups.

One last thing I added was some diamond transparency. I used the edges of this sheet...as I didn't want to waste the bits that didn't have the frames on them.I added a few gems here and there and it was done.


And here it is in its place in my kitchen.


Thanks for popping into today to see what I have made. Hope to see you again next time!
SaveSave