Wednesday, 28 November 2018

Christmas Mixed Media Tags


Hello. Lisa here!! 
Today it's time to get messy fingers. We are getting out the paints and all the fun stuff!

I'm using this Simple Stories collection - Freezin' Season which you can view here.

I'm creating several different tags all at once.
You can watch me creating them in this video here.


I started off with 10 large white tags and I covered them in a strip of the patterned papered each.

 
It's them just a layering process. Adding one layer at a time.
A little paint, I used a stencil with paste and then another stencil but with a Dylusions ink spray this time.


I needed to tone them down a little so added some white paint across the middle and then cut all these cute little images out from the Simple Stories papers.

 
Before I stuck them down and wrapped some cotton around and tied in place to add even more texture.
Texture and layers. That's what it's all about!! 
 
 
To finish I went around the outsides with a black pen and added some Glossy Accents in places. I sprinkled the Cosmic Shimmers to the tags and then took a thin paintbrush with water to paint over using the shimmers.
 
 
You are left with some amazing results!
 
 
I'm so happy with these tags.
I will be using some for a happy mail swap and some to attach to gifts.
 
 
They also make great card toppers or use them on your scrapbooking pages.
 
I hope you have enjoyed this today. Don't forget to watch the video here.
Thanks so much.
 
Lisa x 


Monday, 26 November 2018

Sitting Pretty ...... Georgia Blues from Prima.

Hi there!

It's Anita with you today and I would like to introduce the stunning GEORGIA BLUES  Collection from Prima. What an absolute delight these papers are with the gorgeous blue tones, floral displays and elegant silver foiling details on each sheet. The patterns are magnificent and varied and they really are rather luxurious.
( Please excuse the poor quality of the photos, the weather has been wet and  lousy here today and I haven't been able to take them outside like I normally do)


I have been wanting to scrap this photo, taken of our youngest daughter for some time. When we were on a day out on holiday in August 2015 we found a row of lovely beach huts at Hunstanton and we had a little photo shoot.... I think these papers were perfect for the job.


I based the layout on a sheet of Dark Grey cardstock and took a sheet of MORNING GLORY that I then gutted out a large oval shape from the centre of the sheet. I cut small snips all the way round the oval and then using a thin paint brush handle, I rolled the edges backwards..... this created a rolled frame and also exposed the pattern from the rear of the sheet.


I also used a sheet of HAPPY DAYS, from this I cut out the bicycle and the floral arrangement from the top left of the sheet. The large remaining piece was placed behind the oval aperture for the photo to sit on.


I added the bicycle and the floral section around the rolled frame and then cut a slice and rolled back on the top of the right hand side of the layout. Behind the slice I slipped in a small panel cut from a sheet of Memory Lane and then did some criss cross lacing using some sparkly blue thread.


I took the Decorative Chipboard and cut it in half ( to use at the top and bottom of the page) I gently added some Pewter cream rub on to make it suit the page a little better.


The title was made using some lovely puffy alphabet stickers from PinkFresh Studio and their Simple and Sweet Range and I then just added a few blossoms, berries and leaves and also a few blue crystal gems to finish.


This really is such a beautiful, useable collection and I am very much looking forward to doing more with the remainder of my DT kit.

Why not pop over to the SHOP and see what other gorgeous goodies are on offer.

Happy Crafting!!

 Warmest wishes
Anita xx

Friday, 23 November 2018

Echo Park Celebrate Autumn - Falling Leaves

Hello, Karen here again with my final layout using the Celebrate Autumn collection from Echo Park.

I decided to create a very simple layout this time using a large 7"x10.5" photo  and some of the scraps of patterned paper which I had left after creating my other two layouts. The photo is of my daughter trying to catch some falling leaves and as it was only taken last month I was really pleased to get it scrapbooked so quickly.


I started with a 12x12 sheet of white Avalanche Bazzill cardstock and stuck my photo to this, just right of centre. Either side of my photo I stuck strips of the Falling Leaves (B Side), 3x4 Journaling cards (B Side) and Pumpkin Farm (B Side) papers which I cut to varying widths.  I machine stitched the strips of patterned paper to the layout using black thread and bent the edges up  a little to create a bit of dimension.


I also added a column of sequins and paper leaves between two of the strips of paper. Some of the leaves were punched from scraps of the patterned paper and others were fussy cut from a scrap of the Falling Leaves paper. I also added some sequins on top of some of the paper strips for added sparkle.


A circle of sequins were glued onto the photo to draw attention to my daughter eagerly poised beneath the trees waiting to catch a falling leaf.


I raided my stash for some Gold Glitter Foam Thickers and some very old stickers from a sheet of Simple Stories  Cardstock Stickers to make the title on the bottom of the photo. Very similar Thickers and stickers can be found in the Papermaze shop


To complete my layout I printed my journaling on the computer onto a piece of white cardstock and stuck this beneath the photo. The date was also added to the layout using Websters Pages The Good Life Little Letter Stickers 

I have really enjoyed playing with this paper collection over the last couple of months and hope I've inspired you to scrapbook those autumn photos and have a look at what autumn goodies are available in the Papermaze shop.

Take Care
Karen x x

Monday, 19 November 2018

Obsessed with Amy Tangerine Shine On collection

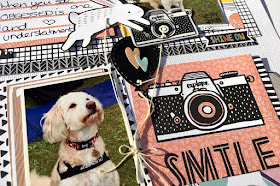
Hi Tracee with you today sharing a layout I created with the fun Shine On collection by Amy Tangerine. (my page is 8 x 8)

obsessed tracee provis papermaze amy tangerine shine on

I don't scrap nearly enough about my furry babies but I saw the "obsessed" card on the "More of  This" 12 x 12 sheet and knew exactly which photos I wanted to use. Rodney's obsession with balloons needed to be documented!

obsessed tracee provis papermaze amy tangerine shine on01

I really like the grid look on a layout and tried to do this here, my problem is I just want to keep adding all the cute bit from the collection. I cut the jumping rabbit from one of the papers, punched a hole and added some string to make it look like a balloon. I also used a camera from the sticker book as a balloon too. I even used part of the branding strip and cut out the little banner shape that says Shine On, a little cardstock on the back and its a cute embellishment.


obsessed tracee provis papermaze amy tangerine shine on02

A little tip: The stickers in the book are clear and sometimes this doesn't show up in the place you want to use it, add a little bit of cardstock and cut round the sticker to make a more stand out embellishment.

Hope you enjoyed my page today and for this and all your other scrapping needs please head over to the SHOP


Friday, 16 November 2018

November Papermaze Kit


Hello Scrappers, Lynn here with a new kit for November which is now available in the store. Two layouts today, one featuring a family tree and another on a musical theme. 


Before we start, here is what you will receive in the kit, such beautiful autumnal colours and designs:


Simple Stories - Forever Fall collection- Autumn Love & Gather Together
Photo Play - Fall Breeze collection - Autumn Leaves
Stamperia - Music collection - Music - Turquoise Texture
Pebbles - Patio Party collection - Panels
Echo Park - Celebrte Autumn -Autumn Floral
Bazzill Basics - Natural and Desert Coral Dark


Reverse side of papers
Extra Bazzill pack - Lagoon, Hazard, Candle & Pinecone.


Embellishments

2 American Crafts Leaves, 5 Jewels, 3 brads, 1 label plate, 2 wood slices, 1 music clip, 1 flower, 10 sequins, 1 alphabet sticker sheet, 50cm hessian.


For my first layout with this kit, I created a family tree. My tree shows my great Grandparents and their 14 children all dressed up for the wedding of the eldest child in 1913.


Start by Gutting the Candle Bazzill making a frame 1" wide all the way around the edges. Trim the Photo Play - Fall Breeze - Autumn Leaves paper to 11" x 11" and mount behind the Bazzill frame.

I used my Cricut to cut a large tree (11") from the Pinecone Bazzill, saving the scraps from this for later.  Stick the tree to the background. I printed a family group photo onto a sheet of A4 photo paper. I made a feehand leaf template and cut each of the family members from the photo. I arranged these leaves onto the tree, sticking them down with 3D foam tape. I trimmed the Desert Coral Dark Bazzill to 10.5" x 10.5" and set this piece aside. Then I cut bows from the leftover strips, using a die from the Sizzix Thinlits Funky Festive die set. To each bow I added a tiny brown gem.

I wrote the name of each of the family members on the branches next to their leaf. For the title and date I used the letter stickers from the kit.


***

For my second layout I picked out the musical elements and papers. It shows my daughter,  Emily making her entrance to her wedding and records the music the couple chose for this part of the ceremony. 


First I gutted the Lagoon Bazzill to leave a 1" frame onto which I mounted the Stamperia - Music collection - Music - Turquoise Texture paper. This was torn around the edges and inked with Distress Ink. I cut slits into the paper a various points and rolled back the edges, tucking pieces of doily behind the gaps.

From the Pinecone Bazzill scraps I cut one complete circle using the Pretty Wreath Sizzix Thinlit die. I mounted my photo behind this wreath and trimmed it to fit. This was mounted onto the layout with 3D foam tape, leaving the edges free so I could tuck things under later.

I then cut the remaining hessian into two pieces to stick horizontally across the layout, tucking them under the photo. I added a thin strip of rose ribbon from my stash. I cut three more incomplete wreaths from the Bazzill and arranged them around the first complete one. With scraps of Lagoon, Natural and Candle Bazzill I cut flowers branches and leaves from the same die set and arranged these on the wreath and other places.

I made three tags using Natural and Pinecone Bazzill and attached these with the brads from the kit. I wove some jute twine through the tags to join them together. The journalling was written across the finished tags.

For my title I used some letter stickers from the kit, a QuicKutz (Ginger) alphabet and some Kaisercraft chipboard letters. The letters were painted with a base coat of Ground Espresso Distress Paint, then dabbed with Brushed Corduroy and Evergreen Bough Distress Paint. Once all this was dry I added Glossy Accents to give a high gloss finish.

Finally I added spots of Nuvo Crystal Glitter Drops - Emerald City to the flower centres and scattered the wood effect sequins over the page.

Thanks for looking.
Back with two more autumnal pages soon.
Lynn x

Wednesday, 14 November 2018

Documenting in my Traveler's Notebook

Hi, Lisa here.
I'm documenting in my Traveler's Notebook today.
I've still got so much of this fun Amy Tangerine Collection 'Hustle & Heart'.
It's so fun, colourful and really easy to use.


I wanted to document a couple of memories from our Summer trip.
The die cut 12x12 pages are perfect to cut out and add to my pages.
They add so much colour.

 
I left an edge down the side, this was perfect to add a strip of journaling.
The pink frame actually has wording on, but I loved it as a frame, so I stuck my photo over the top to use it as a frame.
I also cut the 'right here' strip from another piece of patterned paper and stuck it at the base of the heart.   
 
 
This card with the cup that I cut out reminded me of our early morning tea looking out over the Smoky Mountains. I love how something like this reminds you of a photo that you have.
 
 
As these papers are so much fun, I thought they would also make really quick and fun cards, so I made a couple. I like to keep a good stash of cards. 
 
 
I hope you have enjoyed this post today.
I highly recommend this Amy Tangerine paperline for really quick and easy and fun projects.
 
Thanks
 
Lisa x


Monday, 12 November 2018

The World is Yours..... Gypsy Rose pt 2


Hello There

Its Anita today, using up the last few little bits of left overs from the sheets of Gypsy Rose that I have been working on. Please see my original post, Be Yourself ,  for the first layout using these gorgeous papers from Kaisercraft.

I am not normally a fan of using too much cardstock, but I had a couple of sheets spare and they worked well with the colours in this paper range. I cut the lighter sheet down to an 11" x 11" square and then using a Martha Stewart Deep Edge, I did a single punch on each side.


I had a few floral clusters left over that I had cut out from the sheet of Inspiring and scattered these around the page. I also added a die cut butterfly and gave her a trail of champagne coloured crystals.


I chose a couple of sections from the sheet called Original....this is full of lovely quotes and sayings and is very usable for a variety of style layouts and cards.


I also used the largest of all the Dream Catcher images in this collection, its taken from the sheet called Free Spirit. A little strip of words was added across the centre and I then added small and large Champagne crystals across the page in various places to finish the layout.


This really has been a delightful Collection to work with....and you can find Gypsy Rose and lots of other stunning Kaisercraft Collections here at the shop!

Happy Crafting, see you again soon

Warmest wishes
Anita xx

Friday, 9 November 2018

November crop...

It's our monthly crop tomorrow, a week earlier than normal and at slightly different times too - we'll be starting at 9am, and finishing at 4pm, due to an evening hiring of the hall.

Our kit has been designed by Janina and uses fussy cutting on Simple Stories Lil Dude papers... 


We'll have our usual array of punches and dies for you to use, with home-made cakes and refreshments, and a discount in the shop! Hope to see you there!!

Wednesday, 7 November 2018

Echo Park Celebrate Autumn - Beach Walks and Hot Chocolate

Hello, Karen here with another layout using the gorgeous, vibrant Celebrate Autumn collection from Echo Park.

We recently spent a week at the coast and enjoyed lots of walks on the beach. We have a habit when walking on the beach on cold autumn days of taking a hot drink from one of the beach cafes with us and so I decided to document this with a scrapbook layout with the rather unimaginative title 'Beach Walks and Hot Chocolate'!


I started with a 12x12 sheet of white Avalanche Bazzill cardstock and onto this I layered pieces of the Autumn Friends, 3x4 Journaling Cards (B Side) and Autumn Acorns papers from the Celebrate Autumn collection. I matted my 5x7 photo onto cream cardstock and then onto a piece of the Colored Leaves paper. After sticking this to the centre of the layout I machine stitched round all the paper edges with black thread.


Using a rubber stamp and die set from my stash, I stamped three take-out cups onto scraps of the cardstock and patterned paper and after assembling them I stuck them to the lower right corner of the layout using 3D foam to add some dimension. Some orange Bakers Twine was also twirled underneath the cups.


My title was die cut from black cardstock and stuck to the top left corner.


Journaling strips printed on the computer were stuck to the bottom left corner.


The layout was completed with a scattering of gold sequins.

I am loving working with this collection and will be back later in the month with one more autumn themed layout. I hope I've inspired you to scrapbook some autumn memories and you can find the celebrate Autumn collection and lots more autumn themed supplies in the Papermaze shop.

Take Care
Karen  x x


Tuesday, 6 November 2018

Photoplay ~ Birthday Boy Wishes #1

Hi all, it's Anna here today. This month I'm working with Photoplay's Birthday Boy Wishes collection. I should also mention that there is also a Birthday Girl Wishes collection, so there's a collection for both little girls and boys. Take a look in the shop for all of the supplies I've used here. Both of these collections are perfect for scrapping children's birthdays, so that's exactly what I've done for my first layout. I decided that rather than focus on one birthday I'd create a page about all ten of my sons birthdays. I printed a small picture of each birthday, all with his cakes.


I mounted the photos on to cardstock and patterned paper from the collection, which I then adhered to some white cardstock. I gutted the centre of the 'birthday boy' patterned paper and trimmed about an inch from my cardstock to make a frame.


I punched out some stars from the 'You're a Star' patterned paper and cut out some words from the 'wish big' paper. I added a small title and some camera chipboard pieces. I used some Jillibean Soup mini alpha stickers to add the age number to each picture.


The bunting on the 'Make a Wish' patterned paper, just needed cutting out...


Thanks for looking, I'll be back with another post using this collection soon!
Anna
X