Thursday, 13 October 2022

October Crop

 Our October crop (where has the year gone?!) is this coming Saturday, the 15th.  The kit uses a mix of papers along with some sprays and stamps!


We have a few spaces remaining, if you'd like to come along, drop us a message.  We'll have the usual array of homemade cakes, punches & dies for you to use and, of course, a 10% discount in the shop!

Monday, 10 October 2022

Vicki Boutin - Print Shop - Moments

Hi everyone!

I'm kicking off this beautiful new week with the newest collection from Vicki Boutin - Print Shop! This collection is a stunner - you're definitely going to want this one. It's jam packed with beautiful colours, bold patterns and is so versatile, you could scrap anything!

For my first layout, I'm channelling my love of graphic design, and creating a heart of hearts.


I started with two pieces of Premium White Cardstock.  I cut a plain heart shape from the first piece, centred on the page. I trimmed 1/4 inch from each side and added machine stitching, before applying sticky foam to the back, before mounting it centrally to the second sheet of white cardstock.


This left a hollow, heart shaped aperture - perfect for filling!

I cut almost all the large hearts from the Cross My Heart paper. To create dimension, I curled the sides of each heart around a pencil to give them extra lift, and then stuck just the centre of the hearts down with Glossy Accents.


When filling the heart, I started with the largest hearts and worked down to the smallest, overlapping and layering the hearts throughout the shape. In the smaller gaps, I fussy cut some of the smaller hearts from the paper and glued these flat.

I left a small space in the centre for my photo to sit. As the heart was so colourful, I wanted the photo to be black and white. To echo this, I backed it on a piece of the Typeset Paper. I double backed the photo with foam so that it would stand just a little bit taller than the hearts.


I love the extra little ink splatters that come on the Typeset paper. It's one of my favourites in the collection - really understated but so perfect for so many pages. I can't wait to see how you'll all use it.

Next, I opened the Floral Ephemera Pack and used the 'Moments' piece for my title. I love the simplicity of this piece against the colourful heart - it was the perfect element for this style of layout.


As a finishing touch, I added a row of black Nuvo Drops all the way around the heart. This really helped tie in all the black and white elements against the colour.


I love the simplicity of this page, contrasted against the high impact from all those colourful hearts - I hope it's inspired you to try something a little bit different.

I'll be back later this month with another Print Shop layout, but until then, take care.


Claire xx

@Scrappysoulmate

Friday, 7 October 2022

Paige Evans ~ Garden Shoppe #1 🌈

Hi, it’s Anna here, wishing you a very happy Friday and weekend! 
For my next couple of blog posts I’m working with the gorgeous Garden Shoppe collection by Paige Evans. 
You can find the collection in the shop here.

I really wanted to document the life of our wonderful Queen in my scrapbook. 
I’ve seen lots of layouts featuring our late Queen lately and when I saw Paper #4 it inspired me to create a rainbow page. 

I began with a sheet of white bazzill cardstock. I then trimmed a strip of Paper #4 horizontally in order to capture all of the colours. I cut each colour strip and lightly distressed and inked the edges. I adhered the coloured strips to the right side of the layout. 


I used my silhouette cameo to cut out a rainbow cutfile, also by Paige Evans. I trimmed it in half to fit and work with my layout, backing each piece with the coloured strips from Paper #4. To back the cloud part of the file, I used the ‘b’ side of Paper #4. 


I printed a few pictures of the Queen that coordinated well with the colours of the paper. Before adhering them, I added a small amount of distress ink to the cardstock, just to pop out behind the photos. 


I chose a few coordinating coloured flowers from the floral ephemera as well as some of the phrases from Paper #23


For my title, I used Thickers from a previous Paige Evans collection - Pick me Up.  
I added a few hand cut hearts from scraps of patterned paper, again keeping them tone on tone.


Thanks so much for looking! I’ll be back again soon with another layout using the Garden Shoppe collection. 

Anna 
X

Thursday, 6 October 2022

Using Up The Scraps

 Hi, Lisa here again today.

I just can't get enough of this Storyteller collection from Cocoa Vanilla Studio lately.


In case you missed it, I used it to create a new journal, which you can see here.

But I had a few bits left and I was itching to use them.

This could be one of those collections where I need to buy a second set just to hoard.

I'm pretty good at not doing that anymore,  but every now and then there's a collection that I just can not resist hoarding. 

So I was on a crafty zoom with friends and I decided to use up my scraps and create a page in my Disney journal.


I had loads of bit of paper left, but no larger pieces except the one with the navy background and hearts, so I used that as a background and decided to create a flip page.


The smaller pieces with no pattern, I tore into strips as you can see here. These worked so well layering up and using some as journaling spots.


This opened out and I remembered that I had a few frames left from Rosies Studio here.

Seeing as I was using up scraps today, this was perfect. I love that it draws attention to the photo of my son and I.


Using scraps was such a fun way to add more laters and details.

I just kept cutting and layering and building on the contrasting colours.

I love using coloured staples to attach too. Another colour and texture.


Even the smallest of scraps had been kept and were being used today.

I love how when I order from Papermaze I receive everything in a 12x12 zip lock. I always keep my orders together and store them this way so that all the scraps get kept together. 

Then when I come to create another time the scraps are so easy to use and keep like today.

Nothing gets wasted.


I had so much fun working on this page.

It wasn't planned and it was all made from leftover scraps.

It was almost like a little challenge to myself to use up the bits and that's what I did.


I encourage you to do the same and let me know what collections you have that are hoarding worthy.

Lisa x

Wednesday, 5 October 2022

Carta Bella Welcome Fall - Autumn Time

Hello. Karen here again with another layout to share using the gorgeous  Welcome Fall collection from Carta Bella. If you're a fan of Autumn, this collection is perfect for you.


I started with a sheet of 12x12 white Bazzill Cardstock. An 11.5" x 8" piece of the Autumn Whisps paper was then matted onto some gold mirror card and stuck towards the top of the layout. Onto this a 9.5" x 6.5" piece of Autumn Blooms paper was then layered and to add some texture I machine stitched with white thread around the paper layers. My 5"x7" photo, matted on white cardstock, was then placed on top.


A couple of strips of Crisp Leaves (orange) paper from last years Welcome Autumn collection were tucked beneath the layers and also some punched strips of Califonian Poppy Bazzill Cardstock. The strips of paper tucked top and bottom of the other papers give the illusion of being whole pieces of paper but by just using strips it saves on paper and also allows you to use up scraps.


From some gold mirror card, I die cut my title on my Silhouette Cameo using a cut file from the Silhouette Store. The title was placed below the photo with 3d foam underneath. I seldom use metallic card but I do think a touch of gold on autumn or Christmas layouts or silver on snowy layouts adds to the seasonal feel of the layouts.


To the top left corner of the photo I glued some flowers fussy cut from the Autumn Blooms paper.


I created a layered tag using a frame and a tag from the Ephemera Frames and Tags pack with 3D foam placed between the two to add dimension.. The layered tag was matted with more gold card and a piece of orange bakers twine was added to to the top. The finished tag was placed to the right of the photo.

Journalling strips printed on my computer were added to the bottom of the layout and finally some gold sequins were scattered around the layout.

I hope you've enjoyed this post and I'll be back again with some more autumnal goodness soon.

Take Care, Karen x x

Tuesday, 4 October 2022

Happy Belated World Card Making Day

 Hello, Lisa here with a quick simple card.

Did you create over the weekend to celebrate World Card Making Day?

I don't make cards as often as I used to, but I still love to send a handmade card to those who appreciate it.

I've been playing with the very pretty Garden Shoppe collection from Paige Evans.

Have you seen it? It's stunning!


I needed to make a quick card for my great niece. And as always I left it to the last minute.

This literally look me 5 mins if that.


I used the yellow paper as a base, tearing it to size so I had that cool textured edge.

The strip along the bottom is the branding strip. It looks so cool!

I added the spotty paper in the centre and layered some of the matching die cuts.

I wanted to add a '2', but it wasn't standing out enough.

There was a long tag with a fancy bit at the bottom.

I tore the fancy bit off and popped it on with a foam bit, added a '2' from the doodlebug alpha stickers and tied some embroidery thread.

To make it look so pretty, I added some blobs of glue to hold it in place.


It's such a pretty card and came together in no time at all.

Happy card making to you,
Lisa x


Monday, 3 October 2022

September Papermaze Kit - Part 2

Lynn here today, with part two of the autumnal September Papermaze Kit. This kit is available in the Papermaze store together with the extra four sheets of Bazzill perfectly matched to go with the papers. 


 Before looking at how I made the layouts shown - here is an image of what is in the kit:


For full details see HERE.


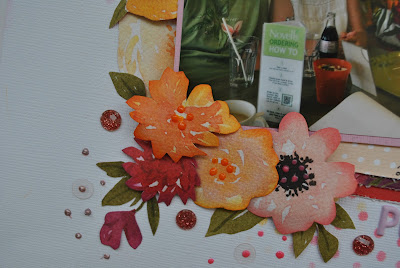
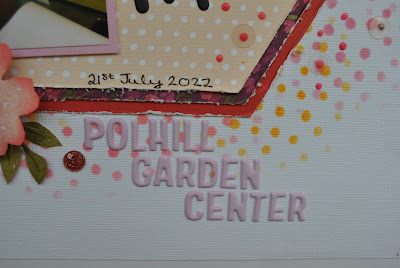
Happy Memories - of the day I met up with my siblings at a garden centre for lunch and some retail therapy.


I used the white Bazzill for this layout, and created a background using a VB Colour Study (Bubbles Mixed Media) Stencil. I chose three colours of Distress Oxide Ink and added colour with a blending tool.


I cut three hexagons, two from the Warm Small Floral paper (19.5 cm wide & 20.5cm wide), Then one from Warm Large Floral (21.5cm wide). I distressed the edges and placed these one over the other, in the centre of the layout.

I mounted my photo onto some Mauve Ice Bazzill and attached this to the left side of the Hexagon with 3D foam tape. 


From the remainder of the Warm Large Floral paper, I fussy cut flowers and leaves. I arranged these around the photo and hexagon, layering some with more foam tape.

The main title was made with a phrase from the VB Colour Study 'The Details' puffy stickers.  The details were added with the Rosie's Studio Alpha stickers included in the kit.


Embellishments from the kit were added - The clear sequins and glitter drops. I also used some Nuvo Crystal Drops.

Rosanna Grace Banks - A heritage layout this time, with a delightful photo of a distant cousin in Australia.

I love the butterflies, moths and other insects on this Brumbleberry paper, they are ideal to go with the Sizzix dies to make a layout to reflect the Victorian fascination with collecting specimens form the natural world. 


I started by trimming the photo to a square shape which would fit into the two 49 & Market chipboard frames I still had in the kit. I mounted the cream frame over the plain raspberry piece. Once in place on the layout, I stared creating my embellishments.


With a couple of tags taken from clothing, chosen because I liked the distressed card, eyelets, string and pins. I also liked the print on the tags so I dry brushed them with some Picket Fence and Worn Lipstick Distress Paint, making sure the shapes were not totally obscured. Once dry this gave me a perfect guide to place my die cut letters to spell out Rosanna's name. The letters and years were cut with Tim Holtz Sizzix Thinlits - Alphanumeric Tiny Type die set, and Bazzill from the kit. The tags were mounted to the bottom right if the layout.


The insects were all cut from scraps of Bazzill, mostly from the kit, but some extra colours were needed and so added from my stash. The Wings were all cut from vellum. The die set used for these is Tim Holtz Sizzix Thinlits Funky Insects. The insects were mounted onto slide frames cut from scraps of white card using the Tim Holtz Sizzix Specimen. The slide folders were inked with Gathered Twigs Distress Ink. 


I mounted each insect into its frame with some 3D foam pads. The numbers were cut from the same die set from Kraft Bazzill and placed at the base of each slide. I added a touch of Nuvo Glitter Drops to each insect and some Nuvo Crystal Drops to give the appearance of a small nail in the little holes at each corner of the slides. 


Finally, while rummaging in my stash, I found a metal label holder and placed this in the corner of the layout.

That's all from me with the September kit, although there is still plenty of card and paper left to make more.
Thanks for looking
Lynn x