Hello, Lynn here today with the brand-new kit for May. It's full of pretty pastel papers, cardstock and embellishments. Here are the first two layouts I have created.
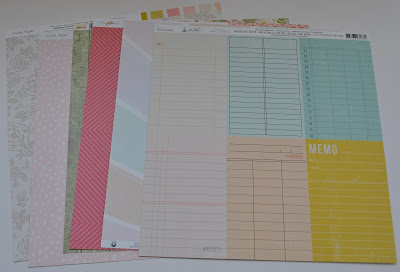
Before looking at how the layouts were made, here is what you will find in the kit:
Patterned papers:
Crate Paper - Gingham Garden collection - Alight & In The Shade
Stamperia - Welcome Home collection - Clocks
P13 - Have Fun collection - #03
American Crafts - Maggie Holmes - Woodland Grove collection - Fresh Blossoms
Heidi Swapp - Set Sail collection - Small Ledgers
Bazzill Basics Cardstock - Coconut Swirl & Coastal
Embellishments:
strip of pearls, P13 chipboard banner, 2 die cut pieces, 2 Rosie's Studio butterflies, 1/6 sheet Crate Paper Gingham Garden - Happy Life Phrase Thickers, 8 Simple Stories chipboard pieces, 50cm green hemp twine, 2 P13 Decorative Tags ,10 Rosie's Studio puffy hearts.
Extra Bazzill Basics Pack - Pinkini, Aloe Vera, Peach Creme & Twill
A Rainbow of Spring Colour - This layout shows some of the pretty spring blooms that have flowered in the garden this year.
For this layout I selected and printed out four small photos that matched the colours of this beautiful striped paper from the Gingham Garden collection, called 'In the Shade'. I used the Twill Bazzill as the background for this project.
From the Twill card I tore a strip from the left side of the paper and inked it with Pumice Stone Distress Ink (also used to distress other torn and cut edges). I placed a strip of the paper under this tear, to make the paper 12" x 12" again.
From the right side of the paper, I cut a piece that was 7" wide at the top and tapered down to 1" at the bottom. The coloured bands were cut out from this, the edges were inked and they were stuck in order onto the right side of the Bazzill.
I arranged a small white doily and the photos onto the page and stuck them all in place allowing room to tuck elements under the photo edges later. From the scraps of paper, I cut some small tag tops. I applied a small eyelet to each one, in a matching colour. I inked the tags and stuck them to the page, tucking them under the photos slightly.
From
the reverse side of the left-over paper, I fussy cut some flowers and
leaves and inked the edges. I arranged them around the photos and
attached them with 3D foam tape.
I used two of the Gingham Garden
phrase Thickers from the kit. I place one to the top of the doily and
another to the top right of the layout.
Finally, I die cut a title using the left-over stripes of colour from the paper and a Tim Holtz, Sizzix Thinlits die set - Alphanumerics Theory.
A Step Back in Time - Last year my friend Anne took me to see Smallhythe Place in Kent, one of her favourite National Trust properties to visit.
For this layout I picked the Aloe Vera Bazzill as a backdrop. I inked the edges of all cut papers with Tea Dye Distress Ink.
I took the Stamperia Clocks paper, with the wooden planks side up, and tore the top right corner off (approx. 5" across and 3" down. Then I tore the bottom half of this paper away, at an angle (approx. 6" on the left and 3 1/2" on the right).
From the 'Alight' paper, I tore narrow strips from the pink and white side, and placed these under the torn edges of the Clocks paper, to make a tiny trim for the raw edges. The prepared papers were applied to the Bazzill. The photo was placed to the left of centre.
From the remains of the Clocks paper, I was able to cut the clocks shown in this photo:
I arranged the clocks on the layout, tucking the torn ones under the papers already applied. Two of the whole clocks were added with 3D foam to add some dimension.
I
used the chipboard banner from the kit to hang from the top right of
the layout. into the open areas I placed the date, using Rosie's Studio - Simply Charming puffy alphabet stickers.
I
fussy cut butterflies from the 'Alight' paper, and arranged them along
the bottom edge of the torn papers. and scattered a few in other areas
of the layout. I selected a few paper blossoms from my own stash and
placed these around the clocks. I wrote my journalling between the
clocks.
Finally, I cut my title using the Cricut and the Peach Creme Bazzill.
That's all for today, I will be back with more from this kit soon.
Thanks for looking.
Lynn x


.JPG)
.JPG)
.JPG)
.JPG)
.JPG)

.JPG)

.JPG)
.JPG)
.JPG)
No comments:
Post a Comment