Monday, 31 July 2023

The Little Things Journaling

 Hi, Lisa here today with my weekly journaling and focusing on the little things this week.


I fell in love this paper collection from Simple Stories - the little things. I love the contrasts of the black and white with the bright colours.

I tend to go for bright colours when I create so this made a nice change for me.

And I teamed it up with these Die Cuts from Rosie's Studio. 


Some of the Die Cuts are actually quite big. I popped this one on to vellum to create a flip page.


 And made this journal card to go on the back to cover up the backside of the large die cut.


 I wanted it still to look pretty when the page was flipped open like this.

I added my photos underneath along with more die cuts.


And I layered up more die cuts for my journal spots.


On the other side I had an older paper that I'd already turned into a page and I really didn't want to cover that up so I made a vellum page this side and created another flip.

And also used the die cuts here.


And the flip then opens to show my photos and journaling.

I love the big die cuts words in the pack too.


To finish the page I used the Rosie's Studio Alphas here.

Using green staples to really make sure they stay in place.

I love making this page.

If you'd like to see it being made I had a video here.

Thanks so much..

Lisa x

Friday, 28 July 2023

Team Scraplift!

This month the DT team have been working on something a little different, and decided to do a team scraplift.  A layout was chosen then everyone used it as inspiration for their own layout.  Sometimes the design of the original layout was stuck to, other times certain elements were used.  The layout that we chose is this one by Michelle Gallant (https://scrapsandpixels.blogspot.com/)


So, let's take a look at what the DT came up with!  Firstly, we have Lynn.  Hers is a very colourful take on the original with snowflakes replaced by flowers:


Claire's scraplift has a lovely fresh feel about it, she's added a bit of mixed media and focused on the central pennants, using the new Pinkfresh Studio Sunshine On My Mind collection:


Karen's version is also very summery, using the Simple Stories Boho Sunshine papers.  She has replaced the pennants with a cluster of tags:


Rebecca has used P13's Sea La Vie and has again focused on the pennants section of the original, but has gone for a dark background with a splash of paint:


Anna's scraplift uses the new Wizards and Company collection from Echo Park, and while she too has focused on the pennants, she has strung them out across the page for a different look:


Lisa has made a double-page spread in her Disney journal.  She took inspiration from the strips at the top and bottom of the original page, and added these under her photo, along with pennants below it:


And Julie has kept with the wintery theme of the original on an A4 layout, grouping the pennants together under the photo and adding some large 3D snowflakes:


It's incredible to think that one layout can lead to so many different variations.  Perhaps you'd like to have a go too?  We would love to see your finished project if you do!  As you can see from the DT projects, it doesn't need to be a copy of the original, just use it as an inspirational starting point.  Happy scrapping!


Wednesday, 26 July 2023

Christmas In July Part Two - Vicki Boutin Peppermint Kisses

 Hello Julie here with Part Two of my Christmas in July project.  This part concentrates on the inside of the Jolly season album that I have made.  I used the beautiful rich coloured paper from Vicki Boutin Peppermint Kisses and one pack of embellishments.  I want to preface this post by saying these embellishments are amazing!  One pack has 50 large pieces in all sorts of festive shapes, however, these pieces are a great size and can create focal pieces to a plain piece of paper on their own.  I have decorated an whole album and still have plenty left for my other Christmas projects.


To start I added the beautiful Floral Sprig paper to the inside covers of the album, to the front inside cover I fussy cut a poinsettia and put it on foam dots for a 3D effect.  I dipped the edges into glue and added some Tim Holtz Distress glitter dust.  This is my "go to" glitter for a fine effect with a vintage gold colouring.  


For my title page, I sewed three lines on my plain 4x6 pocket to create three shaker pockets.  I added some tuille to the top of the front of the pocket.  I noticed the banner strip at the top of the papers had some lovely patterns on the back of them and so I used one such banner for the top of the back of the shaker pocket and added some mittens from the embellishment pack.


Continuing with the sewing I split the next pocket in half with a line of stitching and also added some sequins and tuille to the bottom of the pocket for texture.  In this pocket I used two tags from the Tags paper and tied them with ribbon to two pieces of 3x4 paper that I had cut from some remainder paper I had been using from the Peppermint Kisses range.  I kept the tags on the outside of the plastic pocket to create a flip type effect.  These tags are super easy to remove from the pockets and can have photos added on the back and front of the 3x4 paper.


For the next pocket I was a bit more adventurous and used a large door embellishment piece as a focus piece and I will eventually have a photo "hidden" behind the door.  I added a pom pom trim to the edge of the pocket with hot glue and some branch embellishments to finish off this piece.  On the back of this pocket I used another large piece of ephemera and turned it into a shaker stained glass window.  I love finding other ways of using these wonderful embellishments.


My next pocket was the simplest.  I used two 3x4 journaling cards for the front and one for the back and simply added some embellishments to the outside of the pocket.  Your album can be as simple or as detailed as you prefer and with the beautiful Peppermint Kisses paper and embellishments it will still look beautiful.


The next pocket was very simply some of Sweet Holiday Wishes paper cut to size with a Santa and a car from the embellishment pack added on to foam dots to create some dimension.  I love the look of this pocket and yet it was very simple to do.


I also created my own tip in by using two journaling cards stapled together and hole punched. I sewed some some acetate on the front of the "Joy" card to make it into a shaker pocket but there is still room on the back for a photo.


For my next pocket I used the beautiful Capture The Joy paper as a background.  I fussy cut one line of the hexagons and folded them to pull out like an accordian.  I then stuck that onto the outside of the pocket.  I loved how this gave such a great 3d effect.  On the back I added a co-ordinating tag and a large poinsettia embellishment which is only partly adhered so you can add a photo behind it.


I felt for my penultimate pocket I had to use the gorgeous gingerbread house.  I used a small plastic pocket from my stash and made a simple shaker pocket that I stapled to the pocket behind it.  I cut some Merry Christmas paper to size and added some co-ordinating embellishments and pieces from the tags paper on the reverse.


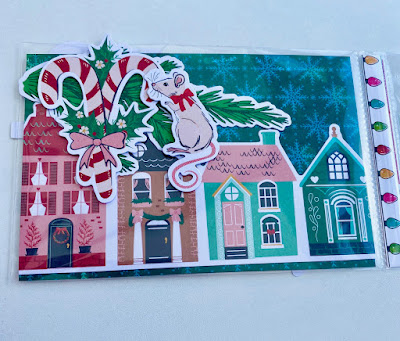
For my final pocket I decided to use just a simple piece of Around Town paper and to utilise lots of the embellishments for the outside of the pocket.  I loved layering the branch with candy canes and finally adding a mouse on top on the back of the pocket.  For the back of the paper I used the large house embellishment and only put tape on three sides of the houses to make it a pocket.


In case you had any spare memorabilia or photos I added a plain pocket to the back cover of the album and added a doily and layered some more embellishments on top of the pocket.  

Thank you for joining me for Christmas in July, I hope I have inspired you to get an head start on those Christmas projects!  Join me in September for some autumnal goodies.

Monday, 24 July 2023

Simple Stories - Boho Sunshine - Slide into Summer

Hello, Karen here with a project to share using the Boho Sunshine collection from Simple Stories. This summery collection is described by Simple Stories as being a " whimsical collection filled with good vibes, rainbows and sunshine. A hipster collection filled with all of the goodness of summer and “be happy” thoughts". I couldn't agree more! It's such a bright, happy collection.

For my first layout I chose to use photos taken at a funfair in the summer of 1973.


I teamed the bright colours in the collection with black and matted all the papers I used with smooth black cardstock. I started by matting a sheet of the Groovy paper, which had been trimmed to 11"x11" and then machine stitched round the edges with black thread,


I printed four photos with white borders onto one sheet of 5x7 photo paper and matted them onto black cardstock and then onto a piece of the Happy Day paper. 


The photos were then layered onto pieces of the Smile Big (A & B Side) paper and placed onto the layout. with 3D foam underneath to lift them up a little.


Using my Silhouette Cameo and a retro font I die cut the title from more black cardstock and stuck this to the left side of the layout.


Using one of the tags from the sheet of Tag Elements as a base, I created a cluster of  embellishments using pieces from the Floral Bits & Pieces pack and Sticker Book.  I chose pieces which reminded me of summer holidays - sunglasses, ice-creams, cameras, etc and also used alphabet stickers from the sticker book to create a sub-title. The tag was tied with some white string and added to the layout with 3D foam underneath for a little extra dimension.


Next to the photos I placed my journalling using word strips printed on the computer.

Finally, I added a few die cut flowers from the Bits & Pieces pack and flower stickers from the sticker book.

My aim when creating this layout was to give it a 1970s vibe and I think I've managed to achieve that. The collection isn't just for retro layouts though and I will be giving you ideas in future posts for other themes for the collection.

Take Care
Karen x x

Saturday, 22 July 2023

Favourite Adventure - 49 and Market - Vintage Artistry Nature Study Collection

Hi everyone, it’s Rebecca back with you today sharing another ‘outdoorsy’ layout created with the stunning Vintage Artistry Nature Study collection from 49 and Market. Having a young son, we are always outdoors exploring so I’ve been really enjoying documenting some of our memories using this collection. You can find it in the shop here.


I made the brave decision to use a patterned paper for my background! It’s very unlike me to move away from my crisp white backgrounds, but I love the subtle detailing on the 49 and Market papers. For this layout, I’ve used the B side of the ‘Exploration’ paper. 

To my background, I added some of the amazing Foliage Rub Ons. I am in love with these! They come in a 6x8 book and there are so many to choose from. I’ve used them just to add a little detail here and there. 


I added a couple of strips of distressed patterned paper running horizontally across my background. These act as a ‘shelf’ to hold everything together. Behind the strips of paper, I’ve placed a large butterfly from the Laser Cut Elements - Wings pack. These butterflies are a little bigger than I was expecting, but I love how I was able to make a feature of them, without overpowering the page. 


On top of my paper strips, I’ve added two photos. I’ve edited my photos so that the backgrounds are black and white. This really helps to emphasise the colours in my little boy’s clothes (which match this collection perfectly!). 

I’ve then embellished the page lightly. I really love the ‘less is more’ approach to scrapbooking. I love a minimalistic look to my layouts… but without them being too bare! I’ve created my title using two pieces from the  Chipboard Word Set and then have added a few mushrooms and hearts from the same pack. 


The page has been completed with the addition of some laser cut outs, from the Mushroom and Foliage pack.


I hope you’ve enjoyed this layout and you find it inspiring. The collection is selling fast so be sure to check it out in the shop before it’s all gone! 

Take care

Rebecca x
@preciouspagespapercraft