Hello Julie here with Part Two of my Christmas in July project. This part concentrates on the inside of the Jolly season album that I have made. I used the beautiful rich coloured paper from Vicki Boutin Peppermint Kisses and one pack of embellishments. I want to preface this post by saying these embellishments are amazing! One pack has 50 large pieces in all sorts of festive shapes, however, these pieces are a great size and can create focal pieces to a plain piece of paper on their own. I have decorated an whole album and still have plenty left for my other Christmas projects.
To start I added the beautiful Floral Sprig paper to the inside covers of the album, to the front inside cover I fussy cut a poinsettia and put it on foam dots for a 3D effect. I dipped the edges into glue and added some Tim Holtz Distress glitter dust. This is my "go to" glitter for a fine effect with a vintage gold colouring.
For my title page, I sewed three lines on my plain 4x6 pocket to create three shaker pockets. I added some tuille to the top of the front of the pocket. I noticed the banner strip at the top of the papers had some lovely patterns on the back of them and so I used one such banner for the top of the back of the shaker pocket and added some mittens from the embellishment pack.
Continuing with the sewing I split the next pocket in half with a line of stitching and also added some sequins and tuille to the bottom of the pocket for texture. In this pocket I used two tags from the Tags paper and tied them with ribbon to two pieces of 3x4 paper that I had cut from some remainder paper I had been using from the Peppermint Kisses range. I kept the tags on the outside of the plastic pocket to create a flip type effect. These tags are super easy to remove from the pockets and can have photos added on the back and front of the 3x4 paper.
For the next pocket I was a bit more adventurous and used a large door embellishment piece as a focus piece and I will eventually have a photo "hidden" behind the door. I added a pom pom trim to the edge of the pocket with hot glue and some branch embellishments to finish off this piece. On the back of this pocket I used another large piece of ephemera and turned it into a shaker stained glass window. I love finding other ways of using these wonderful embellishments.
My next pocket was the simplest. I used two 3x4 journaling cards for the front and one for the back and simply added some embellishments to the outside of the pocket. Your album can be as simple or as detailed as you prefer and with the beautiful Peppermint Kisses paper and embellishments it will still look beautiful.
The next pocket was very simply some of Sweet Holiday Wishes paper cut to size with a Santa and a car from the embellishment pack added on to foam dots to create some dimension. I love the look of this pocket and yet it was very simple to do.
I also created my own tip in by using two journaling cards stapled together and hole punched. I sewed some some acetate on the front of the "Joy" card to make it into a shaker pocket but there is still room on the back for a photo.
For my next pocket I used the beautiful Capture The Joy paper as a background. I fussy cut one line of the hexagons and folded them to pull out like an accordian. I then stuck that onto the outside of the pocket. I loved how this gave such a great 3d effect. On the back I added a co-ordinating tag and a large poinsettia embellishment which is only partly adhered so you can add a photo behind it.
I felt for my penultimate pocket I had to use the gorgeous gingerbread house. I used a small plastic pocket from my stash and made a simple shaker pocket that I stapled to the pocket behind it. I cut some Merry Christmas paper to size and added some co-ordinating embellishments and pieces from the tags paper on the reverse.
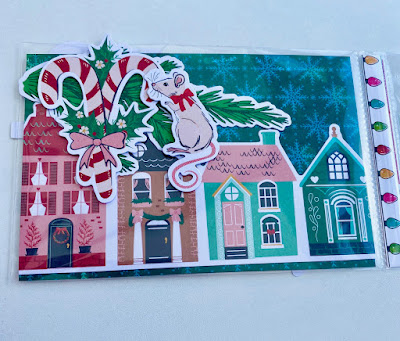
For my final pocket I decided to use just a simple piece of Around Town paper and to utilise lots of the embellishments for the outside of the pocket. I loved layering the branch with candy canes and finally adding a mouse on top on the back of the pocket. For the back of the paper I used the large house embellishment and only put tape on three sides of the houses to make it a pocket.
Thank you for joining me for Christmas in July, I hope I have inspired you to get an head start on those Christmas projects! Join me in September for some autumnal goodies.


No comments:
Post a Comment