Friday 28 June 2013

June kit

June's kit is full of the bold colours from Simple Stories 24/7 line.  The 6 papers feature greens, reds, black and yellows, and features corkboard, hexagon and polaroid images, making it ideal for masculine layouts.  Here are the fronts of the papers...


and the backs...


You also get 2 sheets of plain cardstock included in the kit.  Lou has designed an exclusive mask for the kit, which you can see here, with the other embellishments, including journaling cards, a Maya Road stamp, chipboard stars, wooden chevrons, washi tape and more!


As always, it's great value for money, at only £10!  You can buy them here on the website, along with co-ordinating cardstock packs.  We'll be showing you some layouts using the kit soon!

Thursday 20 June 2013

Final Echo Park - Perfect Summer

For my final project this month I decided to make a couple of simple cards
Using some cut files on my cameo and some black cardstock I created these 2 masculine cards

I love how you get plenty of alphabet stickers on the sheet, they last for ages and can be used for multiple projects, as indeed I did!
I layered up 2 of the car cuts with a piece of vellum in between to create a shadow effect, vellum is one of my favourite products at the moment

This card was really simple once again using my cameo and the bright yellow chevron paper, it all came together really quickly.

Have fun creating!
Tracee x

Friday 14 June 2013

June Crop

Tomorrow is our crop day again and we are lucky enough to have a layout designed by Janina as our Crop Kit this month. Janina's gorgeous layout uses the new BoBunny Mamma Razzi II papers and requires a 6" x 4" vertical photo. 


If you would like to join us for a day of crafting and chatting, with refreshments and a shop discount on the day, there are still a few spaces left. Please email enquiries@papermaze.co.uk for more info or to reserve a place. 
We look forward to seeing you there! 

Thursday 13 June 2013

All About A Boy Part 2


Hello, It's Anna here again to show you my second layout using the Echo Park 'All About A Boy' Collection.
I really wanted to use this collection with these photographs of us on a car ride at Disneyland. The arrows, cogs and vehicle elements all seemed very appropriate for the pictures.
The only trouble I had was the bright pink car! It really didn't fit in with this collection. I could have turned the photo's black and white but instead chose to add some elements from the Simple Stories SNAP range. The pink from this line went pretty much perfectly with my pink car! So I used a couple of stickers and some alphas to bring the pink in that way. 


Thanks for looking!
Anna 

Tuesday 11 June 2013

FUN WITH STENCILS PART 2

Hi Carol with you again today for part 2 of Fun with Stencils....so today we are going to build up depth with stencils and then use a main stencil for a focal point.

If you'd like to have a go you will need:-

Tag - size 8 or Alterations Tag die
Stencils - brick wall, diamonds, small circles, a main focal point stencil
Moulding paste
Paint/inks/gilding wax
Washi tape
Distress inks
Text stamp
Black ink
Simple Stories 24/seven layered stickers.

Take your tag and colour using distress ink - I've used three inks and applied with cut and dry foam - don't worry about ensuring no "lines" when you apply the ink as the majority will be covered over


Use the brick mask and a darker distress ink sponge thro' on the entire tag - hi-light edges with a pencil.


Taking your chosen focal point mask, I've used a flower here, add moulding paste thro' the mask and allow to air dry.  One point to remember when using paint or embossing paste or moulding paste with your masks/stencils always clean them straight away.  I always "prepare" a cleaning surface before I start


Once dry I've then added paint thro' a diamond stencil and the small circles stencil.  A few bits of text were stamped on the edges.  I then coloured my image using the gilding wax and a small flower was coloured using the wax to make it "fit" in with my colour scheme.... pieces of washi tape and a sticker was added to finish off the piece.


The last part of the post is a card....stencils add so much depth to your backgrounds...here I've used the bumping technique outlined in the previous post...


and two colours of distress ink..... it gives the impression of being blurred.....I've masked off an area, inked and then bumped...then stamped with black ink....layered stickers from the simple stories 24/seven pack finish off the piece.....

TFL xx

Thursday 6 June 2013

May's kit

Did you get a chance to grab one of our May kits?  They flew out of the door, but we have managed to make up a few more, if you'd like to get your hands on one!  You can find them on the website here!

The papers have a lovely summery feel to them, with teals, creams, yellows and pinks...


Here's the reverse sides:


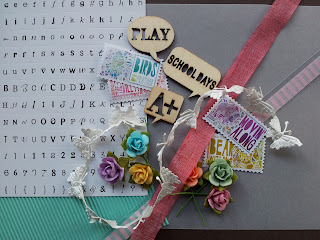
There's a gorgeous selection of embellishments too, with pretty ribbons and flowers, and some very on-trend wooden chips!  There's also some corrugated paper, vellum and a sheet of alpha stickers.


One of our crop regulars Jacqui, has been having a play with the kit - take a look at her beautiful layout - we love the cut-out elements from the papers, and how she has coloured the butterfly ribbon:


Monday 3 June 2013

Echo Park all about a boy...

Hi, it's Anna here with my first post for the Papermaze blog! I'm really happy to be here! 
I have been working with the new Echo Park 'All About A Boy' collection. 

For my first layout using this collection I followed Tracee's sketch. 


Here is my take on the sketch...


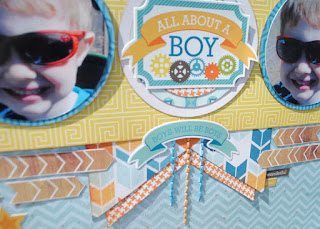
...and some close ups...


I kept my layout quite similar to the sketch (I really liked the design of it and love using circle pictures on my layouts every now and then for a bit of variety). I cut out some of the chevrons from the 'adventure' and 'curious' paper and added several of the element stickers

I'll be back soon with my second layout using the Echo Park 'All About A Boy' collection. 
Take a look at the collection here. I used a variety of the patterned papers and the element stickers.

Thanks for looking!

Anna 

Saturday 1 June 2013

More from Echo Park - A Perfect Summer

Along with the Echo Park papers this month I got sent a sheet of corrugated cardstock, I don't know about you but I just love the feel of this stuff! Is that weird? lol
I was going to use it as a base for the layout, but instead I used it to help pull just the blue colours from the papers with a small pop of red to draw the eye in.


 I simply stitched a spiral circle onto the middle of the layout and then cut the chevron paper into "arrows"
A little tip: I needed 4 P's for this layout and as I had already used 2 of the 4 that came on the sheet I cut the bottom loop from the B's to make my extra P's. Lots of different letters can be created from others if you run out of one you need
I used one of the little frames from this sheet of American Crafts 5 & Frolic for the photo mat
 
The Summer part of the title was cut from the 3 x 4 journaling card sheet, which I layered on top of a torn piece if the corrugated paper
For a final pop of interest I added a kraft tag onto which I wrote my journaling.
I really love this line of paper and how it looks quite different from This layout I made with the same collection

All supplies for this layout can be found in the shop
Tracee x