Friday 29 March 2019

Using up your scraps!

A quick and easy project today!
I like everyone else must have lots of scraps left over when using pattern paper? But what do you do with them. In the past I have made some pretty picture frames with bits and pieces in but I have not done this for a while. So I wanted to have another go.

I went to a local homeware shop and found this little frame which was just perfect!

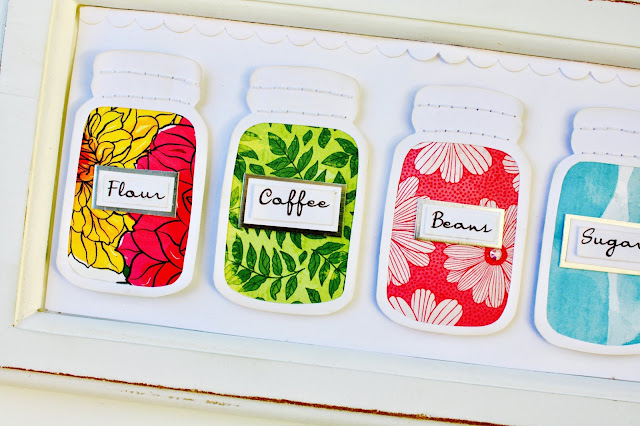
I wanted something to hang in my kitchen. And in my kitchen I have shelves with lots of glass jars in them that hold bits and pieces.

I wanted to use this as inspiration and here is what I came up with. The good thing about something like this is that you can match the colours of the jars to match your kitchen!! I used the scraps from the page I did for this blog a few weeks ago.


To get the labels right I used a font on the computer which I loved.

Here are a few close ups...


And the other side...


Thanks for popping in to see this little project! See you next month where I have some ideas for using your planner!

Thursday 28 March 2019

Photoplay ~ A day at the Park #3

Hi all, welcome back to the Papermaze blog! It's Anna here today to share another Disney project using the 'A day in the Park' collection from Photoplay.
I have loved using this collection and would really recommend it for all of your Disney scrapping or a day out at another theme park would work well too! Take a look at the whole collection here.

I have created another picture frame for this post (take a look at my first layout using this collection here and my first picture frame for my second post here) I'd really like to make a memory wall, so my two frames are a great place to begin.


I used a photo frame from Poundland, with some string and three pegs already attached to it. I began by adding a background using the 'oh boy' patterned paper (reverse side) and adhering it to the back of the picture frame, after some careful measuring!


I then chose my three photographs and printed them out square. I decided to mount them using some chipboard frames using a previous Disney themed collection 'Say Cheese II' by Simple Stories.

Lastly, I added some of the lovely stickers from the elements sticker sheet and some thickers for my wording!

Thanks for looking!
See you soon
Anna
X


Monday 25 March 2019

Taking The Scenic Route

Hello Lisa here with a 12x12 for you today.

I love to travel. It's such a passion. But I love all the planning just as much as the actual travelling.
So today I'm sharing a layout that I've created sharing how I plan my trips and how it pays off.

 
This is such a fun collection to use.
 
 
I wanted to document this place that we found when researching this trip. It's the smallest church in America. So cool!!
 
 
I kept the journaling super simple. I didn't need to do anything else other than simple as to be honest, I have so much detail using all the die cuts and the papers and stickers already. So I just took a rler and black journal pen and journaled.
 
 
Adding detail and layering is my favourite thing to do when scrapbooking.
Here I have a combo of stickers and the die cuts.
To add even more interest I've also added a few stitches.
 
 
This 12x12 paper here is really fun to use. I cut out 3 squares, stuck at the top of the page and sewed along the bottom. 
 
 
Continuing on with the sewing, I sewed around the outside of this die cut card. I really like this finish.
 
 
I'm so happy with how this page came out.
It was also really fun to tell the back story of how we found this sweet place.
 
I love this collection so much. I plan to make a mini book with is next time.
There will be a video to go with that.
 
I hope you've enjoyed this.
Thanks so much.
 
Lisa x


Friday 22 March 2019

March Crop

We have a super bright, fun layout for everyone at the crop tomorrow!


It's designed by Lynn and uses the Pebbles My Bright Life collection!  As usual, we'll be at Otley Village Hall from 10am until 5pm, with tea & coffee on tap and some delicious home-made cakes!  Hope to see you then!

Wednesday 20 March 2019

Family is the Anchor..... Prima Midnight Garden pt 2


Hi There

Its Anita here again today and I have a quick little post to share of an altered frame that I have made to hang in our home. I have used some more of the Prima Midnight Garden range, which is very elegant and lush.


I have had this frame for quite some time and never quite knew what to do with it, so I thought this might be the perfect opportunity.
 

I painted the whole frame with 2 layers of white chalk paint and when it had dried I gently sanded it back in places with a fine sandpaper to expose the black and give it a *shabby* look.


On the top have I removed the photo aperture mount strip  and popped in the photo with a panel of  Rose Receipts on either side of the photo to fill the rest of the frame.


In the bottom section of the frame I used a wide strip of Midnight Garden
This has some really pretty copper metallic detailing on it in amongst the flowers.


 I had some little wordy stickers that I picked through and chose those that I thought worked on this piece.


In my own stash I had some copper chipboard letter packs so I used them for the title and the quote underneath.... I also added some little copper dots to the corner of the frame.

I much prefer this look to the original frame and am now looking forward to displaying it at home.


Thank you for looking xx

Warmest wishes
Anita xx

Monday 18 March 2019

March Papermaze Kit

Hello, Lynn here with the very pretty Papermaze Kit for March. I love making heritage layouts featuring my family photos, and I am lucky enough to have quite a big collection. This month's kit is ideal for these photos of my ancestors.


Before looking at how the layouts were put together, here are the kit details:


March Kit
Reverse side of papers
Patterned papers:
Kaisercraft - Whisper collection - Earthy and Buff
Kaisercraft - Everlasting collection - Admirer
Kaisercraft - Scrap Studio collection - Album
Prima - Lavender Frost - Hidden Truth
Stamperia - Rose with Scriptures SBB581
Bazzill - Stonehenge and Quartz


Extra Bazzill Pack
 Lily White, Bitter Chocolate, Walnut Cream and Olive
 
Embellishments
Doily, Dusty Attic Stitching, 30cm rose trim, 6 Line stickers, 8 mini lolly sticks, Prima flower, strip of enamel dots, 8 vanilla dew drops, 50cm jute twine.

Sisters - The photo I have used here is over 115 years old and features three very stern looking, widowed sisters - Julia, Adelaide and Rebecca Jane.  


I gutted a piece from a sheet of Stonehenge Bazzill, I only wanted to take a piece from the bottom half of the card, this needed to be at least 4" x 10", and was set aside to use later. 


I used Frayed Burlap Distress Ink for all the inking on this layout. All my edges were distressed and inked.

I cut the Earthy paper to measure 11.5" x 11.5". I made two tears in the edge of the paper, both about 1" deep (one about 2.5" up from the bottom on the left and the second about 3" in from the right along the bottom). I then cut a banner shape from scrap paper (8" x 4"), and used this as a template to draw a guide on the paper where I wanted to cut the shape from. I cut the shape with a craft knife, distressed and inked the edges and replaced it the other-side-up, back into the gap I had taken it from. This was all stuck down onto the gutted Stonehenge Bazzill.


From the piece of Stonehenge Bazzill I cut another, smaller, banner shape - 7.5" x 3". This was mounted onto the page below but overlapping the first banner. At this point I splattered some Picket Fence Distress Paint over the whole page.

I cut a 1/4 section out of the doily, and mounted the 3/4 remaining, to the top left of the layout, then laid my photo to cover the missing section and overlap both banners as shown in the picture. 


I tucked small pieces cut from the 1/4 doily under the tears in the patterned paper. I printed my journalling onto white paper, then I layered this onto a piece of Stonehenge Bazzill, which I cut slightly larger than the paper.  


I cut three butterflies from the Buff paper, and raising the wings with 3D foam pads, I glued the bodies in place onto the layout. I used some flower stamen for the butterflies' bodies and antenna by folding them in half and twisting them back on themselves, then glued them over the paper bodies. I used three different sized enamel dots around each butterfly.

I added a length of five ribbon roses along the bottom of the photo. With two chipboard fronds form an earlier kit, I inked the leaves and added one to each side of the photo. The Stitched Dusty Attic piece was glued onto the banner under the roses.

Finally I made a title with some Kaisercraft Chipboard Alpha #3 letters. I painted them with more Distress Paint - Picket Fence base, then dabbed with a little Worn Lipstick. Once dry the letters were coated with Diamond Glaze to make them glossy. 


Rose Emma is the title of my second layout today, and it features my Great Aunt Rosina Emma, known as 'Rose'. My layout was inspired by the beautiful work of Bec Genet


Starting with a scrap piece of 12" x 12" card, I cut and mounted two strips of Admire paper (3" x 12"), with the stripes running vertically. I stuck one to each side of the card.

I used a Tim Holtz Layering Stencil - THS077, and some texture paste coloured with Worn Lipstick Distress Oxide Ink. Once dry I added a piece of 5" x 12" Hidden Truth paper to the centre of the page.

From my stash I used cream lace and some beaded lace and ran a strip of each down the length of both sides of the Hidden Truth paper where it joins the Admire paper.

I cut different sized tags from the other side of the Hidden Truth paper using some nesting tag dies by Crafter's Companion. I added two clusters of three tags tucking them under the lace on either side of the panel. I used a little embroidery thread through the holes in the tags.

Using a Sizzix Nesting Oval Frame 3 die set, I cut the outer frame from Olive Bazzill. I treated the frame with Versamark Ink and Stampendous Frantage Shabby Pink Embossing Enamel. The centre was more Olive Bazzill and
I used the smallest die to cut the photo. These were all added to the layout with 3D foam pads. I die cut a swirl (Autumn Morning - Crafter's Companion) from Olive Bazzill and mounted this under the frame.

I selected some small paper roses from my stash and arranged them as seen in the picture. I added a few flat backed pearls to the swirl.

Finally the title was made with more Olive Bazzill and The Boxed Brush Sizzix Sizzlit alphabet. I also used a few tiny alphabet stickers.


That's all for today, I have two more layouts using this kit to share with you early in April.

Thanks for looking.
Lynn x

Friday 15 March 2019

Simple Stories Little Princess

Hello, Karen here. Today I have a layout using the new Little Princess collection from Simple Stories. This collection is full of princesses, dragons, castles, frogs and much, much more and is perfect for scrapbooking little girls and would also be great for birthday layouts. I dug deep into my photos to find some photos taken quite a few years ago of my daughter in her Snow White costume.


I started with a cut file from Paige Evans which I cut from some smooth white cardstock.


The cut file had a number of rectangles with heart apertures but I chose to cover some of these with 1.5" x 2" photos or words cut from some of the 2x2 Elements patterned paper.


Three of the rectangles were made into shaker pockets. I attached some acetate behind the heart aperture and then stuck 3D foam round the edges of the hearts to hold some sequins. Pieces of patterned paper from the collection were then glued to the back. The 'pegs' were backed with pink cardstock before the cut file was attached to a sheet of the Dream Come True paper using 3D foam to give it some dimension.


I fussy cut some flowers and leaves from the Make A Wish paper and used these as embellishments.


I found a quote on Pinterest from Disney's Snow White - "Remember you're the one who can fill the world with sun shine", which I thought was perfect for the layout and added this using some mini alphabet stickers from Pinkfresh Studio. I don't think the exact stickers are available in the shop but there are many similar stickers.


I scattered a few American Crafts Shimelle Glitter Girl - Enamel Dots and a few sequins on the layout.


To complete the layout I trimmed ¼" off of the top and right edge of the layout and backed it with a sheet of Amber Bazzill Cardstock.

I hope you feel inspired to scrapbook photos of your little girls and you can find the Little Princess collection in the shop as well as lots of other new collections.

Take Care,
Karen x x


Thursday 14 March 2019

Photoplay ~ A Day in the Park #2

Hello!
It's Anna back with you for my second post using Photoplay's 'A Day in the Park' collection.
This time I have created a simple mini picture frame. I love being able to display my scrapbooking around the house as much as having my pages in albums. I find picture frames are a great way of doing this. They also make great gifts!
 Take a look at the whole 'A Day in the Park' collection here.


I used a small square frame from Next, I took out the glass but I kept the mount that came with the frame. I used the backing paper in the frame to measure out a piece of kraft cardstock for the background. I then printed a square picture of my son and I having fun at Disney!


I used the element stickers, chipboard stars - sprayed with ink spray, and nuvo drops to embellish the photo frame mount. I also cut out some of the words from the 'fireworks' patterned paper.


Thanks for looking!
See you again soon.
Anna
X

Monday 11 March 2019

Midnight Garden......from Prima

Hello There

Anita here with you today and I have got a layout for today's post using the beautifully foiled Midnight Garden range from Prima.
This collection is a gorgeous mix of deep, dark florals mixing ruby, turquoise and creams with rich copper foiling and vintage designs.

I wasn't sure initially what photo to use on these luscious papers and it did pose a problem for me for  little while. However, I eventually came across this photo of my eldest daughter that was taken on a photo day at the nursery she used to attend. We had borrowed a posh frock from a friend for the photos and she sat beautifully for the sitting bless her.


The page is backed by a sheet of dark grey cardstock and on the left hand side I stamped using a Kaisercraft Clear Stamp in the Diamond design and some copper acrylic paint.

Using a sheet of More Roses Please to create the page I sliced down from top to bottom on the left hand side approx 3" in.... I also popped a 3" strip of  Feather Collector, sliced in half, behind the top sheet. I rolled both layers back separately to expose the reverse of the paper and also to show the Diamond stamping in the background and to create some dimension on my page.


Using 3 colours of Stickles in Pink, Copper and Midnight Blue I sponged randomly across the page which added some pretty sparkly highlights.


Using a Tim Holtz Tattered Florals large die I cut out a few flowers using sections from Feather CollectorOld Map , and Travelling Ticket,
I layered them up, curling the edges and sponging them with Copper and Pink Stickles, then popped in some Pink Stickles for the centres.


Copper glitter card was used to die cut some swirls and vines that were added to the blooms. 


A couple of small panels were cut from Rose Receipts which I gently inked around the edges of with an old dark brown ink pad, I also added an inked small tag with a cute heart paper clip from Doodlebug. These were layered and tucked behind the photo.


Rather than matting the photo I popped it into a delicate chipboard frame and also added a chipboard title.


A few feathers were cut from the Feather Collector sheet and added below the title and I used a teeny sticker on the tag and under the title from a sheet of Pretty Little Studio sayings.


I finished the page off with sprinklings of sequins in various areas in coppers and golds.

I hope you treat yourselves to some of the gorgeous Prima papers, there are so many new and beautiful sets to choose from in the shop..... they really are stunning.

Happy Crafting

Warmest wishes
Anita xx