Tuesday 30 May 2017

Cards with Bella Boulevard Secrets of the Sea

Hi Tracee with you today sharing another project using the Secrets of the Sea Boy collection by Bella Boulevard

cards tracee provis bella boulevard secrets of the sea boy papermaze

I created a layout using this collection earlier in the month (that you can find HERE) and fussy cut lots of elements out, I didn't use all of  these on the page so thought I would create some cute cards to use them up. These cards are made with a generic theme so can be used for any occasion.

cards tracee provis bella boulevard secrets of the sea boy papermaze 2

I used a bling swirl for the whales spout, I added some of the wave paper to the inside of a polaroid frame to create a little tank for the whale to "swim" in. The sentiment was cut from the borders sheet and a puffy heart sticker for the final touch.


Best Fishes, such a cute sentiment, I used my printer to create the title for this card. I quite often do this if I haven't got a stamp to fit the purpose.


I was sent a strip of green mesh in my DT package this month and I roughly cut it to replicate seaweed, I think my fussy cut fish is finding it very appetising! The bubbles were created with blobs of stickles and also add a little sparkle.

I had great fun creating these cards and the whole collection is delightful.
Please pop over to the SHOP for this collection and all your scrapping needs


Friday 26 May 2017

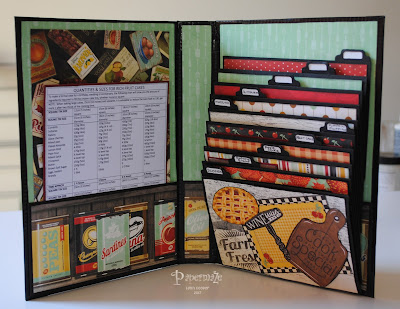
Bo Bunny - Kiss The Cook (Mini Album)

Hello - Lynn here today - back with more of the Bo Bunny 'Kiss The Cook' papers. The collection inspired me to make a cookery book for all my tried and tested cake recipes. I have been looking at 'You Tube' videos for creating albums. I love the idea of paper engineering to make something that is practical and appealing.


I added a few sheets of 'Kiss The Cook' paper to those I had left over from the layouts I made earlier in the month, I also had some Combo Stickers left and added a pack of Noteworthy Die Cuts
The album required some mat board, Black Bazzill Cardstock, magnets, Golden Gel Medium (Matte), Creative Expression Cosmic Shimmer Acrylic Glue and Black Duck Tape.
For the tabs I used Sizzix Tim Holtz Alterations Bigz Die - Tiny Tags and Tabs.

I took much inspiration from the work of Zannerol and Katy Orta King on You Tube, before setting about making my version. Here is a bit of a pictorial step-by-step, including the measurements.


Cut Mat Board with a craft knife - 2 pieces for the back and front of the album (6.75" x 9.5") & 1 piece for the spine (1.5" x 9.5").
  

Using Duct Tape, this is strong and will also provide a water resistant finish - useful in a kitchen! For the inside of the album, butt the front and back to the spine and tape together.


Tape all around the edges to give a neat, protective finish. Cut notches where the folds show on the outside to give flexibility. Outside shown above and inside shown below.


Close the album so the spine is stretched before adding tape.


Tape the outer spine, you can see a book placed inside the album at this point to hold the spine & covers in position.


Depending on the number of pages you want in you book cut the cardstock - To make 9 pages (total of 18 pockets). Cut 9 file pieces 8" x 6" and score at 0.5" and 4.5". Cut 1 end piece 4.5" x 6" and score at 0.5".


Stick the 0.5" tabs to the next file until they are all joined and add the end piece, concertina style - see above and below.


Mark positions for the tiny magnets and stick into place inside each file. These will be covered by the decorative papers later.


With the Sizzix die cut tabs from scraps of black cardstock left over from files. Add small pieces of white card inside and glue into place at the top of each file. Front shown above and reverse shown below.


This last flap will be used to secure the files into place at the bottom of the inside cover, The back pocket will cover this join and help keep it secure.


To decorate, cut papers to fit the back, front and spine and arrange pieces from the pack of die cuts, stickers and also images cut from the papers. Stick images in place with Gel Medium, and seal by painting this over the images. Again this will help make the album water resistant for use when cooking. Allow time for this to dry before attaching to album.
  
Front Cover

Back Cover

Add some detail with a black and white waterproof markers.


Decorate the inside by making pockets using more cardstock and decorative papers. Each file can be flipped down to reveal the recipe you need. The magnets hold the others out of the way. 


Cut smaller pieces of patterned papers to cover the files. These can then be decorated with photos, images and recipes.


Print or write out general information sheets like this to store in the pockets.
The photo above shows the reverse side of the files - yet to be decorated. The whole file system is held in place with more magnets.


This is a work in progress, and I will add to the album as I discover new favorite cake recipes. I have already cut enough pieces of paper to cover the rest of the files. and I have an envelope of die cuts, stickers, items I have cut out, photos and recipes ready to continue.


I hope this has inspired you to have a go at making your own album, for photos, recipes, journalling or another purpose.

Thanks for looking.
Lynn x

Wednesday 24 May 2017

New Design Team Member, Chloé Murray!


Hello!

My name's Chloé, and I'm super excited to be posting here on the Papermaze blog today. I'm truly honoured to have been invited onto the design team, and I thought it might be fun to share some of my work with you, and tell you a little about me.


I've always been creative, since early childhood. I kept a scrapbook of sorts from age 10, and in scrapbooking I found my "place". I started out with traditional 12x12 layouts, before gradually moving over to Project Life-style scrapbooking. Generally I stick with pocket pages now, however the occasional layout gets thrown in, and my travel albums include lots of traditional pages. I'm now the proud owner of a huge IKEA kallax unit filled with albums, and they bring me so much joy! I'm also a big fan of creative journaling, which I hope to write an introduction post on very soon.


I live in Hampshire with my boyfriend and our two dogs, Archie and Winnie. You'll soon learn that my little dogs are the loves of my life, and they feature in many of my projects... I'm definitely a crazy dog lady! I do also have six pet bunnies, so it's perhaps fair to say that I'm just a crazy pet lady in general. 

I hope you've enjoyed learning a little about me; I'll be back with my first DT project very soon! If you'd like to, you can follow me on my social media channels here: YouTube, Instagram, Twitter.

Chloé


Monday 22 May 2017

My Heart is Full....Kaisercraft Wildflowers pt 2

Hello again, it's Anita and today I am here with my final post for May ( How DID we get to the end of May already this year??)
I would like to apologise for the low quality of the photo's, due to camera issues I have had to use my phone for this post. And for some reason the layout looks lopsided and crooked in places in the pics...I promise it really isn't though ;)

Not sure if you have seen the delightful Wildflower Collection by Kaisercraft yet or not, but if you haven't, do yourself a favour and pop over to the shop. It's really beautiful and such a pleasure to work with, with its delicate palette of colour and soft watercolour designs....what's not to like?


I used the reverse side of a sheet of Vines for my layout, which although very pretty as it was, I decided I couldn't just leave it alone!


So I used a 12 x 12 Stencil and some Texture paste and created a little bit of dimension. I then dribbled and splattered some Cosmic Shimmer Mists in various areas and blew through a straw to create runs of gentle colour (some of which drizzled into the texture paste).


I used a couple of aqua toned small doilies to mat the photo of my youngest daughter when she was a cheeky wee nipper! I then made a cluster of paper blossoms and leaves and added a sprinkle of sequins and crystals.


I absolutely LOVE using sequins on my layouts, I think they are one of my favourite embellishments. I like to liberally sprinkle them about, but i also love to pile a huge cluster on sometimes with a good size dollop of glue! So for this page I made an oversized photo corner and generously piled them up!


I cut a couple of over sized flowers out from a sheet of In Bloom  and embellished the stamens with some AB crystals which sparkle and capture the light beautifully.


The sheet of Wings is covered with multi-coloured butterflies and I cut out a couple that blended in well with the page.


I finished the page by adding a quote cut from a sheet of Gathered 
and sprinkling a few more sequins and crystals .....and then I made myself stop ha ha!


I really enjoyed creating this layout, I feel like my creative mojo may well be coming back to me again....well I hope so anyway! Enjoy whats left of May and I will see you again in June.

Warmest wishes
Anita xx

Friday 19 May 2017

May's Crop

I'm not sure how we come to be in May already, but here we are at the 3rd weekend, and it's crop day tomorrow!  This month's kit uses some American Crafts paper and distress inks, (and the photo is one of many I took on our recent holiday!)


As usual we're at Otley Village Hall from 10am until 5pm, with homemade cakes, tea, coffee, punches, dies and a shop discount!

Friday 12 May 2017

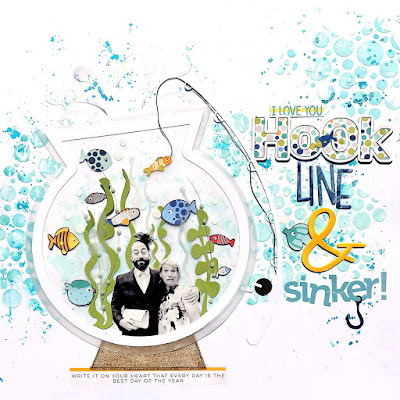
Hook Line & Sinker with Bella Boulevard

Happy Friday! Tracee with you today to share a layout created with the fun Secrets of the Sea collection by Bella Boulevard.

hook line and sinker tracee provis papermaze bella boulevard secrets of the sea boy

I was completely inspired by this sheet, called finding fishies. I could just imagine all those fun colourful fishes swimming around!


I love to fussy cut my photos and create a little scene with them, me and my husband are always taking silly pictures, I thought this crazy one of us was perfectly placed in the fishbowl that I cut out on my Cameo.

hook line and sinker tracee provis papermaze bella boulevard secrets of the sea boy01

I fussy cut some of the fish from the paper, there are lots of different ones and they are different orientations too which I like, we don't want our fish all swimming in the same direction after all do we! I also cut some seaweed from both plain cardstock and vellum to add some different textures to the page. For my background I used some gel paste that I coloured with various blue mists, I made sure i didn't mix the colours too evenly through the paste and that gave me some variations. 


The stencil I used is very similar to this new "Bubbly" Kaisercraft one.


I used my cameo once again to cut out the "Hook" word, I added some of the Fish Parade sheet to the back and couldn't resist fussy cutting a small fish to swim across it. The "I Love You" strip came from part of the saying on the Borders sheet. The rest of my title was made up of random thickers, Vanessa has a great choice over at the shop.

For this page and all your scrapping needs please pop over to the shop.

Hope you all have a Happy Scrappy weekend!


Wednesday 10 May 2017

Bo Bunny - Kiss The Cook (Black & White v Colour)

Hi, Lynn here today with a couple of layouts featuring the versatile Bo Bunny collection - Kiss the Cook. I love the contrast of Black and white with bright colours in this collection.

For my first page I had a very colourful photo to scrap so I selected the black and white papers from the collection.


I trimmed the paper 'Menu', black and white checkered design by 0.5" on two sides and decorated it with two different Tim Holtz Layering Stencils (Nordic and Burlap), together with Black Soot Distress Ink.  With Distress Stain I added a few splats of Black Soot too. I then mounted this on a pale yellow (Chiffon) sheet of Bazzill cardstock. The cardstock was gutted first so I could use some to mat my photos.


With chipboard I selected letters and cut some triangles to make flags for bunting. These were painted with Picket Fence Distress Paint, then coloured with Distress Inks. They were all glazed with Glossy Accents. This really made them pop off the page. The bunting was completed with some black twine.


As you can see, I also added a few pieces of Idea-ology film strip ribbon, and a doily. The red tab sticker is from the Kiss The Cook Combo Stickers Sheet.

For my second page I used the brightly coloured papers to record the strawberry 'New Home' gift I made last summer for my daughter.  On this page I have matted everything including the whole layout. I used more  Chiffon and some Pomegranate Bazzill. The two circles were matted on the red card and then trimmed with scalloped scissors. each scallop had a dot of Liquid Pearls added to it.


I used many of the stickers from the Kiss The Cook Combo Stickers Sheet, including the borders (hearts and lace). I made another lacy border using cream Bazzill and the Sizzix Tim Holtz Sizzlets Decorative Strip -Vintage Lace Die

I mounted my main photo onto a strawberry element from the 'Kiss The Cook' paper, then the rest was made up using pieces from this sheet together with 'A La Mode', Baked Fresh' and 'Delicious'.

To finish I added a few buttons, twine and gems.
Thanks for looking
Lynn x

Monday 8 May 2017

document ( using scraps)

using the left over scraps from the paper from the Bo Bunny Bella Rosa collection.
Its hard using up scraps to create another layout but I'm trying to use up my scraps as much as i can and so this is what i came up with. 
The background card is kraft and an old sheet of ledger paper from Heidi Swapp that went well with the colours of the patterned paper. The strip that the photos sit on are a couple of cork sheets cut to size and blocks of the left over scraps tucked under the photos


Chevrons cut from the patterned paper, and die cut some leaves, used vellum and a tag and some tissue tape


each photo is covered with a transparent overlay which has been in my stash for ages.  This layout i feel represents using up left over papers and old stash that all of us have laying around. I've loved using the thin sheets of cork and would love to see how well it die cuts too

 close up pics