Friday 30 April 2021

Bucket List Scrapbooking


Hi, Lisa here today scrapbooking some fun bucket list items we've ticked off.

I thought it would be fun today to share a few little tips with you.


This page started by me receiving the amazing new collection from Simple Stories - Safe Travels. You can see it all here. 

I actually wanted the collection for a Bucket List Junk Journal I'm planning, but when I opened it all up I wanted to create a quick 12x12 straight away.

That's the sign of a perfect paper collection I think. When you get ideas and get started straight away. I just couldn't wait : )


I wanted to create a kind of grid like design. There are lots of papers with little boxes that are crying to be cut up.

One of my biggest tips, when you are laying things out on your paper and you like what you've done. Take a quick snapshot so you can remember where everything is.     


This is how my initial design looked. 

So then I could remove everything and add some colour.


Using stencils and colour is such a fun way to add colour. There are loads of stencils to choose from here.
 Once this area was dry, I went around with some watercolours too to add even more colour. 


I wanted to add some extra texture to the page so I hand sewed some yellow stitches to tie the yellow in a little more and I wrapped some teal thread around the top journal card too.

I think this finishes the page off really nicely.


I hope you enjoy this page and I hope you have some scrappy time planned this weekend.

love

Lisa x


Thursday 29 April 2021

Pinkfresh Studio Keeping it Real - Big Mood by Meg


Hello guys, it's Meg here again today with my second layout using Pinkfresh Studios Keeping it Real collection! 


This page was inspired by the vibrant colours in the collection - I wanted to showcase them and after spotting how perfectly the colours on all of the different papers match each other, I really wanted to have a go at a tone-on-tone layout. 

I absolutely love both sides of the striped Big Mood paper (so much so, I had to buy another sheet of it!) and I had so many ideas spinning rounds in my head for it, but the stripes just lend themselves so well for tone-on-tone designs. It just felt clear to me that's the direction I needed to take! 


First decision I needed to make was to have horizontal or vertical stripes - I liked the idea of vertical and thought perhaps I could try dripping some mixed media down the page (I'm really enjoying that effect at the moment), but I decided to go with horizontal instead, so I could journal along the stripes eventually. 

 Next I wanted to fussy cut some paper to create tonal ephemera - I love doing fussy cutting! It really makes a collection stretch further and is a cost effective way of creating embellishments. 

I'd noticed the A-side of the Big Mood paper matches the stripes pretty well, but so do the icons on Daily Grind and those sweet houses on Adulting! I decided to use the houses (honestly they are just so cute, I wanted to fussy cut the lot!) and some of the little icons from Daily Grind. 


Once I'd decided which papers I was going to cut into, I started thinking a little bit more about how I was going to arrange my page.

Now was the time to pick out photos, because the amount of photos I want to use dictates the design of the page - I almost always pick out my photos to match the papers I'm planning on using (for example, Spring photos for Spring collections), which was easy with Keeping it Real because the papers go well with almost any event and situation! 

I picked out two black and white photos of my family during the COVID lockdown as I liked the idea of making a 'mental health being stuck in the house' type of layout, which tied in with the houses and some of the sentiments. I picked black and white so that it would stand out against all of the vibrant colours on the rest of the page and decided I wanted them to be central, so that the eye would be drawn there. 

After picking my photos and having decided I wanted to use the houses and the stripes horizontally, it came naturally that I should cut the background piece diagonally - so that the houses would stagger nicely along it and still be visible. So I cut the stripes and distressed the edges, fussy cut my houses and icons and fixed them in colour order with the coordinating enamel dots, puffy stickers and phrases cut out from Daily Grind. 


Lastly, I had to decide on journalling. I thought that the top right hand corner looked a little too white but couldn't decide how to embellish it for a while. Eventually I decided to use a corner of the Big Mood, while saving some of the arches on the other side of the paper for a later layout. I distressed it to match the rest of the page, journalled along it in white and finished with a few more enamel dots to jazz it up a little! 


And there we have it - another page finished and it was made easy by the wonderful coordinating colours. The Keeping it Real collection is definitely a must-try for you if you have ever fancied trying a tone-on-tone layout like this! 

I hope you enjoyed my page and I hope to be back with another one real soon - have a happy scrappy week and take care, 

Meg x 


Wednesday 28 April 2021

Feed the Ducks - P13 Paper Products - Soulmate

Hello, Rebecca with you today. I hope you are all keeping well and enjoying a little bit of freedom as the restrictions are starting to be lifted. I’ve popped by to share another layout I’ve created with the gorgeous 'Soulmate' collection from P13 Paper Products. I am really enjoying this collection and the neutral tones mixed with the dark Navy. It's perfect for scrapping more masculine pages.


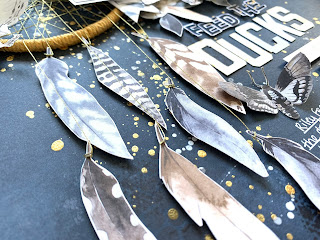
I was really drawn to Paper #1 with all the beautiful feathers. I fussy cut loads of them out and as they were sitting in a pile on my desk they reminded me of a dream catcher - and that's where the idea for this layout was born! I used a 10cm wide metal ring and wrapped some string around it to add some texture and to make it look more like a dream catcher. I then painted the string gold using a metallic acrylic paint, and wrapped my favourite WRMK Gold Metallic Thread all around it to give it the classic dream catcher look.

I selected Paper #4 for my background as I loved the contrast of the bright gold against the dark navy. I wanted to jazz the paper up a bit so I added some gold splatters to the left hand side of my page, where the dream catcher would sit, and finished it off with a few white splatters. I then added a little bit of stamping with black ink for some subtle texture.

I used Glossy Accents to stick my dream catcher in place, and then I set about attaching the fussy-cut feathers. I tied the metallic gold thread around the top (well, technically I suppose it’s the base!) of the feathers and then attached the thread to the dream catcher hoop, making sure they all hung at different lengths. I placed foam pads behind the feathers for a bit of dimension.

The photo I’d chosen for this layout is of my little boy feeding the ducks at a local lake - I thought it went perfect with the feathers theme, and the colours in the photo worked perfectly with the layout. I printed it smaller than usual, at just 2x3 inches so that it could sit nicely on the dream catcher. I added a white border to my photo to help separate it from the background slightly, and added a layer of vellum behind it. 

I then moved on to embellishing my layout. Normally the embellishing part is where I struggle the most when creating layouts, but I’m finding it really enjoyable with these P13 collections. It really helps that the collections tend to have a colour scheme, or at least a limited number of colours to them. The embellishments all match perfectly with all the patterned papers, so it offers so many different options when it comes to deciding what to use. 

As with Beyond the Sea, the Soulmate collection has plenty of opportunity for fussy-cutting! I spent some time cutting the individual elements from Paper #7, the florals from Paper #2 and the moths from Paper #3 and this gave me lots to work with! 

I started with the floral clusters as they are the biggest elements. I layered them underneath my photo and then I worked in some of the elements from Paper #7. I absolutely loved the owls, and although we weren’t feeding owls at the lake, owls have feathers and so they work for me! I also added in a round sticker from Sticker Sheet #3 with some of the same gold thread tangled behind it and a skeleton leaf from my stash.

I added a couple of the moths from Paper #3, raising them up on foam pads to give the appearance that they were flying.

For my title I’ve fussy-cut some of the letters from Paper #4 to make the word ‘ducks’ and then I’ve used Alpha Sticker Sheet #2 for the rest of my title. I had the problem that my alpha stickers were never going to show up against a navy background, so I stuck them onto white cardstock and cut them out leaving a thin border to help them stand out more.

I then finished my layout with a couple of phrase stickers from Sticker Sheet #1 under my title. 

So that’s another layout from me with no white cardstock! It’s becoming a habit with the P13 collections!! The thing is, the patterned papers are so beautiful I just HAVE to use them! 


If you’d like to watch how this layout came together, I have a process video up on my YouTube channel, which you can find here.

Until next time, take care

Rebecca x


Tuesday 27 April 2021

Cocoa Vanilla Studio Sunkissed - Fun in the Sun

Hello, Karen C here with another layout using the bright & sunny Cocoa Vanilla Studio's Sunkissed collection. 


For my layout today I started with a 12"x12" sheet of white Bazzill cardstock which, after trimming 1/8 inch off of each edge, I matted onto a sheet of black cardstock.

In the centre of the layout I layered 7"x7" squares of the Sunny Days and Just Chillin papers. I also cut some strips from the Good Vibrations paper and tucked these underneath the sides of the squares. My photo was matted on black cardstock and placed on top of the layout with some 3D foam underneath to raise it up a little.


One of the Pocket Cards was attached to the layout next to the photo, with more 3D foam underneath.


Some of the gorgeous Glitter Foam Title Stickers were used for the title. I really like these foam stickers. The glitter really stays put and doesn't come off on your layout like some older glitter stickers do.


At the top and bottom of the layout I added strips of the Good Vibrations paper and some tags made from some of the Pocket Cards were used to ground clusters of embelishments.


White Twine was added to the tags and tied in bows. I then added some phrase strips and hearts from the die cut ephemera pack, Glitter Foam hearts, some Puffy Dots from Doodlebug and some stars punched from glitter card.


On the corner of the photo I stuck a clear sticker from a Me & My Big Ideas clear sticker book I had in my stash. I don't think the particular sticker book I have is now available, but there are many more similar sticker books still in the shop.


Tiny letter stickers were used to add the place name and date at the bottom of the layout and gold sequins were scattered around the layout.

To complete the layout I used a black gel pen to draw round the edges of the layout as well as the patterned papers and elements.

Thanks for looking. 
Take Care and I'll be back again soon.

Karen 
x x

Monday 26 April 2021

Echo Park ~ Welcome Spring #1

Hello all, it’s Anna back with you today to share my first layout using Echo Park’s Welcome Spring collection. You can find the collection in the shop here!

For my first layout, I began with a white bazzill cardstock base. I added a strip of the ‘b’ side of the 6x4 journaling cards to the left hand side of the page, tearing the edge, I also added a strip of bazzill ‘African Daisy’ alongside it and also tore the edge of this piece. I added a few spatters of shimmerz paint in bubble gum blast and Christmas cheer and waited for it to dry. 

Meanwhile, I backed two Paige Evans pinwheel Cutfiles using the b side of the journaling cards patterned paper as well as some bazzill cardstock in the shades of ‘romance’ ‘African daisy’ and ‘lagoon’. I also made two of my own pinwheels from the ‘sunny spring days’ patterned paper. To make these two pinwheels, I cut one square measuring 4x4cm and the other 5x5cm. I centred my pinwheels with enamel dots by Pinkfresh Studio. 


To create my title, I fussy cut the sun, clouds and word ‘hello’ from the 6x4 journaling cards and selected ‘sunshine’ from the element sticker sheet. I mounted the clouds/hello title using 3D foam pads to slightly raise it from the page. 
 I mounted my photograph with a thin boarder of the ‘romance’ bazzill cardstock and added a second layer with the ‘sunny spring days’ patterned paper. 


I embellished my layout with stickers from the element stickers sheet. There are so many stickers on this sheet, images and wording in various sizes. I like having the option of smaller stickers too as you sometimes only need a little something. 


To finish I added a few shape sprinkles by doodlebug. 

Thanks so much for looking, I’ll be back with another layout from this collection soon! Have a great week!

Anna

IG ~ adisneycraftylifewithanna

X


Friday 23 April 2021

Pebbles, Jen Hadfield - Reaching Out - You Make Our House A Home

Hi everyone!

Claire back again with my second layout from Jen Hadfield, Reaching Out.

As promised - I'm using the bold, bright and fun side of this awesome collection - I had an absolute blast making this page!


I started with a sheet of the blue Bazzill cardstock from the Matchmaker pack. I gutted the paper to leave an inch or so border and mounted a piece of smaller white premium cardstock on top.

Now, some of you may know, that I cannot resist a paper with houses - they are screaming to be fussy cut and I decided it would be rude not to (especially with my track record!).  One of my favourite design elements is repeating shapes, so I decided that this time I would make a house from mini houses - why not?! :)

I took a piece of the Be You paper and cut a house shape to make an aperture. I also trimmed the paper to about 10.5" and distressed the edges. Before sticking it down, I hand stitched a border around the house in blue thread for extra definition and machine stitched around the edge, lifting the edges slightly to get a bit more height.

And now the fun part - I fussy cut the houses from the Hi Neighbor paper and mounted them on foam pads. I strategically positioned them inside the house aperture until the shape was full.

Next, I double mounted my photo using the 'b' side of the Stick Together paper and the 'b' side of the Scatter Friendship paper. I left the bottom layer a little longer and ripped the end for extra interest.

Once the photo was positioned, I set to embellishing.


I used some florals and houses from the ephemera pack around the photo, with a floral rainbow along the top. I also added a floral cluster from the Accent Stickers.


For the title, I used the Navy Puffy Alphabet Thickers coupled with some chunky white thickers from my stash. To finish the page off, I used a red heart from the Hello Phrase Thickers above the chimney and added a few Prima Crystals in Golden Desert for each cluster.

The journaling was hand written on some strips of left over white cardstock and added on foam pads.

This was an incredibly fun page to make - so many great elements to play with and so different to Layout 1 I shared earlier this month.

It's been a while since I saw a collection with this many options - it's exceptional value for money and I feel like I have only just scratched the surface of what this has to offer.

Hope you've managed to enjoy some scrappy time this month.  I will see you next time.

Take care,

Claire xx

Wednesday 21 April 2021

Cocoa Vanilla Studio Sunkissed - The Beach Life

Hello, Karen C here again with another layout using Cocoa Vanilla Studio's Sunkissed collection. My previous layout picked out the colours in the Feeling Fine paper - pink, orange, yellow and a tiny bit of blue. Today's layout is based on the blue/green Good Vibrations Ombre paper and other blue elements in the collection. Although my layout isn't a 'boy' layout I hope it shows that the collection could be used for feminine or masculine layouts.


I trimmed 1/8 inch off of each edge of a sheet of the Good Vibrations paper and mounted it on a 12 x 12 sheet of white Bazzill cardstock. Using white thread I machine stitched round all the edges of the paper and also round the edges of five of the blue/green pocket cards and an extra card I made from a piece of the Sunny Days paper.


The pockets cards were placed on the left half of the layout cascading from top to bottom. Some were raised slightly with 3D foam beneath them and I also added some bakers twine to one of the cards to add some extra texture to the layout.


Die cuts from the die cut ephemera pack were scattered among the pockets cards as well as the words 'Love This' which were cut from the Fun in the Sun cut apart sheet. My photo was matted on white cardstock and attached to the top right of the layout.


Using my Silhouette I cut the word 'Beach' five times from smooth white cardstock and using a wet glue I glued the pieces on top of each other to create a thick chipboard-like title. The title was placed near the bottom of the layout and was completed with the addition of more die cut letters and some blue puffy alphas from my stash.


A die cut of a pair of sunglasses was added to the title as well as a little pennant to the photo.


My DT kit contained some Puffy Dots from Doodlebug, These are like enamel dots except they are soft and squishy and have a matt finish. I dotted a few of the dots around the pocket cards.


The layout was completed with the addition of the date and place using some blue alpha stickers from my stash and some blue iridescent sequins. 

I'm really enjoying playing with the Sunkissed collection and will be back again soon with another layout.

Take Care
Karen x x 

Monday 19 April 2021

Pinkfresh Studios, Keeping it Real - 'You are the Sprinkles to my Ice Cream' by Meg

Hello! Happy Monday and welcome to the blog today!

It’s Meg and I’m over the moon to be sharing my first ever Papermaze project with you, using the beautiful Pinkfresh Studio ‘Keeping it Real’ collection.

I really love these papers – the colours are incredibly fresh and versatile, the quality and thickness of the paper is noticeable and the collection itself lends itself to all kinds of themes and events easily.


I was so inspired by the patterned paper Daily Grind – I couldn’t decide whether to use it as a background paper, to use a smaller area of it or to fussy cut it (the options are so limitless with this paper, I ended up buying a second sheet!), but I really loved the sweet little ice creams and so I eventually decided to pair it with an ice cream cutfile I had seen by Peartree Cutfiles. The cutfile actually included two ice creams but I only wanted one, so I enlarged it, cut it out with my Cricut and placed it on my Daily Grind background paper to wait for more inspiration to strike.

Placing the cutfile on the paper helped me to decide that the patterned paper would be too busy and stood out too much behind the ice cream, so I backed the ice cream cone and wafer sticks in the more subtle striped patterned paper Tiny Victories and decided I would keep the ‘ice cream’ part white, but with some mixed media ‘sauce’ and sprinkles. The sprinkles came from my stash, but Doodlebug Design do similar sprinkles.


I dabbed some pink acrylic on to the ice cream with some kitchen roll and backed the cherry in red, from a small part of the Big Mood striped paper. Following this, I noticed the cute ‘Enjoy’ flag with ‘the little things’ written underneath on the Reality Check paper, which I thought would just be perfect poking out of the top of the ice cream. I fussy cut it out and carefully poked a couple of holes in it so that I could use embroidery thread to attach it to a cocktail stick! I saved the ‘the little things’ sentiment and used it as an embellishment later on, as I love using up tiny pieces and not letting anything go to waste!

I absolutely love patterned or cut-apart paper that can be fussy cut, turned into tags or embellishments as it really makes your money stretch further and you can create such unique pieces.


Next, I placed the ice cream onto white Bazzill Avalanche cardstock (which is definitely my favourite white cardstock because of the subtle linen texture it adds to the page) but with the ice cream also being in white, it just seemed to fall a little flat on the page. I moved the Daily Grind paper around with the Avalanche cardstock and ice cream to decide which combination fitted the best, but every which way I moved the paper (with half and half, more of patterned paper and less of the white, more of the white and less of the patterned), it just seemed to be ‘too much’ or ‘not enough’! I considered changing the ice cream colour on the cutfile to pink or even yellow, but I liked the way the sprinkles and sauce stood out on the white. Eventually I tried adding the pink Bazzill Romance cardstock between the white Avalanche and the Daily Grind paper and I found that it really worked well as a bridge of colour between the two and really brought out the colours in the Daily Grind. It was at this point I decided to go with the large banner shape that I cut the Avalanche cardstock out of and to use the Daily Grind paper to be a secondary banner behind the white and to repeat the vertical lines either side of the page.

Once I had decided the shape placement on the page, I started to get down to the nitty-gritty embellishing! I dripped some more pink mixed media ‘sauce’ down the page behind where the ice cream would be, topped it with some darker pink paint drips and some gold to the ice cream cone before adhering the ice cream, matted my photo twice in the Romance and Avalanche and began picking out florals from the Floral Cardstock Die Cut pack that worked best with the layouts colour scheme – I chose mostly pink, yellow and blue flowers and arranged them around the photo in colour triangles to bring attention to the photo in the centre.


After I had stuck down the floral dies, I stuck down the ‘the little things’ that I had saved when I made the flag earlier, a few puffy stickers and thought about my title for the page. I went with ‘You are the Sprinkles to my Ice Cream’ to go with the ice cream cutfile and I decided to stamp it on using stamps from my stash as I was running a little short of alpha thickers (don’t worry, I’ve been on a shopping spree and fixed that now)!

I decided to add another small cluster of floral die cuts and the blue teapot puffy sticker on the other side of the page to balance out the large cutfile and I finished with some journalling to tell the story of the photo.


Thank you for looking at my page today and I hope you feel inspired to give the beautiful Keeping it Real collection a try – the colours are stunning and will make you smile!

Have a lovely week and I hope you pop by again soon – I will be back again too at some point this month to show you how I use more of the collection.

Take care,

Meg x

Saturday 17 April 2021

'Wander' by ScrappyAdam... Simple Stories 'Safe Travels' Collection

Happy Scrappy Saturday!

It has been a busy few weeks for me but I am so happy to be back on the Papermaze blog sharing a new layout using the new Simple Stories collection, Safe Travels. I absolutely love this collection - it is travel themed but it can be used for so much more especially with the travel restrictions of today. I loved my DT Pack and then bought the rest of the collection - like I always do!

I have used it to document a photo from a three week road trip across Europe we took in 2019. I have so many photos from this trip to document - I have so many photos to document! Do you scrap chronologically? Or are you more of a random scrapper like me? I scrap whatever photo I feel like depending on what I am working with! 


I took inspiration from Day 3 of Scrap Squad's '12 Days of Spring Scraplifts' over in the Scrap Squad Facebook group. I don't do scrap lifts all that often, even though I have a huge virtual pile on my phone and it was nice to have the starting inspiration for a change. I did change the orientation of my layout from the scraplift for Day 3. 

I took a sheet of White Bazzill as my background. I don't use white backgrounds all that much so that was a nice change.I started with two strips each of the papers Happy Travels, Weekend Vibes and Take Me Somewhere. I decided to tear these strips and had one large strip at the bottom and two smaller layered behind this and three smaller strips on the top. I did intentionally make it very textured with tearing and distressing the edges. 


I added my photo, slightly bigger than a 3x4" and used a Chipboard Frame to highlight the photo and layered a sticker to create a subtitle with the words already on the frame. 


To the top right, I added a cluster using the adhesive brads and enamel dots as well as a couple of stickers from the sticker book. 


I wanted to add more because there was a lot of white space left for me! If you've seen my layouts before then you know I don't do white space often at all! So I added a big foam sticker, some washi tape strips, brads and stickers as well as a rub on from my stash. 


That's pretty much it! Quite a simple page for me - with quite a bit of white space for me! Hope you have enjoyed it and I will hopefully be back with another Safe Travels project very soon!


In the meantime, pop along and have a look at all the other amazing creations on the blog, have a happy scrappy Saturday and stay safe and take care!

Adam x