Thursday 28 January 2016

and another...

Hi Carol with you today, this time of the year is always busy with Birthdays and Valentines is around the corner too..so, it has to be another card…


with postage being so high if you add volume to your cards its always a challenge to keep them flat!

This card base is 5" x 7" and a great size to work on.  I have cut Graphics 45 "raining cats and dogs" papers to make banners and adhered them to the base with another piece of patterned paper.  An image was cut from one of the sheets and matted onto black cardstock and adhered to the front along with a rather apt, for my friend, saying.

TFL

Monday 25 January 2016

Layout share with Dear Lizzy Documentary

Hi Tracee with you today, it's been quite a while since I had a project to share. I have used the Dear Lizzy Documentary for my page plus a couple of extra pieces from the shop.

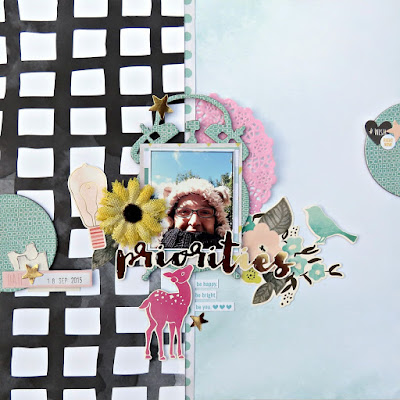
Priorities scrapbook layout by tracee provis for papermaze 01

I wanted to scrap this Selfie of me one day back in September when the sun was shining, but it was freezing cold and my priority was "staying warm"
I used both 12 x 12 sheets and the 6 x 6 paper pad from the Documentary collection, I also added lots of stickers from the sticker sheet (I am normally a look how pretty they are......can't possibly use them type of gal, but just lately my stash has been growing for this very reason)


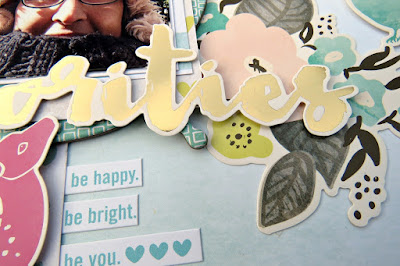
Priorities scrapbook layout by tracee provis for papermaze 02

The sticker sheet has a mix of colours from the collection with some touches of gold, I used the gold "priorities word sticker as my title and then some word sticker from the Bella Boulevard Little Bits range.

Priorities scrapbook layout by tracee provis for papermaze 04

I couldn't resist adding the pink deer onto my page, he is just too cute! I covered some chipboard with one of the sheets from the 6 x 6 pad and then used my Big Shot and a Tim Holtz die to cut out the clock, which I used as a layer behind my photo.


I used the Happy Happy  sheet for one half of my background, I love how bold the squares are and yet because I have only used half it doesn't overwhelm the whole page. For the right hand side I used half of the Fancy Free sheet, which has a beautiful ombre watercolour type effect.
I didnt waste any of the cut out from the clock I die cut as I cut the circle in half and glued it to the sides of my page. Once again I layered up the stickers and added the yellow burlap flower I was sent too.

I hope you enjoyed todays layout and for this and all your scrapbooking needs please visit the shop


Friday 22 January 2016

New Year & A New DT Member

I was thrilled to be invited and very excited to start as a member of the Papermaze Design Team. Vanessa asked me to say a few words about myself. So here goes:


I am married to Alan and we have triplets aged 23 years and all pursuing their chosen careers in various parts of the country. I am currently working my notice as a palliative care nurse specialist at a children’s hospice at home service in Kent. Alan and I are planning to move to Suffolk where we have spent much of our free time over many years.


Craft wise, I have always been interested in craft of various kinds, starting with dressmaking, Crochet and knitting. Cross stitch was my passion when the children were small and I ran a small club from my home at the time. I also wrote for magazines reviewing charts and kits. 


By the time scrapbooking came to the UK in about 2003 I had a lot of photographs and wanted to record our adventures with the children. I have developed my love for scrapbooking and card making over the years, attending retreats and crops as well as creating layouts and cards at home. I used to make and sell cards at school fetes, and wrote for magazines designing cards.

A 16" canvas made for my brother and his wife
I have attended various crops and retreats over the years, and taken part in The Mojo Holder Blog and Scrapology as part of the design teams.  I don’t have a particular style of scrapbooking as I like to try lots of different techniques and ideas.  My family history research has led to many heritage layouts and I am lucky enough to have many beautiful old photographs to work with.

A very early layout
Here is a double page layout I made for the Papermaze shop a while ago featuring a Periodic Table of Scrapbooking Elements, you may have seen it in the store. I have recently designed a few crop kits for Papermaze and I am looking forward to joining the Design Team.


Thanks for looking
Lynn x

Wednesday 20 January 2016

sunshine selfie

I'm not the best at taking selfies as you can see, but I wanted to scrap this photo, just to show that not every photo has to be perfect to scrap. The patterned papers are from My Minds Eye, my story collection. To start the page a made a template of a sunburst and cut out my patterned paper, making sure I numbered the back of each piece.
I then drew my rectangle in the centre of the page and used various word stamps to make a border, I pulled out a selection that I thought would work and mixed up the fonts too. I then adhered my patterned paper pieces, leaving a clear gap in the corner. For this piece I used my fuse tool to create a clear pocket to which I added some die cuts and sequins  
 

I then matted my photo on to some pink card and created a flower cluster underneath. Stamped my camera image on vellum, and used my own dies to create a title.

Friday 15 January 2016

First crop of 2016...

Tomorrow is our first crop of 2016, and we're kicking off with a gorgeous layout designed by Lynn - lots of inking in this one!  


Cakes are in the oven as I'm typing and don't forget there'll be a January sale 20% discount off everything tomorrow!  If you'd like to join us, just drop me an email :)  And here's a list of all our crop dates for this year:

February 20th
March 19th
April 9th
May 21st
June 18th
July 23rd
August 20th
September 17th
October 15th
November 12th
December 3rd

Wednesday 13 January 2016

Cards and Tags

Hi, Carol with you today sharing with you a card and tag that I've made for someone's upcoming birthday!

I think its lovely to have matching cards and tags, not only to give, but to receive, and how lucky are we, as crafters, to be able to make everything to match?


My card:-


I used a 6x6 inch card base and cut a piece of Graphics 45 paper slightly smaller which I then stamped using a text stamp and some distress ink - the edges were then distressed and doodled and then adhered to my base.  Using some more Graphics 45 paper I cut some banners and a piece of honeycomb from the "mixed media" thinlets die set.  Prima flowers, a stamped sentiment and some pearly bling finished off my card.

My Tag:-


The same graphics 45 paper was adhered to cardstock and then die cut - the same papers and flowers were used to make a matching tag.

TFL xx

Friday 8 January 2016

You're Invited...


Hi, It's Anna here. I've been working with the Bo Bunny You're Invited collection. 
I have created a layout called 'wedding selfie' this collection is really great for scrapbooking wedding or party pictures. 


I layered some strips of patterned paper above and below my photograph. I used this Martha Stewart butterfly punch to punch out all of the little butterflies and arranged them below my photo. I added some stickles and pearls to some of the butterflies. 


Thanks for looking! 
Anna 

Tuesday 5 January 2016

a christmas wreath

I know that Christmas has been and gone, but some of us like to scrap our pictures after the mad rush of the festive season. So armed with the beautiful kaisercraft home for Christmas patterned papers and die cut holly wreath I went about creating a layout/home décor piece.
The die cut wreath is simply beautiful and I wanted this to stand out. so instead of laying card stock behind it I use a thick 12x12 acetate sheet that I cut into a circle.
I then cut my photo into a circle and cut the circles our from the warm wish wishes double sided paper, these then became my bauble's. I then fussy cut some of the poinsettias, leaves and holly leaves from the poinsettia paper and layered behind the baubles. I used a die that I had in my own stash and some glitter tape to create the stag. Then accented the leaves and the poinsettias with gold gliding wax.
 
Then thought how  can I display it?
so I found an old wooden trouser/skirt hanger and decorated it with the patterned papers.


I love how this turned out and its something I can pull out every Christmas. Plus the trouser hanger gives me other ways to display other layouts maybe project life layouts too.

Friday 1 January 2016

Happy New Year!

Happy New year everyone!
 hope everyone is ok this morning and not too partied out from last night!

Its Carol with you today sharing this "Thank You" project….


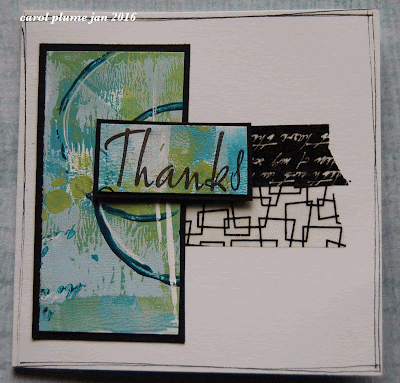
On the run up to Christmas I made a couple of master boards using acrylic paint, a brayer, stencils and some white cardstock - these master boards were then cut up to make Christmas cards and matching tags….I had some left over and decided to make Thank You cards with them.


As you can see you only need little pieces of the masterboard which if you mount onto black card stock really pops against the white background of the card blank.  Washi tape, bling and a stamped sentiment makes these very quick and elegant cards.

TFL xx