Monday 30 October 2017

Kaisercraft - Bombay Sunset & Sizzix Dies

Hello, It's Lynn here, on this beautiful, bright, Autumn morning from our holiday in Kendal.
 

A variation on a theme from me this time! I'm back with another Sizzix folder based on the same idea as before, but showing how you can change the theme to anything you want it to be. I have made this one to store my floral dies, and my other one was based on a masculine theme.


For today's project I used Kaisercraft's Bombay Sunset papers - with such pretty, bright colours. 

Here are the dimensions for cutting the Chipboard.Front and back pieces (2 the same) - 14.5 cm x 17 cm
Spine - 4.5 cm x 17 cm
Small box front - 6cm x 14 cm
Small box back - 7 cm x 14 cm
Small box sides (2 the same - remember to flip one over so they are a mirror image of one another) - 4 cm wide, height of 6 cm at the front and 7 cm at the pack of piece (see photo)

Small box base - 4 cm x 14 cm


For further details to make the folder, please see the original post. This time I used white Duck Tape instead of black.


For the front cover I used a sheet of 'Sunset' and various dies. For the lettering I used scraps of paper from the collection with Sizzix Tim Holtz Alterations Decorative Strip - Alphabetical and Typeset. The flowers are cut from white cardstock and inked with Distress Inks. The dies are Sizzix Tim Holtz Alterations Thinlits Die Set - Wild Flowers.


For the inside of the folder I used 'Daybreak' and for the box I used 'Sari'.


the box was lines with the reverse side of 'Sunset'


As before the box inside which holds up to 7 Sizzix Thinlits Die Sets, is held in place with magnets, hidden under the decorative papers. The folder is held shut with magnets too.


I has fun making this folder with these beautiful papers.
Now to work out different measurements for my other dies!
Thanks for looking
Lynn x

Friday 27 October 2017

Echo Park ~ A Perfect Autumn #2

Hi all, it’s Anna here today. I’m popping in to show you my second layout using Echo Park’s Perfect Autumn collection. You can take a look at the collection here, it's a beautiful Autumnal collection. I've really enjoyed working with it this month. 


My layout uses recent photos of my son wearing shorts and t-shirt during our recent unusually warm weather for the time of year! I have titled my layout ‘Autumn Sunshine’ for this reason.

I started by making a diamond template and then cut out diamonds in various patterned papers and card stock. I had a play around with placing them on my layout, and decided to cut some in half to mix and match the patterned papers before I was happy with how they looked.
Next, I decided on which photos to use (I used one 6x4 and two 3x2). I adhered these to the centre of the page. I added some element stickers, wood and word strips to complete my layout. All of the supplies used can be found in the shop

Next month, I'll be using Echo Parks A Perfect Christmas collection and beginning some Christmas projects! I'll see you then!

Thanks for looking!
Have a great weekend.
Anna
X


Monday 23 October 2017

Milk & Cookies with Doodlebug

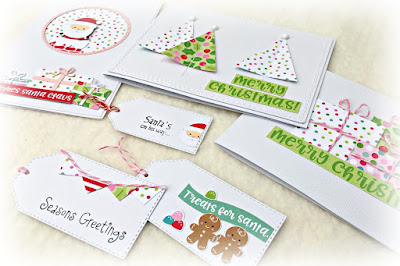
Hi Tracee with you today, I am here to share.....dare I say it Christmas cards and tags. You can never prepare to early for the festive season so I have made a head start on my cards for this year. I got to use the delightful Milk & Cookies collection by Doodlebug.


The new Milk & Cookies collection by Doodlebug is a modern sweet design with all your traditional elements, Santa's, Trees and all the rest. I created some cards and then with my scraps made a few tags too, my Christmas gifts are going to look so pretty.


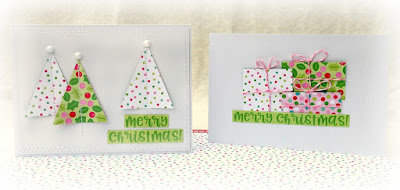
I kept my cards clean and simple to showcase the beautiful papers. I cut some basic shapes and turned them into gifts and trees, my sentiments were cut from the Merry Berries border sheet. and I added twine and some pearls too.


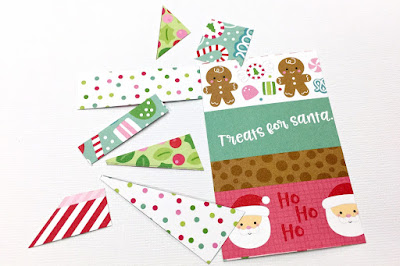
When I had finished the cards I had these few scraps left over, normally I would just toss them instead I cut some tags and decorated them. I think they turned out very cute!


I didn't waste anything, I even used the half Santa head I just fussy cut it and attached it to the edge of my tag. I even cut the teeny weeny marshmallows as "Treats for Santa". I hope I didn't scare you too much with the "Christmas" word, there are a whole bunch of new collections over in the shop, take a look and you will be spoilt for choice. If you're not quite ready for Christmas crafting there are lots of nice Halloween collections too


Friday 20 October 2017

October's crop

We're getting a little distressed with this month's crop kit!  I've combined a base sheet of Kaisercraft paper with other manufacturers and some inking and tearing!


As always there will be home-made cakes, refreshments and a discount in the shop.  We start at 10am and finish at 5pm, drop me an email if you'd like to join us!

Thursday 19 October 2017

Simple Pocket Page Inserts | Turn the Page by Paige Evans


Hi all,

Chloé here again today, with a simple little pocket page insert to share with you. This month I've been working with the Turn the Page collection by Pink Paislee (designed by Paige Evans) and I absolutely love it! It has a very summery feel, but I couldn't resist using it with these outdoor photos from September.


I take a lot of photos, and often I simply can't choose which ones to print for my scrapbooks. I've been trying to keep things much more simple this year, however occasionally I do end up with extra photos that I can't bear to leave out. When this happens, it can make it difficult to fit everything into my normal arrangement of pockets! Sometimes you just have to add an insert, and that's what I did today. 


I absolutely love this floral paper from the collection, and I knew I wanted to make a 4x6 card to go behind my 4x4 photo. I layered up a pink doily, some washi from my stash and some chipboard stickers from an old Dear Lizzy Collection. The busy floral of the patterned paper made my job super easy; it needed minimal embellishment!


I've said it before and I'll say it again; a good cut-apart sheet is a lifesaver for pocket scrapbookers! This one from Turn the Page is just gorgeous, full of versatile phrases and motifs. Nothing is more annoying than cards that are totally irrelevant to you! Our elderly springer spaniel Bramble has recently been diagnosed with cancer, so the quote on this card seemed perfect. I did some doodling on the card to finish it off, and embellished the photo with some enamel dots and a date stamp.


I hope you've enjoyed this look at a pocket page insert! Feel free to follow me on social media for more crafty goodness. 


Monday 16 October 2017

When you Love What You Have ...... Kaisercraft Golden Grove

Hello There

It's Anita with you today and I have been using the rest of my beautiful Kaisercraft Golden Grove papers for this layout. This is such a lovely colour-way to play with and is perfect for both scrapping and making cards too.


I cut a large circle out after drawing round a plate and also punched out lots of small circles, which I then stuck all the way round the large circle to create a scalloped edge.


                              I felt that the scalloped circle was a little plain and so I popped on flat
                                        backed pearls and crystals alternately onto each scallop.


I used a dark green piece of cardstock and tore a jagged mat for the photo to sit on and then brushed some Icicle Stickles around the torn edges to give a soft sparkle


The papers have some rather stunning flowers on and these were fussy cut and layered on foam pads in various places around the page to help add a little dimension.
There were a couple of teeny butterflies in amongst the flowers so i cut them out and added to the quote panel and raised the wings. Then popped a green organza ribbon bow on to finish.


I finished the page by adding little twinkly highlights here and there with some more Icicle Stickles......Jeez I love that stuff!! It is probably one of most used items in my stash! Can't beat a little bit of sparkle eh!....

This gorgeous collection from Kaisercraft can be found in the shop here  along with a vast selection of other gorgeous and fabulous goodies......grab a cuppa, sit down and have a good look....you will be glad you did!

Happy Scrapping!
Warmest wishes Anita xx

Friday 13 October 2017

Kaisercraft - Factory 42 - Part 3 - Cards for the Boys

Lynn back today, using the Kaisercraft, Factory 42 paper pad to make some cards for the boys. There are plenty of papers in the pad and I mixed and matched them with other elements from my stash. I'm often short of men's cards, so this was a great opportunity to make a few in advance.


No1. - Happy Father's Day
Kraft Bazzill Cardstock
Texture paste & Tim Holtz Harliquin Layering Stencil
Brads
Kaisercraft, Factory 42 Paper Pad
Cork & Sizzix Tim Holtz alphabet Bigz Dies
Gold Miricard
Cogs (made for the layout last month) using embossing powders and the Sizzix Tim Holtz Alterations Thinlits Dies - Gearhead


No. 2 - Time is Measured ...
Some of the same items as before plus
Sizzix Tim Holtz Bigz Die - Weathered Clock


No. 3 - Thank YouSome of the same items as before plusJute Twine


No. 4 - You Are The Best
Some of the same items as before plus
Kaisercraft Factory 42 Sticker Sheet
White Bazzill Cardstock


No. 5 - World's Greatest DadSome of the same items as before plus
Sizzix Tim Holtz Alterations Thinlits Die - globe
Distress Inks


No. 6 - Wishing You A Happy Birthday
Some of the same items as before plus
Kaisercraft Keepsake Photo Frames Acetate Sheet


After making all these cards, the layout and the Sizzix binder I still have plenty of 6.5" x 6.5" paper pad left to use for more projects.
Thanks for looking 
Lynn x

Wednesday 11 October 2017

Echo Park ~ Perfect Autumn #1

 Hi, it's Anna here today. This month I have been working with Echo Park's Perfect Autumn collection and today I'll be showing you my first layout that I've created with it. 


I began by having a play with some PaperArtsy Infusions on some white bazzill cardstock - I used Orange County, but there's lots of colours to choose from. As you have probably noticed, I'm more of a clean scrapbooker! But I really liked using the infusions - just sprinkle and spritz with water to create your desired effect.


I cut a large circle of the Happy Harvest patterned paper as well as a thin boarder of the reverse side. I adhered this to the middle of my layout, over the infusions.


I finished by adding some details to the outside of my circle. I used stickers from the element stickers sheet, fussy cuttings from the journaling cards as well as a tag and flowers.


Thanks for looking, have a good week! 
Anna
X

Monday 9 October 2017

Crazy Campers with Simple Stories Cabin Fever

Hi Tracee with you again today to share a layout that I created using the adorable Cabin Fever collection by Simple Stories


I used a free cut file from Paper Issues for the mountains in the background, I painted these with some Nuvo Enamel Drops they are really versatile and make the best "enamel dots" I know, Vanessa has lots of different colours in stock here.


I used a mixture of different fonts to make my title, I cut the letters for the word campers from the adventure awaits sheet, they are different sizes but i like the way it looks.


I'm sure there are many more words that you could make from this sheet.


I used the 12 x 12 combo cardstock sticker sheet to make up some sub titles at the bottom of the page. I added enamel dots to my clusters as well. I find myself stitching on most of my pages these days and on this one I stitched around most of the edges including the photos.

I hope you are having a Happy Scrappy day, see you later in the month.
For this page and all your crafting needs please head over to the shop.


Wednesday 4 October 2017

Top of the World with Maggie Holmes Carousel collection

Hello Tracee here with you today to share a layout I created using Maggie Holmes Carousel collection


Whilst the collection leans towards a more feminine palette I decided to pull out the blue tones and create a masculine page. I added in various black washi tapes as a contrast.


I cut lots of strips and arranged them down my page, my page is 8 x 8 so I didn't need long strips but even then I wanted to make the most of my sheets so this is how they looked before I layered my main cluster on top.


I often use methods like these just to squeeze every last bit from my papers! I also added the stitching and paint splatters at this point.


I added some of the blue stickers from the pack and some word stickers. The wood pieces added another contrast and also helped to reduce my huge stash by a small margin!

I will be back later in the month with a more feminine page using this collection. I hope you have a Happy Scrappy day and for this page and all your scrapbooking needs please head on over to the SHOP