Showing posts with label Sizzix. Show all posts

Wednesday, 2 July 2025

June Papermaze Kit - Part 2

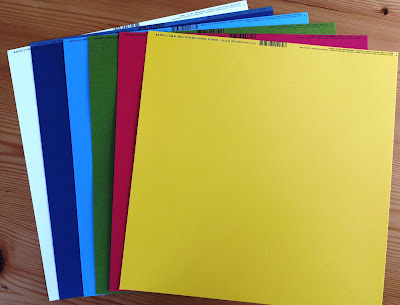
Lynn here today, sharing my next two creations using the delightful Papermaze kit for the month of June!  The kit is comprised of six double-sided patterned papers, two sheets Bazzill Basics cardstock and a whole bunch of co-ordinating embellishments. There is also a pack of four extra Bazzill Basics matching available to purchase to compliment the kit. Two  new layouts featuring baby Florence. this time I added some non-traditional elements to the layouts, in the form of cake toppers and playing cards.


Patterned Papers:
49 and Market - Vicki Boutin - The Flower Emporium - Starters Paper 3 & Starters Paper 9
Echo Park - Firefly - Bright Floral & Shining Daisies
Simple Stories - Sunny Days - Happy Days & Soak It Up!


The photo below shows both sides of the papers:


Embellishments:
Pretty Little Studio - Love is Kind - Friends Forever Die Cut Titles
Pinkfresh - Chrysanthemum - Chipboard Flair
Rosie's Studio - Keeping Cool - Puffy Stickers & Frames
Cocoa Vanilla - Storyteller - Wood Button
Doodlebug Designs - puffy hearts - Bumblebee
Washi Tape


Bazzill Basics Cardstock - Coconut Swirl, Patch (included in Kit), Petunia, Powder Blue, Tangelo & Yukon Gold (in Extra pack).

Happy Beeday - A few days after Florence's first birthday, she came to stay and we celebrated with a cake. 

The background for this layout is the Powder Blue Bazzill from the kit. Distress Oxide Inks (Faded Jeans, Wild Honey & Mustard Seed), were stencilled using a Vicki Boutin honeycomb stencil from her 'Art for Everyone' set. I sprinkled a little water over this to oxidise the inks. 


I cut a selection of 1.24" hexagons using a Memory Box die set. I used both sides of Bright Floral & Shining Daisies for the hexagons, I inked the edges and arranged them over the layout. 


I cut a piece of Soak It Up! 3.25" x 9", with the orange side up, and mounted my three small photos onto this. My photos were placed to the right side of the page, just over half way down.


For the title I used the cake topper I had for the cake, I also used bees from some cupcake toppers.

From the kit, I used the Rosie's Studio - Keeping Cool - Puffy Stickers and the Cocoa Vanilla - Storyteller - Wood Button


My journalling was added directly to the Bazzill with a fine black marker pen. The date was added using Doodlebug Designs Sunshine Alphabet Stickers - Bumblebee.


Daddy's Girl - Happy Families - Florence went to visit Daddy at work at the Butcher's in Blackheath. 


For this layout I used both sheets of 49 and Market - Vicki Boutin - The Flower Emporium - Starters Paper 3 & Starters Paper 9. I started by using the #3 paper as the base, and I cut apart #9 paper into the seperate sections to be used as photo mats and a journalling spot.


I trimmed my photos to fit within two pieces selected and cut from #9 paper, I rounded the corners using a punch, and inked the edges with Distress Ink. I also chose the postcard piece and treated this as before. I used some bronze alphabet stickers for a sub-title and added journalling to the postcard.


I cut my title using a Sizzix Bigz XL Alphabet die and some fine corrugated cardboard. I inked the edges and fronts of the letters. 


I found a children's 'Happy Families' card game, and selected the butcher family, I arranged these down the right side of the layout, together with some smaller traditional playing cards for the back view. 


Once all arranged, I stuck the pieces in place and added a date to the little banner flag on one of the photo mats, using a Sizzix Alphanumeric Tiny Type upper and lower die set. 


That's all for the June kit, I'll be back with the July kit soon. 
Thanks for looking.
Lynn x

Monday, 16 June 2025

June Papermaze Kit - Part 1

Lynn here today, sharing my first two creations using the delightful Papermaze kit for sunny June! Both of these layouts depict my granddaughter at her baby sensory group.


Here is what you will find in the kit:


Patterned Papers:
49 and Market - Vicki Boutin - The Flower Emporium - Starters Paper 3 & Starters Paper 9 
Echo Park - Firefly - Bright Floral & Shining Daisies
Simple Stories - Sunny Days - Happy Days & Soak It Up!

The photo below shows both sides of the papers:


Embellishments:
Pretty Little Studio - Love is Kind - Friends Forever Die Cut Titles
Pinkfresh - Chrysanthemum - Chipboard Flair
Rosie's Studio - Keeping Cool - Puffy Stickers & Frames
Cocoa Vanilla - Storyteller - Wood Button
Doodlebug Designs - puffy hearts - Bumblebee
Washi Tape


Bazzill Basics Cardstock - Coconut Swirl, Patch (included in Kit), Petunia, Powder Blue, Tangelo & Yukon Gold (in Extra pack).

Teddy Bear's Picnic - This sensory session involved teddy bear's picnic songs and activities. Lots of teddies and teacups! This layout was fun to create and I love the colour scheme. 


I started by gutting the Happy Days paper to create a border 12" x 12" and 1" deep. I gutted  a 10.5" x 10.5" piece of the Yukon Gold Bazzill to make a 1" frame and placed this over the paper. The Coconut Swirl Bazzill was trimmed to 10.25" x 10.25", I splattered Distress Ink over the cardstock using Wild Honey, Worn Lipstick and Faded Jeans. The Coconut Swirl was then mounted over the Yukon Gold and the paper. 


I selected two 4" x 6" photos, and cut a piece of Bright Floral paper to the same size and placed the three items across the layout.  


I used both the Rosie's Studio - Keeping Cool - Frames from the kit. I backed them both with some scrap white cardstock. I wrote my journalling into the single film frame, and placed this to the bottom right of the layout. The three-photo film strip was placed vertically to the right side.


I used all the Bazzill Basics Cardstock colours from the kit and some scraps in different shades from my stash to die cut the cups and animals. The animals were from a Katie Skilton Sizzix Thinlits set called 'Animal Portraits'. The Tea cups and saucers were cut from the Tim Holtz Sizzix Thinlits Papercut Cafe set. 


After cutting all the pieces and layering them up, I placed the cat above the first photo, the rabbit under the same photo, and the bear to the far right of the page. I added a cup to each section on the film frame, and I stacked two more beside the cat. I attached them all with 3D foam pads. 


With a selection of Doodlebug Designs Alphabet Soup Puffy stickers (Bumblebee, Swimming Pool and Cupcake), I spelt out the date. 


Using more of the Yukon Gold Bazzill, I cut the title using a Die-Namics alphabet die set. 


Finally, I used the Doodlebug Designs - puffy hearts - Bumblebee from the kit in both top corners of the layout.


St. Patrick's Day - Another baby sensory session, this time it was to celebrate St. Patrick's Day. I made Florence and her little friends knitted hats with large shamrocks. 

I started making this layout by gutting the Patch Bazzill to give me a 1" frame. I cut a sheet of Smooth White Bazzill to 10.5" x 10.5" and placed this over the green frame. I selected the area of the Soak It Up! paper I wanted to feature (the yellow sun section and some of the colourful rays), and trimmed this to 10.5" x 6" and used this to cover the top half of the white card. 


I cut a 12" x 1" strip of the Happy Days paper and trimmed it with a Martha Stewart border punch, and placed this directly under the patterned paper onto the white card. The washi tape from the kit was used over the join of thetwo papers. 


Three small photos arranged in a row to the left of the layout and overlapping the papers. I cut the title using the Cricut in Yukon Gold and Patch Bazzill and offset one over the other, to the bottom right of the layout. 


I made a shamrock with more of the Patch Bazzill and a heart punch. I cut 6 hearts, folded them all in half and arranged them to create the leaf. I popped a few 3D foam pads under the folds, to prevent them from laying too flat. I cut a stalk freehand from the Bazzill, then arranged the leaf and stalk to the right of the page. I threaded some green cord through a heart shaped button to add to the centre of the shamrock.


Selecting one of the Pretty Little Studio - Love is Kind - Friends Forever Die Cut Titles from the kit, I placed this with 3D foam pads to the top left of the layout, then added my journalling underneath. 


I happened to have some pretty little flower buttons on my desk from another project. The colours went well with the papers, so I strung them onto more of the cord. I arranged them, bunting style across the layout. I took three more buttons and some cord to place some flowers in the bottom right corner near the title. 

A few of the 
Rosie's Studio - Keeping Cool - Puffy Stickers were added to the photos.

That's all for today, I'll be back with more from this kit soon.
Thanks for looking
Lynn x

Monday, 2 June 2025

May Papermaze Kit - Part 2

Lynn here, returning with the second post, sharing my layouts using the Papermaze Kit for May. Some lovely cheery bright colours in the papers, card and embellishments. Here are my last two layouts for this month.


In the kit you will find the following items:


Patterned Papers:
Echo Park - Born to Travel - See the Sights Plaid & Postcard
Echo Park - Little Things Mean a Lot - Bright Butterflies
Graphic 45 - Spring is in the Air - Choose Happy
Photo Play - Lucky Cat - Cherry Blossoms
Simple Stories - For the Record - Just the Details


The photo above shows both sides of each paper.

Embellishments:
2 Woodware junk Label Stamps, purple & pink Studio Light pearls, 10 Dress It Up red hearts, 2 doilies, P13 frames, Rosie's Studio Bayfair dragonfly, 12 Rosie's Studio Bayfair Sentiments Ephemera & 12" Doodlebug washi tape Airmail.


Bazzill Basics Cardstock - Bazzill White, Admiral (included in kit), Wildberry Pie, Mexican Poppy, Grenadine & Hillary (Extra Pack).


Geisha Girl - The photo in this layout is one of a series my father took while experimenting with a camera and colour photo processing back in the 1950's


The base for this layout is a sheet of Tutu Pink Bazzill cardstock. I cut a piece of Cherry Blossoms paper tearing the edges to end up with a piece 8" x 11", which I placed towards the bottom of the cardstock.


I cut the two doilies in half and used three piece to tuck into the top of the paper. More of a lacy effect was created with a 12" length of 1.25" white cotton lace.


I printed my photo, mounted it onto some white card and placed it to the right side of the layout. Using the Cricut I cut some cherry blossom flowers in several sizes, and the Bazzill White, Grenadine & Black Bazzill. I also cut an 8" ring and some large swirls, also in black.


My journalling was printed onto some white card, and tucked it into the top of the patterned paper.


My title was cut using some gold cardstock and the Cricut, and arranged long the outside of the black ring.


I placed the
Rosie's Studio Bayfair dragonfly at the top right of the layout. Finally, I added a touch of sparkle to the centre of each blossom, with some Gold Coast, Nuvo Glitter Drops.


I'm Gonna Learn How To Fly - These photos were taken when we celebrated my father's 70th birthday with a Tiger Moth flight. After the flight, the grandchildren were allowed to sit in the cockpit for a photo.


This layout started with the sheet of Postcard paper, I gutted the centre, making a frame of 0.75" including the airmail style border. I flipped the gutted centre over to show the blue world map side. I distressed and inked all the edges, and glued them to a spare sheet of 12" x 12" paper.


Using Admiral Bazzill I cut a title and arrows using the Tim Holtz, Thinlits, Sizzix die set - Vault World Travel. I also cut a globe with the Destination die set.


With the Vault Noteworthy die set, I cut a clipboard with silver Miri card and Kraft Bazzill. The note paper was cut from a scrap of lined paper. I added my journalling to the note paper.


My photos were mounted onto some of the Wildberry Pie Bazzill cardstock, They were arranged onto the centre of the layout and tied together with some red, white and blue twine.


Using the two Woodware junk Label Stamps from the kit, I stamped them onto some scrap card with black Archival Ink. I cut these out and inked the edges with Blueprint Sketch Distress Ink.


All the pieces were arranged around the photos, with the addition of a few of the Rosie's Studio Bayfair Sentiments Ephemera from the kit.


I used the manufacture's strip and cut both 'Born To Travel' labels from it, then arranged these under the clipboard.


Finally, I scattered the Dress It Up red hearts from the kit, over the page.

That's all for today, I will be back with the June kit soon.
Thanks for looking.
Lynn x