
Lynn here with my first two layouts and details of the January kit. Both these layouts have photos taken at my nephew's wedding last September. As always the kit has a lovely combination of papers, card and embellishments. A beautiful range of purples, blues and aqua with a touch of sparkle.

First of all here, is a photo of the kit and details of what it contains. The kit is currently available in the shop and remains excellent value for money at just £10.00
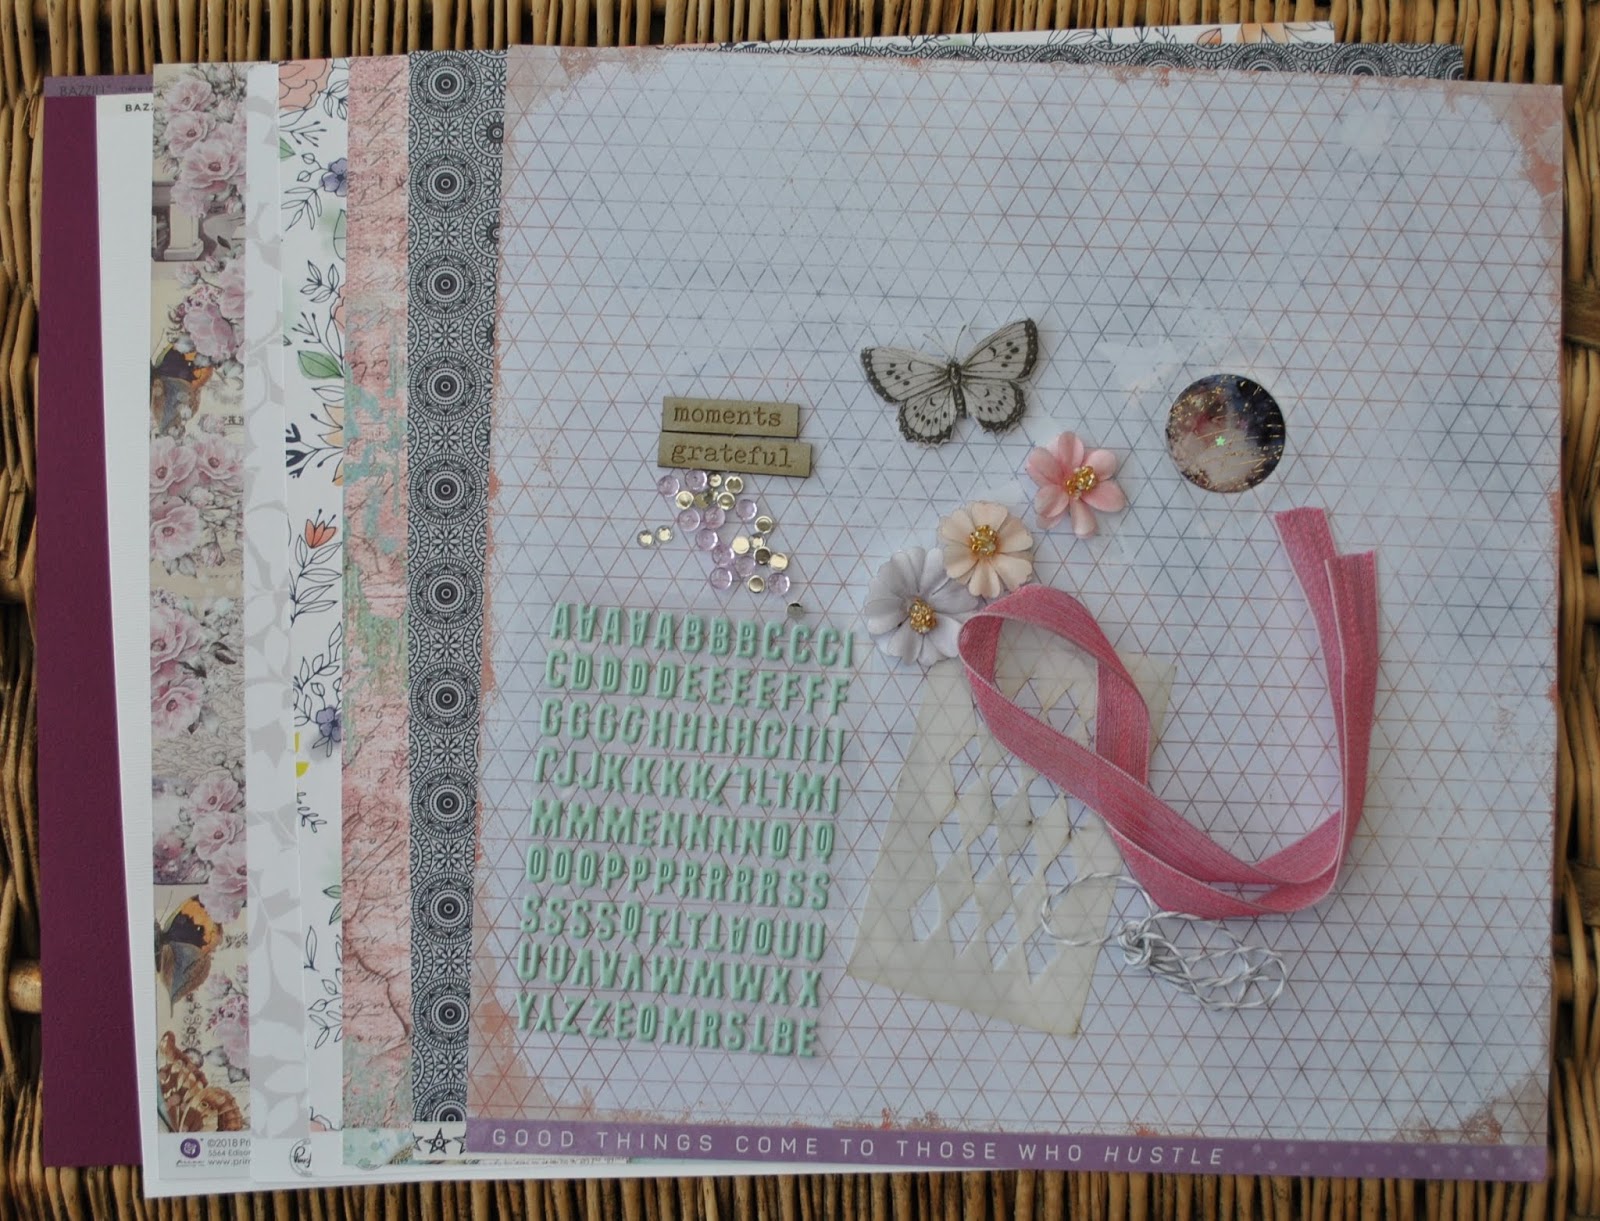
Patterned Papers:
Pinkfresh Studio - Indigo Hills 2 Collection - Glen & Gorge
Prima - Moon Child Collection - Love Constellations (foiled)
Kaisercraft - Misty Mountains Collection - Eclipse
Kaisercraft - Stargazer Collection - Orbit
Stamperia - Wonderland - Dragonfly
Bazzill Basics: Avalanche & Mardi Gras

Extra Bazzill Pack: Quartz, Admiral, Whirlpool & Smoky


Embellishments: Exclusive Papermaze stencil, Pinkfresh Alpha, Prima butterfly, 3 Prima flowers, 50cm ribbon, 2 Dusty Attic words, 50cm Baker's twine, Prima Enamel Sticker,10 Dew Drops, 15 gems.
Beautiful Bride is the title of my first layout, although the colours of the papers are perfect for the wedding, I chose a black and white photographs of my nephew's bride.

The backdrop for this layout is the foiled side of Prima's Moon Child - Constellations. It's difficult to show off the quality of the foiled dots in the photo. I added more sparkle using the exclusive stencil from the kit, together with texture paste and some ultrafine glitter. I sprinkled the glitter onto the paste while it was still wet. Once dry, I worked out where I wanted my photo to sit and gutted a piece of paper approx. 4.5" x 4.5" from the centre. I did a little fussy cutting from this piece and set them aside for later.
I picked three different small doilies from my stash and arranged them where I wanted them to sit under my photo, and covering the gutted hole. Using the Mardi Gras Bazzill, I made a photo mount, and cut some ferns using dies from Funky Florals #1 set (Tim Holtz Sizzix Thinlits). I also cut my title from the same cardstock - I used a Sizzix Sizzlits Alphabet (Boxed Brush) and a Tim Holtz die from the Handwritten Love Thinlits set.
After sticking the photo into place I arrranged flowers around it, I using flowers from the kit plus a few extra smaller flowers from my stash and the flowers I cut from the reverse of the paper earlier. I added the enamel Sticker from the kit, this pretty moon has a real sparkle from the stars and shine from the glossy surface. I also added the ferns cut from Bazzill.
The title was glued in place, and silver Stickles was added to the centre of the cut out flowers. Finally I added the flat-backed gems to one of the doilies in a circle.

I picked from the blue and white papers for this layout. I started by gutting the Admiral Bazzill, so I had a frame of about 1" all round. I trimmed the Orbit paper to 11.5" x 11.5" then gutted it so I had a frame of 1.5". The Orbit paper frame was mounted centrally over the Admiral cardstock frame. I then cut the Smoky Bazzill to 9.5" x 9.5" and mounted this over the other two.
The next few bits of cutting will depend on the size of your photo, but as a guide mine are as follows. Use the Admiral Bazzill to make a photo mount 6" x 4.2", a journalling block mount 3" x 4.2" and then a mount for the bottom panel 9.2" x 4.2". I cut some lined paper for the journalling and trimmed down one side with an ek success punch (spiral bound notebook edge), I cut a band of the stripe side of Eclipse paper, with the stripes running vertically. I hand stitched seven stems with leaves onto this paper using embroidery thread.
Mount the photo, journalling panel and patterned paper onto the Bazzill mounts and arrange onto the layout, leaving a gap of about 1" in the centre for the flowers. I then glued a paper daisy at the top of each stem across the middle of the page.
My title was designed and cut using my Cricut Design Space and the remainder of the Admiral Bazzill. I stuck this onto the layout and covered it in Glossy Accents.
After writing the journalling and arranging the butterfly from the kit, I added a trail of sparkle along the journalling block and wings with Crystal Stickles.
That's it for today, but I have more layouts made with this kit to share soon.
Thanks for looking.
Lynn x
1 comment:
what a great kit once again! Love the pages you have created so far Lynn xx
Post a Comment