Showing posts with label Pink Fresh. Show all posts

Friday, 17 November 2023

Catching Up When You Feel Behind


Hello!! Lisa here with a huge catch up session.

I hate that feeling of not keeping up and it's something that I always tell people not to worry about. 

Life gets in the way and we are busy making memories rather than recording them.
However, I've been so good with my weekly journal this year that I wanted to keep up to date.

I don't stress about the weekly and sometimes I just do 3 weeks on a page spread, but I still wanted to document a few things.


  I ended up creating 3 spreads in the one sitting so I was up to date and that felt so good.


I used the new Christmas collection from Pink Fresh Studio - Holiday Dreams - here.

Now I know these aren't Christmas pages, but I'm not huge into Christmas scrapbooking. I keep a small journal and just do minimal. That way I can keep up and I just don't like documenting December after December, so this way works best for me.

I do however LOVE papers like these. Chrismassy, but not full on in your face Santas and Rudolphs if you know what I mean.

So a collection like this is perfect for me.


Lots of bits to cut out.

These papers were so pretty that I wanted them to be the focal point of this particular spread, so I created flips to hide photos.


And I fussy cut some leaves from one of the patterned papers.


This one here I cut from this piece here.

The green became a great frame for my photo and the JOY was perfect as it was. It doesn't have to be a Christmas page to work.

I had so much fun with this collection and will use the remainder in my weekly journal over Christmas which I will share with you later in December.

If you'd like to watch this catch up journal session, there's a video here.

Have fun documenting your every day stories.
Lisa xx


Friday, 29 September 2023

Summer Stories

 Hello, I'm catching up on documenting our Summer stories today.

How are you doing with you own Summer adventures?


I'm working in my DIY New Home Journal.

It's been quite a Summer for us.

We've sold our home of 25yrs and bought a new build.

I've been documenting the journey here in this journal.


It's so nice have one space to tell a whole story.

I'm so enjoying this journal and I will love looking back on this in years to come.


 I'm using the PinkFresh Studio collection - Sunshine on my Mind here.


I had alot of photos to add today. I used a strip of one of the papers to create this pull out piece with photos both sides.


And then it opens out like this.


I clipped a couple of photos to the top and used a couple of the die cut words from the collection to create a little title.

Using a couple of the papers I decided to do the majority of my journaling on this one page.
The alphabet stickers from Rosie's Studio really make this page.
They needed some help to pop, so I used some of the yellow paper to help them stand out.

Although they stick well, I still use a little hot glue to make sure. 
I hate years later looking back and seeing that I've lost a couple.


And on the other side I've added photo photos.
I love this little house die cut, it's so cute!


I loved creating this page.
It's an important part of our new home story.


Thanks so much.
Lisa xx


Wednesday, 30 August 2023

Making Journaling Easy

 Hello,


Today I'm documenting a fun Summer story.

It's some memories in Magic Kingdom that I wanted to remember. 

Journaling can be tricky sometimes and can feel overwhelming, so I'm sharing so tips today to make it a little easier.

I do also have a video for you here.


 I'm playing with some of the pieces from the new Pink Fresh Studio collection - Sunshine on my Mind.

You can view everything here, it's so perfect for Summer stories.


- One of my journaling biggest tips is to break up the journaling.

Create lots of areas for smaller pieces of journaling.

Here I used some chipboard alphas from Rosie's Studio to help with my journaling.

Replace some of the words with alphas. This can also become your page title.


I've had so much fun with the Ephemera Pack here that coordinates.

And for this little piece of journaling I've just roughly hand drawn my journal lines and scribbled down what I wanted to say. Doesn't get much easier than that.

The tickets flip over and there's journaling underneath.


The next page I have more bits and pieces of journaling.


I used the alphas to kick start my journaling again.

and I had fun with this paper here.

I cut out some of the pieces and created flips.


And then I added a little quote underneath and journaled on the reverse. 

Easy peasy!


I even journaled on the back of this photo.

I've had so much fun creating today and love this collection.

I love these pretty colours.

Hope you do too.


Don't forget the video.


Lisa x


Monday, 27 February 2023

A Fun Journal Idea

 Hi,

I had an idea the other day and was excited to share it with you.

I was posting a photo on Instagram Stories the other day.

We'd done so much in one day. I listed everything on my Instagram post.

Then I thought it would work so well for my journal.

So I went back and screen shot the photo.


It really is a great way to add journaling to a page.

I used this stunning PinkFresh Studio collection - Flower Market.

You can see the video of this page coming together here.


I created a bit of a soppy page, so there's lots of hidden journaling.

I cut up lots of pieces and attached with washi tape to create little flips and journal underneath.

(You can do this with all their collections)


I also used some little tags to make flips in exactly the same way.

And embellished with Ephemera and the vellum die cuts too. 

If you flip the gold ephemera over it's matt silver on the back and looks so subtle and pretty.


And I used the little pink puffy alphabet stickers from Rosie's Studio here.

I love how all the pieces layer up so well.


If you struggle with journaling try adding it to your photo like this, it really makes it easier. Plus it saves space on your pages too.


 This turned in to a long pully out pages with lots of flips in the end. I love how this turned out.


I hope you like this idea too.

Happy scrapping

love

Lisa x

Monday, 30 January 2023

Creating A Pocket Page With Jumbo Tags

 Hello,

Lisa here working in my Disney journal.

And I'm using the Pink Fresh Studio collection here - Delightful.


This is the paper that inspired this page here.

I started by making a huge pocket almost the size of my page.

I cut the paper to the size I wanted.


To make it look more obvious as a pocket, I took a small hole punch and punched 2 half circles.


 I fancied doing some fussy cutting, so took this paper here.


And I placed the leaves behind my photo. I went around roughly with with a black pen to help them stand out.


Moving in to the jumbo tags.

I cut them out from that piece of patterned paper that originally inspired me.


I used a corner punch to give them a more finished look and added photos.

I loved these puffy alpha stickers from Rosie's Studio.


They look cute and are such great value too.

And on the reverse of the tags.


I'll be adding my journaling.

I'm so happy how this page turned out.

There's a video coming to my YouTube channel so you can see it being made if you wish.


Thanks so much.

I hope it's inspired you.

Have a lovely day.

Lisa x


Monday, 22 November 2021

Pinkfresh Studio ~ Holiday Magic

Hey!
 It’s Anna back with you today and I’m so excited to kick off the Christmas spirit on the blog with the latest collection I’m working with…
Over the next few weeks, I’ll be working with the bright and bold ‘Holiday Magic’ collection from Pinkfresh Studio

Just in time for the start of December, I have made an advent calendar for my first project… 


To create this calendar I used a diy fillable calendar box from hobbycraft. 
I then set about altering it using my Pinkfresh goodies. 
I began by measuring the squares and creating a template. I used the template to cut out a covering for every door using a variety of patterned papers from the collection.


I used various pieces from the ephemera pack to embellish each door, but you could also use the puffy stickers and die cuts to do this too. I adhered some of the ephemera using 3D foam pads to add some extra dimension. 


I embellished each door further by adding lots of Nuvo drops and enamel dots. I also added wooden numbers to each door. 


I filled each door with a little treat and I’m all ready for the countdown to Christmas with my very own diy advent calendar! 


I’ll be back soon with a layout using this collection! 

Thanks for looking, see you soon! 

Anna 
X

Friday, 23 October 2020

Pinkfresh Studios ~ Days of Splendor #2

Hi, it's Anna back with you today, sharing my second layout using the Days of Splendor collection from Pinkfresh Studios. Take a look at the whole collection here.

I used the large chevrons from the moments that matter patterned paper, I cut a few of them out and adhered them to some cream cardstock. I also cut out the camera from the same paper.


I cut some leaves from the grateful heart patterned paper as well as some Paige Evans leaf cutfiles. I also added a piece of floral ephemera from the collection that I worked with last month - Pebbles The Avenue.


I used the journaling bits from the collection to embellish my layout, alongside my photograph, I also added a photograph into one of the journaling bits and I added some hidden journaling in the purple envelope.

I used some of the chipboard flair and enamel dots to further embellish my layout too along with some drops of ink spray.


Thank you so much for looking!
Have a great weekend, see you soon.
Anna
X

Friday, 17 July 2020

July Papermaze Kit

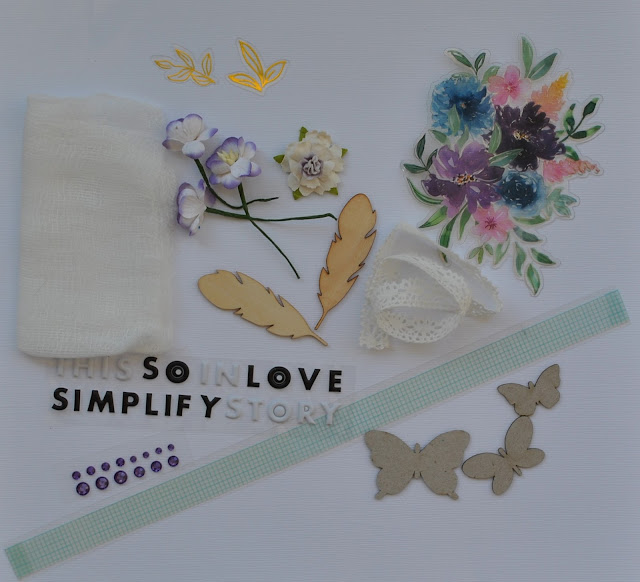
Hello, Lynn here with the pretty Papermaze Kit for the month of July. Lovely pastel shades of lemon, lilac, aqua, blue and pink, with much bolder purple. Together with the extra Bazzill pack, the kit is available in the shop from today.

Here are my first two layouts:


Before I explain how the layouts were made, here is a list of what is in the kit.


Patterned Papers:
Kaisercraft - Amethyst collection - Flutter & Gem

Pink Paislee - Bloom Street collection - #08
& #19
Fancy Pants Design - Cherry on Top collection - Flavour Burst
Heidi Swapp Art Walk collection - Escape

Bazzill Basics Cardstock: Pansy & Avalanche

Reverse side of papers:


Embellishments:


30cm Washi tape, cheesecloth, 30cm lace, 3 Tando butterflies, 2 wooden feathers, 2 strips Doodlebug jewels, 3 cherry blossom flowers, 1 Prima flower and Pinkfresh puffy word stickers, 2 pieces Pinkfresh acetate ephemera


As always there is a pack of four sheets of Bazzill available as an optional extra. 


Ocean Breeze, Chiffon, Tutu Pink & Purple Palisades

The Good Life - This photo of me was captured recently in the garden by my husband - he says it's me in my element! We certainly have plenty of garden here in our Suffolk home to keep me busy!

The layout was inspired by the cut file which I cut once as it is presented, then flipped horizontally for a second cut to give me a mirror image. The cut file is from Handipaper and the inspiration from a layout by Nathalie DeSousa.


Starting with the Bazzill Purple Pallisades, I cut it into three pieces 30cm x 10cm. Setting one piece aside for later I flicked ink over the other two pieces. For this I used Dylusions Ink Spray in Black Marble and White Linen (flicked rather than sprayed), and diluted Distress Oxide Ink in Wilted Violet and Shaded Lilac (giving a chalky effect). Once dry, these were glued vertically to either side of a scrap sheet of 30cm x 30cm paper.

I cut a piece of Kaisercraft - Amethyst collection - Gem to measure 30cm x 10cm and this was placed in the centre of the Bazzill.

Using the cut file I cut the two floral borders from Avalanche Bazzill and placed them along the edges of the patterned paper over the Purple Pallisades Bazzill, to give some dimension and movement I only used glue along the straight edge. 

From the remainder of the Purple Pallisades Bazzill I trimmed both 30cm sides with a Martha Stewart Border Punch, then trimmed them to give me two strips 2.5cm wide. These were glued into place overlapping the cut file pieces by adhering the straight edge only, leaving me room to tuck something underneath later


I took the cheesecloth from the kit and opened it out. Then I wiped Distress Oxide, using the two purple shades onto the craft mat and spritzed with water. I dragged the cheesecloth back and forth through the ink until I had some of both shads and a mix of the two showing. I also left a few parts white.  This was left to dry, then I cut strips and tucked them under the trimmed Bazzill as shown in the photo.

I cut six of the smaller butterflies from the
Kaisercraft - Amethyst collection - Flutter paper, inked the wings and placed then randomly onto the page with 3D foam. I added Nuvo Glitter Drops to the wings and Nuvo Crystal Drops to the bodies.

From the kit I used the
Doodlebug jewels to scatter over the page, together with some lilac Dew Drops from my stash.

My title was made with Pinkfresh Studio Joyful Day Puffy Alpha Stickers.


Daisy Girls -  These photos of my girls were taken in 1993 in the garden when Nanny was visiting and she made them each a daisy chain.


I made the border by gutting a sheet of Pansy Bazzill, leaving a frame of 2.5 cm. Then I trimmed the Pink Paislee - Bloom Street collection - #08 paper to measure 29cm x 29cm.
Before attaching the paper to the Bazzill frame. I used the Vicki Boutin Wildflower and Honey Stencil and some texture paste to apply some daisies to the background.


While the texture paste was drying I set about fussy cutting the largest butterflies from the
Kaisercraft - Amethyst collection - Flutter paper. I inked the edges with Wilted Violet Distress Ink, then I sculpted some shape into the wings with the blade of my scissors. I attached some pearl stamen to each butterfly for antenna. The butterflies were attached across the middle of the page with 3D foam.  I added some Diamond Stickles to the veins on the wings, and I found some gold pearls to stick to the daisy centres.

Finally the title was made from Purple Pallisades and Pansy Bazzill using Tonic Studios Uppercase Alpha Die Set - Windsor.

So that's all for today! I will be back with more from the July kit in two weeks time.
Thanks for looking
Lynn x