Showing posts with label Distress Stain Spray. Show all posts

Friday, 12 August 2022

Family Gallery...... Mintay Joy of Life Collection

Hi Everyone

Anita here today and I have completely fallen in love with this delightful collection from Mintay...... Joy of Life. Such beautiful soft colours, distressed frames and wood fence panels plus an array of beautiful elements to fussy cut and embellish your pages with


I absolutely the sheet of 06 which is crammed full of beautiful frames in different styles. I chose the 4 I wanted to use and cut them out. On the reverse side of the frames there are lots of very pretty designs that can also be fussy cut and added to the page.


These frames are perfect for chopping into your normal 6x4 photos that are maybe quite busy and you want to try and make use of certain parts of them and also great if the people aren't quite so close and filling the photo


Prior to adding anything to the page I sprayed and splattered with some Tim Holtz Distress Oxide Spray

This is great for adding a little gentle extra to your page without being bright, solid colours like the normal spray mists would do.

Various items were fussy cut from sheet 09 This is full of pretty elements including birds, floral displays, bicycles, houses etc and they were layered and/scattered about the page. Some were added to the frames, along with mesh bows and the frames had some white twine added to hang them from the top of the layout, to create a gallery effect.


I had a rummage through my old stash cupboard and found some boxes of old Making Memories Foam stamps ( I used to love using these and haven't touched them for such a long time) it made such a nice change to break out old stash and use and I think I shall be using these more often now again!

I used a fancy patterned one and stamped using ivory acrylic paint on the top left and right corners and then used an alphabet set of their stamps to create the title FAMILY.

When this was dry I used a black gel pen to add a fine line around the outer edge of each letter to just make them stand out a bit.


The page was finished with my favourite embellishments....some bling and sparkle .....flat backed pearls and some irridescent sequins scattered about.


I hope you have enjoyed seeing my page, thank you for looking and I will be back later in the month with my 2nd layout using this pretty collection.

If you pop over to the shop you will be able to see all the gorgeous different Mintay papers in stock....they really are fabulous and such great quality.


Warmest Wishes

Anita xx


Monday, 28 March 2016

Simple Stories - Carpe Diem

Hello, Hope you all had a good Easter - Lynn with you today using the lovely Simple Stories - Carpe Diem collection. I have made a couple of layouts and a card this month. (The papers were also used for the crop kit this month.)

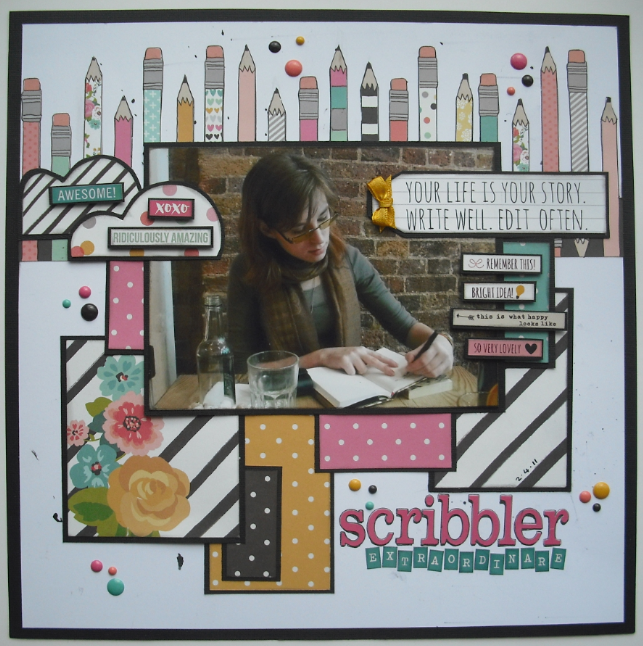
Scribbler Extraordinare


First up is this layout of my daughter Emily scribbling ideas down in her trusty note book.

Using the 'Pencil it in' paper I cut off the row of pencils and leaving a 1" band of black along the bottom I cut round each pencil. I kept the manufacturer's strip as this also had a pencil on it, I used this on another project.

Here is how I cut the paper ...

... and the pencils
The Black Bazzill, was gutted to leave a 1" frame (12" x 12"). Then a sheet of  White Bazzill was cut to 11.5" x 11.5" and spritzed it with Black Soot Distress Stain. The white cardstock was then mounted centrally onto the black. The strip of pencils was stuck across the page so they were near the top. 

I selected the following items from the collection:
Pink Dot Black Dot,
Teal Dot Yellow Dot
4 x 6 Horizontal Journalling Cards
Expressions Cardstock Stickers
From these I cut shapes images and quoted, they were inked with Black Soot Distress ink and mounted onto Black Bazzill to leave a very narrow border. Some of these elements were raised with 3D foam pads. I made a tag from the quote and added a yellow ribbon bow.

I outlined all the pencils and the pink letters with a black marker pen.

To finish I scattered some 'Carpe Diem Enamel Dots' over the page.

Honey I Shrunk The Kid

My second layout shows my cousin's daughter Rosie on holiday in Tenby.


Another sheet of White Bazzill, this time I edged the page with stitch stamps from PaperArtsy JOFY from set 26 and a Versafine Onyx Black ink pad. Then I inked the edges with Distress Ink in Worn Lipstick and Black Soot.

The decorative strips across the centre of the page were created from both sides of  'Pencil it in' paper. The pleated strip from the rainbow side has been stitched in place with the sewing machine. The black was left over from cutting out the pencils earlier and was cut using a Martha Stewart deep edge punch.

The Balloons were stamped onto the colour side 'Pencil it in' paper using Versafine Onyx Black ink pad and Stampers Anonymous Tim Holtz Crazy Things stamps. They were tied with Black Licorice Divine Twine.

Using scraps of Carpe Diem papers (Pink Dot Black Dot, Teal Dot Yellow Dot, Brand New Day and Fist Bump), I cut rectangles, circles, stars, and label shapes to layer up up under and around the photo and to create some interest at the top right and bottom left of the page.

With an index card image from the '4 x 6 Horizontal Journalling Cards' paper, I trimmed this down and used it for my title. The wording was created using more letters from the  'Expressions Cardstock Stickers' sheet.

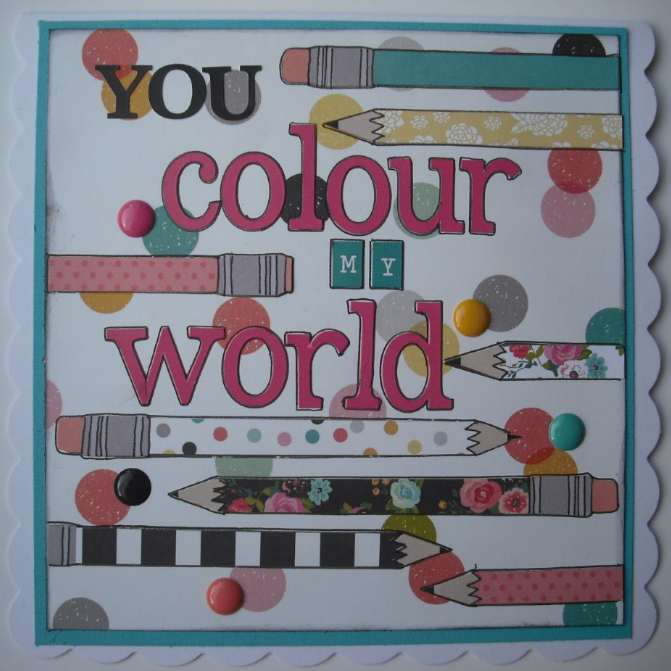
You Colour My World

I made a card by cutting individual pencils from the 'Pencil it in' paper and the '4 x 6 Horizontal Journalling Cards' paper.


The white card blank was covered with Brand New Day paper mounted onto Peacock Bazzill. I added lettering using the stickers and then the pencils. I drew round the pencils and letters as before, and finished off with some more enamel dots.

Thanks for looking.
Lynn x