Showing posts with label Enamel Accents. Show all posts

Monday, 17 March 2025

March Papermaze Kit - Part 1

Welcome to the March Papermaze Kit, and I'm kicking off with a double layout for a change. Both of these layouts can be independent of one another, they can also be arranged either way around. The March kit is full of pretty spring papers, embellishments and cardstock colours. The photos show my baby granddaughter and friends, at the sensory group they attend weekly, celebrating World Book Day, Flo's favourite book of the moment being a Peek-A-Boo Book with a strawberry character on the front, so she is dressed in strawberries!


Here is the kit, showing the 6 papers, 2 sheets of cardstock and a selection of matching embellishments to try. Don't forget there is also a pack of 4 sheets of cardstock, selected by Vanessa, to go with the kit as an extra purchase (see all six sheets of cardstock in a photo below).


Patterned papers:
Simple Stories - Tea Garden collection - Lovely Day & Be Happy
Echo Park - Blossoms & Bees collection - 4 x 4 Journalling Cards & Bright Hexagons
Echo Park - Little Things Mean A Lot collection - Free Spirit Fireflies
Mintay Papers - Blossom Serenity collection - #04

The photo below shows both sides of the papers:


Embellishments: SS 8 Tea Garden Bits & Pieces, Rosie's Studio butterfly, 2 Rosie's Studio Button Embellishments, 3 wooden butterflies, strip of puffy flower stickers, selection of Rosie's Studio puffy sentiments, 3 mini flowers, strip of Doodlebug enamel heart sprinkles.


Bazzill Basics Cardstock:
CS White & Parakeet (included in main kit). Yukon Gold, Twilight, Petalsoft & Lagoon (in extra Bazzill Pack).


World Book Day - Left-Hand Side


For the left-hand layout, I used the 
Lagoon Bazzill as the backing. I wanted to use the photo of Flo and her friends as the main feature, so printed it A4 size. Then with the sheet of EP Bright Hexagons, I set about cutting a frame of hexagon shapes, cutting the center of the paper away in an irregular pattern. (I set aside the centre of this sheet of paper for use on the right-hand side.)

I set the frame of hexagons over the Bazzill, and arranged the photo to the left side of the page, leaving room for the details and title. I cut three tags using scrap white card and the Sizzix, Tim Holtz, Tag Collection die set. With a little of the
Yukon Gold Bazzill I cut the rings to reinforce the tag holes and threaded them with some orange ribbon from my stash. I placed the tags to the top right of the photo and added my journalling.


I made the title with several different fonts on the Cricut, and cut with various scraps of Bazzill from the kit and my stash. I placed the title to vertically to the right of the photo.


To embellish this page I used the Rosie's Studio Button Embellishments, strip of Doodlebug enamel heart sprinkles and some of the Tea Garden Bits & Pieces, keeping some back for the next page.

Peekaboo - Right-hand side

For this page I purchased an extra sheet of Lagoon Bazzill as the backing, to match the first layout. From the left-over piece Bright Hexagons paper, I cut three irregular panels of hexagons. These were placed vertically onto the Bazzill. 


On the Bright Hexagons paper many of the hexagons have several layers and a heart in the centre, I wanted to recreate this as a large shape, to use for the title. I created these shapes using my Cricut - two hexagons in Yukon Gold Bazzill, one with 9cm sides and the other with 10.5cm sides. Then I cut another hexagon from some white scrap cardstock measuring 9.45cm.  These were layered up, then I added a heart shape cut from the same white cardstock, 11.5cm across. I placed the finished shape over the three strips of paper.


I placed my four photos across the layout, leaving enough white space to add a title later.


I used the Cricut to cut the date, in more scraps of Bazzill from the kit and my own stash. I placed the date in the bottom left corner of the page. I also made the title and place this over the white heart.


I embellished the page using the same elements as for the left side (Rosie's Studio Button Embellishments, strip of Doodlebug enamel heart sprinkles and some of the Tea Garden Bits & Pieces).

That's all for today, I'll be back later with two single layouts made from the same kit.
Thanks for looking
Lynn x

Saturday, 27 March 2021

March Papermaze Kit - a little extra!

Hi Lynn here - with an extra layout made using the March kit. I have already made four layouts with this pretty kit, (two published last week, and two for next week), but had some papers left over and so made this extra one.

Before we look at the process of making the pages, here is a reminder of what you will find in the kit - please see this post for more details.


For this layout I gutted the
Will You Be Mine? paper to make a frame 2.5cm deep. I used this frame with the hearts side uppermost. Over this I applied the Whirlpool Bazzill, which I had trimmed down to 28cm x 28cm. I distressed this and the other papers and inked them with Distress Ink. 

Using a Tim Holtz Layering Stencil - 'Stitched' and some Worn Lipstick Distress Oxide Ink I added some little crosses to the background Bazzill.

Then I cut hearts in various sizes using Bazzill and both sides of the patterned papers - Will You Be Mine? and
String of Pearls, including a larger one for my journalling. I arranged these in a large heart shape on the page.

I mounted my photo onto some scrap white card and then Flamingo Bazzill. This was placed to the left of the page, with the journalling heart to the right.

My title was created with a Tim Holtz Sizzix Thinlits die set - Alphanumeric Shadow - Upper and scraps of Bazzill. I heat embossed these with Clear and Turquoise Tinsel embossing powders.

Tip - I keep any spare embellishments from each kit in a box on my desk and I dip into this from time to time - for this layout I selected the chipboard heart strip, puffy letter stickers, pink lace and some wooden elements.

Finally I added raised dots with Ranger's Enamel Accents in Pink Gumball, Glacier White and Caribbean Coast.

Thanks for looking. I'll be back soon with the rest of the March Kit.
Lynn x

Wednesday, 14 September 2016

Ranger's Enamel Accents Review

Hi, Lynn here! This month I'm reviewing one of the newest products to arrive on the shelves of the Papermaze store - Enamel Accents by Ranger. Well… not ‘totally’ new - black and white enamel accents were introduced in 2010. 

So, what’s new?

10 bright colours. So now there’s a rainbow palate of 12 to choose from.


What are Enamel Accents?

Enamel accents are a dimensional medium that dries to a very shiny, opaque, domed finish. They are available from Ranger in 14ml bottles with a nozzel and cap. 


What projects could they be used for?

These fine-tip applicators are great for detailed work. They can be used on paper, card, glass, plastic, fabric, wood, metal, canvas… the list goes on, but in all cases you can create an extra dimension to your work with faux enamel accents.

So far I’ve seen them used to great effect with paper crafting, home décor, mixed media, and jewellery projects. Some have chosen to work directly on their project with the accents, others make accents on scraps of acetate to be added to a project at a later date.

These enamel accents have been used to doodle, dot, dash and decorate craft projects, achieving the look of shop sold enamel dots with a non-toxic formula. 

What colours are available?  


The Enamel Accents colours match the Ranger Dye Ink Pads (which are also available from Papermaze) and are available in:
  • Black Tie
  • Blue Ribbon
  • Caribbean Coast
  • Cheese Puff
  • Classic Cherry
  • Electric Lime
  • Glacier White
  • Grape Soda
  • Lily Pond
  • Pink Gumball
  • Wild Orchid

How do I use them?

Top tip: Before you start, grab a piece of scrap paper or paper towel to establish the flow before working directly on your project. This will eliminate any air bubbles from the nozzle which may spoil the finished shape of your enamel piece.

If the nozzle becomes blocked use a fine piece of wire with a blunt end (about the width of a pin) to remove the problem. Do not use a pin as the sharp point may make a hole and cause a leakage where you don't want it!

It is a good idea to invert the bottle while the cap is still attached and give one good shake to move the fluid to the tip of the nozzle. There is no need to repeatedly shake the bottle.

The medium is easy to apply, simply hold the bottle upside down and gently squeeze the sides until the required amount of medium has been dispensed.

Experiment. I found a little practice was needed until I was happy with the shape of the results.


If you are not working directly onto your project, use a piece of acetate. You can store the dots until you need them, and pick your favourites.

When you’re finished, wipe the nozzel with a clean cloth and replace the cap. Once the cap is definitely secure, bang the bottle on the table to move liquid from the nozzle and back into the bottle to prevent blockages.

When finished it is wise to wipe the nozzel with a clean cloth and once the cap is replaced bang the bottle on the table to remove liquid from the nozzel back into the bottle, to prevent blockages.


How long does it take to dry?

That depends on the surface size and depth your accents. It is best to leave your accents overnight for best results. 

What base materials can it be used on? Can I use different colours?


Ranger’s Enamel Accents are opaque - which means they can be used on any colour base. The colours remain true on white, black and any other colour.

What if I need a different shade of enamel dot?


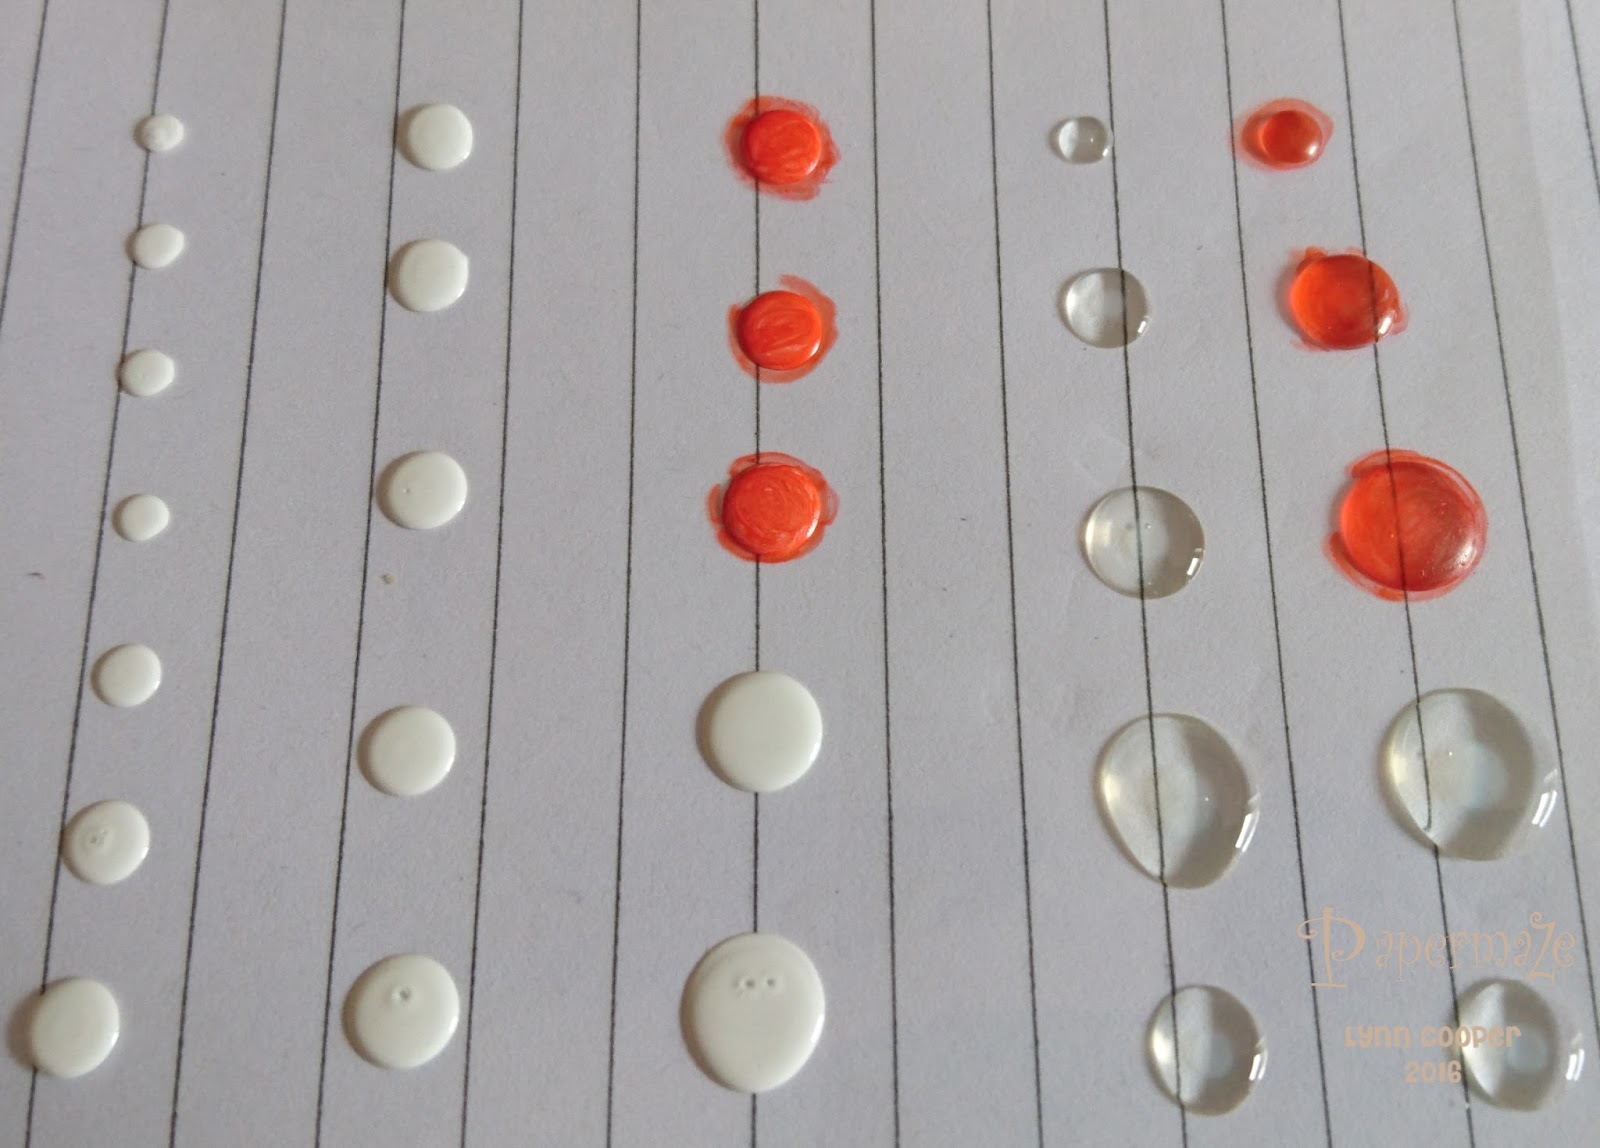
I’m sure more colours will be introduced at a later date, but in the meantime, you can colour your dots.

Take the Glacier White and make the dots in the sizes you require. 
Allow to dry and then colour with your favourite alcohol markers. You can also try this with Glossy Accents instead of the Enamel Accents (see above).


How do I adhere my pre-made dots to my projects?

Peel them from the backing and simply stick in place with adhesive. Glossy Accents works well. I found that if I took the finished dots off the acetate and put them together, they don't appear to stick together. They look very attractive together in a jar, but it’s not quite so easy to see them all.


Can I use more than one colour in a single accent?


Yes, you can use colours to make designs or make eye balls on stamped images!

Tim Holtz Bird Crazy Stamp
In the image below I have used several colours, dragging a spot of green outwards with a pin to create a flower pattern. See this tutorial HERE by Ranger for more ideas. I think I need more practice!


How do Enamel Accents compare with Liquid Pearls?

Both have a place in my craft stash. The Accents (right) leave a high gloss, domed finish and the Liquid Pearls (left) a pearly, more peaked finish.


Have fun experimenting with the Enamel Accents,
and don't forget to share what you make.
Thanks for looking
Lynn x