Showing posts with label Nuvo glitter drops. Show all posts

Monday, 2 November 2026

Graphic 45 - BOOtiful Greetings - The Wicked Witch of the West

Lynn here, with my last layout using the Graphic 45 BOOtiful Greetings collection. This time I have scrapped this photo of my daughter as the Wicket Witch of the West in her year six production of The Wizard of Oz.


There are several layers to this background, starting with a sheet of Raven Bazzill, this was gutted to leave a 1" frame. Then I trimmed Pumpkin Layout paper to 11.75" x 11.75" and gutted this, also to a 1" frame. Next came some Bazzill White cardstock trimmed to 10" x 10". The final layer is the remainder of the Pumpkin Layout paper trimmed to 9.75" x 9.75". I inked the edges of all these papers using Black Soot Distress Ink.


My photo was mounted onto Butter Mints Bazzill, then again onto Raven Bazzill, and placed to the bottom left of the page. I added a little purple washi tape to the top and right of the photo. With fine orange metallic tape from my stash, I added a strip to the top right and bottom left of 
the layout. 


The Title was created in three layers, using Butter Mints, Tangelo and Raven Bazzill. 


I used a Sizzix Bigz XL Die - Handmade. Once all three card letters were layered and placed onto the layout, I added sparkle with Nuvo Glitter Drops - Honey Gold. 


Finally, I embellished the page with images from the BOOtiful Greetings Ephemera Pack.


That's all with this collection for now, I'll be back with another collection soon.
Thanks for looking.
Lynn x

Monday, 7 September 2026

49 and Market - Glimmer and Glee collection - Part 1

Lynn here today with a different collection, this month I'm using 49 and Market's pretty pastel Glimmer & Glee collection. This collection has water colour style images, which are great for documenting parties, birthdays, babies, and garden gatherings. The palette is a clever mix of pretty corals, pinks, yellows, blues and greens. Here are my first two layouts using this collection.


New Baby Boy
- This first layout has photos of my great nephew at 7 weeks.


I started with a sheet of Jubilee, which said 'Baby Boy' to me. I chose to have the dark plaid band to the left side of the page. I trimmed my photos to measure 6 x 8cm. I arranged them along the pale plaid pattern band, after matting them onto some pale blue card stock. The mats were inked with Faded Jeans Distress Ink.


I selected some images from the Glimmer & Glee Laser Cut Elements sheets - I used the larger wreath over the photo in the centre of the trio. 


I hung the bear on the swing from the bottom of the wreath and the bear with balloons, flying off from the top right of the wreath. I attached the bears with 3D foam pads.


For my title I used some old foam stamps I have in my craft room, made by Making Memories.
I stamped the title words 'NEW BABY' with Distress Paints. First with Scattered Straw, to create the shadow, then with Faded Jeans for the bolder main colour. Once the paint was dry, I coated the blue letters with a layer of Nuvo Glitter Drops - Gold Coast. A date was added inside the wreath, with card stock letters, die cut using Tim Holtz Alphanumeric 'Label' Thinlits set. 


I added the word 'BOY' to the title with Doodlebug Designs Sunshine card stock Alphabet Stickers - Bumblebee.


More Laser Cut Elements were chosen to add balloons, a bunch floating up from the semicircle printed at the bottom right of the layout, and a single blue balloon to the top left semicircle. 


With some acrylic domes in pastel shades, I scattered multi-coloured dots over the page. Finally, I added an acrylic heart from my stash to the wreath. 

Lazy Sunday Afternoon Here is my granddaughter, all dressed up and visiting her other grandparents for Sunday lunch.


This time I chose the Glimmer and Glee Cheers paper, on the side with two large white areas suitable for photo mats. A difficult decision as I love the other side with the balloons too!
I printed my photos in two different formats and sizes to suit the white areas on the paper. There is a wreath printed onto this sheet - similar to the lase cut one I used on the first page.


Working up from the bottom of the layout, I created a page wide flower trough, by cutting a 2cm  strip from the wooded planks side of Toast paper. I glued this down at either end leaving the length free, allowing me to tuck in the bird table and flowers. 


Then I built up a picture to reflect the garden in the photos. I selected images from the Glimmer & Glee Laser Cut Elements sheets. I stuck the element down under the strip, but raised them up on 3D foam pads above the strip... 


... I started with the bird house near the centre, then the rows of flowers either side of this. In some cases, I added more single flowers overlapping the first layer.


I used Tim Holtz Alphanumeric dies 'Tiny Type - in upper and lower case, to create the date from cardstock, and glued this in place over the paper strip. 


With a selection of butterflies from the Laser Cuts collection, I arranged them in an arc from one photo to the other at the top left of the page. I folded up the wings, glued the bodies to the page and place 3D foam pads under the wings to give them motion. I added two more butterflies in the same way, to the right of the page following the line of the wreath.


My title was created on the Cricut using more of the pale blue card stock and Faded Denim Distress Ink.

That's all for today, 
I'll be back with more from this collection soon.
Thanks for looking.
Lynn x

Wednesday, 2 October 2024

September Papermaze Kit - Part 2


Lynn here today, I'm back with my second post using the lovely kit from Papermaze for September.  There is a clever combination of geometric patterns and floral papers.

 Here is what you will find in the kit:


Patterned Papers:
Paige Evans - Adventurous collection - #10 & #24
Vicki Boutin - Bold + Bright collection - Great Day
Echo Park - Happy as Can Bee collection - Busy Busy Bees
Echo Park - Sunny Days Ahead collection - 3x4 Journalling Cards
P13 - Travel Journal collection - #03

The photo below shows both sides of all six papers in the kit:


Embellishments - Prima In Full Bloom Flower, Pinkfresh Making the Best of it alpha sheet, 3 frames 49 and Market Colour Swatch Ochre, 2 Rosie's Studio Born to Bloom acetate words,
2 P13 Travel Journal Tags, 12" Lace, A pinch of Pinkfresh Matte Gold Pearls.


Bazzill Basics Cardstock - Beeswax and Whirlpool (in main kit).
Smoky, Apricot, Fig Swirl and Twig (in extra pack).


Knit One, Purl Two, Teach Three - My three children on holiday in Norfolk, Aunty Barbara was showing them how to knit.


I used a sheet of CS White Bazzill for this layout. Using a Vicki Boutin Stencil from the Fernwood collection (Greenery set), and Distress Inks (Picked Raspberry, Broken China and Spiced Marmalade), I worked a knitted effect background randomly over the page.


I used the same inks, each mixed with a little water, and flicked over the stencilling. I cut the  Great Day paper in half, one half was cut into fine strips of 1cm and 1.5cm wide. These were then cut into different lengths. The other half sheet of the paper was used to cut flowers and leaves from. To create these, I used the Tim Holtz Sizzix Thinlits set - Funky Foliage.


I arranged two photos and the strips of paper onto the Bazzill. The white strips were placed at the base, where I planned to add my journalling. Next I placed the flowers and leaves into three clusters. around the photos.


My title was created with three different packs of Doodlebug Designs Alphabet Soup puffy letter stickers (Bubblegum, Swimming Pool and Coral. I scattered
Matte Gold Pearls from the kit over the layout.


I added the journalling to the strips of paper. Nuvo Glitter drops were painted onto the flower centers. Finally, I covered the photos with a protective piece of plastic sheeting, then added a few flicks of black Distress Paint over the clusters.


Inverewe Gardens - While in Scotland earlier this year we stayed near Loch Ewe. These photos were taken in the walled garden of Inverewe Gardens.


For this layout I chose the Paige Evans Adventurous #10 paper, including both sides. I found a chipboard scalloped circle frame from an old set by Technique Tuesday. I drew around the inner circle of this onto the back of the paper. Then I cut the circle out about 1cm away from the pencil line on the outer side of the pencil line.


I painted the chipboard with Evergreen Bough Distress Paint, then dabbed more pains over this with a sponge. I used Cracked Pistachio, Peacock Feathers, Broken China and Picket Fence.


I then rebuilt the page, with the A side of the paper as the background and the B side inside the circle, I did this by gluing them both to the back of the chipboard circle.


Using Beeswax and Whirlpool Bazzill and some white card scraps, I cut flowers and leaves using Tim Holtz Sizzix Thinlits die set - Funky Floral. I added these to the chipboard circle after inking the tips of the petals with Spun Sugar Distress Ink.


Using more of the Beeswax Bazzill I die cut the title and date using Tim Holtz Sizzix Thinlit Alphanumeric Theory Die Set.


I scattered some aqua pearls onto the page, then I added my journalling to the page.


That's all for the September kit, I'll be back with the new kit for October soon.
Thanks for looking.
Lynn x

Friday, 2 February 2024

January Papermaze Kit - Part 2

Lynn here today, with my second pair of layouts using the January Papermaze Kit, which is still available in store. This time I have used the pretty papers to make a pair of heritage layouts, with photos of my Australian ancestors.


Before looking at how the layouts were made, here are the details of what is inside the kit.


Patterned Papers: (image below shows both sides of the papers)
49 and Market - Moonlit Garden collection - Calming & Reflections
Simple Stories - Simple Vintage Essentials collection - Limited Edition
Echo Park - Wedding Bells collection - Precious Peonies
Pinkfresh Studios - Holiday Dreams collection - Under the Tree
Vicki Boutin - Discover + Create collection - Nonfiction


Bazzill Basics - Lagoon & Touch of Pink (included in the kit). Almond Cream, Date Swirl, Avalanche and Dark Olive.


Embellishments: 1 Prima flower, 6 Tim Holtz number strips ephemera, Tim Holtz number token, 12" Lace, 3 heart enamel stickers, 2 Vicki Boutin chipboard frames, selection of simple Stories foam stickers and 6 - 49 & Market chipboard words.


Leathia Pearl Banks - 1886 - 1970 I typed the information I found out about Leathia onto paper and pasted it to the back for the layout, for reference in the future. She was one of 12 children, married and had three children. She lived in New South Wales, Australia.

For this layout I used the charming 'Calming' paper from the 49 and Market Moonlit Garden collection. It is so beautifully illustrated; it almost needs no embellishment. With a craft knife I cut around the inner detail of the flowers, and one butterfly, ready to tuck the photo underneath.


With two pages from an old gardening book, I distressed and inked the edges, and used them as a mount for the photo and stuck it all to the centre of the page.


With some metal filigree style photo corners from my stash, I decorated the four corners of the photo. 

From the remains of the ''Reflections' paper I cut the black butterfly and lily, these were raised on 3D foam and added to the right side of the page, overlapping the photo. I cut another smaller white butterfly from the offcuts and place this to the top right of the photo.


To the left of the photo, under the blue butterfly I added three items from the kit - the Prima flower, the lace tied into a bow, and the charm - which I tied onto the bow with a little sewing thread to hold it in place.


With a Tonic Studio die set I cut the title and dates, from more scraps of paper, I applied these above and below the photo. I coated these with Glossy Accents to give them a shine and help them stand out a little better.


The butterflies were decorated with some Nuvo Glitter Drops, and I placed a sticker from the kit to the right of the photo to finish off.


William Henry Banks 1844 - 1878 - Born in Huntingdon, England and emigrated to Australia. Married and had one child but died at the age of 34.
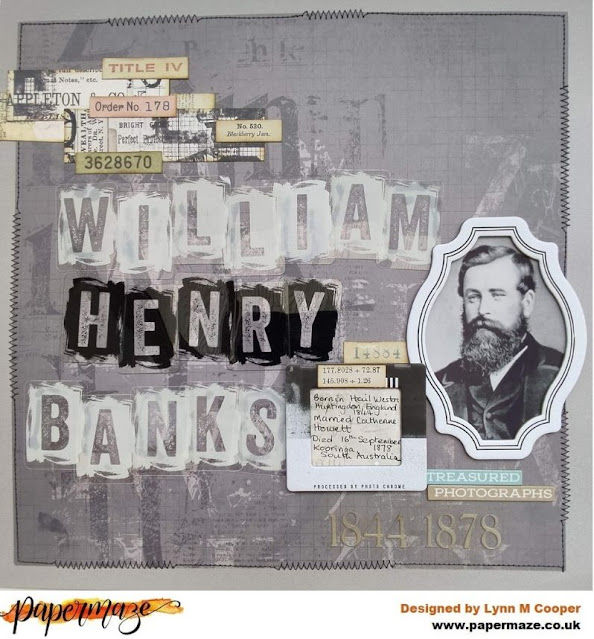

I trimmed the 'Limited Edition' paper to 11" x 11" and mounted it onto the remains of the Date Swirl Bazzill, used on the earlier Disney layout. I then stitched around the paper using black thread and the sewing machine. I used zig-zag and straight stitching.

With the two chipboard frames from the kit, mounting my photo behind one and my journalling on scrap paper behind the other. I added the photo the the extreme left of the layout. The journalling was raised on 3D foam so it would overlap the photo slightly.


My dates were cut with the same dies as before. The title was created using some Idea-ology
Transparent Tiles - Alfa, by Tim Holtz.


I also used more embellishments from the kit - chipboard phrases and number strips ephemera,


That completes the January kit, I will be back with the romantic February kit soon.
Thanks for looking.
Lynn x