Showing posts with label wood. Show all posts

Sunday, 18 September 2022

Thankful Tiered Tray Decor ...Photoplay Thankful Collection

t

 Hello again, it's Anita here with you today.


We are now at the start of my absolute favourite time of year....Autumn! And there are some beautiful, vibrant paper collections out there to create with! I am lucky enough to have some of the Photoplay Thankful Collection to work with for my post today.


For the last couple of years I have been enjoying looking at Pinterest and other sites seeing the gorgeous tiered trays that seem to be all the rage in the USA. There are several variations of tray available and people decorate them to match the seasons changing and for other themes and celebrations....and I have completely fallen in love with the idea. 

They can however work out quite expensive and as I rarely have spare money to buy *non essentials* I thought I would try and see what I could create myself for a fraction of the price!

Have a look and see what you think!


 I started off with 2 different sized lightwood trays that I bought from Hobbycraft and a plain pine candle stick that I painted to match the trays. I dry brushed the trays and candle stick with white acrylic paint to give it a more rustic effect and used wood glue to fix the trays to the candlestick and create the 2 tiers.


Here is a list of products used to create all the following items that I have made for my 1st ever tiered tray attempt.

Thankful and Blessed

Warm and Cozy

Pumpkin Spice

Element stickers

Lengths of 90mm x 20mm wood 

Lengths of 68mm x 15mm wood

Lengths of 90mm x 90mm wooden posts

Childrens Alphabet wooden blocks

wooden beads

ribbons, raffia and twine

mini wooden rolling pin

pine drawer knob

Various colour acrylic paints

MDF blank square photo frame

So, all of the wood pieces, blocks and bricks were painted with white, pumpkin orange or sage paint and then gently sanded the edges to slightly distress them and soften the edges. I added stickers from the element sheet and panels from the paper sheets, then raffia, twine and ribbons where needed.


The chunky wood block had a painted pine handle added to the top and I wrapped twine, raffia and ribbon onto it.


The beads were all painted with the same paints and I made a tassel from the twine and gingham check ribbon.

The MDF picture frame was painted white, backed with the reverse side of the paper and a rather lovely quote added.
 

the mini rolling pin was covered in paper and the raffa and ribbons tied on the ends. Super cute!

I made the pumpkin latte from a mini mason jar and added cinnamon, a straw and some sprinkles to the topping, finishing off with a gingham bow.


The childrens little alphabet blocks make a delightful little addition to the trays and you can make as many or as few as you like.

I added a few little shop bought bits...ceramic and plastic pumpkins, wooden mushrooms, greenery and autumns leaves.


I have to say that I am so very pleased with this for my first attempt and I am looking forward to decorating for Christmas in a short while....maybe even Halloween first!!

I hope you have enjoyed my post today, thank you for looking.


Warmest wishes

Anita xx

Monday, 30 November 2020

November Papermaze Kit - Part 2

 Lynn back today with part two of the November Papermaze Kit.The lovely soft colours in this collection are ideal for creating layouts displaying photos of russet, wind swept foliage, fallen fir cones, berries and fields of pumpkins. With this in mind here are my second pair of layouts.

Before looking at the processes involved in making these layouts, here is what is in the kit:

Patterned papers:
Cocoa Vanilla - Day Dream - Daisy Days and Sweet Serenity
Pebbles - Jen Hadfield - The Avenue - 2nd Avenue and 3rd Avenue
Vicki Boutin - Story Teller - Memoir
Pinkfresh Studio - Days of Splendor - My
Favourite

Bazzill Basics - Coconut Swirl and Blackberry Swirl

The reverse side of the papers:

Embellishments:

Tando Creative Mini Tags pack, 6 dew drops, mini black doily, strip wooden dots, Cocoa Vanilla Puffy Heart, 5 paper flowers, 24" Twine and Prima layered heart sticker

Extra Bazzill Pack:

Fawn, Guacamole, Coral Cream and Sea Water.

Autumn Leaves - This photo shows Emily during her red hair phase. She was visiting Hall Place, Bexley to do an autumn photo shoot together with a fellow A level photography student. The photo reminds me of the line about autumn leaves from the 'Windmills of your Mind' song. Although I slightly changed the words for my long title, otherwise it would have been even longer!

For this page I cut pieces from two sheets of patterned paper, cutting a piece at an angle from the top of '2nd Avenue' (before cutting I chose a few images from the flip side for later). I set aside the floral heart for this page and the little house for the next layout.

I dripped some Antique Bronze Distress Paint along the angled edge of the
'2nd Avenue' (fawn side), and allowed it to dribble down the page. Once dry this was placed onto a spare piece of 12" x 12" paper, then I cut a piece from 'Sweet Serenity' to fill the gap at the top of the page.

With the Sizzix 'Vintage Lace' Sizzlit die I created some lace from the Black Bazzil, and placed this along the join between the two papers. Then I added two strands of the twine from the kit.

The kit contains a whole pack of Tando leaves, and after coating these with Gesso, I dipped them into a mix of autumn shades of Distress Oxide Inks. Once dry I decorated with patches of Gilding flakes to give them some shimmer.


I chose a selection of frames from the 'My Favourite' paper. These were carefully cut out and arranged in clusters above and below where the photo would be and also on the bottom right of the page. 

My photo was backed with Black Bazzill, raised with foam and stuck into position. The leaves were scattered, cascading down from the photo, saving one for the frames at the top of the photo and another for the cluster at the bottom of the layout. 

I added the paper flowers from the kit to each area where the frames had been placed. For the cluster at the bottom I added the heart saved earlier, and a tiny bow made from left over twine. I added some journalling in this area too. 

I raided my box of letter stickers and from many different packs I put together my long title.


Finally the Dew Drops from the kit were placed among the leaves. 

The Prior's Pumpkin Patch - For my last page I selected this photo of my little niece. She is sitting on the doorstep proudly showing off the carved pumpkins the family picked and carved the day before.  


This layout makes good use of the patterned paper left over from the previous three layouts. The base is the sheet of Fawn Bazzill. Then I did a lot of layering by cutting the scraps of papers as listed below.

Horizontally:
27xm x 11cm Sweet Serenity (colour wash side)
16cm x 15cm My Favourite (candy stripe section)
30cm x 4.5cm 3rd Avenue (Wood panel side including the manufacturer's strip with houses)
17cm x 4cm 3rd Avenue (houses side)
13cm x 2cm and 12cm x 4 cm Daisy Days (daisy side)

Vertically:
30cm x 8cm Sweet Serenity (dotty side)
28cm x 3cm Memoir (orange side including manufacturer's strip with script)
10cm x 3cm 2nd Avenue (fawn side)

I mounted my photo onto white card and placed it over the layers of paper, without sticking the edges down, to allow me to tuck elements underneath. 

I cut a few more of the frames from 'My Favourite' paper and used these in various places, including one for a little journalling. The black mini doily was tucked under the corner of the photo with a circular frame and the puffy heart layered on top.

I added in some phrases from the '2nd Avenue' paperwith the wooden dots and the layered heart sticker from the kit. 

My title was made from several different Basic Grey alphabet sticker sheets. I made them pop by outlining them with a fine black pen.

Finally I placed some paper leaves from my stash around the photo.

That's all for the November kit, although there is still plenty left over as usual. I'll be back with the December kit later in the month.

Thanks for looking
Lynn x

Monday, 4 May 2020

April Papermaze Kit - Part 2

Hi, Lynn here today with the second set of layouts using the very pretty April Papermaze Kit.

As with the first pair, I have a heritage and a wedding layout to share with you.


A quick reminder of what you will find in the kit see the photo below. For full details, see my previous post.


April Papermaze Kit
Rebecca Mary Wilmott 1797 - 1869 - A layout for another heritage photo from my father's family. I have printed the details of Rebecca's life out and stuck them to the back of the layout for reference.


For this page I used both sides of 'Clock' paper from Stamperia. I started by carefully cutting around the clock with the roses from the centre of the paper with a craft knife. Then I flipped the paper over and trimmed back the planks to create a frame for the layout. I inked the edges with Gathered Twigs Distress Inks.
 
I distressed some cotton lace with the same ink and used small pieces to stick to the frame paper, so it peeps from behind. I attached both frame and clock to the Walnut Bazzill with some 3D foam tape to created some dimension.

The Tando Chipboard clock was embossed with the Ranger Distress Embossing Dabber
and Stampendous Frantage Embossing Enamel - Aged Teal, this was placed towards the nutop left of the clock on the paper. I trimmed the photo and mounted onto some of the Lagoon Bazzill. I applied it to the layout overlapping the Tando clock using more foam tape.

My title was cut from Lagoon Bazzill with a Sizzlits Boxed Brush alphabet die set. The letters were arranged around the clock face then I added a coat of Glossy Accents.

I added some cherry blossom flowers, arranging them in clusters in the gaps around the clock. 

With a Martha Stewart leaf punch and the green side of 'Dozen Roses' paper I added leaf fronds to the flowers, and added a touch of sparkle with some  Diamond Stickles.

Our Wedding Guests - Another layout for my daughter's wedding, this one showing the wooden mannequins I decorated for each of the guests as place settings and table numbers. If you would like to know more about this project, please see this post here.  


I started with the 'Cubbies' paper, using it as a display case for all my little wooden figures. I printed a selection of photos in different sizes, and trimmed them to fit from one to six of the boxes.

I used the Maya Road envelope to display a few more photos. Then with a black pen I added some numbers to the label holders printed on the paper.

The cork butterflies were glued to the page and I added some tiny dots of white gloss Nuvo Crystal Drops.

The title was cut from Quartz Bazzill using the Alphanumeric Cutout Script Thinlits dies.

I made some leaf fronds using the 'Dozen Roses' paper and a Martha Stewart punch, I used them to decorate the resin rose on the front of the envelope.

I will be back soon with the May Kit, thanks for looking.
Lynn x

Monday, 20 April 2020

April Papermaze Kit

Hello Crafters, It's Lynn here today with the first post using the very pretty April Papermaze Kit. There is a rose theme this month, with pretty pinks and greens.

For the first two pages I have a heritage and a wedding layout to share with you.


Let's see what you will find in the kit.


April Papermaze Kit
 Patterned Papers -
Carta Bella - Farm House Market collection - Cubbies and Wreaths
Simple Stories - So Happy Together collection - My Squad
Simple Stories - My Valentine collection - My Sweetheart
Photo Play - Be Mine Collection - Dozen Roses

Stamperia - House of Roses collection - Clock SBB674
Bazzill Cardstock - Flamingo and Walnut


Reverse side of papers
Embellishments - Tando Clock, 30cm washi tape, 10 gems, 3 cork butterflies,1 resin rose, 1 Maya Road envelope, 50cm jute twine, 30cm lace, 3 Prima flowers and 4 wooden leaves.


The April Matchmaker Bazzill Kit contains - Natural, Guacamole, Quartz and Lagoon

Adelaide 1831 - 1911 - for this heritage layout I have used this portrait photo of one of my father's ancestors. I have typed up all I know about her and how we are related. This was printed out and stuck to the back of the page for future generations to understand where she fits in. I was lucky to make contact with someone on Ancestry who had a lot of photos to share from this branch of the family. 


The beautiful sheet of paper
from Simple Stories - My Valentine collection, called My Sweetheart is very detailed and so does most of the work for you. I trimmed it down by 1cm all the way around the edges so as not to lose too much detail. I distressed and inked the edges. I mounted it onto the sheet called My Squad. I gutted the latter to leave a frame of 2.5cm.

I applied some wide white lace and pleated blue ribbon across the middle of the page. With My Cricut, I cut the pieces for a oval shaped frame from Flamingo and Quartz Bazzill. The top layer was cut from some scrap thick card and embossed with Stampendous Frantage Embossing Enamel - Shabby Pink. I glued the layers together with my photo in-between. I mounted this to the right of the page with 3D foam tape.

I arranged paper roses near to and overlapping the frame. I punched some flowers with a Martha Stewart leaf frond Punch. I added a little Crystal Stickles to these leaves.

With more of the Flamingo Bazzill I cut the title using the Cricut. I glued this to the page and used some Glossy Accents to make this shine.

With the 3 in 1 Butterfly punch from Martha Stewart I cut a selection of butterflies from the strips of Sweetheart paper cut off earlier. These I scattered over the top of the page, adding a little more Stickles.

I placed gems from the kit onto the lace.


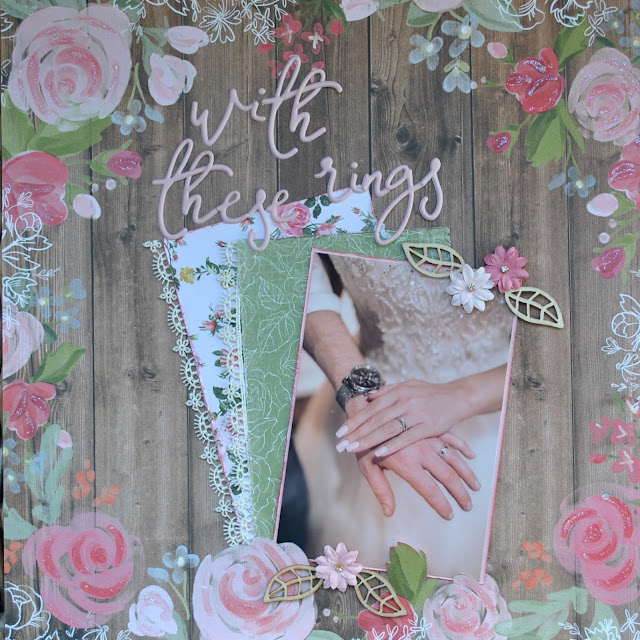
With These Rings - Another layout created for my daughter Catherine and her husband George's wedding album. The official photo of their hands with the wedding bands.


This is another page where the background paper did most of the work for me. This time it was a sheet of
Carta Bella - Farm House Market collection Wreaths.

I trimmed my photo and matted it with some Quartz Bazzill, then made two mats the same size as the Bazzill, one from each side of
Photo Play - Be Mine Collection - Dozen Roses.
I trimmed the left side of both mats with the lace from the kit.

With a craft knife I cut into the top of the roses and leaves at the centre of the bottom of the page. I tucked the mats and photo into these cut away pockets.

I decorated the photo with the wooden leaves and the gem centered flowers from the kit.


My title was spelt out with Pinkfresh Studio Office Hours Puffy Alpha Stickers.

Finally with Crystal Stickles, I highlighted the darker areas of all the roses.

I will be back soon with two more layouts, thanks for looking.
Lynn x

Thursday, 18 April 2019

April Papermaze Kit

Hi, How are you getting on with hunting for Easter eggs?

Lynn here today with the new Papermaze Kit for April, and very bright and colourful it is too! There are many hearts in the paper designs and embellishments. This kit is amazing value for money, and with the additional purchase of some Bazzill White, I achieved a total of six layouts this month.


Here are the first two layouts I made using the kit.


Before we start making the layouts, here are the kit details:


Patterned Papers:
Pink Paislee - Paige Evans - Whimsical #18
Vicki Boutin - Field Notes - Simple Things
Photo Play - Wild Love - Thief of Hearts
Echo Park - I Love Crafting - Inspiring Words
Kaisercraft - Blessed - Beaming and Gratitude
Bazzill Cardstock - Bazzill White and Tropical


Reverse side of papers
Embellishments
2 doilies, 2 wooden hearts, 4 pegs, strip of pearls, mini washi tape, 50cm twine, 2 concertina flowers, 5 small flowers, 30cm scallop ribbon, 1 heart charm, exclusive Papermaze chipboard words and hearts.


Extra Bazzill
 Extra Bazzill Cardstock Pack: Admiral, Bazzill Orange, Fussy and Rain.

Live Your Dream With Passion
My first layout shows my daughter and her fiancé on holiday in Amsterdam last summer. My inspiration for this layout started off with a page by Sandra Wallace.


With Beaming paper gut the 12" x 12" sheet to leave a border for the layout of 1". I used this (black and white) hearts uppermost, setting aside the rest for later.

Take the sheet of Tropical Bazzill and trim to 11" x 11", I splattered a little black ink over this card. Then I inked the edges heavily with Worn Lipstick Distress Oxide Ink giving a chalky finish around the page.

Back to the Beaming paper and 2 banners, the larger one with the blue side up is 3" x 7", and the smaller one with hearts side is 2.5" x 5". I inked the edges of these, but not so heavily. They were then layered up behind where my photo will be, with the doily (pale side up), between the photo and the banners. This can all be stuck in place before embellishing.

For embellishments I took a selection of items from the kit to decorate around the photo - the two accordion flowers, four of the Prima flowers, the Papermaze exclusive 'Love' chipboard, 1 wooden heart, and the charm. To this I added some leaf fronds punched and inked (Martha Stewart punch) and a tiny ribbon bow. 

In the bottom right corner of the layout I used a Tim Holtz Stamper's Anonymous, quote stamp "Live your dream with passion" and black Archival Ink Pad. Then I added one punched leaf frond and one more Prima flower.

Finally I scattered some pink dew drops onto the Bazzill. These were left over from an earlier kit.

Tip -  I keep the leftovers from each kit in a small bag on my craft table when making these layouts and dip into them when I need some additional embellishments.

One is Fun

This next layout shows my great niece at a photo shoot to celebrate her first birthday.


All the edges inked on this page with Worn Lipstick Distress Ink.

This time I worked with both sides of the Photo Play, Wild Love paper. Using the hearts and arrows side, I created a wide border for the page by gutting the paper to leave a frame 1" deep all round.

I cut the Bazzill White card to 10.5" x 10.5" and gutted this in the same way.  Then I cut the Pussy Bazzill to measure 10" x 10".  These were all layered up centrally on top of each other and stuck in place.

I cut a heart freehand from a scrap of paper, and used that as a template to cut the pink side of the Wild Love paper. I stuck this to the centre of the page leaving the left side free so I could tuck in the washi tape. Then with the washi tape from the kit, I cut strips of varying length and added them to the left side of the page with different sized gaps between them. Then I finished sticking the heart in place.

With the second wooden heart from the kit, and the Papermaze exclusive chipboard hearts, I set to with my Distress Paints! I used Worn Lipstick, Picket Fence and Broken China to paint the wooden heart and Broken china for the other hearts. These were left to dry, then I added Glossy Accents to the pink centre of the wooden heart.

I took three very similar photos and attached them in a staggered fashion, you can see the edges of the bottom two, under the top one. I trimmed the bottom of the photos with some rose ribbon left over from last month's kit, which is available in the shop to buy from the roll - (please ask).

My title was cut using two different Sizzix dies - 'Fun' and '1' were cut from the scraps of Tropical Bazzill from the first layout using a Tim Holtz Bigz Die - Block Tall Alpha. 'Is' was cut using a scrap strip of the Bazzill White card using Tim Holtz Thinlits Cutout Script Alpha.


Thanks for looking, and I will be back with more from this kit soon.
In the mean time keep an eye out for those eggs and good luck.
Lynn x

Wednesday, 10 January 2018

Kaisercraft - Wandering Ivy

Hello and happy new year to you all, Lynn here with a layout made using the Wandering Ivy collection from Kaisercraft.

When I received my design team package for January and found these beautiful, rustic papers and a package of embellishments I just knew they would be ideal for presenting some of the photos from my daughter's wedding.


I selected just one sheet of paper from the collection for this layout - 'Ivy Wall'. The majority of the paper is white-washed wood effect paper with ivy tumbling from the top. I decided to cluster three circular photos from the ceremony itself near the top. The hop bines in the photo are reflected well in the printed ivy.


The flowers in my kit were also perfect as Emily chose green and white / cream for her flowers.
I used some 'Avocado' Bazzill to cut leaves, these were scraps from her wedding invitations. I also added in some dark brown Bazzill scraps for the pine cones. All the greenery and pinecones were cut using a Sizzix (Tim Holtz Alterations) Thinlits set 'Festive Greens', suitable for a lot more than Christmas.


The wooden birds and 'Today' word as well as the tiny letter stickers were also in the kit.


The little cluster at the bottom right of the page, was created with other bits from the kit, lace, tag, glittery half pearls, tiny gold doily and metal name plate. I added some rub-on letters for the month from my stash and I used some dies to cut numbers. I also added some jute twine.

Thanks for looking
Lynn x