We are around to that time of the month again, it's our crop day on Saturday! This month's kit has been designed for us by Lynn.
Thursday, 16 March 2023
March Crop
Monday, 13 March 2023
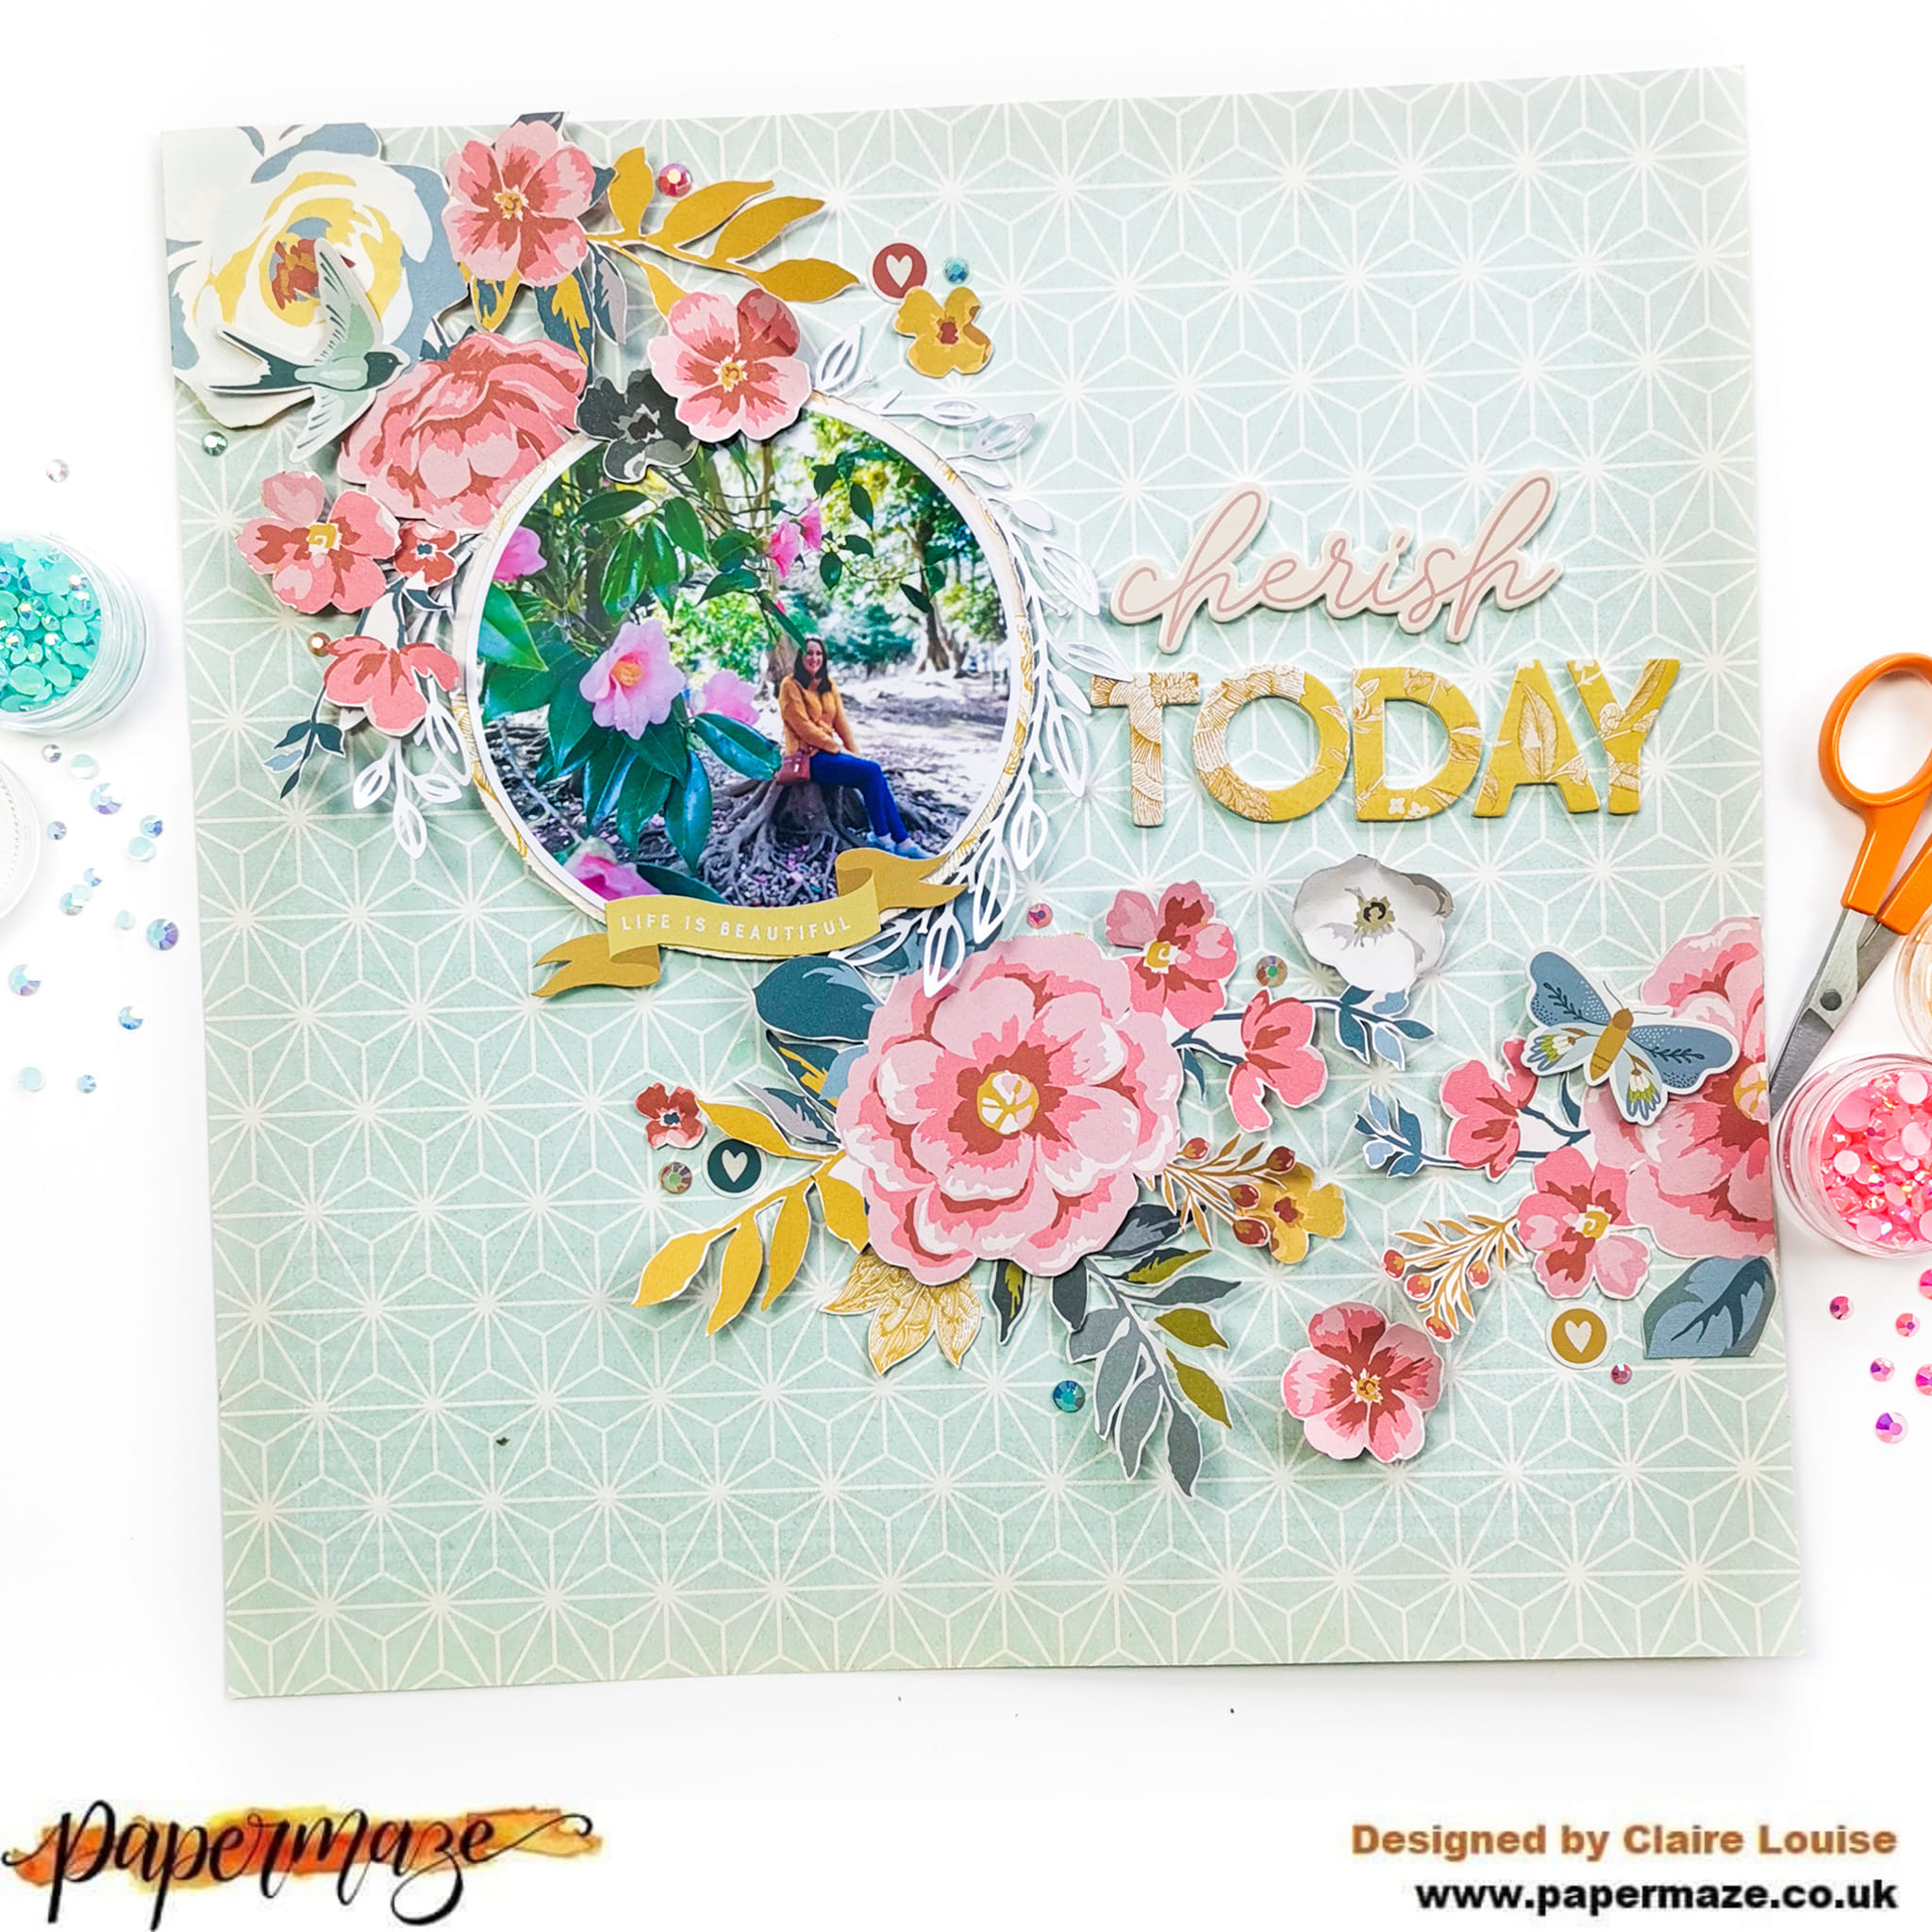
Simple Stories - Wildflower - Cherish Today
Hi everyone,
Claire here, and i'm popping in with my second layout using the Wildflower collection - this really is such a gorgeous collection. I think it's definitely going to be one of my favourites of the year and we're only in March!
This time, I'm focusing on the patterned paper, using it firstly as my background, and secondly, enjoying lots of fussy cutting to create a sweeping floral design across the page.
The base of my layout uses the b side of the Journal Elements paper. It's a really lovely soft teal colour, with a very dainty pattern that works perfectly for a background paper.
To this, I added my circular photo, which I mounted on the Breath Deep paper and framed it using a 'Leafy Wreath' cutfile from Anetts Designs.
Across the bottom, I created a small subtitle, using the pretty yellow banner from the Combo Stickers.
Next the fun part!! The Flowers! This collection really does have the prettiest floral papers I have seen in a long time. The choices - and possibilities - are endless!
I used the Complete Bliss paper, fussy cutting both small and large clusters, as well as individual flowers and leaves to stretch across the page - but honestly, any of the floral papers in this collection would work just as well. They're all stunning!
I started in the top left corner, raising some on foam, and leaving some flat, curling the leaves to create movement and dimension.
Once all the florals were in place, I began to add some smaller embellishments. I took a bird and a butterfly from the Combo Stickers, raising these on foam to sit in amongst the floral clusters.
I adore these. They're my favourite element of Simple Stories collections so I was delighted to get two on a page. They sit just to the right of my photo and pull in all the colours of the design. Just the job to finish the page off.
I hope you have enjoyed this layout - I certainly enjoyed making it.
See you next time.
Claire xx
@scrappysoulmate
Friday, 10 March 2023
American Crafts Blooming Wild by Paige Evans - Smile
Hello, Karen here today sharing my first layout this month using American Crafts' new Blooming Wild collection by Paige Evans.
I was instantly drawn to the colourful sunburst design on the B side of paper #22 and knew I wanted to use it for my first layout. Sunburst papers have appeared in several of Paige's collections and I felt challenged to use the paper in an original way.
Using a circle cutter I cut 4 concentric circles from the centre of the paper. The hole in the paper was backed with a piece of cardstock and the circles were all then glued back into the hole. Each circle was rotated slightly so that it created a multi-coloured circle (a bit like a dartboard) in the middle of the layout.
I had a surplus white cardstock frame left over from a previous project I'd cut on the Silhouette and so I added this to the layout. I think the pops of white on the layout help to give it a fresh feel.
The positioning of the sequins and length of the stitched lines were all kept very random for added interest.
In my stash I found a circular sticker which I mounted on some card and stuck to the centre of the stitched rays.
My 4x6 photo of my son was matted with white cardstock and attached to the right side of the layout with 3D foam underneath. An older puffy phrase sticker from my stash was added to the bottom of the photo as a title.
Using embroidery thread I stitched round the outside of each heart. Word strips (from Paige's older Bloom Street collection) were attached to each heart with 3D foam underneath and then the circles were attached to the layout, with more foam underneath.
Finally I added the date at the bottom of the layout with navy blue foam alphabet stickers.
Thanks for dropping by today. I hope this layout has given you an idea of how to use the starburst paper in this (and other) collection and perhaps also try handstitchign on you layouts.
I'll be back later in the month with more form this collection and in the meantime take care,
Karen x x
Wednesday, 8 March 2023
Happy Day - Simple Stories - Simple Vintage Life in Bloom Collection
Hello, it’s Rebecca with you today and I’m really excited to be sharing my first layout created with Simple Vintage Life in Bloom - another beautiful collection from Simple Stories. The colours in this collection, mixed with the pops of black, are just simply stunning and I’m loving creating with it. I’m also loving that there are some new products with this collection - including rub-ons, ephemera and washi tape! You can find the full collection in the shop now!
The patterned papers in this collection are beautiful, so I wanted to create a layout which showcased several of them. To do this, I decided to cut circles from several of the papers. I’m a sucker for circles and hexagons on a layout, and it’s my go-to technique when I want to use lots of different papers, without overcrowding the page and making it look too busy. To cut my circles, I used a set of metal nesting dies. These allowed me to easily cut several circles of varying sizes.
I arranged the circles on my background - offset slightly and more towards the right hand side of the page, and with a circular photo in the centre. I decided to go for a black and white photo today - mainly because there were so many different colours in the photo and I thought it would take away from the beautiful colours in the collection - but also because the collection has pops of black, and so a black and white photo seemed the obvious choice!
With my circles and photo in place, it was time to add my title. I selected the ‘Happy Day’ Foam Sticker as it describes the photo perfectly, but also because I felt it was well-suited to a circular photo and had a natural spot for the photo to nestle in.
Now it was time to add the beautiful florals! This collection is certainly not short of florals - it has floral patterned papers (perfect for fussy cutting), Floral Bits and Pieces and florals in the sticker book, so I was spoilt for choice. I selected a couple from the Floral Bits and Pieces, and some from the Sticker Book and arranged them around my circles.
I embellished further with a couple of fussy-cut butterflies from the ‘Shine Bright’ patterned paper, a few chipboard hearts from the chipboard stickers, and a couple of phrases from the element stickers.
As my design was offset towards the right of the page, it left me some space on the left, which I felt needed some colour. I tore a strip of floral patterned paper and layered it with some bazzill cardstock behind it for contrast. I then added a chipboard sticker and a tiny fussy cut butterfly to finish.
I absolutely adore how this layout turned out. I always love the Simple Vintage collections from Simple Stories but this has to be one of the most beautiful collections I’ve ever seen. It’s definitely love at first sight!
If you’d like to watch this layout come together, there is a process video over on my YouTube channel.
Thanks for reading, I’ll be back later in the month with another Life in Bloom layout.
Take care,
Rebecca x
@preciouspagespapercraft
Monday, 6 March 2023
Simple Stories - Wildflower - Life In Bloom
Hi everyone,
Following lots of lovely new releases from Simple Stories, today I'm bringing you a layout made with the new Wildflower collection, which is a collaboration between Simple Stories and My Minds Eye.
In real life, this collection is absolutely beautiful, way beyond the pictures you see online.
For this page, I'm focusing on the patterned papers and florals, offset against a mixed media background.
I started with a piece of Premium White Cardstock, applying a heavy cost of gesso as I planned to add quite a lot of water to the page.
With watercolour inks, I applied blue, pink and yellow ink in vertical lines with a brayer, letting each colour dry before adding the next. I love the effect this creates and enjoy the extra level of control the brayer brings so you don't get very messy!
Once the ink was dry, I took a scripty stamp from my stash and stamped randomly in black ink, in a vertical line. Some of this is hidden by the photo, but you can still see a hint of stamping which doesn't overpower the layout.
To create my layers, I mounted my photo on several pieces of paper, using the b sides of the Complete Bliss and Breath Deep papers, as well as a piece of blue Bazzill cardstock from the Matchmaker Pack, distressing all the edges to give some extra texture.
Once these were in place, I started to embellish.
I decided to create three main clusters, colour-blocking each embellishment cluster with the ink I had added to the page, creating tone-on-tone clusters as much as possible. I used flowers from the Floral Bits & Pieces Ephemera Pack, and Combo Stickers. In this first yellow cluster I also added a pretty yellow tab from the Journal Bits & Pieces pack.
Friday, 3 March 2023
Pinkfresh Studio ~ Spring Vibes #2 🌼
Wednesday, 1 March 2023
February Papermaze Kit - Part 3
Lynn here today, back with an extra post with the February kit. I made a total of six layouts this time with the brightly colourful kit.
Here is the kit:
For full details of the kit please see the first blog post.
Bright Lights - A photo of my girls when they met up at Kings Cross St. Pancras last month.
I gutted the 'Kissing Booth' paper to make a frame of 2.5cm deep. The white cardstock was trimmed to 26.5cm x 26.5cm. I used a Tim Holtz Layering Stencil THS003 Rays and Distress Ripe Persimmon Distress Ink, Over the top half of the card, I stencilled through with a blending tool, making the ink darker near nearer the centre of the rays. I diluted some more of the Ripe Persimmon and flicked this over the stencilling. Then I also used Black Soot, Mustard Seed Distress Inks and did a little more flicking. Once this was dry, I randomly stamped some hearts with the Black Soot Ink and the stamps included in the kit.
One
of the doilies from the kit was stuck to the bottom left of the rays. I
store a strip of 'You're a Dream' paper, and with the black side up, I
stuck this across the centre of the cardstock.
Using some scraps of Black and White cardstock, I double mounted my photo, and stuck this to the right side of the page. The cardstock was stick to the centre of the frame. I fussy cut a few tickets from the 'Kissing Booth' paper and stacked them to the left of the photo. Some of the tickets were glued to the base and others were raised with 3D foam pads. My title was made with two sets of letter stickers - Rockabye Black glitter foam Thickers and LDRS One Fine Day small puffy alpha stickers.
Finally, I scattered the Bo Bunny Candy Dots over the stencilling.
London - My Nephew and his family in London on their way to the theatre see Frozen.
I trimmed the 'Dream Chaser' paper to 21cm and placed this over a scrap piece of 12" x 12" cardstock. I arranged this with Aqua Bazzill trimmed to 8cm under the paper and 1 cm at the top of the paper. I added two strips of ready die cut Bazzill Basics Trims from my stash.
With a Vicki Boutin - Colour Study - Bubbles stencil and Evergreen Bough Distress Ink, I inked dots over the area where my photos will sit later.
My
photos were mounted onto the scraps of 'Dream Chaser' paper, using the
flip side. I made a rosette with the Tim Holtz Sizzix Thinlits set, and
scraps of the 'Ticket Booth' paper. I added a cardstock shape from a Doodlebug pack of Odds and Ends Chit Chat.
I made my title with a die cut banner, which I cut in white card and inked with Distress Ink. Then I added lettering with some Doodlebug Teensy Type Alpha Stickers in Lily White. The word 'London' was created with Thickers Cecily Glitter Chipboard Alpha Stickers.
More of the Teeny Type stickers were used for the date, and I also added a few more fussy cut tickets.
That's all for February, I'll be back soon with a new kit for March.
Thanks for looking.
Lynn x
.jpg)