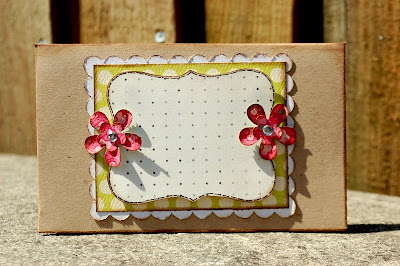
I love making cards but always hate sending them out in envelopes as the envelopes always look so boring...so i decided to have a go at making my own envelopes that match the card...
First off i actually took a cheap envelope that i liked the size and shape off and opened it all the way up ( very carefully as to not rip the parts with the glue)...
I then traced round it onto some kraft card...sorry didnt realise the lines on this didnt show up very well, but you get the picture.

I wanted the edge of the envelope to be decorative so i used a punch on it...
 I then inked all the edges...
 with ink and a sponge...
I then drew around it again but this time i made it half a cm smaller and out of pattern paper...

 I then adhered it onto the kraft envelope...and stuck it all together...
 I then wanted a fancy way to close it...
So i punched out two circles one a little bit bigger than the other...inked round the edges...
 and attached them together with a felt brad...
 I then made some holes in the envelope like so...one on the flap
and one on the body of the envelope...TO make sure they were in line i drew a line and then erased it afterwards...

I then secured the brads...
 and to secure it together i used some string...
Then i moved onto the front of the envelope...
I layered the following...
 onto the front of the envelope
The green rectangle size is 9cm by 7cm...

I then punched out some small flowers...
 and layered them...
 added some gems in the middle and added them either side of the green square
Now onto the card...
I cut out a rectangle of kraft cardstock to the size 17cm by 12 cm and cornered all the edges...
 I then layered papers and ribbons onto it as seen in the photo below...
the green dotted paper is - 10cm by 8.5
The pink layer at the bottom covers the whole of the card so i adhered that one first.
I added a small layer of scalloped paper ( using the Basic Grey Basics called Docket)
And then under that i added some of the new Prima Lace in brown.
I then adhere it all together...dont adhere to the actual card just yet though....
I then used a Making Memories frame...
 i tied a button with string and laced it though and up over the top of the frame...this is then stuck to the card... ( sorry the photo is missing the pink chequed paper at the back, it should be there)
 Tie the string around the back of the card and adhere it with string tape...then add another button to the the other side of the frame...
 I then layered these...
 Jelly Bean Soup journaling spot, text scalloped circle and a Prima Flower...
 Here is the final product...


 The pattern paper i used for this project is My Minds Eye - quite contrary Mary Mary
I dont intend to send this one though the post ( obviously lol!!!) but i think being hand delivered, it brings a bit of a difference to the envelope, which is what i wanted...
Thanks for popping in...come back 2m for another pretty as a picture project...Wendy x

5 comments:
I have so so enjoyed every one of these tutorials. thank you so much!
Oh wow - I wouldn't dare post that! But a beautiful card to hand deliver and to receive obviously.
:)
wow!!! Love all these projects... :)
Thanks for the inspiration..
Hi Wendy,
Just found your blog and this one via Cosmo Cricket. Now you are my fave!
Post a Comment