Friday 30 September 2022

How To Start A Journal - Part 2

 Hello, Lisa here with more journal chat.


Did you see my post earlier this week where we transformed an unwanted cookbook into a journal?

It went from this.


to this


I have the full process video here if you missed it.

Today we are moving on to the next step.
Starting inside the journal.

It's a question I get asked about a lot.
How to start a journal?


I talk about different ways to start a new journal and show lots of examples.

I then also start working on this new one.

I'm using this lovely collection once again from Cocoa Vanilla Studio - Storyteller.

The reason I called this journal my Storyteller journal : )


I wanted to give this journal an introduction so carried on with the Storyteller collection inside using the papers, die cuts and stickers.

The dark background went so well. I added some gesso and some stencilling too.


And then used a white gel pen to tell my first story. 

The story behind the journal and my intentions for it.

I thought this would be a good start.


I'm so excited to get creating in this new Storyteller journal.

If you love telling stories too, I really encourage you to create one too.


I hope this inspires  you today.

Have fun


Lisa x

Wednesday 28 September 2022

Keep Going, Keep Growing - Paige Evans’ Garden Shoppe Collection

Hello, it’s Rebecca with you today sharing my very first layout created using Paige Evans’ new ‘Garden Shoppe’ collection. I’ve been a little bit excited for this collection and have been waiting (im)patiently for it to arrive - but it’s finally here and you can find it in the shop here.


For this layout, I wanted to scrap a photo of my little boy in a local sunflower patch. Paper #7 was perfect for this layout as it is full of clusters of yellow flowers. I’m not entirely sure if they were intended to be sunflowers, but that’s what they look like to me! I fussy cut the whole sheet to use the flowers as embellishments. Paper #8 also stood out to me as being perfect for this layout - the colours work beautifully with my photo and this gave me the idea to limit my colour palette to just yellows and greens for this layout. 


I cut my photo in a Hexagon shape, and then cut a hexagon from Paper #8. I matted both hexagons with coloured cardstock from the Bazzill Matchmaker Pack - again, sticking to green and yellow. 


Wanting to add a little ‘something’ to my background, I reached for a Tim Holtz stencil and my Distress Oxide Ink Pads. I chose to use the shades Mowed Lawn and Fossilised Amber, and with a blending brush, added some light ink through the stencil onto my background. I then also applied some ink directly to my background to fill in some of the gaps behind the hexagons. 


I adhered the two hexagons to my background with craft foam behind them to introduce some dimension to the page. With my fussy cut sunflowers, I then began to embellish the layout. I added some flowers to the edges of my hexagons, keeping a tight, central design. I also added some to two corners of the layout as I felt the outer edge of the page was looking too empty. I’m all up for lots of white space on a layout - but so long as it doesn’t make the page look too bare and empty. 


Selecting some stickers from the Sticker Book, I embellished further. I’ve added some of the stickers to white cardstock and cut them out to make them a bit more sturdy and to help them stand out on the page. I love how a lot of the stickers in this collection are foiled - they add a bit of bling to the page. 


I also added some of the Accent and Phrase Stickers. I love this 12x12 sheet of stickers - I always seem to notice more on it every time I look! 


I finished the layout off with some gold splatters. For this, I watered down some metallic gold acrylic paint and applied it with a paintbrush. 


I hope you like the completed layout. If you’d like to watch it come together, there is a process video up on my YouTube channel here.


Thanks for reading! 


Rebecca x

@preciouspagespapercraft


Tuesday 27 September 2022

Let's Start A New Journal Together - Let's Tell Stories - Part 1

 Hello, Fancy starting a new journal with me today?


Lisa here. You know how much I love a journal, especially a DIY journal.

I love the freedom it gives me creating one myself.

Today I'm taking an unwanted cookbook.


My daughter was having a sort out before going back to uni and this was in the charity pile.

I'd recently watched 'Indie Quill' on YouTube and seen that she's used a Jamie Oliver cookbook as a journal and I loved this idea, so decided to do the same with this one.


I do have a video here if you'd like to see how I went about this from start to finish.

And the paper collection that plays such a large roll in this journal is this one here.

Cocoa Vanilla Studio - Storyteller.


I love to tell stories in my journal so I've taken the name of this collection and called this my 'Storyteller Journal'. 

A place to share random stories in any order.

No rules, just fun and stories.


I used the papers from the collection to cover the book. Using Mod Podge worked really well for this. I added paint too and some of the die cuts and stickers and then went over the top with another later of Mod Podge to secure it all in place.


I love the wording 'Melt' on the book so I kept that.

I also used some of the packaging.

The large word 'Storyteller' is actually the packaging of the die cuts.

It works so well : )


I carried on with the decorating on the reverse of the book.

The wording of the papers, die cuts and stickers was such a great fit as you can see.


I added some washi to the spine, also coating in Mod Podge to secure it.


I'm so happy with this new journal and feel very excited for our new storytelling adventures together.


I hope it inspires you to transform a book for your stories.

I'll be sharing Part 2 with you very soon as we'll be moving inside the book.


Lots of love

Lisa x

Monday 26 September 2022

P13 - Hit the Road - Summer Days

Hi everyone!

I know we're all now officially in Autumn mode, but I'm kicking off this new week with a little bit of summer scrapping - reminiscing, documenting all the fun adventures we had over the last few months.

Today I'm using the Hit the Road collection from P13. It's hugely versatile, and would certainly translate across the seasons to document any outdoor adventure.


I have to say, P13 have knocked it out of the park with this collection. The addition of all the different ephemera packs, tags, tickets, stickers and phrases has been so much fun to create with - the possibilities are endless and I still have plenty left over for several more layouts. I'd highly recommend them.

I started with some Premium White Cardstock and applied clear gesso as I planned to create a mixed media background.

Once the page was dry, I added a bit of water and used Distress Oxide Sprays in Scattered Straw, Bundled Sage and Tumbled Glass. I love the combination of these colours and they are the perfect match to this collection so grab them whilst you can!


To create the sun rays, I used a dry brush and some Distress Oxide in Squeezed Lemonade through a sunburst stencil. This really helped to anchor my page and provides a central focal point to build the layout on top of.


I tore two strips of paper (Paper 4 and Paper 6) to echo the sunny blue and yellow tones. These papers are so beautiful in real life - the colours are absolutely gorgeous!

On top of the paper strips, I built my layout, starting with the frames from the Ephemera Frames and Words pack.


Around the frames, I build my forest using trees from the Ephemera Bits & Pieces pack and fussy cut from Paper 7.


At the left end, I added an embellishment cluster comprising elements again taken from the Ephemera Bits & Pieces pack and Paper 7.


I also tucked in some moss from my stash for extra texture.

On the right hand side, I created a secondary cluster to balance the page, using the Ephemera Bits & Pieces.


For my title, I used an acrylic piece from the Papermaze August Kit. There are a few still in stock if you want to add this gorgeous title to your stash :) 


As a finishing touch, I added a subtitle just above the acrylic piece, using the 'Pure Happiness' title from the Ephemera Frames and Words and tied some bakers twine across the bottom to reinforce the rustic feel of the countryside.

Hope you've been inspired by the pages I've created - I have certainly enjoyed making them.

I'll be back next month with a new collection. Until then, take care.

Claire xx
@scrappysulmate  


Friday 23 September 2022

Simple Stories ~ Say Cheese at the Park #4 🐭

Hi it’s Anna back with you today! 
I have another layout to share with you using Simple Stories Say cheese at the Park - I have had a whale of a time with this collection, it’s been perfect for documenting magical Disney memories. 
You can find all of the collections as part of this release in the shop here.. 

For this layout, I have used the Say Cheese at the Park part of the release and in particular the ‘Tags’ paper. 


I began with a 12x12 piece of white bazzill cardstock. I then selected 8 tags that I wanted to use. 
I decided that something was needed on the background, so I added some Distress Ink in the shade of Fossilised Amber. I then used a stencil to apply some more Distress Ink in the shade of faded jeans


I arranged the tags on my layout and added my photos to some of them, mounting them with cardstock first. 


I used stickers from the Combo Stickers and Sticker Book to embellish the tags. 

I added a few finishing touches, by randomly adding some Nuvo Drops. 


I used the alpha stickers from the sticker book for my title. 


I finished the layout off by adding some twine, tying it between each of top and bottom tags. 


Thank you so much for looking! 
See you again soon. 
Anna 
X

Wednesday 21 September 2022

Carta Bella Welcome Fall - Hello Autumn

Hello, Karen here. I hope you're doing well. Today I'm sharing a layout that I've created using a digital cut file from Paige Evans and the the beautiful new Welcome Fall collection from Carta Bella. This collection features traditional fall/autumn colours and images of pumpkins, autumn leaves, florals, etc. 

As well as using the new 'Welcome Fall' collection I have also included some scraps of last years 'Welcome Autumn' collection in my layout. Carta Bella (and other manufacturers) often use a similar colour palette throughout their themed collection which means you can easily mix and match old and new collections. As well as using the 2022 and 2021 collections on the same layout (both of which are available in the shop), I could also have mixed in some of the even earlier autumnal collections such as 'Hello Autumn' or 'Fall Market'. And as an added bonus, because Carta Bella is the sister company of Echo Park, their collections also mix well with Carta Bella too so I could also have included Echo Parks 'Fall Fever'or 'Fall' collections. This makes these collections such great value for money as they present so many opportunities for using them.


I started my layout with a sheet of Acorns and Leaves paper. I trimmed about a quarter of an inch from each edge and them matted the B side onto a sheet of white 12x12 cardstock and machine stitched round the edges using white thread.


Using my Silhouette Cameo I then cut Paige Evans Leaf Background file from smooth white cardstock, sizing it so that it would fit my layout with a small border round the outside.

Using scraps of papers from the Welcome Autumn collection and some gold mirror card I backed the cut file. 


The backed cut file was added to the layout but before gluing it down I splattered some gold Heidi Swapp Color Shine on the background paper. It doesn't show too well in the photographs but in real life it add a little extra shine.


My four photos were matted in pairs onto more gold mirror card and then placed on top of the cut file.


I fussy cut some flowers from the Autumn Blooms paper and used these to embellish the page, placing clusters of flowers on the corners of the photos.


I also cut a phrase from a tag in the Frames and Tag Ephemera Pack and placed this on top of one of the flowers as a title.


Finally I added a few gold sequins and the date using letters die cut from the gold mirror card.


I hope you like this layout and love the autumn collections as much as I do. Why not pop along to the shop to check out what is available and even if you already have autumn themed papers left over from previous years maybe think about mixing some the newer papers with them on your layouts, cards and other craft projects.

Take Care, Karen x x


Sunday 18 September 2022

Thankful Tiered Tray Decor ...Photoplay Thankful Collection

t

 Hello again, it's Anita here with you today.


We are now at the start of my absolute favourite time of year....Autumn! And there are some beautiful, vibrant paper collections out there to create with! I am lucky enough to have some of the Photoplay Thankful Collection to work with for my post today.


For the last couple of years I have been enjoying looking at Pinterest and other sites seeing the gorgeous tiered trays that seem to be all the rage in the USA. There are several variations of tray available and people decorate them to match the seasons changing and for other themes and celebrations....and I have completely fallen in love with the idea. 

They can however work out quite expensive and as I rarely have spare money to buy *non essentials* I thought I would try and see what I could create myself for a fraction of the price!

Have a look and see what you think!


 I started off with 2 different sized lightwood trays that I bought from Hobbycraft and a plain pine candle stick that I painted to match the trays. I dry brushed the trays and candle stick with white acrylic paint to give it a more rustic effect and used wood glue to fix the trays to the candlestick and create the 2 tiers.


Here is a list of products used to create all the following items that I have made for my 1st ever tiered tray attempt.

Thankful and Blessed

Warm and Cozy

Pumpkin Spice

Element stickers

Lengths of 90mm x 20mm wood 

Lengths of 68mm x 15mm wood

Lengths of 90mm x 90mm wooden posts

Childrens Alphabet wooden blocks

wooden beads

ribbons, raffia and twine

mini wooden rolling pin

pine drawer knob

Various colour acrylic paints

MDF blank square photo frame

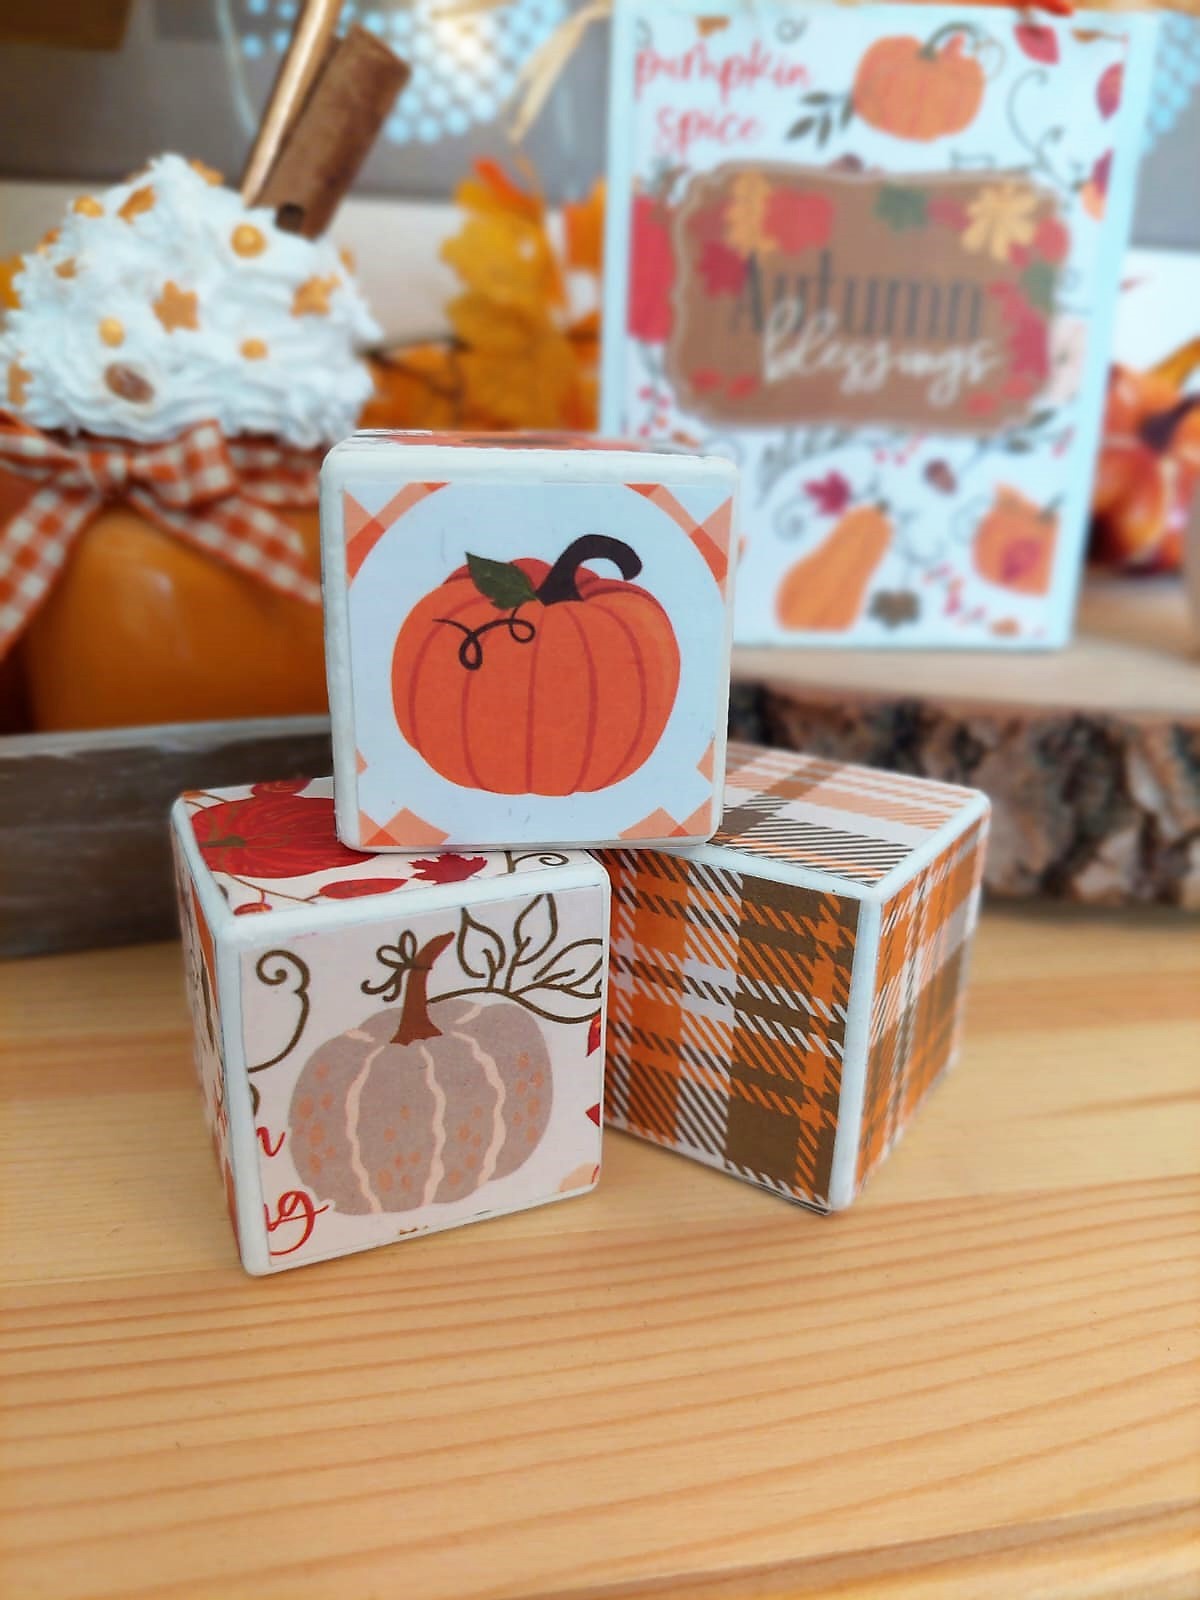
So, all of the wood pieces, blocks and bricks were painted with white, pumpkin orange or sage paint and then gently sanded the edges to slightly distress them and soften the edges. I added stickers from the element sheet and panels from the paper sheets, then raffia, twine and ribbons where needed.


The chunky wood block had a painted pine handle added to the top and I wrapped twine, raffia and ribbon onto it.


The beads were all painted with the same paints and I made a tassel from the twine and gingham check ribbon.

The MDF picture frame was painted white, backed with the reverse side of the paper and a rather lovely quote added.
 

the mini rolling pin was covered in paper and the raffa and ribbons tied on the ends. Super cute!

I made the pumpkin latte from a mini mason jar and added cinnamon, a straw and some sprinkles to the topping, finishing off with a gingham bow.


The childrens little alphabet blocks make a delightful little addition to the trays and you can make as many or as few as you like.

I added a few little shop bought bits...ceramic and plastic pumpkins, wooden mushrooms, greenery and autumns leaves.


I have to say that I am so very pleased with this for my first attempt and I am looking forward to decorating for Christmas in a short while....maybe even Halloween first!!

I hope you have enjoyed my post today, thank you for looking.


Warmest wishes

Anita xx