I know the Christmas season is almost over but I just wanted to share a wall hanging that I made for one of my daughters.
I used a large chipboard shaped ornament and decorated it using the Simple Stories DIY Christmas collection. I was also sent these adorable acetate snowflakes that added a sweet touch to the piece.
I hope you are all busy enjoying your Christmas x
Tuesday, 30 December 2014
Sunday, 21 December 2014
wall hanging
so after a recent trip to Ikea and eagerly looking through there catalogue I stumbled across a clever idea of using a cork trivet stand as pin board.
For this project I used the beautiful Bo Bunny candy cane papers. I cut out several different sized circles of pattered paper and my photo. I wanted to be able to remove the photo and change it, so I attached the photo to the cork trivet by using a drawing pin. Wooden stars have been adhered to the smaller circles and the tim holtz mini snowflake die has been used to add dimension.
The stickers spell out "I believe" and the dots on the letter I is done using curled up wire and mini buttons.
The edges of the paper are distressed using pumice stone distress ink.
Friday, 19 December 2014
Best Day Ever
Hi, It's Lisa with you today.
As we near towards the end of the year, I like to think back to some of my favourite days that we've had. One that stands out in particular was a day at one of the Disney Waterparks in October.
Typhoon Lagoon.
We met friends there and just laughed all day.
Hot sunny weather, good company, a lazy river and ice cream.
Who could ask for more????
I documented this day here.
I didn't have much of a plan for this LO. It just all came together. I was feeling arty and started on the background. I loosely based my colour combo on the photos.
I started by tearing some old book pages and gluing to the LO and painting gesso over the top and left it to dry.
I dipped my paintbrush in some acrylic paints and then in a pot of water and let them drip over the LO. I did this with different colours. Some of them I swished over the page a little and then dried off.
The splashiness kind of goes with the water I guess : )
I inked up a couple of my Kaisercraft background stamps too. These are great. I think they are really good value for money. There are quite a few to choose from here.
I already had these Mini Placemats in mind from Jillibean. I'd placed them to one side to use.
I've got quite a few of these now and really enjoy using them. They are great to use on cards and PL pages too. I used 2 on this LO.
I have to show you the bucket of ice cream that we shared. Yes that whole bucket is full of an ice cream sundae. I'm not a big fan of ice cream but that was amazing. It tasted homemade.
So do you have a favourite day from this year that you are going to scrap?????
xx
Monday, 15 December 2014
Twas the night before Christmas….
Hi, Carol with you today with some more Graphic 45 Christmas paper makes…. at this time of the year I'm well in card and tag making…so, with the left overs of my papers I have made these:-
For my base I have used a 6" square card base and have covered that with Graphics 45 Christmas backing paper …..The main image has been cut from a large 12" x 12" page I added stickles to the holy leaves, the berries and Santas beard….another cut out from a 12" x 12" page added the clock…. small poinsettias from here finished off my card…
I also made a matching tag:-
I used a tag for my base and covered with the same background paper and added piece of washi tape to the bottom…I cut out Santa and his sack from left over pieces of a 12 x 12" sheet and added stickles to his beard and trim on his outfit…and toys in his sack….a couple of tags from the tags and pockets sheet were added to finish off the tag…
All items available from the shop
Here are they both together:-
This is my last Papermaze post before Christmas to I would like to wish you all a Very Happy Christmas and a Happy New Year and I will see you on the 2nd January 2015.
Friday, 12 December 2014
Using December's kit
Our December kit is available today, and although it is the season to be merry, we've tried to make it a festive kit, without being overly so! So you'll find a sprinkling of snowflakes, a smattering of stars and a few glimpses of glitter. With colours of red, gold and teal, the kit could easily be used to showcase Christmas photos. But the designs equally lend themselves to non-Christmas projects - just take a look at the layout that Lou has created here:
It's great value at £10 and there's also the option to buy an extra co-ordinating cardstock kit to supplement the 2 sheets that come with the kit. You can find it on the website here :)
Our Christmas crop is tomorrow, and features our Christmas challenge kit, Christmas bingo and two free make and takes! The shop is opening up early, at 9.30am and will close around 11-11.30am. If you fancy joining us, just drop us an email!
Wednesday, 10 December 2014
Bo Bunny Candy Cane
I looked at all the new papers in the shop and the new Bo Bunny candy cane collection caught my eye. Not colours I would have normally have gone for, but lots of fun to use.
I have used blocks of patterned paper distressed with pumice stone distress ink on some white card stock. Cut elements out of the patterned paper and the letter stickers off the sticker sheet to create my title.
The acetate layout is from my minds eye transparent frames.
the snowflake is made from cutting the patterned paper using the Tim Holtz mini snowflake rosette and the finally added some light grey ink splatters to my layout
Monday, 8 December 2014
Scraps and Stars
Hello, it's Lisa using up scraps today.
Do you tend to keep hold of pretty scraps too?
They are far too pretty to throw away, but then you just keep on buying all the new pretty papers that come out and before you know it you are swamped in pretty scraps.
Today I am using up some scraps.
I ordered quite a lot of the DIY Boutique collection from Simple Stories in the Summer. I'm a big Simple Stories fan.
This particular paper was a fave of mine.
I'm a sucker for little frames!!
I still had some of the frames left so I made this LO here to use them up.
I still have a couple more frames to use. I might make a couple of cards.
I also used a Prima Star Stencil.
It's the first time that I've tried one from Prima and I was really impressed. They feel really solid in comparison to some stencils that you can buy. I will definitely be adding to my collection.
You can see the whole range that we have here.
They are worth adding to your Christmas wish list : )
See you soon xx
Wednesday, 3 December 2014
Simple Stories DIY Christmas
Tracee with you today.... Do I look older?
Sharing a quick and easy project with you today as I have been busy celebrating my big umm ...0
I love to make a cards with matching gift bags and that is what I have to show you today
Sharing a quick and easy project with you today as I have been busy celebrating my big umm ...0
I love to make a cards with matching gift bags and that is what I have to show you today
I was given the Simple Stories DIY Christmas collection to play with and it a super collection with gorgeous reds and greens, all set off by a striking black for contrast.
I used some Kraft cardstock for the background of my card to match the Kraft bag that I altered.
I added some inks and used 2 different Polka Dot masks, I then used another mask with texture paste to create an interesting but simple mixed media background.
I followed the same steps on the bag for the background and then clustered some more of the elements from the Chipboard shapes to complete my bag.
I hope you enjoy the projects for today and don't forget to pop over to the shop to purchase some of this adorable collection for yourself
Tuesday, 2 December 2014
Baby It's Cold Outside
Hello, it's Lisa here today.
I hope you are all cozy and warm.
I've been playing with the Carta Bella 'All Bundled Up' collection.
To me this is the perfect Winter paper collection.
Those colours have my name all over them and I'm not one for themed papers. I like something that can be used all year around. I love these!!
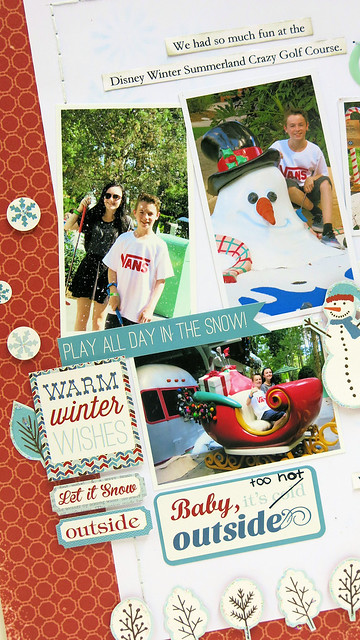
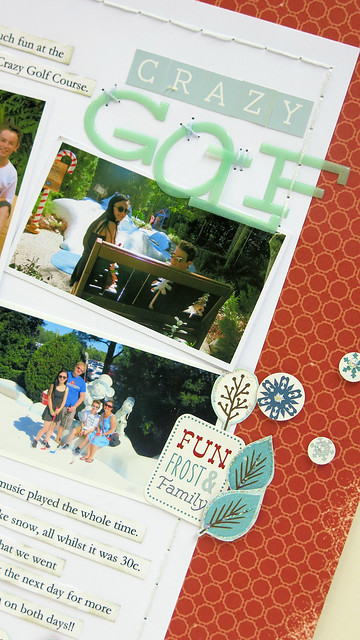
I wanted to document a morning we had at a Disney Crazy Golf course recently.
It's called Winter Summerland. It's Christmas all year round. Christmas songs are playing, everything is Christmas themed and there's even fake snow.
All rather odd when it's 30c out there, but so much fun.
I used this paper here 'Snowmen' as my background, but as always, I loved both sides. So I cut out the area behind the white cardstock so I could cut out the snowman and all the little leaves.
It worked a treat!
I also had cut all the little trees from the same paper and stuck them along the bottom of the LO. I alternated between sticking one down with glue and the other 3d foam tape.
I love these stickers. They are so much fun!!
I finished off the LO with some hand stitching and some stickles of the leaves and snowflakes.
I can't wait to carry on using this fun collection.
I have so many more ideas.
Thanks for stopping by today xx
Monday, 1 December 2014
Welcome December…..
Hello, Carol with you today as we head into the last month of the year….with most of us frantically making those Christmas cards, tags and presents that we thought we had time for…will we do it? I am usually finishing off those "special" cards on Christmas Eve Eve!!
So, I thought that I would share with you a quick tag that I've made…
I started by cutting a tag from cream cardstock, or you could use a ready cut tag, tape your tag to one of the fantastic new Christmas stencils from Tim Holtz, I have used the holiday knit stencil using festive berries distress ink and evergreen distress ink and a blending tool add colour to the tag, over blending in some areas….ink the edges with the festive berries ink…
For the poinsettia - this is made using the poinsettia bigz die….for this large size I have used all of the die cuts, using this versatile die means that you can mix and match the sizes so that you can make a flower thats the right size for your project - for this one I have cut a large green set of leaves, large, medium, small and centre in red….I then cut out two of the red leaves and fixed these to the large green so that you have 3 green and 2 red on the base level - Ink the edges with walnut stain distress ink and then painted a layer of crackle paint in rock candy over the leaves and left to dry…. once dry build up your flower glueing each layer in place, I have used a button for the centre…. I have added a strip of washi tape and then added my poinsettia - add a couple of pins and then some elements from the Graphics 45 tags and pockets pack
All elements are available from the shop just click on the links.
Thank you for looking today.
Subscribe to:
Posts (Atom)


.JPG)


.JPG)


