Wednesday 29 September 2021

One Collection - Four Super Quick Projects in Under 45 mins

Hi, Lisa here! 

Anyone else struggling for creative time right now?

For me it's definitely all about the quick projects right now.

I need speedy craft fixes.


I always say that by having a good paper collection, it instantly speeds up the process.

For these projects today I'm using the 'You Are My Sunshine' from Bella Blvd here.  

And I created all this here.


I do have a full process video coming to my YouTube channel on Monday here.


I started off by creating these 3 tags.


Tags are fast and can be used on your scrapbooking pages, as card toppers or pop on a gift or in a mini book. I love using tags!! They are perfect if you need a quick craft fix as they don't take much time.

I love the contrast of these fun papers and I used 3 of the strip stickers from this 12x12 set here.


Next I made this card. I often make more than one using the same design, but I just made the one today. I destressed the edge a little and cut one of the elements from this sheet here.

I use sheets like this all the time for card making. They literally take 5-10 mins per card. 

Next was a quick pocket.


I love using pockets in my journals, but they work great for scrapbooking pages too. 

Perfect for hidden journaling, adding memorabilia or using as a gift card for someone. 

Finally I created a new page in my Orlando Journal.


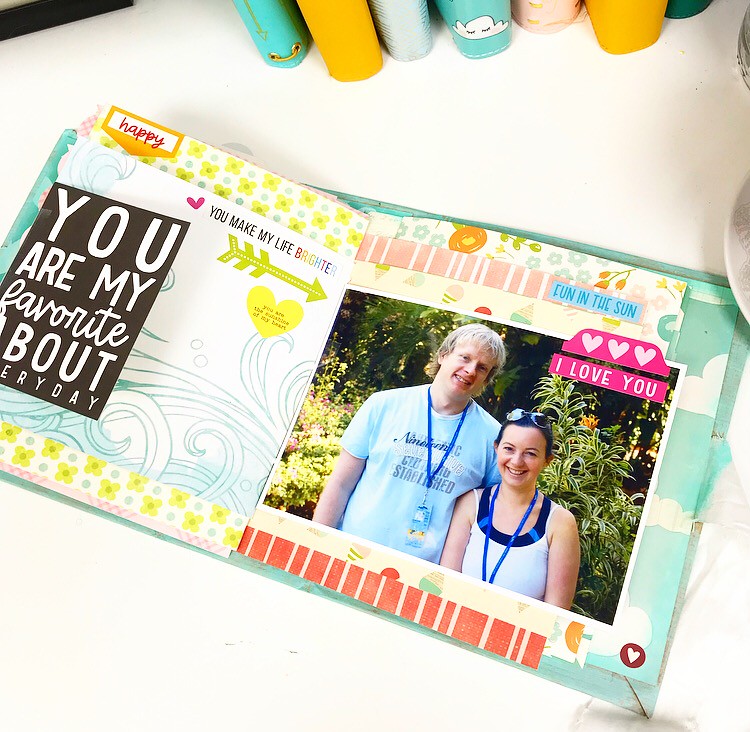
 Again, this came together in minutes.

I had a large photo from 2007, so I backed it with the cute cloud paper here.

added a few stickers from the 12x12 sheet.


I loved the card from the elements page, so I cut it out and added clear tape to the left so it flips open to reveal my journaling.


And again, I've just needed stickers to embellish.


And that's it.
One collection, 4 projects in under 45mins.

I hope you feel inspired.
Don't ever put lack of time put you off from crafting. There's always ways.

Lots of love
Lisa x


Monday 27 September 2021

Simple Stories - Vintage Costal #3 - Sun, Sea & Sand

Hello! Happy Monday!

ScrappyAdam back with you at Papermaze today, finishing up September with my third Vintage Costal layout!  

I did bring in a couple of elements from 49 + Market's Beached Collection and the older release of Vintage Costal because it all works together so well!


I started with a sheet from the Basic Kit which have a lovely slight distressed look. Using a mix of scraps and 6x8" Paper Pads from both collections, I cut 9 squares at 4" to make a grid. I also inked the edges with some blank ink

I added two photos - matting them on a 6x8" sheet, cutting the photos down to slightly less than 6x4"s and set about creating some clusters around the page and photos. I wanted each square to be a little feature without overshadowing the photos. 


I am a big fan of dimension on my pages - it does mean bulky layouts and bulky albums but I love the dimension and different textures! So, I am a fan of the very dimensional layered stickers, the foam stickers and the chipboard - so they all feature on my layout here!

Of course, more is more with me and so I also brought in the adhesive brads, sticker book and element stickers. I also used a netting style die cut piece from Beached. 

I used a combination of foam and flat stickers for my Sun, Sea and Sand title and finished off with some flair from Dotty About Flair. 


Thanks so much for joining me today - I hope you have a brilliant week and look out for lots more inspiration coming up!

Stay safe, take care.

Adam x

Saturday 25 September 2021

Pinkfresh Studio - The Best Day - Celebrate Good Times

Hi Everyone!

Claire back with you today sharing my second layout with Pinkfresh Studio The Best Day collection.

As this collection contains so many pretty colours, I decided to opt for a more summery layout this time, in complete contrast to the first layout I shared a few weeks back.

The 'So Thankful' paper was just the job. It's a really colourful, fun striped paper that screams summer and good times. I decided I would make this the feature of my layout.


I tore three strips of the paper, ruffled the edges and lay them on top of each other in a staggered design to cover almost half the page. Underneath the rough edge of each strip, I added some foam pads, helping create a bit of extra dimension.

I double mounted my photographs using the Love You Always and Hello Fall papers. I positioned my photographs roughly on the page to get an idea of where they would sit. I drew around the outline lightly and then added Shimmerz Paint Going Peach Side underneath to create a bit of a mixed media splash behind my photo.


Next, I pulled out a selection of florals from the Floral Ephemera Pack in blue, lilac, pink and yellow to match the stripes on the paper. I folded the leaves and rounded the petals to create some dimension and then layered these in a cascading design in between the paper layers and down my page.


I added some circular elements across the page, using several of the Chipboard Flair pieces and a pink floral circle from the Floral Ephemera Pack. The bigger 'Love This' phrase circle is from the Chipboard Frames.


I added a small piece from the Journaling Bits as an extra layer under my left photo, distressing the edges and added a small date label to the right photo as part of a bigger cluster using a pink camera from the Cardstock Ephemera pack and a 'love this day' sticker from the Puffy Stickers.


For my title, I again used a combination of the Puffy Alpha Stickers and Mini Puffy Alpha Stickers. As a final touch, I sprinkled some Pinkfresh Studio Jewels in Ballet Slipper amongst the florals.


I hope you've enjoyed the layouts made with this collection - as you can probably tell, I absolutely love it and am sure i'll be creating lots more with it throughout the autumn - it really is beautiful and so versatile.

Until next time, take care.

Claire xx

Friday 24 September 2021

Sweet Life - Simple Stories - Simple Vintage Lemon Twist

Hello, Rebecca back with you today sharing my second layout created with the Simple Vintage Lemon Twist collection by Simple Stories. The collection is available in the store here


I'm still loving this collection - so much so, that I was inspired to create a layout with a patterned paper background! If you follow me on YouTube or Instagram you'll know this is something I very rarely do...if at all!

I started with a sheet of the Happy Thoughts patterned paper and trimmed it down to 10.5 x 10.5 inches. I then made a slit in the top and bottom, towards the right hand side of the page, each about 4 inches long. I folded the edges back on either size of the slit, to reveal the B side pattern. I made a couple of folds to add a bit of interest, and secured them with some mini staples to bring another texture to the page. 


I distressed the edges of the entire page and then backed the empty triangle areas with the Sweet Life paper as I planned to mount the patterned paper onto white cardstock, but I didn't like the way the white was showing through the gaps. I then stuck the whole page to a sheet of 12x12 inch Premium White Cardstock, which gave my page a white border, and finished this off with a border of white machine stitching.


This collection comes with some gorgeous Chipboard Frames so I selected an oval one and backed it with my photo. It has a decorative lemon to the left of the frame which has the words 'Sweet Life' and I thought that would make the perfect title for my layout. I added some craft foam behind my photo and stuck it in the centre of the page in between the two slits.


Moving on to embellishing my layout, I selected a few elements from the Bits & Pieces pack, and positioned them above and below my photo. The idea being to have a line of embellishments cascading down the page. I popped a couple of tickets and some phrase banners underneath the photo, and above my photo I added a tag, a heart, a butterfly and another phrase banner. 


From the Floral Bits & Pieces I selected another butterfly and a bumble bee. The chipboard frame already had one bumble bee on it so I placed the cardstock bee onto the lemon so that there was one either side of the frame.


I then finished my layout with some white splatters, using watered-down white gesso to add a bit of white to the background to break up the patterned paper a bit.

If you'd like to watch this layout come together, there is a process video up on my YouTube channel, which you can find here.


Thanks so much for reading. I hope this layout has inspired you in some way - there's plenty of this collection left in the store if you fancy having a play with it. I've found it possibly one of the easiest collections to work with! The limited colour palette means that everything matches perfectly and I've found that the layouts seem to fall together so easily and enjoyably! Thankfully I have lots of this collection left, so this won't be the last you see of it from me!

Take care

Rebecca x


Wednesday 22 September 2021

Paige Evans ~ Bungalow Lane #2

Hi! It’s Anna here with another layout using Paige Evans’ Bungalow Lane collection! I have just adored playing with this collection, you can find what’s left in the shop here

For this layout I decided to focus on Paper 13.
It’s a busy pattern, but I wanted to showcase how it could be used on your layouts…

I began by using white bazzill cardstock as my base. I then trimmed down two 12 inch strips of the b side of Paper 4 and two torn strips from the other side.  
I mounted these to each side of my bazzill cardstock


I then cut out a selection of the patterned squares from paper 13.
I trimmed some of them down further to just the triangle, diamond or circle shapes to create some areas of white space. 
I arranged these together in a grid in the centre of the layout, leaving a slight gap in between each one. 


I made a pull out journaling card to tuck behind the largest photo, using a trimmed down project life card, which I stuck ‘the story’ foam sticker - from the phrase thickers - to the top of (I backed it first with some scrap cardstock to stop it sticking to the layout) 


I mounted both of my square photos on to the b side Paper 13
I added a title along the bottom of the grid and a few foam word stickers from the home sweet home phrase thickers.


I added embellishment to some of the grid squares by adding some dimensional stickers, enamel dots, foam stickers and punched out stars, I adhered some of them using 3D foam pads for extra dimension too. 


Thanks so much for looking! 
See you again soon. 
Anna 
X


Monday 20 September 2021

49 & Market Vintage Artistry Hike More - Sometimes Nature is all you Need

Hello, Karen here again to share another layout using the 49 & Market Vintage Artistry Hike More collection. I'm still loving this collection and for today's layout I've used some nature photos taken whilst on holiday in Norfolk.


For my background I used a sheet of the Boscage paper. I trimmed 5mm from each side and matted this onto a sheet of Bazzill Kraft cardstock to give a very narrow border to the layout. Using my sewing machine I stitched all the way round the edge using white thread.

My eight  2" square photos were double matted on white and kraft cardstock and attached to the layout with 3D foam underneath. I only put foam underneath the top and bottom edges of the left side of the photos because I knew I wanted to tuck a journalling card behind the photos and by omitting the foam in the middle it made it easy for the card to slip in and out.


Using my computer I printed my journalling onto one of the journalling cards from the cut apart sheet. I downloaded a mushroom dingbat from dafont.com so I was able to add some mushroom images to my journalling. The left side of the card was punched using a notebook border punch from EK Success and the finished card was tucked behind the photos.


In the centre of the photos I added a word strip from the pack of Ephemera Bits and used 3D foam underneath for dimension.  


I created three embellishment clusters on the layout using more of the Ephemera Bits, Chipboard StickersWashi Tape and Epoxy Stickers as well as lace, wood buttons and twine from my stash. I tried to include all the colours from the collection in each of the clusters.


By rubbing some of the rub-ons onto some patterned paper and then fussy cutting the images out I was able to create some extra die cuts, for example some of the butterflies. 


On this layout I used a lot of 3D foam underneath the elements to give the clusters lots of dimension.


Finally I splatted some Distress Oxide Ink in Peeled Paint onto the layout. 

I loved putting this layout together and love how it turned out. It was good to finally scrapbook some of the many nature photos I take. Remember to check out the collection in the shop.

I'll be back again soon and in the meantime, Take Care.
Karen x x 

Friday 17 September 2021

Simple Stories - Vintage Costal #2

Happy Friday!

ScrappyAdam back with you today sharing another layout using the beautiful Simple Stories, Simple Vintage Costal


I started off by pulling a sheet of a Vicki Boutin Mixed Media Background. These are fab when you don't want to get messy with mixed media but want the look!

I then added various strips down the middle of the page - these were actually strips taken from the packaging of the Basics Pack! I pulled out a chipboard frame and added in two photos. 


I really wanted to use one of the banner stickers and I tried the layout in various formats and ended up using a banner sticker underneath my chipboard frame and set it to the left of the page. 


I had to think then about the right side of the page. I decided to pull some sequins and another chipboard frame and turned it into a shaker pocket - and I love the result!


It was then a matter of embellishing - which I always love! I pulled the foam sticker to form part of my title along with alpha's from the sticker book (and two tile stickers from my stash). I have used layered stickers, adhesive brads, chipboard, element stickers and sticker book. You can see the full collection including the gorgeous papers and fun embellishments here and see what's in stock - it's a popular collection!

This collection is absolutely stunning and I love it so much!

Please note, this collection was re-released this year by Simple Stories after a main release last year (I think) and the chipboard frames and banner stickers are from the initial release. 

Thanks for joining me today - I will be back with a third layout using this collection next week!

Take care and stay safe!


Adam x


Thursday 16 September 2021

Our monthly crops are back!!

 Our first crop since February 2020 is this coming Saturday, 18th September.  To say we are a little bit excited is an understatement!  We cannot wait to see everyone again.  

Our kit for this crop has been designed by Janina Beckett, using beautiful Cocoa Vanilla Studios papers. 


There will be a selection of delicious homemade cakes, the tool table will be available, teas & coffees, and of course the shop will be open too!  

The crop takes place at Otley Village Hall from 10am until 4pm, and costs £5 for the day.  We still have a couple of spaces left, so if you'd like to come along please do drop us a message - booking is essential!  

Wednesday 15 September 2021

September Papermaze Kit

Hello, Lynn here to introduce the versatile September Papermaze Kit - with a mix of papers and embellishments in soft neutral colours. Ideal for many different themes including heritage, nautical, masculine or feminine.

I have created four layouts, two heritage and two with very recent photos. I have used chipboard in all of my layouts, from three different companies, all available from Papermaze.


Before we start making the pages - here are the details of the kit:

Patterned Paper's:
Prima Marketing - Nature Lover collection - In Flight
Ciao Bella - Delta collection - River Wood & Seagrass
Simple Stories - Happily Ever After - We Do!
Kaisercraft - Explorer collection - Roam
Jen Hadfield - Reaching Out collection - Over The Rainbow
P13 - Soulmate collection #02
Bazzill - Truffle & White

This shows the flip side of the patterned papers:


Embellishments:
Simple Stories Colour Vibe Alphabet Sticker sheet, 25cm lace, Prima butterfly, rainbow clip, 3 Prima flowers, 5
Stamperia Chipboard Quotes, P13 film card and 5x gems

Extra Bazzill Pack:
Yukon Gold,
Powder Blue, Pigment & Dusk.

Ferrisa Banks - (1850 - 1934) The details of this ancestor's life will be on my personal blog, and I will put them on the back of the layout for future generations to find.


For this layout I used a Tumbled Glass Distress Ink pad to ink the edges of the papers and card.

I built up the page using a sheet of scrap 12" x 12" paper as a base. Working from the outer edges I first placed 2.5cm strips of Dusk Bazzill. Next came strips of 'We Do!' paper cut to 2.5cm and trimmed with a Martha Stewart border punch - I used the pale blue side. I flipped this paper to the brown floral side and tore 2.5cm strips.  With the blue side of the 'In Flight' paper I cut 3cm wide pieces for each side and trimmed them with another Martha Stewart border punch.

To these paper layers I added strips of lace.

The gap between the strips of paper and lace were filled with a piece of Powder Blue Bazzill trimmed to 21cm wide. I stamped this randomly with the script stamp from the Tim Holtz Stampers Anonymous Entomology stamp, using an Archival Ink Pad - Potting Soil.

I tied two lengths of pale blue seam binding ribbon around the cardstock with a bow to the right side.


I selected a chipboard clock face from Tando Creative and treated this with clear embossing ink and Stampendous Shabby Blue Embossing Enamel.

My photo was trimmed and attached to the film strip card from the kit.

The Flower Buds piece from a chipboard set by Dusty Attic, was treated with a coat of Gesso. Then I added Walnut Stain and Antique Linen Distress Paints.


All the above pieces and the photo were arranged onto the page, then I embellished with Tim Holtz Idea-ology Filmstrip ribbon, fussy cut butterflies from the 'In Flight' paper, and the quote chips from the kit.


I die cut a title from the Dusk Bazzill and finally added Nuvo Glitter Drops to the butterfly wings and the flower buds.

Elizabeth Humbley Banks - (1796 - 1861) - Another ancestor from the same family line as Ferrisa.

With the Pigment Bazzill as my base, I used a stencil by That Special Touch and several Distress Ink Pads in shades of brown, to create a script background. I inked the edges with more Distress Ink. 


I tore the top from the
Soulmate #02 paper at an angle, then trimmed a tiny strip from the other three sides. This was mounted towards the bottom of the Bazzill.

I chose two
Scrapiniec Chipboard pieces, a lantern and a frame. These were both treated with clear embossing ink and some copper embossing powder. 

My photo was trimmed and mounted inside the frame before attaching it to the top left, overlapping the card and paper. I used the lace from the kit to tuck along the top edge of the paper. I also tucked half a small doily under the edge of the paper, to the right of the photo. Onto this I added the butterfly from the kit.

I placed the lantern to the bottom right of the page. With a selection of paper flowers from my stash I created floral clusters over the page. To these I added some pearls to the flower centres. The leaves were made from Dusk Bazzill using a die from Tim Holtz Sizzix Thinlits Funky Foliage set.  

I cut my title on the Cricut and embossed it with clear embossing powder to give it a little shine. x


That's all for today, back with more from this kit very soon.
Thanks for looking
Lynn x