Showing posts with label Shimelle. Show all posts

Friday, 1 December 2023

November Papermaze Kit - Part 2

Lynn back today, with the second pair of layouts made using the November Papermaze Kit. A lovely selection of bright colours with some black and white too.


Here are the details of what you will find in the kit.


Patterned Papers:
49 & Market - Spectrum Gardenia - Painted Foundations Color Wheel
Doodlebug Design - Hello Again - Dainty Dots
Simple Stories - The Little Things - Always Remember
Simple Stories - Simple Vintage Life In Bloom - Make Time
Simple Stories - What's Cookin' - Let's Eat
American Crafts - Shimelle Main Character Energy - After Hours
Bazzill Basics - CS White and Hillary

Reverse side of papers

Embellishments

9 frames of Tim Holtz Film strip ribbon, 3 Paige Evans die-cut leaves, heart button, 1m black twine, 1 sheet alphabet stickers, 1 strip of enamel hearts, 1 flair badge, 6 water droplets

Bazzill Basics extra pack - Blackbird, Apricot, African Violet and Petunia

Yes, You Can! Photos of the girls on the way home after their first ballet exam.

For this layout I used the CS White Bazzill from the kit and did some stencilling down the centre matching the colours of the papers. I chose Peacock Feathers, and Picked Raspberry Distress Oxide Inks through a stencil from my stash. I flicked more of these inks and some water over the area too.  


I cut two large triangles from the striped side of 'After Hours', then I cut two more slightly larger from the spotty side of  'Make Time', paper. The stripes were mounted over the dots and then applied to either side of the layout.


My photos were mounted on to white, then black cardstock scraps. and then arranged onto the layout. From scraps of the Make Time paper I cut some of the tickets and tucked these around the photos. 


My title and some arrows were taken from Vicki Boutin's The Details Thickers puffy phrase stickers pack.  More details were added with the alpha sticker pack from the kit.


Finally, I added the water droplets from the kit.


 Baby Girl - I used a photo of the very youngest member of the family.


I completed all the cutting and mounting of papers and cardstock, before working out where to do the stamping. The sizes for this will depend on the size and orientation of the photos. For this I used the Petunia Bazzill, both sides of the 'Dainty Dots' paper and the spotty side of the remains of the 'Make Time' paper. I mounted my photo onto some scrap white cardstock, and cut and arranged the mounted patterned papers across the page. Using Blackbird Bazzill as a base, and without sticking anything in place, I worked out where the stamps should go. I made light pencil marks before everything was removed from the background.


With a VersaMark ink pad and Jofy stamp set #14, I stamped the daisies onto the black, and heat embossed with white embossing powder. The paper, card and photo were then glued in place.


I punched some butterflies using a Martha Stewart 3 in 1 punch, I places a cluster of these around the flowers.


With another scrap of Make Time paper and more Petunia Bazzill, I made a half tag, punching a hole and rounding the corners. I used the heart button and the black twine from the kit to attach to the tag and mounted it to the top left of the layout.


I created some dots around the flowers and butterflies with White Gloss Nuvo Crystal Drops.


My title was created with some white foam letter stickers. With the sticker pack in the kit, I added Poppy's name and the date. Finally, I trimmed a selection of phrases from the 'Always Remember' paper, and placed them around the page.

That's all from the November kit, I'm currently preparing layouts with the December kit - I'll be back soon.
Thanks for looking.
Lynn x

Wednesday, 1 November 2023

October Papermaze Kit

Lynn back today, with my second pair of design team layouts using the Papermaze October kitThis kit contains some lovely, bright, colourful papers, embellishments and cardstock. 


Here are the details of what you will find in the kit:


Patterned Papers:
Pinkfresh Studio - Sunshine On My Mind collection - Poolside
Crate Paper - Moonlight Magic collection - Pixie Dust
Photoplay - Sweet Sunshine collection - Sun Rays
49 and Market - Vintage Artistry Sunburst collection - Ray of Sunshine 
Shimelle - Main Character Energy collection - Blue Skies & Zoom In
Bazzill Basics - White & Evening Surf

Reverse side of papers

Embellishments:
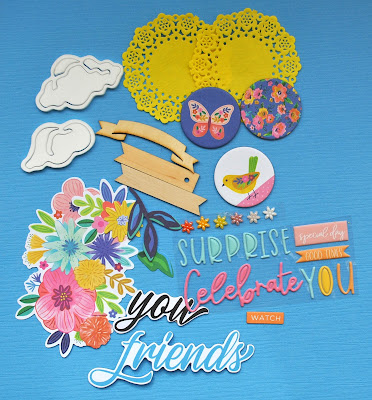
2 exclusive acrylic clouds, 2 mini doilies, 3 - 49 and Market Chipboard word pieces, 3 Paige Evans Chipboard Milk Caps, 6 Paige Evans Floral Ephemera pieces, 3 wooden banners, selection of Rosie's Studio Puffy Phrase Stickers and a strip of enamel flower gems.


Extra Bazzill Basics Pack - Berry Sensations, Lily Pond, Blue Calypso and Amber.

Summer Sunshine - A photo my father took of me on the beach at Woolacombe Bay back in the 1960's.


The White Bazzill, was stencilled with sun rays using a Vicki Boutin Print Shop Off Set stencil and a mix of Mustard Seed and Squeezed Lemonade Distress Oxide Ink. Then I added waves using a Simple Stories 'Waves' stencil and a mix of Faded Jeans and Broken China Distress Oxide Inks. I flicked some watered-down Candid Apple and Spiced Marmalade Distress Oxide Inks over the cardstock.

I tore two 1" strips of papers from the 'Poolside' paper. The torn edges were inked with Faded Jeans Distress Oxide and attached to the top and bottom of the White Bazzill.


From the 'Sunray' paper, I cut four strips approx 6" deep and different widths, I inked them with Faded Denim Distress Oxide Ink and placed them across the layout, as a base for my photo.


From the remains of the 'Poolside' paper I trimmed the words 'Summer' and 'Sunshine'. I distressed the edges and applied them overlapping the photo onto the Bazzill.


With Candied Apple Distress paint, I painted two of the wooden banners from the kit. I applied some yellow twine to the hole in one banner and added Doodlebug Designs - Alphabet Soup - Swimming Pool numbers for the date. This I glued to the bottom left of the photo.

Then I used the other banner and added two pieces of twine and a Paige Evans 
Ephemera flower from the kit. This banner was placed over the join between paper and Bazzill at the bottom right of the layout.


With Doodlebug Designs - Alphabet Soup - Bumblebee letter stickers I spelt out the name of the beach.


Finally, I added the enamel flower gems from the kit.

Good Fun - A photo taken when we all got together after the second lockdown.

For this layout I choose to use a sheet of Smooth White Bazzill from my own stash. I worked out where the patterned papers would sit and stencilled with a Tim Holtz Layering stencil - Burlap THS007. I used several colours of Distress Oxide Ink - Squeezed Lemonade, Twisted Citron and Spiced Marmalade.


With the 'Zoom In' paper, I tore off a strip from the lop leaving a piece 12" x 8.5". I attached this to the Bazzill, then trimmed a strip from the remains of 'Pixie Dust' paper, with the stripes showing, I tucked this along the top of the first paper.


My photo was placed overlapping the Bazzill and the papers to the right side of the layout. I cut a tag from scrap white card, using the Tim Holtz Sizzix Thinlits Tags die set. I inked the edges, and attached this at the base of the layout, I threaded some purple organza ribbon through the hole in the tag, and tied this in a bow. I used this tag as a journalling black.

With three mini tags cut from the same card and die set, I added the date, and tied them together with a short length of purple twine. These were placed at the top of the photo.


I used the  Paige Evans Ephemera flowers from the kit and arranged them around the layout.

I fussy cut some cameras from the other side of the Zoom In paper, and arranged them on the layout. Two chipboard word pieces from the kit were used for the title and the third was added to the tag to complete the layout.

I have one more layout from this kit to share with you.
Thanks for looking.
Lynn x