Showing posts with label Autumn layout. Show all posts

Friday, 13 June 2025

All Creatures Great and Small - Simple Stories - Simple Vintage Woodlands Collection

Hi everyone

It’s Rebecca here today, sharing my first layout using the beautiful new Simple Vintage Woodland collection from Simple Stories. This collection is absolutely stunning—ideal for a wide range of photos, but especially perfect for woodland or autumn-themed memories. You can find it in the shop here.

To start, I chose a few of my favourite patterned papers and cut them into strips of varying lengths and widths. I spent a little time playing around with different arrangements before settling on a design I loved. I decided on a darker, wider strip as the base layer, with lighter, softer colours layered on top for contrast.


With my landscape photo placed in the centre, I felt it needed something to anchor it visually. I added a horizontal strip of patterned paper beneath the photo, creating a "shelf" effect to ground the image.

I'm a big fan of the 'Tags' patterned papers from Simple Stories collections and love incorporating them into my layouts. I selected two tags, punched gold metal eyelets through them, and tucked them along the vertical edges of the darker base strip—adding a nice layered touch.


With the larger elements in place, I turned to the smaller details. For my title, I used a die-cut from the Bits & Pieces and popped it up with foam pads for added dimension.


I then selected a couple of woodland-themed die-cuts from the Bits & Pieces and tucked them on either side of the photo. These larger shapes are great for forming the base of embellishment clusters, giving a solid foundation to build on.


To add more interest and texture, I introduced some subtle stencilling in two areas. Using a stencil from my stash and a blend of 'Mowed Lawn' and 'Rustic Wilderness' Distress Oxide Ink Pads, I softly added colour to the background. On top of the stencilled areas, I adhered a few fussy-cut butterflies, creating delicate trails behind them using Nuvo Drops.

To tie everything together, I finished the layout with a few ink splatters using the same Distress Oxides—bringing cohesion and a touch of whimsy to the page.


Thank you so much for stopping by. I hope you love this layout and feel inspired to get crafty!

Take care,
Rebecca xx

@preciouspagespapercraft


Monday, 4 November 2024

Mintay Papers - Autumn Splendor - The Golden Hour

Hello, Karen here with another layout using papers and embelishments from the Autumn Splendor collection from Mintay Papers, and this time I have also teamed the collection with a sheet of paper from Echo Park's Woodgrain collection


This layout was inspired by an older sketch I found on Pinterest which was created for Scrapbook Werkstatt. I can't remember ever using triangles on a layout before but thought it was an interesting sketch and would work well with the supplies I have. 


I started but gutting the centre from a sheet of Echo Park's Warm Wood Grains - Tan Wood Grain paper and then layered an 11.5" piece of smooth white cardstock on top. Using some brown thread I machine stitched round the outside edge of the white cardstock.


Using my mini brayer I rolled some watered down Dried Marigold Distress Oxide Ink onto areas of the layout where I planned to added other elements and when the ink was dry I splatted some Spiced Marmalade ink on top. The Dried Marmalade ink was more yellow in colour than I had expected but I think it still works well with the layout, adding a bit of contrast to the orange and brown in the patterned papers.


From papers #2 & #4 I cut some triangles - 2 large and 4 small. I machine stitched round the edges of each triangle and then stuck them to the layout with 3D foam underneath.


In my stash I found some bronze metalic washi tape and tucked some torn pieces of this under the edges of some of the triangles.


My 4x6 photo was printed with a white border and this was placed on top of the triangles. I love the lighting in this photo - I think it gives the photo a real cosy feel.


From the leftover Echo Park Woodgrain paper, I die cut the title using a cut file on the Silhouette Cameo. The title was placed above the photo.


Paper die cuts and images fussy cut from paper #9 were used to embellish the layout, creating a cluster in the bottom left corner with some washi tape and on the corner of the photo.


Brown word strips were created and printed on the computer and placed below some of the triangles.

Finally I scattered a few bronze coloured sequins here and there and added the date with some tiny letter stickers.

Thank you for popping by today. I'll be back soon with another project and in the meantime, please take care.

Karen x x

Wednesday, 23 October 2024

Bella Blvd - One Fall Day - Fun Fall

Hi everyone,

Claire back here today sharing my second layout with the One Fall Day collection from Bella Blvd. 

You can find it in the shop here.

For this page, I'm focusing on concentric circles and pulling together all the beautiful colours this collection has to offer.

I cut 3 circles of different sizes from the Leaf Pile, Hello Fall and Falling for You papers. I distressed the edges and layered each piece one on top of the other, but stacked them all towards the left of the circle, rather than layering them centrally one on top of the other. I hope that makes sense! Please shout if it doesn't.

I mounted my photo with the Grateful and Borders papers, again distressing the edges before adding this on top of the circles. I also layered a piece of the borders paper along the top of the photo, using a notebook punch to add extra texture.

To anchor the design, I created three ephemera clusters - the largest of which was to the right had side of the photos using those statement trees and some other pieces from the  Ephemera Icons pack.

Then, on the left side of the design, I wanted to create two smaller clusters, following the circular edge and tucking and layering leaves from the Ephemera Icons Pack and Ciao Chip Chipboard Stickers in between the edges of each circle.


Then, my favourite - a mixed font title! It's been a while since I've done this and I always love the effect. Both of these titles were from the Ciao Chip Chipboard Stickers and I love how it pulls all the colours together. For placement, I followed the circular edge again to keep the design cohesive. 

As a final touch I added some phrase stickers from the Doohickey Cardstock Stickers and sprinkled some Pinkfresh Studio Jewel Essentials into each cluster. 


I hope you've enjoyed this layout. It was so much fun to make and I'd highly recommend this fun collection for your autumn scrapbook pages. 

Until next month, happy scrapping! 

Claire x

@scrappysoulmate 

Monday, 21 October 2024

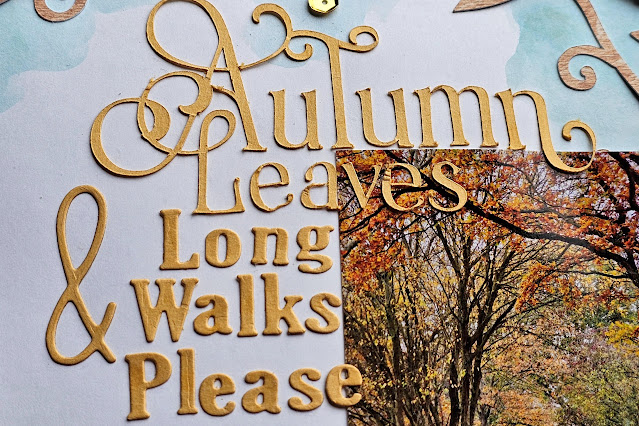
Mintay Papers - Autumn Splendor - Autumn Leaves and Long Walks Please

Hello, Karen here to share another layout using the Autumn Splendor collection from Mintay Papers. I can't tell you how much I am enjoying playing with this collection. I always love creating autumn themed layouts but this collection makes the process so much fun as the images on the papers and embelishments are so cute and the colour scheme is beautiful.

I started this layout with a 12x12 sheet of smooth white cardstock which was trimmed down slightly and mounted onto a gutted sheet of 12x12 cardstock from the Echo Park Wood Grain collection. Using my sewing machine I then stitched round the edges to give extra interest and texture.

Using the remaining woodgrain cardstock which had previously been gutted, I cut on the Silhouette Cameo an autumn wreath cut file. 


The cut file was laid onto the middle of the layout and lightly drawn around with a pencil. Using some pale blue watercolour paint I smooshed some over the top of the pencil marks so that when the cut file was glued to the layout the paint was still visible round the sides. The paint did warp the layout a little but once the layout is put into an album I think it will flatten.


With die cuts from the die cuts pack I then had fun embellishing the wreath shape.


3D foam was placed underneath some of the die cuts for added dimension.


Some jute twine was twirled amongst the die cuts ....


.... and some wood veneer leaves from my stash were added to any empty spaces


A 3x4 photo was tucked into one side of the wreath.


I created a long title using some words and letters cut from yellow cardstock and placed the title on and around the top left corner of the photo.


Finally the date was added to the layout using tiny stickers and a few gold sequins were scattered here and there.

I hope you like this layout. Do pop over to the shop and take a look at the full collection. 

I'll be back soon.

Take Care
Karen x x

Monday, 7 October 2024

Bella Blvd - One Fall Day

Hi everyone and welcome back to the Papermaze blog.

It's Claire here today and for this layout I'm channelling all the fall feels with the Bella Blvd One Fall Day collection

I started with a piece of blue bazzill cardstock from the Matchmaker Pack, opting to use this as my base.

Next, I picked three patterned papers to create vertical strips down each side of my page. I used:

I distressed the edges and laid 2 strips flat to the page, and raised the Leaf Pile paper on foam. 

Next, I mounted my photos using the Fall Break paper and the orange and green cardstock from the Matchmaker Pack, adhering to the page on foam. 

Then the embellishments! Taking elements from the Ephemera Icons, Ciao Chip Chipboard Stickers and Doohockey Cardstock Stickers I built clusters around my photos, mixing materials and colours to draw the eye across the page. 


To complete the layout, I used the Ciao Chip Chipboard Stickers to create my One Fall Day title. 

This page was super fun to make and I hope it's inspired you to get your autumn stories documented. 

Check out the full collection in the shop here

Claire x

@scrappysoulmate 


Friday, 4 October 2024

Mintay Papers - Autumn Splendor - Sweater Weather

Hello, Karen here, with my first layout using the new autumn collection from Mintay Papers - Autumn Splendor. This collection has a beautiful soft colour palette with lots of autumn related images of pumpkins, leaves, cute animals and more. 

I started my layout with a sheet of smooth white cardstock and using a small brayer I added some brown acrylic paint to the centre. 

I applied the paint quite thickly so that it created texture and the paint strokes were clear to see. Once the brown paint had dried, I then splattered some watered down white paint on top.

Using paper #9 I cut several half inch strips and placed these in an L shape to create a shelf for my 3"x4" photo to sit on, which was placed where the paper strips intersect.


Around the photo I layered various pieces from the die cut pack. There are 60 die cuts in the pack so there were lots to choose from.

Some of the die cuts were layered with 3D foam underneath to give some dimension to an otherwise fairly flat layout. I absolutely love the die cut pack and had to be careful not to get carried away and add too many pieces to the layout!

A title was added using some Mini Alphabet Thickers from my stash.

I trimmed the layout down to 10" square and matted it onto a sheet of Bazzill Fawn cardstock and using white thread machine stitched round the edges. The layout was completed with a scattering of sequins from the Picket Fence Woodlands mix .

I'm really enjoying creating with this collection and hope I've given you some inspiration for scrapbooking your autumn photos. 

Take care and I'll be back again soon with another layout.

Karen x x


Thursday, 26 September 2024

Thankful - 49 and Market - Vintage Orchard Collection

Hi everyone, it's Rebecca with you today sharing my second layout of the month. I'm still loving working with the Vintage Orchard collection from 49 and Market - more so now the weather has turned that little bit more autumnal! Anybody else scrap with the seasons? It may be a bit weird but I'm not one for scrapping summer in autumn, and spring in winter etc... I find my inspiration and creativity flow better working with the current season. You can find the full collection in the shop here.


For today's layout I really wanted to use the black woodgrain patterned paper from the collection, but felt like it was a bit too much as a background and felt like I needed some empty space on the page to balance it out. To achieve a more balanced feel, I cut the woodgrain paper into smaller strips, distressed the edges and arranged them in the centre of a sheet of Premium White Cardstock. To add a bit more detail to these strips, I applied torn sections from the Washi Tape Sheets and I love the look that this has achieved.


Not wanting to cover up all the washi, I decided to just scrap with one photo today. I've used one of the Stacked Frames to house my photo, with a journalling card from the Ephemera Bits to bring in more of the copper shade that features in my photo. I positioned my photo over on the right hand side of the page, and using some of the die-cuts from the Laser Cut Elements and Laser Cut Wildflowers, I built up a small cluster in the corner.


For the title, I've used a die-cut from the Ephemera Bits. I've gone for a bright green title to bring a pop of colour to the page. 


To help balance the layout, I've created a smaller cluster using die cuts to the top left corner of the layout. On top of both clusters, I've added a chipboard phrase from the Chipboard Set.


To add some details to my background, I've applied some Rub-On transfers from both the Botanicals Rub-Ons and the Essentials Rub Ons. I absolutely adore 49 and Market rub ons - the packs are so generous and they are so easy to apply. I love how they give my background a mixed-media effect with very little effort from me!

To finish the layout, I slotted in a couple of notebook edge die cuts from the Laser Cut Elements and some of the Wishing Bubbles and Baubles stickers. 


Thanks so much for reading. I hope you like the layout and it offers you some inspiration. This stunning collection is available in the shop now so grab it before it sells out!

Take care

Rebecca x 

@preciouspagespapercraft