Showing posts with label fall layout. Show all posts

Monday, 22 September 2025

Gather Together - Simple Stories - Simple Vintage Autumn Breeze Collection

Hi everyone!

It’s Rebecca here, sharing my final layout for September. This month, I’ve been fully embracing the autumn vibes, crafting with the gorgeous Simple Vintage Autumn Breeze collection by Simple Stories. Packed with rich, traditional fall colours, it’s perfect for documenting everything from woodland walks to pumpkin picking adventures! You can find the full collection in the shop here.

To begin, I cut several strips from various patterned papers. I chose a wider strip to create a strong vertical base, then layered in some narrower horizontal strips to build depth. I distressed all the edges using the blade of my scissors—one of my go-to techniques for adding texture.
Next, I positioned my two circular photos slightly overlapping at the center of the page. I opted for two different sizes to keep things visually interesting. In the space beside them, I added my title using two of the Foam Stickers.

To extend the design diagonally across the page, I tucked two larger floral clusters from the Floral Bits & Pieces just beneath the photos so that only parts of them peeked out. I love how the bottom cluster blends seamlessly into the photo, especially with the little pumpkins—it feels like a natural extension!

With the main elements in place, I turned my attention to the smaller details. I scattered a few word and phrase stickers from the Elements Stickers sheet, staggering them in a way that echoes the title. I also added some foam sticker hearts for extra dimension.

The layout felt balanced, but I still wanted to add a little something more. Rather than piling on more embellishments, I chose a softer touch—subtle stenciling. Using a leafy stencil from my stash and Wild Honey Distress Ink, I applied the ink in soft circular motions with a blending brush for a delicate autumnal background.
To finish the page, I framed the entire layout with a darker patterned paper from the collection. This helped ground the design and balanced out the white space beautifully. As a final touch, I sprinkled a few sequins across the page to add just the right amount of sparkle.
Thanks so much for stopping by and reading! I’ll be back next month with a brand new collection—most likely something spooky and fun for Halloween!
Take care,
Rebecca xx
@preciouspagespapercraft

Monday, 8 September 2025

Fabulous Fall Vibes - Simple Stories - Simple Vintage Autumn Breeze Collection

Hi everyone,

It’s Rebecca here on the blog today! I’m feeling a bit torn about September… On one hand, I’m excited for autumn and all its beautiful colours. But on the other, I’m really sad to see summer go! One thing that always helps ease the transition is seeing the gorgeous new autumn collections arriving in the shop—and this month, I’ve been working with Simple Stories “Simple Vintage Autumn Breeze.” You can find the full collection in the shop here. I always look forward to the Simple Vintage lines as we head into autumn, and this one definitely didn’t disappoint!


To start my layout, I tore strips from two different patterned papers. I chose a subtle, neutral paper for the top layer, backed with a more colourful one for contrast. Down the left-hand side of the page, I arranged a cascade of Polaroid-style frames, which I fussy-cut from the Crisp Days patterned paper.

I hollowed out the centre of one frame and backed it with my photo, adding foam behind it for dimension. Placing it centrally among the other frames helped it stand out. I also tucked a larger piece of ephemera from the Ephemera pack behind the framed photo to add some extra detail.


For my title, I chose the word ‘Fabulous’ from the Foam Stickers, and placed it to the right of my photo—raised up on foam pads for added depth. Underneath, I added a smaller foam sticker to extend the title. I love combining fonts like this—it adds visual interest and a playful feel to the page.


With the larger elements in place, I started embellishing. I fussy-cut some tags from the Tag Elements paper, punched metal eyelets through each, and arranged them around the layout for extra texture and charm.


Next, I turned to the Floral Bits & Pieces. I selected a few floral clusters and layered them around the layout, including a sticker from the Elements Stickers to complete the cluster in the top-right corner.


At this point, I needed to decide on a background. I’d been building everything on Premium White Cardstock, but it felt a bit too stark—it just wasn’t making the elements pop. The great thing about adhering your layout pieces together first is that you can lift them off and try different backgrounds underneath!

After testing several patterned papers, I fell in love with the bold orange Journal Elements paper (B side). It really brought out all the other colours on the page. It was a bit of a daring choice for me, but I’m so glad I went for it!

To finish off the layout, I added a couple of tabs from the Bits & Pieces and some mini heart foam stickers. I love how these tiny, last-minute touches pull everything together without overwhelming the page.


Thanks so much for reading—I hope you’ve enjoyed seeing how this layout came together. I’ll be back later this month to share my second layout using this stunning collection.

Take care, 
Rebecca xx

@preciouspagespapercraft

Wednesday, 23 October 2024

Bella Blvd - One Fall Day - Fun Fall

Hi everyone,

Claire back here today sharing my second layout with the One Fall Day collection from Bella Blvd. 

You can find it in the shop here.

For this page, I'm focusing on concentric circles and pulling together all the beautiful colours this collection has to offer.

I cut 3 circles of different sizes from the Leaf Pile, Hello Fall and Falling for You papers. I distressed the edges and layered each piece one on top of the other, but stacked them all towards the left of the circle, rather than layering them centrally one on top of the other. I hope that makes sense! Please shout if it doesn't.

I mounted my photo with the Grateful and Borders papers, again distressing the edges before adding this on top of the circles. I also layered a piece of the borders paper along the top of the photo, using a notebook punch to add extra texture.

To anchor the design, I created three ephemera clusters - the largest of which was to the right had side of the photos using those statement trees and some other pieces from the  Ephemera Icons pack.

Then, on the left side of the design, I wanted to create two smaller clusters, following the circular edge and tucking and layering leaves from the Ephemera Icons Pack and Ciao Chip Chipboard Stickers in between the edges of each circle.


Then, my favourite - a mixed font title! It's been a while since I've done this and I always love the effect. Both of these titles were from the Ciao Chip Chipboard Stickers and I love how it pulls all the colours together. For placement, I followed the circular edge again to keep the design cohesive. 

As a final touch I added some phrase stickers from the Doohickey Cardstock Stickers and sprinkled some Pinkfresh Studio Jewel Essentials into each cluster. 


I hope you've enjoyed this layout. It was so much fun to make and I'd highly recommend this fun collection for your autumn scrapbook pages. 

Until next month, happy scrapping! 

Claire x

@scrappysoulmate 

Monday, 7 October 2024

Bella Blvd - One Fall Day

Hi everyone and welcome back to the Papermaze blog.

It's Claire here today and for this layout I'm channelling all the fall feels with the Bella Blvd One Fall Day collection

I started with a piece of blue bazzill cardstock from the Matchmaker Pack, opting to use this as my base.

Next, I picked three patterned papers to create vertical strips down each side of my page. I used:

I distressed the edges and laid 2 strips flat to the page, and raised the Leaf Pile paper on foam. 

Next, I mounted my photos using the Fall Break paper and the orange and green cardstock from the Matchmaker Pack, adhering to the page on foam. 

Then the embellishments! Taking elements from the Ephemera Icons, Ciao Chip Chipboard Stickers and Doohockey Cardstock Stickers I built clusters around my photos, mixing materials and colours to draw the eye across the page. 


To complete the layout, I used the Ciao Chip Chipboard Stickers to create my One Fall Day title. 

This page was super fun to make and I hope it's inspired you to get your autumn stories documented. 

Check out the full collection in the shop here

Claire x

@scrappysoulmate 


Monday, 9 September 2024

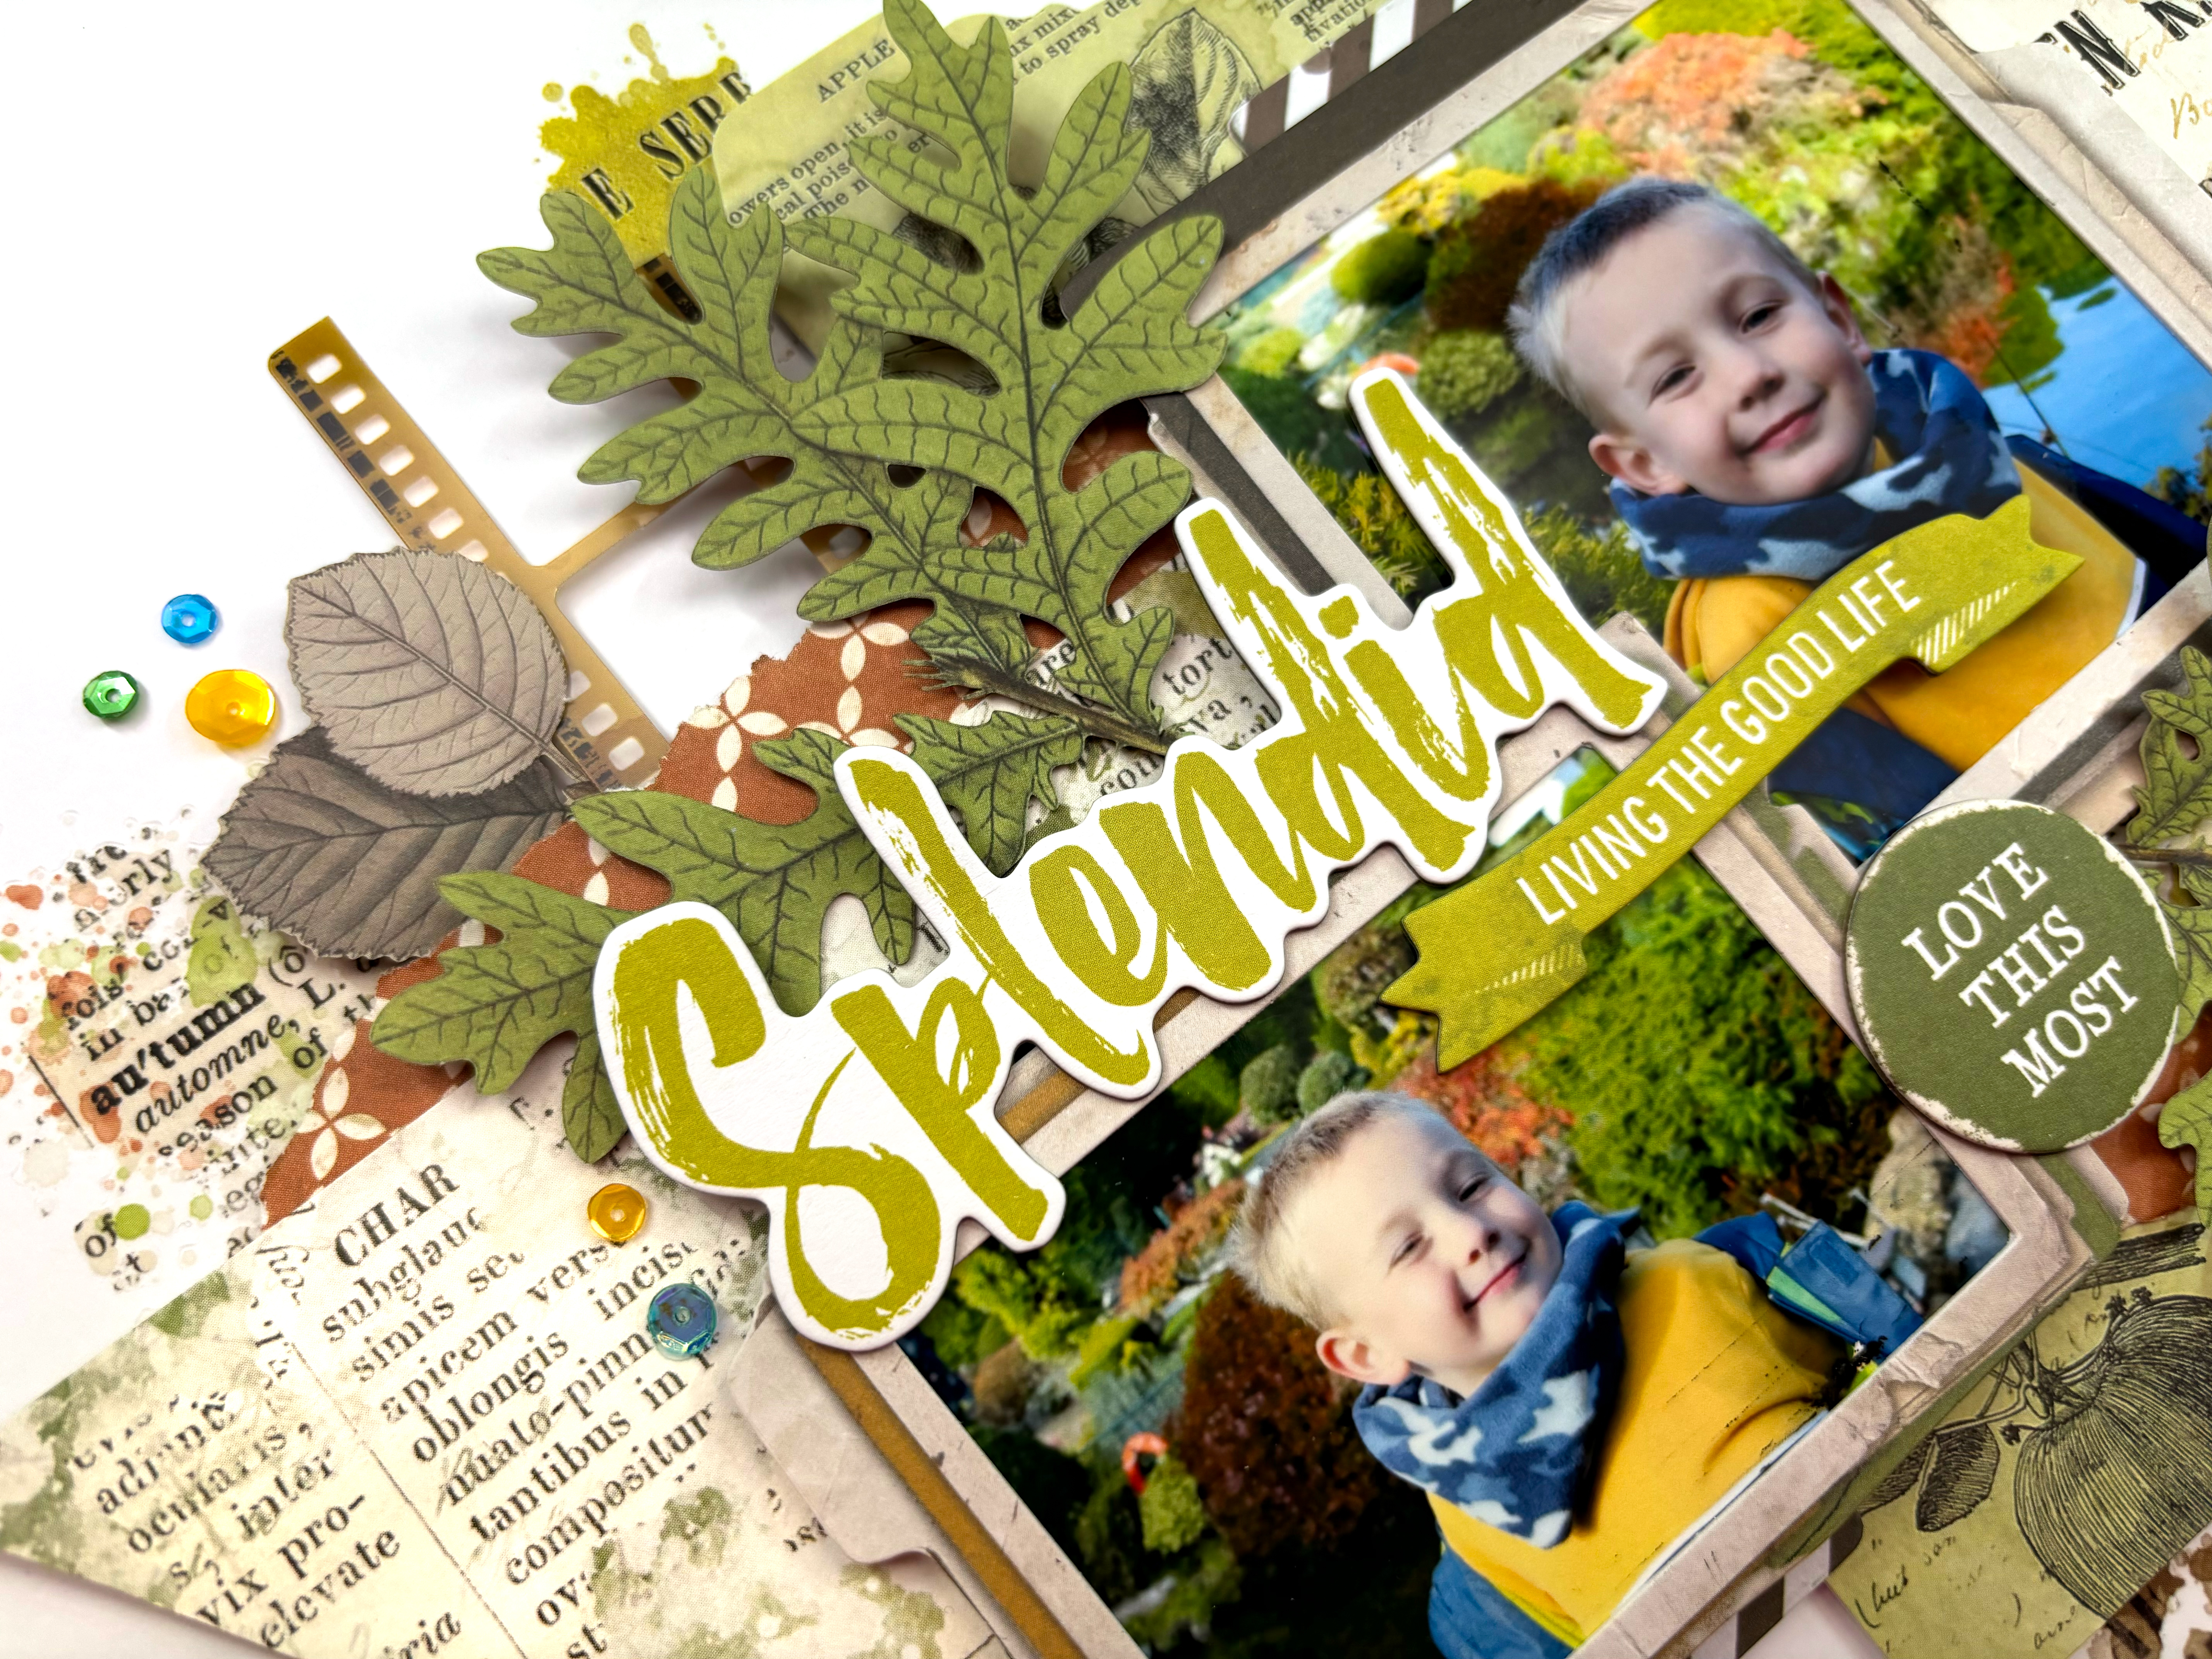
Splendid - 49 and Market - Vintage Orchard Collection

Hi everyone, it's Rebecca with you today sharing my first layout created with 49 and Market's 'Vintage Orchard' collection. The weather has certainly changed and Autumn is on the way. As sad as I am to say goodbye to Summer (although did it ever really arrive this year?!), Autumn is my favourite season to scrap so this collection was right up my street! You can find it in the store here.


I started with the 'Nestled' patterned paper - one of my favourites - and cut a 3 inch wide strip. I trimmed down either end and cut fish tails to make it more like a banner. I placed this in the centre of a sheet of Premium White Cardstock with some torn sections of the 'Painted Foliage' above and below it for contrast. At this point I hadn't stuck anything to the white cardstock - I was just sticking everything together and working on layers.


Behind the fishtail banner, I positioned one of the larger cards from the Ephemera Bits pack. This pack is amazing and includes 96 different elements so it will last a long time! 

On top of these layers, I added my photos, housed in two of the Stacked Frames. I've raised both photos up using foam to add in some dimension between the layers. I was then able to add in some smaller layers, including some striped frames from the Ephemera Bits and some filmstrips from the Acetate Assortment Set. I love how these little layers make all the difference.


I've used one of the Chipboard Words for my title, picking not only a phrase which works for the photos I'm documenting, but also a colour which matched my photos and the other elements on the page.


With these larger elements in place, I turned my attention to embellishing, which for me is the fun part and where the layout really comes together. I selected some gorgeous green leaves from the Laser Cut Wildflowers. This is another amazing pack which includes 92 pieces so is really good value for money. 


Once I'd gone through and adhered all these pieces together, I was able to see how much of the white cardstock my layout was covering. This makes it so easy to add details to the background because I can move everything on and off the page in one piece. The Vintage Orchard collection includes 3 sets of rub-on transfers. I selected some from the Blendable Rub-Ons and the Essentials Rub-Ons and applied them to my background. I love how easily they apply, and they don't really leave an 'outline' as such, so they really do look like stamping and mixed media (just without all the effort and mess!).


I finished off with a couple of laser cut butterflies and some sequins for a little bit of sparkle!

Thanks so much for reading! I hope you've enjoyed this layout and it offers you some inspiration. Vintage Orchard is a stunning collection and is available in the shop now.


Take care

Rebecca x 

@preciouspagespapercraft


Friday, 6 October 2023

Simple Stories - Simple Vintage Life in Bloom - Life is a Journey

Hello,

It's Claire here today, and this month I am going to be creating with the Simple Stories Simple Vintage Life in Bloom collection. 

This gorgeous collection has been re-released and is back by popular demand. I didn't purchase any of this collection during its first release and instantly regretted it.  Having got a second chance, I couldn't wait to create with it and wow! It really is stunning!!

Upon first glance, you'd probably say this was quite a summery collection, but I really wanted to create an autumnal layout - No problem - this collection has it all!!


To start, I grabbed a sheet of Bazzill White Cardstock and applied a thin coat of clear gesso as I planned to add mixed media.

In the meantime whilst the gesso dried, I made some maple leaves following this video I found on YouTube.

https://www.youtube.com/watch?v=All296p9kk4&t=8s

I selected two papers from the 6x8 Paper Pad. It has some really beautiful patterned papers - one pink and orange Gingham, and a newspaper print which were perfect to create the leaves.

To add definition and help them stand off the page, I inked the edges of the newspaper print in pink and orange Distress Oxide, and outlined the gingham leaves with a black Sharpie.


I lay these in a vertical cluster down the page and drew lightly around the edge so that I knew where to place my mixed media. For the pink and orange leaves, I used pink and orange watercolour, and for the newspaper print, I used black paint.

To give an extra pop of colour, I cut some smaller leaves with a die, using the turquoise paper again from the 6x8 paper pad.


I folded and curled the leaves to create a rustling leaves feel to the page. I adhered the large maple leaves with foam to create dimension and movement, and lay the blue leaves flat, adhering just the base to the page with Glossy Accents. This allowed me to bend the tops of the leaves up to give some extra interest.


Next, I took my photo which I had made into a circle so it would sit nicely amongst the leaf clusters, and backed it on a piece of the  Black Gingham paper. I love the pop of black against these brighter colours. It really helps bring my photos to life.


For my title, I reached for the Foam Stickers, using this big Bold Life piece to help tie in extra black into the layout.


Alongside this, I added an extra foam sticker saying 'is a journey'. I thought this would be appropriate as the changing leaves and arrival of a new season always chimes as a new chapter and it also seemed fitting for my photo, where my dog is zooming off into the woods, ready to start a new adventure! 

For a small extra detail, I wanted to add a pop of green, echoing the photograph, so took this small butterfly from the Sticker Book, adhering flat straight to the page.

I mirrored this with a small leaf sprig from the Floral Bits & Pieces on the right had side of the design to balance the colours.


Just above the leaves, I also added a butterfly from the Foam Stickers, nestled in amongst the leaves. 


I splashed some ink using Black Nuvo Drops and some Shimmerz Vibez around the page, and added three decorative brads sprinkled across the design to add an extra bit of interest. Really love these, the silver edges really catch the light.


To anchor the design, I felt like it needed a border, so I gutted the Make Time paper and trimmed 1/4" from around my white cardstock, mounting it onto the border piece. This paper works so well as it contains all the colours from the layout and really helps to pull it all together.

As a finishing touch, I added a black doodle border around the edge.


I hope you've enjoyed this layout and it's inspired you to check out the collections you have in your stash that may not be specific to the season. I had great fun making this one and look forward to coming back with some more projects later this month.

In the meantime, you can check out this collection in full here.

See you then!

Claire xx

@scrappysoulmate