Showing posts with label frames. Show all posts

Wednesday, 11 March 2026

Simple Stories - Color Me Happy - Shine!


Hi!

It's Claire on the blog today and I am having a blast this month, creating with the Color Me Happy collection from Simple Stories!


Packed with gorgeous, colours, patterns, ephemera and scallops (my favourite!), it really gives your imagination the opportunity to run wild!

I really wanted the colours to pop so opted for two strips of the 4x6 Elements Paper to act as a base. I love how the black background and coloured polka dots really stand out against a crisp white cardstock background.

Laying them horizontally, to anchor the design, I then began to build layers. I fussy cut a row of the circles from the All About It paper, and cut them in half, giving me a strip of semi-cicrles. I lay these across the middle of the paper strips, along with a small piece of the pale pink paper from the Matchmaker Pack. To build depth, I used foam tape to adhere these to the page.

Next, I fussy cut the 'Add a little Color' pieces from the Journal Elements paper, giving the design some vertical height. On top of this, I used two small chipboard frames from the Chipboard Pieces pack to house my photos.  These look so cool in real life. I'd happily have an entire pack of just these! 


I also pulled out several scalloped pieces, mixing colours and patterns to create scalloped edges throughout the design. By doing this, it also ties in the scalloped edge from the semi-circle patterned paper used earlier. 

I created some extra layers and clusters using the smaller pieces from the Chipboard Pieces and the Cardstock Stickers Basics. 

For my title, I reached for the Foam Stickers - a firm favourite in any Simple Stories collection! 


And one last touch to really help the page pop - some small stars punched from plain black cardstock. 


I hope you've enjoyed this blog. It was certainly a fun one to make! I'd highly recommend this collection - it's such a happy collection to use, and the possibilities are endless! Check it out in the shop here whilst stocks last! 


See you soon! 

Claire xx

@scrappysoulmate 


Wednesday, 11 February 2026

Carta Bella - Pressed Floral - Our Happy Place

Hello everyone

Today I'm sharing a layout documenting a day out to Highclere Castle (Downton Abbey). The gardens there are beautiful and this photo was the perfect inspiration to create a page filled with pretty florals.


I chose the Pressed Floral collection from Carta Bella. I immediately fell in love with the Full of Magic Floral Frame paper, but wanted a central design. I used a scalpel and scissors to cut out the frame, inverting the corners to place the floral clusters in the middle, brushing dry Distress Oxide into the centre of the page through a stencil to anchor the design. 

Using a frame from the Ephemera Frames and Tags pack, I mounted my photo, poitioning it right in the centre of the floral cluster.

Next, I wanted to add extra florals and foliage for depth. I fussy cut a selecion of flowers from the 3x4 Journalling Cards paper, complementing this further with some die cut leaves using the Fern Valley Craft die and Branch Mix Die set from Arden Creative Studio. 

I slotted some in under the floral cluster, raising some on foam for dimension. 

To create my title, I chose two phrases from the Ephemera Frames and Tags pack, aligning these along the edge of the inverted frame. 

Thank you for joining me on the blog today. I hope you've enjoyed it. You can check out the collection here. I'll be back in a few weeks with another layout for extra inspiration. 

Happy scrapping! 

Claire x

@scrappysoulmate 


Monday, 8 September 2025

Fabulous Fall Vibes - Simple Stories - Simple Vintage Autumn Breeze Collection

Hi everyone,

It’s Rebecca here on the blog today! I’m feeling a bit torn about September… On one hand, I’m excited for autumn and all its beautiful colours. But on the other, I’m really sad to see summer go! One thing that always helps ease the transition is seeing the gorgeous new autumn collections arriving in the shop—and this month, I’ve been working with Simple Stories “Simple Vintage Autumn Breeze.” You can find the full collection in the shop here. I always look forward to the Simple Vintage lines as we head into autumn, and this one definitely didn’t disappoint!


To start my layout, I tore strips from two different patterned papers. I chose a subtle, neutral paper for the top layer, backed with a more colourful one for contrast. Down the left-hand side of the page, I arranged a cascade of Polaroid-style frames, which I fussy-cut from the Crisp Days patterned paper.

I hollowed out the centre of one frame and backed it with my photo, adding foam behind it for dimension. Placing it centrally among the other frames helped it stand out. I also tucked a larger piece of ephemera from the Ephemera pack behind the framed photo to add some extra detail.


For my title, I chose the word ‘Fabulous’ from the Foam Stickers, and placed it to the right of my photo—raised up on foam pads for added depth. Underneath, I added a smaller foam sticker to extend the title. I love combining fonts like this—it adds visual interest and a playful feel to the page.


With the larger elements in place, I started embellishing. I fussy-cut some tags from the Tag Elements paper, punched metal eyelets through each, and arranged them around the layout for extra texture and charm.


Next, I turned to the Floral Bits & Pieces. I selected a few floral clusters and layered them around the layout, including a sticker from the Elements Stickers to complete the cluster in the top-right corner.


At this point, I needed to decide on a background. I’d been building everything on Premium White Cardstock, but it felt a bit too stark—it just wasn’t making the elements pop. The great thing about adhering your layout pieces together first is that you can lift them off and try different backgrounds underneath!

After testing several patterned papers, I fell in love with the bold orange Journal Elements paper (B side). It really brought out all the other colours on the page. It was a bit of a daring choice for me, but I’m so glad I went for it!

To finish off the layout, I added a couple of tabs from the Bits & Pieces and some mini heart foam stickers. I love how these tiny, last-minute touches pull everything together without overwhelming the page.


Thanks so much for reading—I hope you’ve enjoyed seeing how this layout came together. I’ll be back later this month to share my second layout using this stunning collection.

Take care, 
Rebecca xx

@preciouspagespapercraft

Monday, 11 August 2025

49 & Market - Beach Vibes - Meet Me Seaside

Hi guys,

Claire here today and this month I'm creating with the Beach Vibes collection from 49 & Market. 

This is such a fun collection. Beautiful patterned paper and so many different ephemera choices, you'll have as much fun scrapping the memories as you did making them! 

The patterned paper is so pretty in this collection that for this layout, I didn't reach for my usual white cardstock staple! Instead I'm using the Solids #1 paper.

Using two frames from the Die Cut Elements, I mounted my photos, adding foam to the frame before adding my photo so it's set back inside the frame, creating a drop shadow.

I offset them vertically and then began to build a beach scene. I added a rub-on to each side of the photos to act as a base later for the embellishment clusters.

Next, I pulled some pieces from the Laser Cut Elements Laser Cut Elements and Die Cut Elements, building depth my laying some flat and adhering others on foam pads.


For my title, I reached for the Chipboard Words, using the graphical piece for my main title and some of the word phrases to create subtitles. 

I really love the extra pops of colour this brings to the layout.

And with that, the layout is complete! 

Thank you for joining me on the blog. I hope you've enjoyed seeing this gorgeous Beach Vibes collection! Check it out on the blog here before it's all gone! 

Until next time, happy scrapping! 

Claire x

@scrappysoulmate 

Wednesday, 12 February 2025

Think Big - Stamperia - Create Happiness Dewdrops Collection

Hello everyone, 

It's Rebecca here, and I’m so excited to be sharing my first layout of the month with you. This time, I’m working with a brand I’ve never used before—Stamperia. To be honest, I’ve always found Stamperia a bit intimidating, so I’ve shied away from it in the past. But not this month! I’m so glad I decided to embrace it and dive in. It’s really exceeded my expectations and has reminded me of both the 49 and Market collections as well as the vintage collections from Simple Stories.

For this layout, I chose to work with the Create Happiness Dewdrops collection. The soft colours and beautiful patterns in the papers immediately drew me in. You can find the collection in the shop here.


As soon as I saw the B-side of the Bird patterned paper, I was captivated by its subtle, soft details. I decided to use this as my background paper. I then selected a couple of shimmering gold frames from the Adhesive Paper Ephemera to frame my photos, which created a central focal point for the layout.


To embellish around the photos, I pulled elements from both the Adhesive Paper Ephemera and the Die Cuts, choosing some gorgeous floral pieces. The Die Cuts really surprised me—made from a thin chipboard-like material, they’re sturdy and easy to layer. I even used foam pads to raise some of the embellishments, adding extra dimension to the layout.


To enhance my background, I added some rub-ons from both the Bird Rub-Ons and the Pinecones and Flowers Rub-Ons. I applied them around the edges of the photos, filling in the gaps created by the floral ephemera.


For the finishing touch, I added my title using a chipboard piece from the Die Cuts and completed the layout with a few Prima Paper Flowers from the Meadow Walk set. The colours in these flowers match the collection perfectly!


Thank you so much for reading! I hope my layout inspires you to try something new or different.

Take care,
Rebecca x

@preciouspagespapercraft

Thursday, 26 September 2024

Thankful - 49 and Market - Vintage Orchard Collection

Hi everyone, it's Rebecca with you today sharing my second layout of the month. I'm still loving working with the Vintage Orchard collection from 49 and Market - more so now the weather has turned that little bit more autumnal! Anybody else scrap with the seasons? It may be a bit weird but I'm not one for scrapping summer in autumn, and spring in winter etc... I find my inspiration and creativity flow better working with the current season. You can find the full collection in the shop here.


For today's layout I really wanted to use the black woodgrain patterned paper from the collection, but felt like it was a bit too much as a background and felt like I needed some empty space on the page to balance it out. To achieve a more balanced feel, I cut the woodgrain paper into smaller strips, distressed the edges and arranged them in the centre of a sheet of Premium White Cardstock. To add a bit more detail to these strips, I applied torn sections from the Washi Tape Sheets and I love the look that this has achieved.


Not wanting to cover up all the washi, I decided to just scrap with one photo today. I've used one of the Stacked Frames to house my photo, with a journalling card from the Ephemera Bits to bring in more of the copper shade that features in my photo. I positioned my photo over on the right hand side of the page, and using some of the die-cuts from the Laser Cut Elements and Laser Cut Wildflowers, I built up a small cluster in the corner.


For the title, I've used a die-cut from the Ephemera Bits. I've gone for a bright green title to bring a pop of colour to the page. 


To help balance the layout, I've created a smaller cluster using die cuts to the top left corner of the layout. On top of both clusters, I've added a chipboard phrase from the Chipboard Set.


To add some details to my background, I've applied some Rub-On transfers from both the Botanicals Rub-Ons and the Essentials Rub Ons. I absolutely adore 49 and Market rub ons - the packs are so generous and they are so easy to apply. I love how they give my background a mixed-media effect with very little effort from me!

To finish the layout, I slotted in a couple of notebook edge die cuts from the Laser Cut Elements and some of the Wishing Bubbles and Baubles stickers. 


Thanks so much for reading. I hope you like the layout and it offers you some inspiration. This stunning collection is available in the shop now so grab it before it sells out!

Take care

Rebecca x 

@preciouspagespapercraft


Monday, 9 September 2024

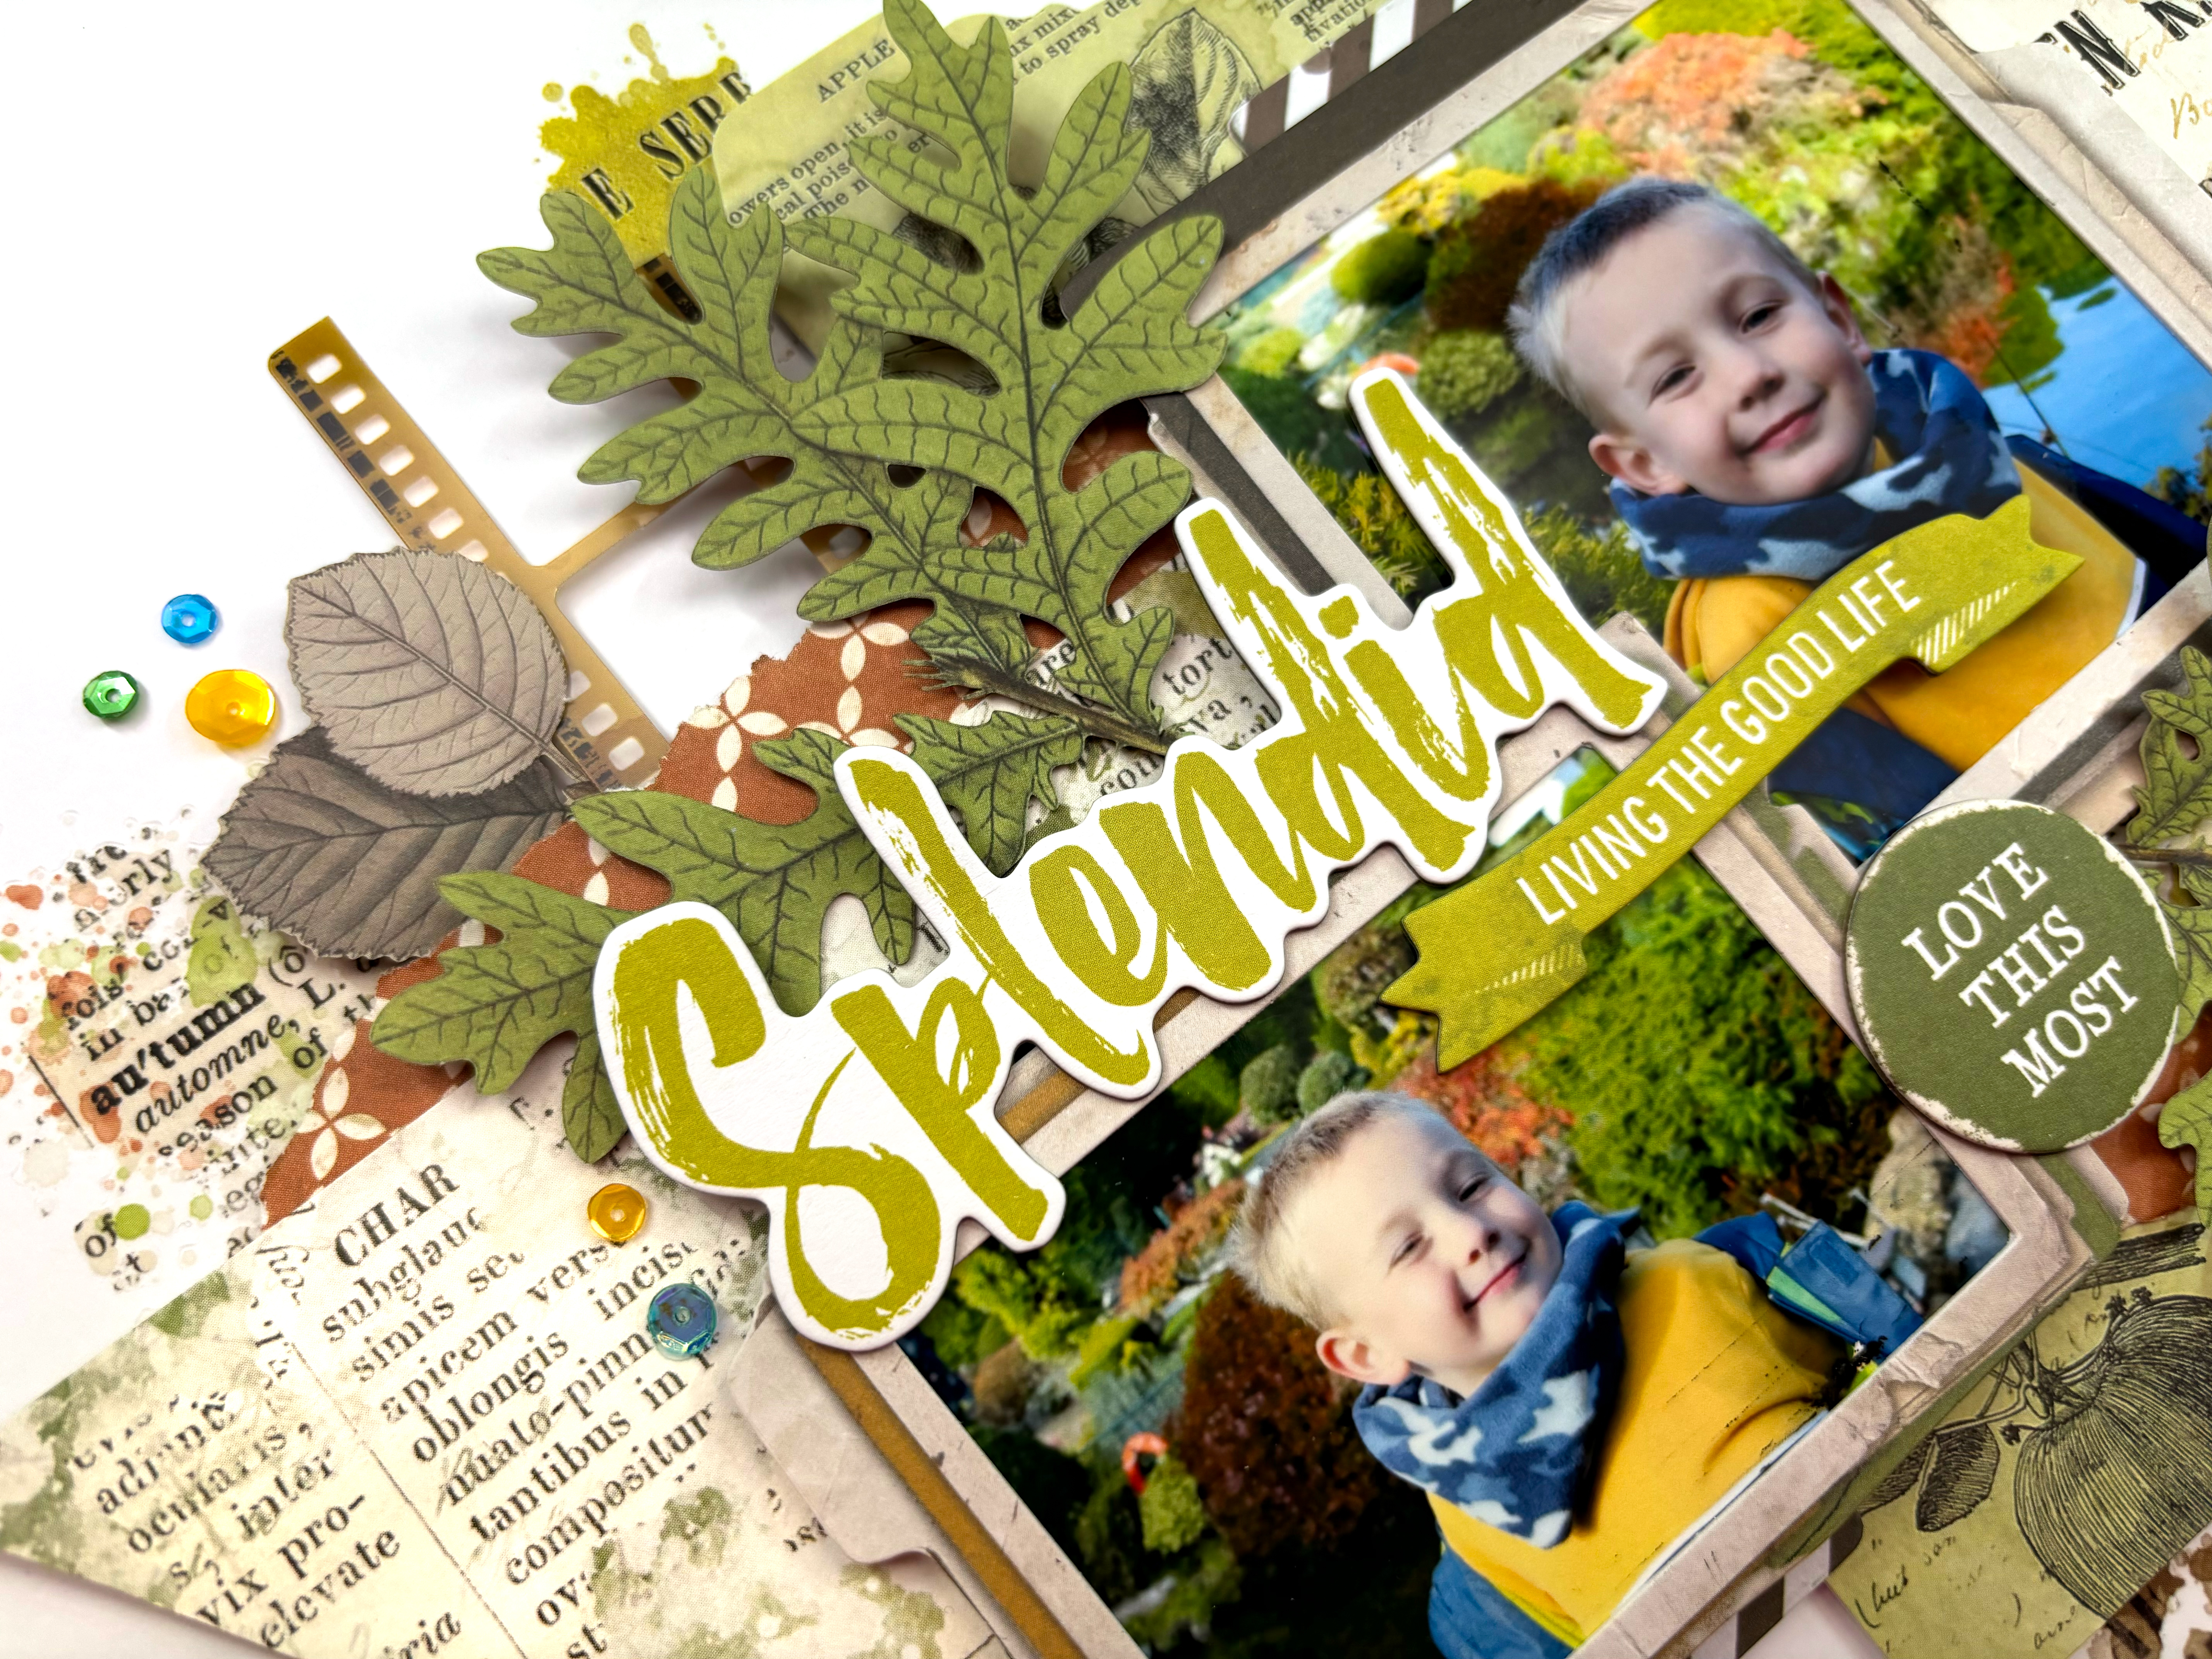
Splendid - 49 and Market - Vintage Orchard Collection

Hi everyone, it's Rebecca with you today sharing my first layout created with 49 and Market's 'Vintage Orchard' collection. The weather has certainly changed and Autumn is on the way. As sad as I am to say goodbye to Summer (although did it ever really arrive this year?!), Autumn is my favourite season to scrap so this collection was right up my street! You can find it in the store here.


I started with the 'Nestled' patterned paper - one of my favourites - and cut a 3 inch wide strip. I trimmed down either end and cut fish tails to make it more like a banner. I placed this in the centre of a sheet of Premium White Cardstock with some torn sections of the 'Painted Foliage' above and below it for contrast. At this point I hadn't stuck anything to the white cardstock - I was just sticking everything together and working on layers.


Behind the fishtail banner, I positioned one of the larger cards from the Ephemera Bits pack. This pack is amazing and includes 96 different elements so it will last a long time! 

On top of these layers, I added my photos, housed in two of the Stacked Frames. I've raised both photos up using foam to add in some dimension between the layers. I was then able to add in some smaller layers, including some striped frames from the Ephemera Bits and some filmstrips from the Acetate Assortment Set. I love how these little layers make all the difference.


I've used one of the Chipboard Words for my title, picking not only a phrase which works for the photos I'm documenting, but also a colour which matched my photos and the other elements on the page.


With these larger elements in place, I turned my attention to embellishing, which for me is the fun part and where the layout really comes together. I selected some gorgeous green leaves from the Laser Cut Wildflowers. This is another amazing pack which includes 92 pieces so is really good value for money. 


Once I'd gone through and adhered all these pieces together, I was able to see how much of the white cardstock my layout was covering. This makes it so easy to add details to the background because I can move everything on and off the page in one piece. The Vintage Orchard collection includes 3 sets of rub-on transfers. I selected some from the Blendable Rub-Ons and the Essentials Rub-Ons and applied them to my background. I love how easily they apply, and they don't really leave an 'outline' as such, so they really do look like stamping and mixed media (just without all the effort and mess!).


I finished off with a couple of laser cut butterflies and some sequins for a little bit of sparkle!

Thanks so much for reading! I hope you've enjoyed this layout and it offers you some inspiration. Vintage Orchard is a stunning collection and is available in the shop now.


Take care

Rebecca x 

@preciouspagespapercraft


Wednesday, 4 September 2024

Pretty Little Studio - You are my Sunshine - If Mums Were Flowers...

Hello there and welcome back to the Papermaze blog,

It's Claire here today and I'm sharing another layout with the You are my Sunshine collection from Pretty Little Studio. This collection is one of two halves - It has bold bright colours and patters on the one hand, and on the other, it offers softer, more subtle patters and beautifully drawn florals. It also has some pet elements in the collection - What's not to love!!

Given my first layout was bold and bright, today, I'm showcasing the other half of this collection and hope it demonstrates its versatility. 


The layout is mostly made with die cut embellishments showing you only need a few pieces to create an impactful page.

I started with a piece of Premium White Cardstock and applied a thin coat of gesso because I knew I wanted to create a mixed media background.

Once the gesso was dry, I added splotches of watercolour in blue and green tones to match the shades in the collection as closely as I could.  I left this to dry overnight and continued with the design the following morning.

I pulled out the Apple Blossom Floral Die Cuts which contain several large die cut floral clusters that make a real statement. Using 4 of these, I positioned these across the page on top of my mixed media, layering and raising on foam to create a bit of dimension.

On top of the florals, I added some smaller butterfly and bee embellishments, providing additional detail to draw your eye into the design.


In laying my florals across the page, there was a natural gap in the middle to house my photograph.  To draw in all the colours of the collection, I layered up three frames from the Frisbee Frame Die Cuts. I really love this effect and enjoyed using the frames as layering pieces rather than as frames directly.


Creating a little more interest, I adhered a small 'love' sticker to the photo, taken from the Per Lovers Word Stickers.

For that little bit of extra movement, I selected some extra foliage from the Fresh Bloom Stems Die Cuts adding one at each end of the large cluster and one in the middle.


To help ground the design, I added two small strips of the Summer Garden paper, adding a decorate edge with a border punch.  


To create my title, I created a small cluster to sit alongside the paper strip, mounted on top of some mixed media, one of the frames and some smaller florals. The alphas are from my stash (Happy Heart collection by Pinkfresh Studio) but the colours matched so well.


And with that, the page was finished. I hope you've enjoyed reading this blog and seeing how the page came together.

This really is a beautiful collection and I can't put it down - In fact, I will have a third layout to share with you later this month, but until then, happy scrapping!

Claire xx
@scrappysoulmate

Monday, 22 April 2024

Dreamer - 49 and Market - Kaleidoscope Collection

Hi everyone! 

It's Rebecca with you today and I'm back to share my second layout created with the gorgeous Kaleidoscope collection from 49 and Market. I have thoroughly enjoyed creating with this collection. With all the miserable weather we've had lately, the bright and vibrant colours have given me a little bit of escapism! You can find the collection in the shop here.


I started by selecting some journalling cards from the Ephemera Bits and some patterned papers and positioning them horizontally across a sheet of Premium White Cardstock. My photo is of my little boy in our swimming pool, so I purposely placed the blue paper in the centre where I knew my photo would sit. It then acts as an extension of the water in the photo. Around the edges of the pieces, I doodled a black border. I love how little pops of black really create drama against the vibrant colours.


I placed my photo in the centre of the blue paper, housed in one of the Stacked Frames. For continuity, I also doodled a black border around the edge of the frame. Either side of my photo, I added some flowers from the Chipboard Set and then built on these clusters using pieces from the Wildflower Laser Cut Outs.


To bring in a bit more black, I selected the word 'dreamer' for my title. This is one of the titles from the Ephemera Bits.


From the Chipboard Words I added three phrase banners - two below my photo and one above - and also some hearts.


I finished the layout with some of the stunning rub-ons from the Rub Ons Transfer Set Essentials. There are 3 different sets of rub-ons available with this collection and each of them are amazing! Perfect for adding details to your background. I love how lots of them look like I've applied mixed media without going to lots of effort!


Thank you so much for reading. I hope you've liked the layouts I've created with the Kaleidoscope collection. Make sure you check it out in the shop!

Until next time,

Take care.

Rebecca x

@preciouspagespapercraft