Showing posts with label stickers. Show all posts

Saturday, 26 July 2025

Doodlebug Designs ~ Butterfly Kisses #2 💖

 Hi everyone, it’s Anna here today and I’m sharing my second layout using Doodlebug Designs Butterfly Kisses. You can find this collection in the shop here

To create this layout I began with a sheet of 12x12 bazzill cardstock as my base. I used my silhouette cameo to cut out a free floral cutfile by Paper Issues on white card - and I just backed the centre of the flowers with ‘sunny days’. I adhered the cutfile to the centre of the page. I then trimmed two pieces of  ‘Rainbow’s End’ and placed them either side of my layout, slightly covering the cutfile each side. 

I printed my three pictures and mounted them onto ‘sunny days’. Once these were positioned roughly where I wanted them I began to add my embellishments. 

I added a title using the Puffy Word Stickers and Bella Blvd Luna Alphabet Puffy Stickers

I added extra details using the ‘This and That Stickers’ including tabs, arrows and word sentiments. I also used some mini hearts from the puffy word stickers to add to the centre of the flowers. 

Thanks so much for looking! 

See you next month, when I’ll be working with a new Simple Stories collection! 

Anna 

@acraftylifewithanna

Monday, 7 October 2024

Bella Blvd - One Fall Day

Hi everyone and welcome back to the Papermaze blog.

It's Claire here today and for this layout I'm channelling all the fall feels with the Bella Blvd One Fall Day collection

I started with a piece of blue bazzill cardstock from the Matchmaker Pack, opting to use this as my base.

Next, I picked three patterned papers to create vertical strips down each side of my page. I used:

I distressed the edges and laid 2 strips flat to the page, and raised the Leaf Pile paper on foam. 

Next, I mounted my photos using the Fall Break paper and the orange and green cardstock from the Matchmaker Pack, adhering to the page on foam. 

Then the embellishments! Taking elements from the Ephemera Icons, Ciao Chip Chipboard Stickers and Doohockey Cardstock Stickers I built clusters around my photos, mixing materials and colours to draw the eye across the page. 


To complete the layout, I used the Ciao Chip Chipboard Stickers to create my One Fall Day title. 

This page was super fun to make and I hope it's inspired you to get your autumn stories documented. 

Check out the full collection in the shop here

Claire x

@scrappysoulmate 


Friday, 9 September 2022

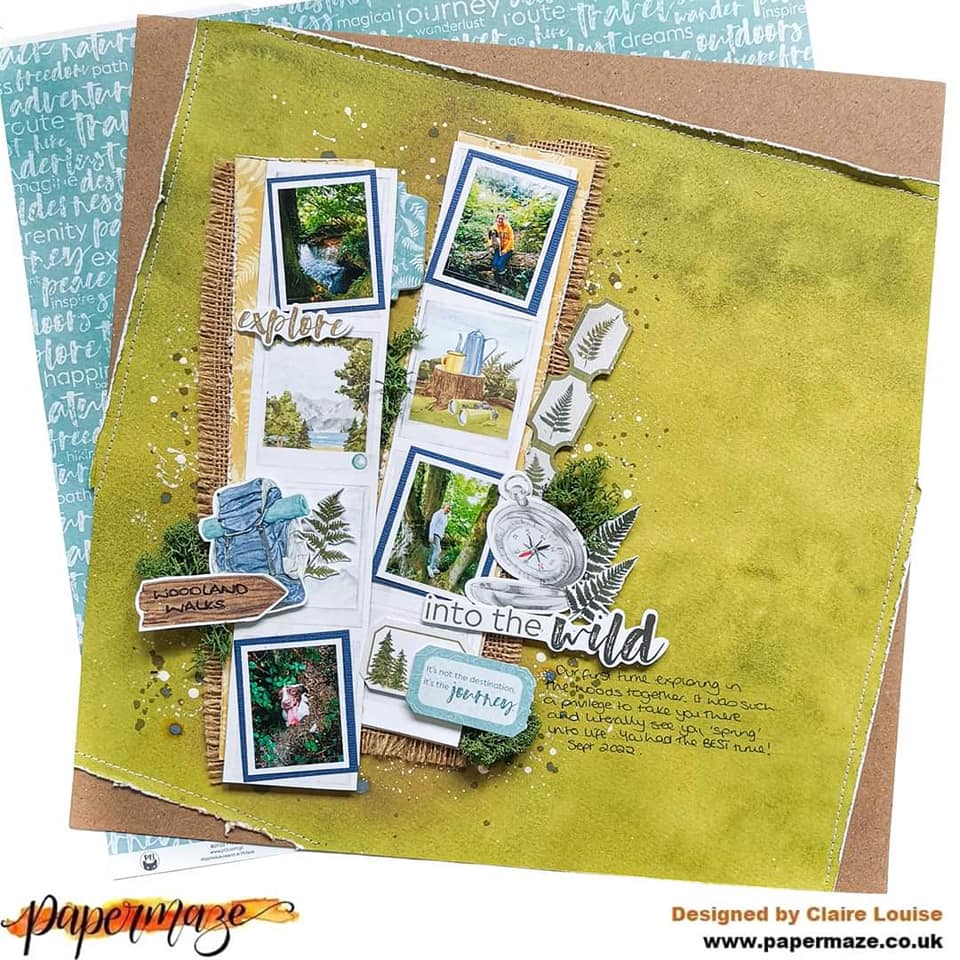
P13 - Hit The Road - Into The Wild

Hi everyone,

Claire here with you today, and this month I will be using the Hit The Road collection from P13


This collection immediately caught my eye. It's jam packed with the beautiful papers you would expect from P13, but they've also released exciting additional products that will take your scrapbooking even further:

  • Four Decorative Tags sets
  • Ephemera Tickets
  • Die Cut Garlands
  • Ephemera Bits & Pieces
  • Three Sticker Sheets
  • Three Chipboard Sticker Sheets
  • Chipboard embellishments and more!

I wanted my layout to feature the beautiful papers, Ephemera Tickets, Ephemera Bits and Pieces and Ephemera Frames and Words.

Using a piece of Premium Kraft Cardstock as my base, I positioned the b side of Paper 3 on an angel, distressing the edges for texture. I trimmed off the overlapping edges and added white machine stitching.

I wanted to create a multi-photo layout, and Paper 4 provided the perfect opportunity to create a photo strip format. I worked out where the strips would sit, and brushed on some Frayed Burlap Distress Oxide ink to create a shadow and help them contrast against the green paper. I also added some splatters.

I printed four photographs, layering them onto blue Bazzill cardstock from the Matchmaker Pack. I positioned these on two strips of Paper 4, and created a second layer using the b side of the paper to show that pop of yellow.

I added a strip of burlap ribbon underneath to create that extra texture you find when out in the woods.


With the main design in place, I began embellishing. I absolutely adore the Ephemera Tickets and couldn't resist the opportunity to tuck some alongside my photo strip.


I also added a few more at the bottom, bringing out the blue tones of the collection.


Just above, I created another small cluster, made with the leaves and compass from the Ephemera Bits & Pieces Pack. The title is from the Ephemera frames and Words Pack.


On the opposite photo strip, I created another small cluster, using the backpack, leaves and signpost which were fussy cut from Paper 7.


Towards the top of the cluster, I used a beautiful blue tab from Chipboard Sticker Sheet #3 and added a small 'Explore' phrase from the Phrase and Words set.


As a final touch, I added some moss from my stash around the clusters to really bring home the feel of the forest, and that was the page complete!

I hope you find inspiration in the page and are as excited as I was to see all the extra bits now included in this P13 collection - it really was a joy to create with.

I'll be back in a few week with another project with Hit The Road.

See you soon.
Claire xx
@scrappysoulmate


Monday, 18 October 2021

Adventure! Doodlebug Fun at The Park!


Hello! Happy Monday! Welcome back to the Papermaze blog. ScrappyAdam with you today! I am working with Doodlebug 'Fun at The Park' for October and I have to admit, this is another favourite collection for sure - so cute!


I took inspiration from a sketch from Lisa Sikorski at Scrap a Sketch and a challenge from Dotty About Flair and decided on three papers for my background - Mini Dot (the red that the layout is matted on) and Say Cheese and Movie Stars for the three torn background elements. 

It's quite a simple layout. For the background, I tore both papers together to ensure I got the correct tear on both papers and then used two parts of the B-Side of Say Cheese for the top and bottom and one part of Movie Stars for the middle. 


I went crazy with my matting and have six mats on the photo using various papers from the collection.


I decided to create a shaker pocket for the left of the photo. This was simply done by cutting a frame from B-Side of Mini Dots and a 3x4" piece for the back and then using some acetate to cover and some Buttons Galore and More Mickey Heads as the shaker element. I added a Shaker Pop from the collection on top of the shaker element.


It was then a case of getting to work digging for embellishments! I opted to use some flair from Dotty About Flair for added dimension and they matched perfectly! Most of the embellishments came from the two ephemera packs - chit chat and odds and ends. I did also make use of the enamel sprinkles and some stickers too! I have used lots of phrase strips and banners. My title came from the chit chat pack. 

There is a YouTube video with this layout if you'd like to take a look, you'll find that here. You can find the full collection here as well as all the Doodlebug goodies here

Don't forget, it's the Papermaze Autumn Sale right now - there's tons of goodies at 50% off (I am finding it hard to resist!!).

I'll see you back here for some more Fun at The Park next week. 

Stay safe and take care!


Adam xx

Wednesday, 18 August 2021

Let's Go Anywhere with Photoplay Collections

Good Morning! ScrappyAdam back with you today and I am continuing my mix and match of Photoplay - and loving it - they all match so wonderfully!


Those eagle eyed amongst you will see that I have brought in a few stickers from another collection on this layout because they worked so well and I used a few from Echo Park's Scenic Route Sticker Book!

I started with a sheet from Photoplay's America The Beautiful - Celebrate as my background as I loved the dark blue star background. 

I cut a large circle from Photoplay's 'Little Boys Have Big Adventures - You're a Star' and used this as a base for my background, following a Pagemaps sketch I then added a strip of the same paper but the B-Side, matted my photos on a paper from Birds of Feather and a cut apart card from Time to Travel

Then the fun bit - embellishments!


I used flair from Dotty About Flair and lots of bits from all the various Photoplay collections to add clusters roughly in each corner of my photos - a sticker from Echo Park did sneak in again!


That's it for this one - fairly simple but I love the result!


I will be back soon but in the meantime take care and happy scrapping!

Adam x

Thursday, 15 July 2021

Time to Travel to Wales with Photoplay

Good Evening and welcome back to Papermaze! ScrappyAdam here with you sharing my first layout of July! I can't quite believe we are in July already! Where has 2021 gone!? 

Have you seen all the new collections instore from Photoplay? There are so may to choose from - it's hard to decide which to go for... so I went with them all! I have started the month off with 'Time to Travel' and added in some patterned paper from Snail Mail and Birds of a Feather! The latter two collections mix together perfectly for sure. 


I started this layout with some inspiration from Scrap Squad's 12 Days of Summer Lifts and I decided to have a play with Day 7. I absolutely love this design and will be playing with it again soon! The original layout which I took inspiration from/scrap-lifted had just the one photo but I adapted it and used two photos. That's what is great about taking inspiration from scrap-lifts - you can lift it exactly or change it to match your style, your photos, your stash!

Do you ever use layouts from other creatives or sketches as inspiration start points for your scrapbooking? Or do you prefer to start your own way? I have to admit, I never got on with either but I am finding it great fun using both and adapting it to my photos, stash and more is more style! 

So, I started with a full sheet of the B-Side of 'Pack Your Bags' as my background. I took a Pinkfresh chevron stamp and stamped chevrons in two areas - coming out (approx.) from where my photos/clusters/layers will be and added a 1" strip of 'Tourist Mode' across the page - slightly more upwards than centre. This red strip is actually one of the four 6x6" patters on the B-Side of Tourist Mode and so I simple adhered them together and then stretched them to make it look like it goes from one side to the other! You can see the join in the middle but I am ok with that!


I went crazy with lots of patterned papers - I started off with sticking with the inspiration layout then went my own way, cutting lots of different papers in different sizes. 


I used two 3x4" photos - one on each side, I didn't mat my photos since there were already a lot of patterned paper layers. There are lots of torn paper layers too!

Then it was my favourite part - embellishments! I fussy cut a few cars and caravans from 'Let's Go' which are perfect for fussy cutting. They seemed appropriate as we were travelling for a short caravan break! I have stuck some embellishments down with foam to add dimension along with the torn paper. 


I mixed up embellishing from the stickers and ephemera. I added in some Bramble Fox cars and geotags as well as three flair from Dotty About Flair. I did bring in some stickers from Echo Park too as well as some washi tape. 

Thanks for joining me today. I will be back soon with another Photoplay layout - using another new collection! Until then, take care and stay safe!

Adam x


Monday, 28 June 2021

Arcade Fun & Games with Echo Park Let's Go Anywhere

Hello, another evening edition on the Papermaze blog with ScrappyAdam

I am still using Echo Park's Let's Go Anywhere and have a fairly simple layout for you today - it goes to show I can do quick and simple! This collection is very much a travel collection but I wanted to show you don't necessarily have to document travel memories! I have documented some fun at the arcades when we went bowling! 


I started with a sheet of white cardstock to add a border to a sheet of the B-Side of the 3x4 Journaling Cards and cut two strips - one at 3" from the B-Side of Pack Your Bags and a strip of cameras from the Cameras paper. My photos are matted on the woodgrain paper which is the B-Side of Take Me Away - the photos, which are two 6x4", printed with quite a thick white border which I decided to leave on to help the photos stand out with the black background. 

I added a cluster to the right of my photo using two chipboard frames topped with a chipboard piece and some stickers from the 12x12 Element Stickers and the Sticker Book


I took some Thickers from my stash, mixing two, for my title and an ampersand from a third set. I added a few puffy stickers from Bella BLVD, the McIntosh stickers along with a red flair from Dotty About Flair. 


Finally adding a couple of bits on the photos directly and to the left and then I decided to tear a piece to the top right as it was looking a little bare and added some strip stickers and a Dotty About Flair flair. 

That was this layout done - unusually simple for me - and quite a quick one too. I'll be back with another layout very soon and there's so much on the blog right now so do pop and see all the other inspiration from the fab design team!

Stay safe, take care and see you soon. 

Adam x


Wednesday, 16 June 2021

Echo Park - Let's Go Anywhere - Spotting Jodrell Bank!

Welcome back to the Papermaze blog! 

ScrappyAdam here with you for an evening edition blog post for a change! This month, I am using the brilliant Let's Go Anywhere from Echo Park which has just been added to the shop. It's a fantastic collection full of black and white with red and woodgrain - I am loving the monochrome feel of it. 

'Spotting Jodrell Bank'


For this layout, I wanted to use the Forest Stencil and also used an arrow stencil from Safe Travels so I used some black ink and the two stencils to create two border strips across the page. I then used four strips of patterned paper, torn into strips from the collection and added in a washi tape for good measure and another pop of red!


I then added two strips from top to bottom, a strip of the B-Side of Cameras and a strip of the B-Side of See the World on top. 


I used the 6x6" pad to back four 3x4" photos and placed these two-together in the middle of the page and decided to use stickers and chipboard to add some detail below the bottom photograph. 


I have used Alpha's from the sticker book along with some from my stash to create the title to the top left of the page, nestled into the stencilling and overlapping the photo. 


I decided to utilise some 'empty' space on the photos by adding sticker, brads, chipboard and enamel dots. I have also added in two flair from Dotty About Flair. 

This collection is absolutely
 brilliant and I am loving creating with it. It's a big change for me to use limited colour but the black and white with pops of red and woodgrain make a refreshing change!

I will be back later in June with another Let's Go Anywhere project and in the meantime, have a look at all the other fantastic layouts! Do take a look at the collection, it's all in stock currently but I can't imagine it will be for very long - such a different collection!

Stay safe, take care and happy scrapping!

Adam x


Friday, 19 March 2021

Havin' a Blast at EPCOT - ScrappyAdam - Say Cheese Main Street

Happy Friday!

ScrappyAdam back with you today with my second project using Simple Stories 'Say Cheese Main Street' and it's another double page layout from me today!

I started off with inspiration from a sketch and made the sketch work for me - and work for a double page as the sketch was a single layout. 


I started with two sheets from the basics paper pack which have different colour in large and small spots. They're fab to give extra cardstock to a collection! 

I used various papers from the 6x8" pad to create banners in 1", 1.5" and 2" widths. I then took two strips of each of the Happy Magic Memories and Magical papers - I have used the black and red sides. I layered these in the middle, inwards on the left page and right across the page of the second one. I layered my banners in four blocks of three behind these strips. 


I backed my photos with the B side of the 4x6" Elements paper. I also used one of the 4x4" Elements in my row of photos. I placed the photos on top of the central strips of paper. 

It was then a case of embellishing with the embellishments in this collection. The foam stickers have got to be one of my favourite - they're amazing! I also used the stickers and ephemera as well as some enamel dots and some items from my stash (such as Dotty About Flair flair and border pieces). Of course, I had to use some of the cute puffy stickers!


I did use some washi tape on this one (forgetting the washi tape from the collection and instead using some from my stash - doh!). I tucked in some strips in and amongst the banners and layered some word stickers from the 12x12" Elements and Sticker Book. 

I hope you're all having a great March so far and I will see you back here soon! Thanks so much for reading. Stay safe and take care.

Adam x


Friday, 5 March 2021

A Disney Double Page with Simple Stories 'Say Cheese' by ScrappyAdam

 Happy Friday!

ScrappyAdam back with you. This month I am working with another Simple Stories collection - this time, I'm scrapping one of my favourite subjects - Disney! So, of course, I am using Say Cheese: Main Street! Plus a few older Say Cheese pieces!

I have one project to share with you today but it is a double page layout! I also have some other projects coming up later in the month!

So, onto my double page layout which documents a trip to Hollywood Studios at Disney World in Orlando. 


I started with two sheets of the Dream Come True paper. I cut a strip on a diagonal from one and then place them on opposite pages and did the same with the other sheet. It is a bit trial and error but easy to match up. I used a sheet of plain white cardstock to adhere my patterned paper to. I then added a further strip to the bottom of each page so I ended up with a large diagonal of the black stars paper. On closer look, you can see that the papers don't match on the cloud part as this was an impossibility! But I am ok with that - the black and washi tape makes up for it, I think!

I then took the red washi tape from the Washi Tape Set and on the top and bottom join of the papers adhered a strip of the washi. This joined them together more I thought and introduced more red to the page. 

I then set about adding my photos - I have four on this one. I've got a 4x4, 2 3x4 and a 4x6! I used two of the chipboard frames on the right page. I used various papers to back the one on the left and create a layered back to it. 

I created a cluster to the left of my photo on the right page using some of the bits and pieces from Main Street and older Say Cheese collections. I also used a bingo card from a cut apart sheet and some stickers from the elements stickers. You'll also see a foam sticker - they are amazing!! I layered lots of stickers and stapled these together. 


To the left hand page, I used some chipboard stickers from Say Cheese 4 to create some added interest - I didn't want to overload with photos across the pages (though I do have thousands of Disney photos to scrap so I probably should have)!


I then added a cluster to the top and bottom of the left side photo - again using various bits and pieces, foam stickers, sticker book, brads, enamel dots, puffy stickers from Say Cheese Main Street. 


Finally, I used the Colour Vibe Alpha sticker books (which are such good value and Vanessa has recently had lots of the new ones in which I've just received loads of, they last so long and the colour variety is brilliant!) to create a title (albeit a predictable/boring title!) that spanned across both pages. 

I hope you've enjoyed popping by today - thank you so much, it is really appreciated! I'll see you later in the month with more from this awesome collection but in the meantime, have a look at lots more inspiration from the other design team!

Take care and happy scrapping!

Adam x