Showing posts with label Torn Paper. Show all posts

Wednesday, 1 January 2025

Together - 49 and Market - Evergreen Season Collection

Happy New Year, Everyone!

I hope you all had a wonderful holiday season! It’s Rebecca here, and I’m kicking off 2025 with our first blog post of the year! After a whirlwind December, I’m finally catching up on my Christmas photos and getting them into my scrapbook. Today, I’m excited to share a layout I created using the beautiful Evergreen Season collection from 49 and Market. You can find it in the shop here.


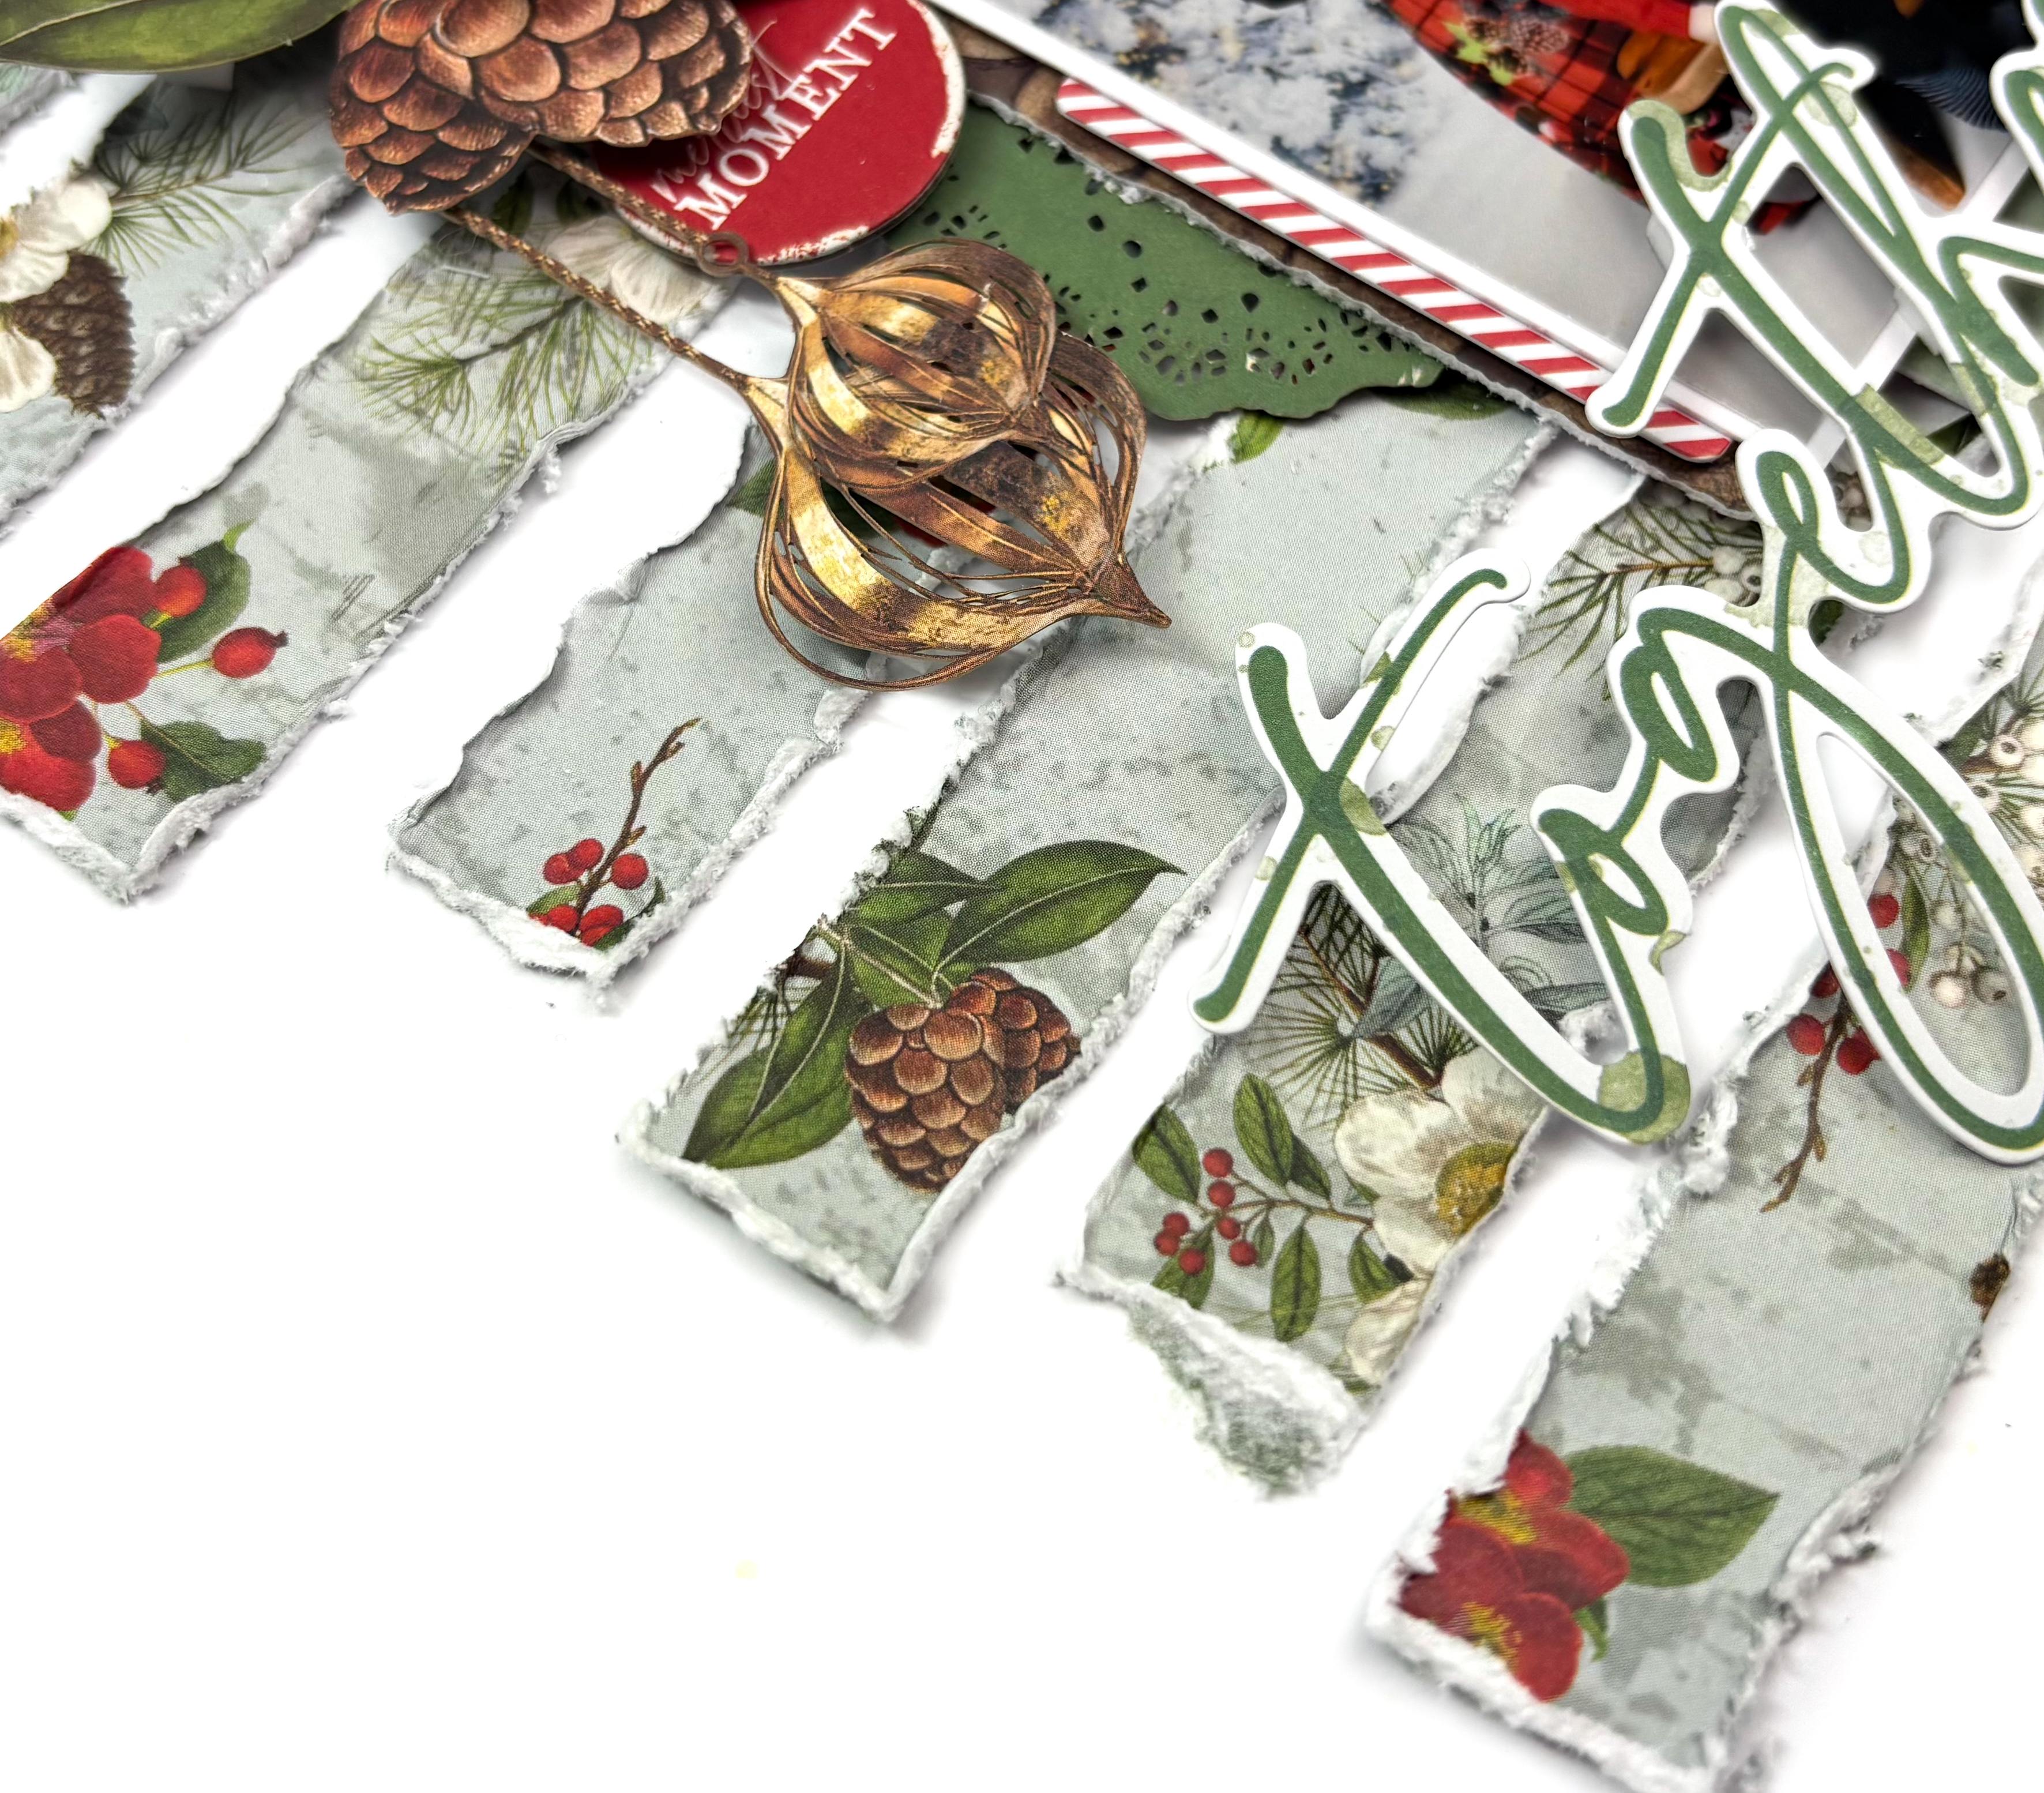
While browsing an online scrapbooking group, I came across a challenge to incorporate something 'torn' into a layout, and it immediately sparked an idea for me. I decided to start by cutting strips ¾ inch wide from the 'Cheerful Christmas Star' patterned paper. I chose this paper because the colours perfectly complement the background of my photo. To achieve the torn effect, I used a ruler as a guide and tore the paper along its edge for a neat, yet distressed look. I further enhanced the edges with a distressing tool and added a final touch by tearing both ends of the strips, fully embracing the challenge!


Next, I adhered the torn strips flat onto a sheet of premium white cardstock. I placed my photo on top, layering some colourful elements from the Ephemera Bits behind it. These layers not only create separation between the photo and the torn strips but also make the photo pop!

For my title, I chose the word “Together” from the Ephemera Bits. It felt perfect for this layout, as I’m documenting a rare photo of the three of us taken during a recent Christmas photoshoot.


When it comes to embellishing, 49 and Market collections always have so much to offer, and I absolutely love the variety! Each pack is filled to the brim with amazing elements, which sometimes makes it tough to choose. For this layout, I selected a mix of Christmas trees in various sizes. The larger tree comes from the Laser Cut Outs - Wildflowers, while the smaller one is from the Mini Laser Cut Out Elements. These trees were a great fit above my photo, as they echoed the trees in the photo background, creating a seamless effect.

I also added some beautiful florals from the Laser Cut Outs - Wildflowers around the photo, with a few chipboard circles from the Chipboard Words nestled among them. These tiny details really help bring the layout together.


To finish the layout, I raised some of the embellishments with foam pads to add depth and texture. I also curled the petals of the poinsettias to give the page even more dimension and interest.

Thank you so much for reading! I hope this layout has inspired you to capture your own Christmas memories in a creative way.

Wishing you all a fantastic New Year ahead!

Take care,


Rebecca x  
@preciouspagespapercraft

Wednesday, 9 February 2022

'I Heart You', using Happy Hearts from Simple Stories by Meg

Hey all - it's Meg here today sharing a layout using the very sweet Happy Hearts collection by Simple Stories! 

I just LOVE Simple Stories collections, they're always so bold, bright and versatile and Happy Hearts is no exception. 

This page was a really fun page to put together and I absolutely just went with the flow - I started by fussy cutting a strip of the roses from the Sweetheart paper. I often start by fussy cutting and inspiration will strike afterwards! 

I decided to do a vertical layout and I tore a strip of the Sweet On You paper and vellum to layer on top of the fussy cut Sweetheart roses, which I stitched on top of and I distressed some of the edges. I tore another smaller piece of Sweet On You to go on the opposite side of the page, to balance it out a little. 

I had some photos already picked out to go with this collection and so I sifted through and picked out this one with my husband and son on our wedding day, which is one of my most favourite photos ever! I double matted it with white cardstock and vellum before adhering it to the page and embellishing around it. 

At this point I decided to use some watercolours to just add a little green and pink on the page behind the roses, then I began sticking down word phrases from the Combo Stickers sheet and the packet of Bits And Pieces. The title 'I Heart You' actually came from the Combo Stickers sheet but I added the 'Heart' from the Foam Stickers sheet on top to add some extra dimension. The 'Happy Heart Day' and 'xoxoxo' stickers were from the pack of foam stickers too. 

I then focused on the little cluster on the right hand side of the page, popping up a little 'Love You' van from the Bits And Pieces pack plus a few stickers from the Combo Stickers sheet. 

And voila! I added some journaling and the page was finished. 

I really hope you like my page as much as I enjoyed creating it! Thank you for stopping by :-) 

Take care, 

Meg x 

Monday, 18 October 2021

Adventure! Doodlebug Fun at The Park!


Hello! Happy Monday! Welcome back to the Papermaze blog. ScrappyAdam with you today! I am working with Doodlebug 'Fun at The Park' for October and I have to admit, this is another favourite collection for sure - so cute!


I took inspiration from a sketch from Lisa Sikorski at Scrap a Sketch and a challenge from Dotty About Flair and decided on three papers for my background - Mini Dot (the red that the layout is matted on) and Say Cheese and Movie Stars for the three torn background elements. 

It's quite a simple layout. For the background, I tore both papers together to ensure I got the correct tear on both papers and then used two parts of the B-Side of Say Cheese for the top and bottom and one part of Movie Stars for the middle. 


I went crazy with my matting and have six mats on the photo using various papers from the collection.


I decided to create a shaker pocket for the left of the photo. This was simply done by cutting a frame from B-Side of Mini Dots and a 3x4" piece for the back and then using some acetate to cover and some Buttons Galore and More Mickey Heads as the shaker element. I added a Shaker Pop from the collection on top of the shaker element.


It was then a case of getting to work digging for embellishments! I opted to use some flair from Dotty About Flair for added dimension and they matched perfectly! Most of the embellishments came from the two ephemera packs - chit chat and odds and ends. I did also make use of the enamel sprinkles and some stickers too! I have used lots of phrase strips and banners. My title came from the chit chat pack. 

There is a YouTube video with this layout if you'd like to take a look, you'll find that here. You can find the full collection here as well as all the Doodlebug goodies here

Don't forget, it's the Papermaze Autumn Sale right now - there's tons of goodies at 50% off (I am finding it hard to resist!!).

I'll see you back here for some more Fun at The Park next week. 

Stay safe and take care!


Adam xx

Wednesday, 22 September 2021

Paige Evans ~ Bungalow Lane #2

Hi! It’s Anna here with another layout using Paige Evans’ Bungalow Lane collection! I have just adored playing with this collection, you can find what’s left in the shop here

For this layout I decided to focus on Paper 13.
It’s a busy pattern, but I wanted to showcase how it could be used on your layouts…

I began by using white bazzill cardstock as my base. I then trimmed down two 12 inch strips of the b side of Paper 4 and two torn strips from the other side.  
I mounted these to each side of my bazzill cardstock


I then cut out a selection of the patterned squares from paper 13.
I trimmed some of them down further to just the triangle, diamond or circle shapes to create some areas of white space. 
I arranged these together in a grid in the centre of the layout, leaving a slight gap in between each one. 


I made a pull out journaling card to tuck behind the largest photo, using a trimmed down project life card, which I stuck ‘the story’ foam sticker - from the phrase thickers - to the top of (I backed it first with some scrap cardstock to stop it sticking to the layout) 


I mounted both of my square photos on to the b side Paper 13
I added a title along the bottom of the grid and a few foam word stickers from the home sweet home phrase thickers.


I added embellishment to some of the grid squares by adding some dimensional stickers, enamel dots, foam stickers and punched out stars, I adhered some of them using 3D foam pads for extra dimension too. 


Thanks so much for looking! 
See you again soon. 
Anna 
X


Wednesday, 16 June 2021

Echo Park - Let's Go Anywhere - Spotting Jodrell Bank!

Welcome back to the Papermaze blog! 

ScrappyAdam here with you for an evening edition blog post for a change! This month, I am using the brilliant Let's Go Anywhere from Echo Park which has just been added to the shop. It's a fantastic collection full of black and white with red and woodgrain - I am loving the monochrome feel of it. 

'Spotting Jodrell Bank'


For this layout, I wanted to use the Forest Stencil and also used an arrow stencil from Safe Travels so I used some black ink and the two stencils to create two border strips across the page. I then used four strips of patterned paper, torn into strips from the collection and added in a washi tape for good measure and another pop of red!


I then added two strips from top to bottom, a strip of the B-Side of Cameras and a strip of the B-Side of See the World on top. 


I used the 6x6" pad to back four 3x4" photos and placed these two-together in the middle of the page and decided to use stickers and chipboard to add some detail below the bottom photograph. 


I have used Alpha's from the sticker book along with some from my stash to create the title to the top left of the page, nestled into the stencilling and overlapping the photo. 


I decided to utilise some 'empty' space on the photos by adding sticker, brads, chipboard and enamel dots. I have also added in two flair from Dotty About Flair. 

This collection is absolutely
 brilliant and I am loving creating with it. It's a big change for me to use limited colour but the black and white with pops of red and woodgrain make a refreshing change!

I will be back later in June with another Let's Go Anywhere project and in the meantime, have a look at all the other fantastic layouts! Do take a look at the collection, it's all in stock currently but I can't imagine it will be for very long - such a different collection!

Stay safe, take care and happy scrapping!

Adam x


Wednesday, 3 March 2021

Happy Birthday - Carta Bella - Let's Celebrate Collection

Hello, it's Rebecca back with you today sharing another layout I've created using the 'Let's Celebrate' collection from Carta Bella. You can view the collection in the shop here.


I recently scraplifted a layout by Christine Meyer with lots of torn strips of patterned paper and I loved the technique so much I couldn't resist doing it again! It's worked really well with this layout because I've scrapped a photo of my little boy tearing open his birthday presents, and the torn paper strips remind me of the wrapping paper I spent ages clearing away after! 

I started with a sheet of Bazzill Basics Cardstock (Admiral) and used my Silhouette Cameo 4 to cut a circle from the centre. I then used the off-cut to create a large number 4. I handstitched a border around the edge of the circle using green embroidery thread. 


I then got to work tearing strips from lots of the patterned papers. I've used 'Make A Wish''Hip Hip Hooray' and 'Vintage Candle Packets' . I didn't measure my strips - just tore them roughly 2 inches wide. I then stuck these strips to a sheet of White Premium Cardstock, overlapping them slightly and raising the bottom edges up with foam pads to add lots of dimension.


I then stuck the outer edge of the blue bazzill cardstock on top, so that the circle I'd cut out was filled with the strips of torn papers. I then added the number 4 on top, also raising that up with foam to add some dimension.

I still had the balloon template I'd used for my previous layout (which you can find here.) sitting on my desk so decided to cut some more balloons! I cut three in total using the 'Party Palooza' and 'One Year Older' patterned papers, and also a sheet of bazzill cardstock to bring in some of the lighter blue from the patterned papers. I added some embroidery thread around the bottom of my balloons to ground them on the page, and also add some texture.


I matted my photo with the same red and green patterned papers and situated it to the right of my number 4. I used a number of stickers from the Element Stickers sheet to embellish my layout, with the 'Happy Birthday' banner sticker acting as my title.


I then went to town with my Nuvo Drops! I really do love Nuvo drops - they add so much colour and interest to a page. I've used three colours and have added a border all around the edges of the number 4 and also around the edge of my circle. 


This layout was really simple, and came together really quickly but I love the overall effect. The torn paper strips add so much texture and dimension to my page and makes it really interesting to look at. It did take a lot of patterned paper to make this layout, but I think the overall look of the page was really worth it.

I hope you've enjoyed this layout. If you'd like to watch how it came together I have a process video up on my YouTube channel which you can find here.

I'm hoping to pop back with one final layout using this collection - I have a few scraps of paper left so I will see what I can come up with!

Take care,

Rebecca x


Thursday, 11 February 2021

Hello Today from Simple Stories by Adam - Back Again!

Hi! ScrappyAdam back again with another Hello Today layout! I am loving this collection and still have some left so you'll see yet more soon!


For this layout I really wanted to use a couple of the chipboard frames and faffed for a ridiculous amount of time trying to decide what to do! In the end, I place one to the top left and one to the bottom right. I decided on papers and went with the 'March' paper as my main background and a strip of 'July' paper to the left. I also teared a little strip in the top right corner and pulled the corners back, stapling each side down and popping a scrap of rainbow paper behind to give a pop of colour and some added interest and texture! I matted the photo on a sheet of the paper and added a tab and label sticker and word sticker. 


I really wanted to get an extra photo on the page so the frame to the bottom right is attached with a traditional style brad (rather than an adhesive brad) from Simple Stories 'Going Places' collection. This frame then twists and turns to reveal a second 6x4" photo underneath! I'd originally planned a shaker pocket so the frame does have a sheet of acetate on the front!


Then it was a case of diving into the stickers and ephemera! I used the 'Hello' foam sticker and placed this on the photo to the right, inside the frame. I popped some of the bits and pieces above this photo too along with a foam heart and enamel dots and a little adhesive brad. 


On the photo to the left, I popped a couple of adhesive brads on the flowers that are part of the chipboard frame, some bits and pieces and a sticker from the 12x12 sticker sheet


Finally, below the left photo, I used various bits and pieces, journal bits and pieces, enamel dots, puffy stickers and adhesive brads and layered various embellishments.  I finished it off with one of the lovely hearts from Cocoa Vanilla's Daydream collection!


That was me done for this layout! Thank you so much for having a read, I really appreciate it! Please do take a look at the Papermaze store - so many scrappy goodies with new stuff arriving all the time, especially all the fab new collections on their way!

Take care, stay safe and I'll see you back here soon!

Adam x