Showing posts with label Chipboard Frame. Show all posts

Monday, 8 July 2024

Little Moments - Simple Stories - Simple Vintage Meadow Flowers

Hi everyone, it’s Rebecca with you today and I’m really excited to be sharing my first layout for July because I’m creating with the beautiful Simple Vintage Meadow Flowers collection from Simple Stories. It’s such an elegant collection with soft, pretty colours. You can find it in the shop here.


I began by cutting out the sheet of notepaper from the Walk in Nature patterned paper. I love all the layers on this paper, but I felt like I wanted to scale it back and make it a bit simpler. Once cut, I distressed all the edges and adhered it centrally to a sheet of lilac cardstock from the 12x12 Basics Kit.


On top of this, I placed my photo, housed in one of the Chipboard Frames. I decided on the frame with more pink in it, to match my photo. 


Before adding any embellishments, I positioned some of the Rub-Ons around the page. I love how easy these transfer on to a layout, and they really elevate the page and add beautiful detailing to any background. 


With my rub-ons in place, I started to build some floral clusters around my photo using the Chipboard Clusters and Floral Bits & Pieces. By selecting larger elements, it means I didn’t actually need to add a great deal (fab for me - more for other layouts!) 


Once I have all my larger elements in place, I like to look through the smaller pieces in a collection to see what else I can add. The great thing about smaller elements is that you can add lots of them, without overcrowding the page. I selected a few stickers from the Cardstock Stickers, some Decorative Brads and some Enamel Glitter Dots.


The chipboard frame I’d selected had the phrase ‘Wild and Beautiful’ on it… which would work great as a title, but there was a phrase in the Page Pieces that had caught my eye. I selected the ‘Little Moments’ phrase for my title as it depicted the story in the photo perfectly. We’d been out for lunch for my husband’s birthday, and on the way back to the car we walked through the shopping centre. Randomly, under the escalator was this gorgeous wooden swing surrounded by a stunning display of florals. It was perfect for a few photos - capturing the ‘little moments’ in our day. I placed my new title on top of the chipboard frame, raised up on foam pads.  To extend my title further, I chose to add a Foam Stickers above my photo which reads ‘ My soul is made from’. 


To finish the layout, I made two little tears in the top and bottom of the background cardstock, and folded the edges in to create a little open triangle. I backed these spaces using a patterned paper from the 6x8 Paper Pad, just to add a little details and bring more colour to the edges of the layout. 


I hope you like this layout and it’s given you some inspiration. Meadow Flowers is such a beautiful collection so make sure you check it out in the shop before it’s all sold out!


Thanks for reading. 


Rebecca x

@preciouspagespapercraft


Wednesday, 24 August 2022

Anchors Away - Simple Stories - Simple Vintage Vintage Seas Collection

Hello, it's Rebecca with you today and I'm back with my final layout created with the Simple Vintage Vintage Seas collection from Simple Stories. I'm not sure I have ever enjoyed working with a collection so much before! You can find it in the shop here.


I absolutely adore all the patterns in this collection so wanted to get as many of them on the layout as possible. I selected my favourite papers and cut some strips from them, 2 inches wide. I cut them at varying lengths and arranged them along the top of the page, starting with the shortest. The first strip is 3 inches long, and then each one gets longer by one inch. I used a mix of 12x12 individual papers, and some from the 6x8 Paper . I machine stitched around the edge of each strip before adhering them to my background with adhesive foam behind them.


I selected one of the Chipboard Frames to house my photo. I chose the ship wheel frame because this layout documents a sailing trip I took my little boy on and he is stood at the wheel of the boat playing Captain! I placed it over to the right hand side of my page, on top of the longer patterned strips.


I wasn't happy with the bottom half of my page. I am a lover of 'white space' on a layout - but this was feeling more like empty space to me! I decided to add more of the patterned strips - but on a smaller scale. I reversed the patterns and lengths, which left me a nice amount of white space in the centre of my page.


I've used a Bramble Fox perspextive for my title which says 'Anchors Away' - perfect for my photo and this collection!


I had a lot of fun embellishing this page. The chipboard frame had a lighthouse on it - which didn't really work with the story I was documenting - so I cut it off and replaced it with a sail boat die cut from the Nautical Bits pack. I then built up some small clusters either side of my photo using bits from the same pack, and also the Bits & Pieces and Chipboard Stickers.


The page was feeling very heavy on the right hand side, so I decided to create some small clusters on the left of the page to balance it out. I made a small cluster at the top of the page and another at the bottom. To these clusters, I also added some small phrase stickers from the Sticker Book.


To finish the layout off, I added some white splatters using watered-down white gesso.


I hope you've enjoyed this layout and the others I've created using this collection. There is a process video available on my YouTube channel here if you'd like to watch it come together. 

Thanks for reading. I'll be back next month with an exciting new collection.

Take care,

Rebecca x

@preciouspagespapercraft


Monday, 8 August 2022

Beach Day - Simple Stories - Simple Vintage Vintage Seas Collection

Hi everyone, Rebecca with you today and I'm sharing another layout with Simple Vintage Vintage Seas collection. I love this collection and enjoyed working with it so much last month that I decided to continue creating with it this month! You can view the full collection in the shop here.


I started this layout by cutting a starfish shape from the B side of the 3x4 Elements patterned paper. I then cut the same shape, slightly larger from a sheet of red Bazzill cardstock and stuck the two together. This gave me a nice red border around the edge of my starfish.


Before adhering the starfish to my background, I used a Distress Ink Pad in the shade 'Blueprint Sketch' and a blending brush to add some colour to where it was going to sit. I added just enough colour so that it peeked out under the starfish like a glow. I also added some splatters in the same colour and then placed my starfish on top, with some craft foam to add dimension to the page.


I selected a frame from the Chipboard Frames pack, and cut it in half as I only wanted to scrap one photo on this layout. I had to do a little surgery and re-attach the right hand edge of the frame to make it work, but you can hardly tell it's been altered. I then used this to house my photo - my little boy on the beach rock-pooling.


I've used one of the Foam Stickers for my title, and placed it at the bottom of the frame. I also added an acrylic perspextive from Bramble Fox's 'Sea Life' collection as I thought it went really well with my layout. 


I then set about building some clusters using the Bits and Pieces and Nautical Bits packs. I added a cluster to the right of my photo, and another to the top 'arm' of my starfish to help balance the page out.


I finished the layout off by trimming about 1/4 inch from each edge of my white cardstock and then adding a red frame using the Anchors Aweigh patterned paper. I love how the red border ties the whole layout together. Strangely, red is my least favourite colour - but I love the reds in this collection! A few white splatters and the layout was complete.


I hope you've enjoyed this layout. If you'd like to watch the layout come together, there is a process video up on my YouTube channel here.


I'll be back later in the month with another Vintage Seas layout.

Take care,

Rebecca x

@preciouspagespapercraft


Friday, 8 July 2022

On Island Time - Simple Stories - Simple Vintage, Vintage Seas Collection

Hello, it's Rebecca with you today and I am super excited to be sharing my first layout using the new Simple Vintage collection from Simple Stories - and it's a stunner - Vintage Seas. It's full of lovely blues and reds with a hint of rustic and it is right up my street! I adore anything nautical so this collection is perfect for me.


I started by cutting circles from some of the patterned papers. My circles are cut approx 2 1/4 inches across (about 5.5cm) and I've used a metal die to cut them. I picked some of my favourite papers - By The Sea (B side), Gone Coastal (both sides) and Sandy Shores. Once cut, I arranged the circles into 5 rows across a sheet of Premium White Cardstock and stitched them in place using my sewing machine.


With my circles in place, I then turned my focus to my photo - my little boy sat on the beach on the Isle of Wight last Summer. I was really drawn to one of the Chipboard Clusters and decided to cut the centre out and use it as a frame for my photo.


For my title, I've used one of the Combo Stickers - it was perfect considering my photo was taken on an Island which is renowned for having a slower, more relaxed pace of life. I've also added a sailboat from the Combo Stickers as my son's top has little lighthouses and sailboats on it.


I really didn't need to heavily embellish this layout because the patterned papers add so much beautiful detail all by themselves! I've added a few chipboard pieces from the Chipboard Clusters pack, and some die cuts from the Page Pieces.


To stretch my embellishing further out on the page, I've added some phrase stickers from the Sticker Book to two of the corner circles. I've raised these up using craft foam to introduce some dimension to the outer parts of the design.


I finished off the layout with a couple of acrylic seagulls from Bramble Fox, and some white splatters. For the splatters, I have watered-down some white gesso and as opposed to using white paint as I find the white stays whiter and doesn't soak into the patterned papers.


I hope you've enjoyed this layout and you find it inspiring. This collection is truly stunning and I can't wait to create more layouts with it. If you'd like to watch this layout come together, you can find a process video up on my YouTube channel here.


Thanks for reading! See you next time.


Rebecca x

@preciouspagespapercraft


Wednesday, 8 December 2021

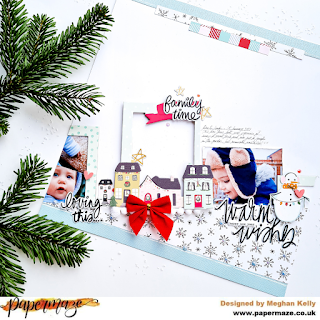
Simple Stories Holly Days - 'Warm Wishes' by Meg

Hey hey everyone! 

It's getting close to Christmas now and I'm sure you've been busy! As have we on the Papermaze Design Team, scrapping with some wonderfully festive collections 😃 

I'm here today to show you a page I've made using Simple Stories 'Holly Days' - I always love Simple Stories for their fun and cheery designs, so I am so super excited to be sharing this with you today! 

I had the Holly Days Chipboard Frames in my pack so the first thing I did was open that packet up to pick out my favourite frames! One that really caught my eye was this one I used in the centre of my design, with the sweet little houses on it. 

This chipboard frame was actually a double frame and at first I thought I was going to use both sides but then I ended up deciding I only wanted to use it as a single frame and layer around it, so I cut it apart with my scissors to create a single frame instead. 

I decided I wanted to create a diagonal design and so I cut a triangle out of the Holly Days Let's Get Cozy paper to make a gentle snowy slope on the bottom of my page. After that it all seemed to come together naturally! I positioned the chipboard frame on the top and the middle of the slope and cut out a house from the other side of the chipboard frame, plus another fussy-cut house from the Home For Christmas paper, which I arranged either side of my chipboard frame to create like a little street of houses! 

I had already sorted through my photos and had picked out my Christmas/Winter photos ready to possibly use with this collection, so I had a quick look through and picked out these three photos of my two children and arranged them either side of the chipboard frame, using a section of another frame to frame my smaller photos on the left and another piece of chipboard frame on the right to create a trio and balance out the page. 

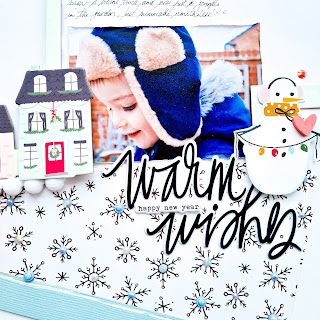
I tucked some pom pom trim under the chipboard frame for some texture and because I love it, it just makes a page feel so Christmassy! There was a banner on the top of the frame that said 'Merry Christmas' but I'd cut it in half and it only said 'Merry', so I used a Warm Wishes Puffy Phrase Thicker sticker by Vicki Boutin American Crafts that said 'family times' to cover it up. These puffy stickers go so nicely with the Holly Days collection and have lovely festive sentiments, so I used two more to create another trio around the page and some golden puffy stars. I also added a snowman that I'd fussy cut from the Holly Days Tags paper, some Bramble Fox red heart Perspectives and a big red bow to add a few more pops of red. 

I added blue Jetstream Bazzill cardstock to the top and bottom of the page which matched the other blues perfectly, plus some strips of Let's Get Cozy paper to the top of the page. I finished with some blue crystal and pearl flatback gems on each of the snowflakes at the bottom of the page for some sparkle and shine!

I hope you've enjoyed seeing my layout today and that you get a chance for a little scrappy downtime during this busy season - I'll be back again soon with another Wintery layout!

Merry Christmas and lots of love from our family to yours,

Meg x 


Friday, 24 September 2021

Sweet Life - Simple Stories - Simple Vintage Lemon Twist

Hello, Rebecca back with you today sharing my second layout created with the Simple Vintage Lemon Twist collection by Simple Stories. The collection is available in the store here


I'm still loving this collection - so much so, that I was inspired to create a layout with a patterned paper background! If you follow me on YouTube or Instagram you'll know this is something I very rarely do...if at all!

I started with a sheet of the Happy Thoughts patterned paper and trimmed it down to 10.5 x 10.5 inches. I then made a slit in the top and bottom, towards the right hand side of the page, each about 4 inches long. I folded the edges back on either size of the slit, to reveal the B side pattern. I made a couple of folds to add a bit of interest, and secured them with some mini staples to bring another texture to the page. 


I distressed the edges of the entire page and then backed the empty triangle areas with the Sweet Life paper as I planned to mount the patterned paper onto white cardstock, but I didn't like the way the white was showing through the gaps. I then stuck the whole page to a sheet of 12x12 inch Premium White Cardstock, which gave my page a white border, and finished this off with a border of white machine stitching.


This collection comes with some gorgeous Chipboard Frames so I selected an oval one and backed it with my photo. It has a decorative lemon to the left of the frame which has the words 'Sweet Life' and I thought that would make the perfect title for my layout. I added some craft foam behind my photo and stuck it in the centre of the page in between the two slits.


Moving on to embellishing my layout, I selected a few elements from the Bits & Pieces pack, and positioned them above and below my photo. The idea being to have a line of embellishments cascading down the page. I popped a couple of tickets and some phrase banners underneath the photo, and above my photo I added a tag, a heart, a butterfly and another phrase banner. 


From the Floral Bits & Pieces I selected another butterfly and a bumble bee. The chipboard frame already had one bumble bee on it so I placed the cardstock bee onto the lemon so that there was one either side of the frame.


I then finished my layout with some white splatters, using watered-down white gesso to add a bit of white to the background to break up the patterned paper a bit.

If you'd like to watch this layout come together, there is a process video up on my YouTube channel, which you can find here.


Thanks so much for reading. I hope this layout has inspired you in some way - there's plenty of this collection left in the store if you fancy having a play with it. I've found it possibly one of the easiest collections to work with! The limited colour palette means that everything matches perfectly and I've found that the layouts seem to fall together so easily and enjoyably! Thankfully I have lots of this collection left, so this won't be the last you see of it from me!

Take care

Rebecca x


Saturday, 17 April 2021

'Wander' by ScrappyAdam... Simple Stories 'Safe Travels' Collection

Happy Scrappy Saturday!

It has been a busy few weeks for me but I am so happy to be back on the Papermaze blog sharing a new layout using the new Simple Stories collection, Safe Travels. I absolutely love this collection - it is travel themed but it can be used for so much more especially with the travel restrictions of today. I loved my DT Pack and then bought the rest of the collection - like I always do!

I have used it to document a photo from a three week road trip across Europe we took in 2019. I have so many photos from this trip to document - I have so many photos to document! Do you scrap chronologically? Or are you more of a random scrapper like me? I scrap whatever photo I feel like depending on what I am working with! 


I took inspiration from Day 3 of Scrap Squad's '12 Days of Spring Scraplifts' over in the Scrap Squad Facebook group. I don't do scrap lifts all that often, even though I have a huge virtual pile on my phone and it was nice to have the starting inspiration for a change. I did change the orientation of my layout from the scraplift for Day 3. 

I took a sheet of White Bazzill as my background. I don't use white backgrounds all that much so that was a nice change.I started with two strips each of the papers Happy Travels, Weekend Vibes and Take Me Somewhere. I decided to tear these strips and had one large strip at the bottom and two smaller layered behind this and three smaller strips on the top. I did intentionally make it very textured with tearing and distressing the edges. 


I added my photo, slightly bigger than a 3x4" and used a Chipboard Frame to highlight the photo and layered a sticker to create a subtitle with the words already on the frame. 


To the top right, I added a cluster using the adhesive brads and enamel dots as well as a couple of stickers from the sticker book. 


I wanted to add more because there was a lot of white space left for me! If you've seen my layouts before then you know I don't do white space often at all! So I added a big foam sticker, some washi tape strips, brads and stickers as well as a rub on from my stash. 


That's pretty much it! Quite a simple page for me - with quite a bit of white space for me! Hope you have enjoyed it and I will hopefully be back with another Safe Travels project very soon!


In the meantime, pop along and have a look at all the other amazing creations on the blog, have a happy scrappy Saturday and stay safe and take care!

Adam x


Friday, 5 March 2021

A Disney Double Page with Simple Stories 'Say Cheese' by ScrappyAdam

 Happy Friday!

ScrappyAdam back with you. This month I am working with another Simple Stories collection - this time, I'm scrapping one of my favourite subjects - Disney! So, of course, I am using Say Cheese: Main Street! Plus a few older Say Cheese pieces!

I have one project to share with you today but it is a double page layout! I also have some other projects coming up later in the month!

So, onto my double page layout which documents a trip to Hollywood Studios at Disney World in Orlando. 


I started with two sheets of the Dream Come True paper. I cut a strip on a diagonal from one and then place them on opposite pages and did the same with the other sheet. It is a bit trial and error but easy to match up. I used a sheet of plain white cardstock to adhere my patterned paper to. I then added a further strip to the bottom of each page so I ended up with a large diagonal of the black stars paper. On closer look, you can see that the papers don't match on the cloud part as this was an impossibility! But I am ok with that - the black and washi tape makes up for it, I think!

I then took the red washi tape from the Washi Tape Set and on the top and bottom join of the papers adhered a strip of the washi. This joined them together more I thought and introduced more red to the page. 

I then set about adding my photos - I have four on this one. I've got a 4x4, 2 3x4 and a 4x6! I used two of the chipboard frames on the right page. I used various papers to back the one on the left and create a layered back to it. 

I created a cluster to the left of my photo on the right page using some of the bits and pieces from Main Street and older Say Cheese collections. I also used a bingo card from a cut apart sheet and some stickers from the elements stickers. You'll also see a foam sticker - they are amazing!! I layered lots of stickers and stapled these together. 


To the left hand page, I used some chipboard stickers from Say Cheese 4 to create some added interest - I didn't want to overload with photos across the pages (though I do have thousands of Disney photos to scrap so I probably should have)!


I then added a cluster to the top and bottom of the left side photo - again using various bits and pieces, foam stickers, sticker book, brads, enamel dots, puffy stickers from Say Cheese Main Street. 


Finally, I used the Colour Vibe Alpha sticker books (which are such good value and Vanessa has recently had lots of the new ones in which I've just received loads of, they last so long and the colour variety is brilliant!) to create a title (albeit a predictable/boring title!) that spanned across both pages. 

I hope you've enjoyed popping by today - thank you so much, it is really appreciated! I'll see you later in the month with more from this awesome collection but in the meantime, have a look at lots more inspiration from the other design team!

Take care and happy scrapping!

Adam x