Showing posts with label cocoa vanilla studio. Show all posts

Monday, 25 March 2024

Outdoors Adventure - Cocoa Vanilla Studio - Great Escape Collection

Hi everyone! 

It's Rebecca with you and today I am sharing my second layout created with the fun Great Escape collection from Cocoa Vanilla Studio. You can find the collection in the shop here.


When I first saw this collection, my eye was immediately drawn to the Happy Camper paper with all the different coloured flags and an idea started forming in my head. This layout is me getting that idea out of my head and onto paper! To start, I used my Crop-A-Dile to punch holes and set metal eyelets at 6 points on a sheet of Premium White Cardstock. Through these eyelets, I threaded some white embroidery floss going vertically down the page in 3 lines.

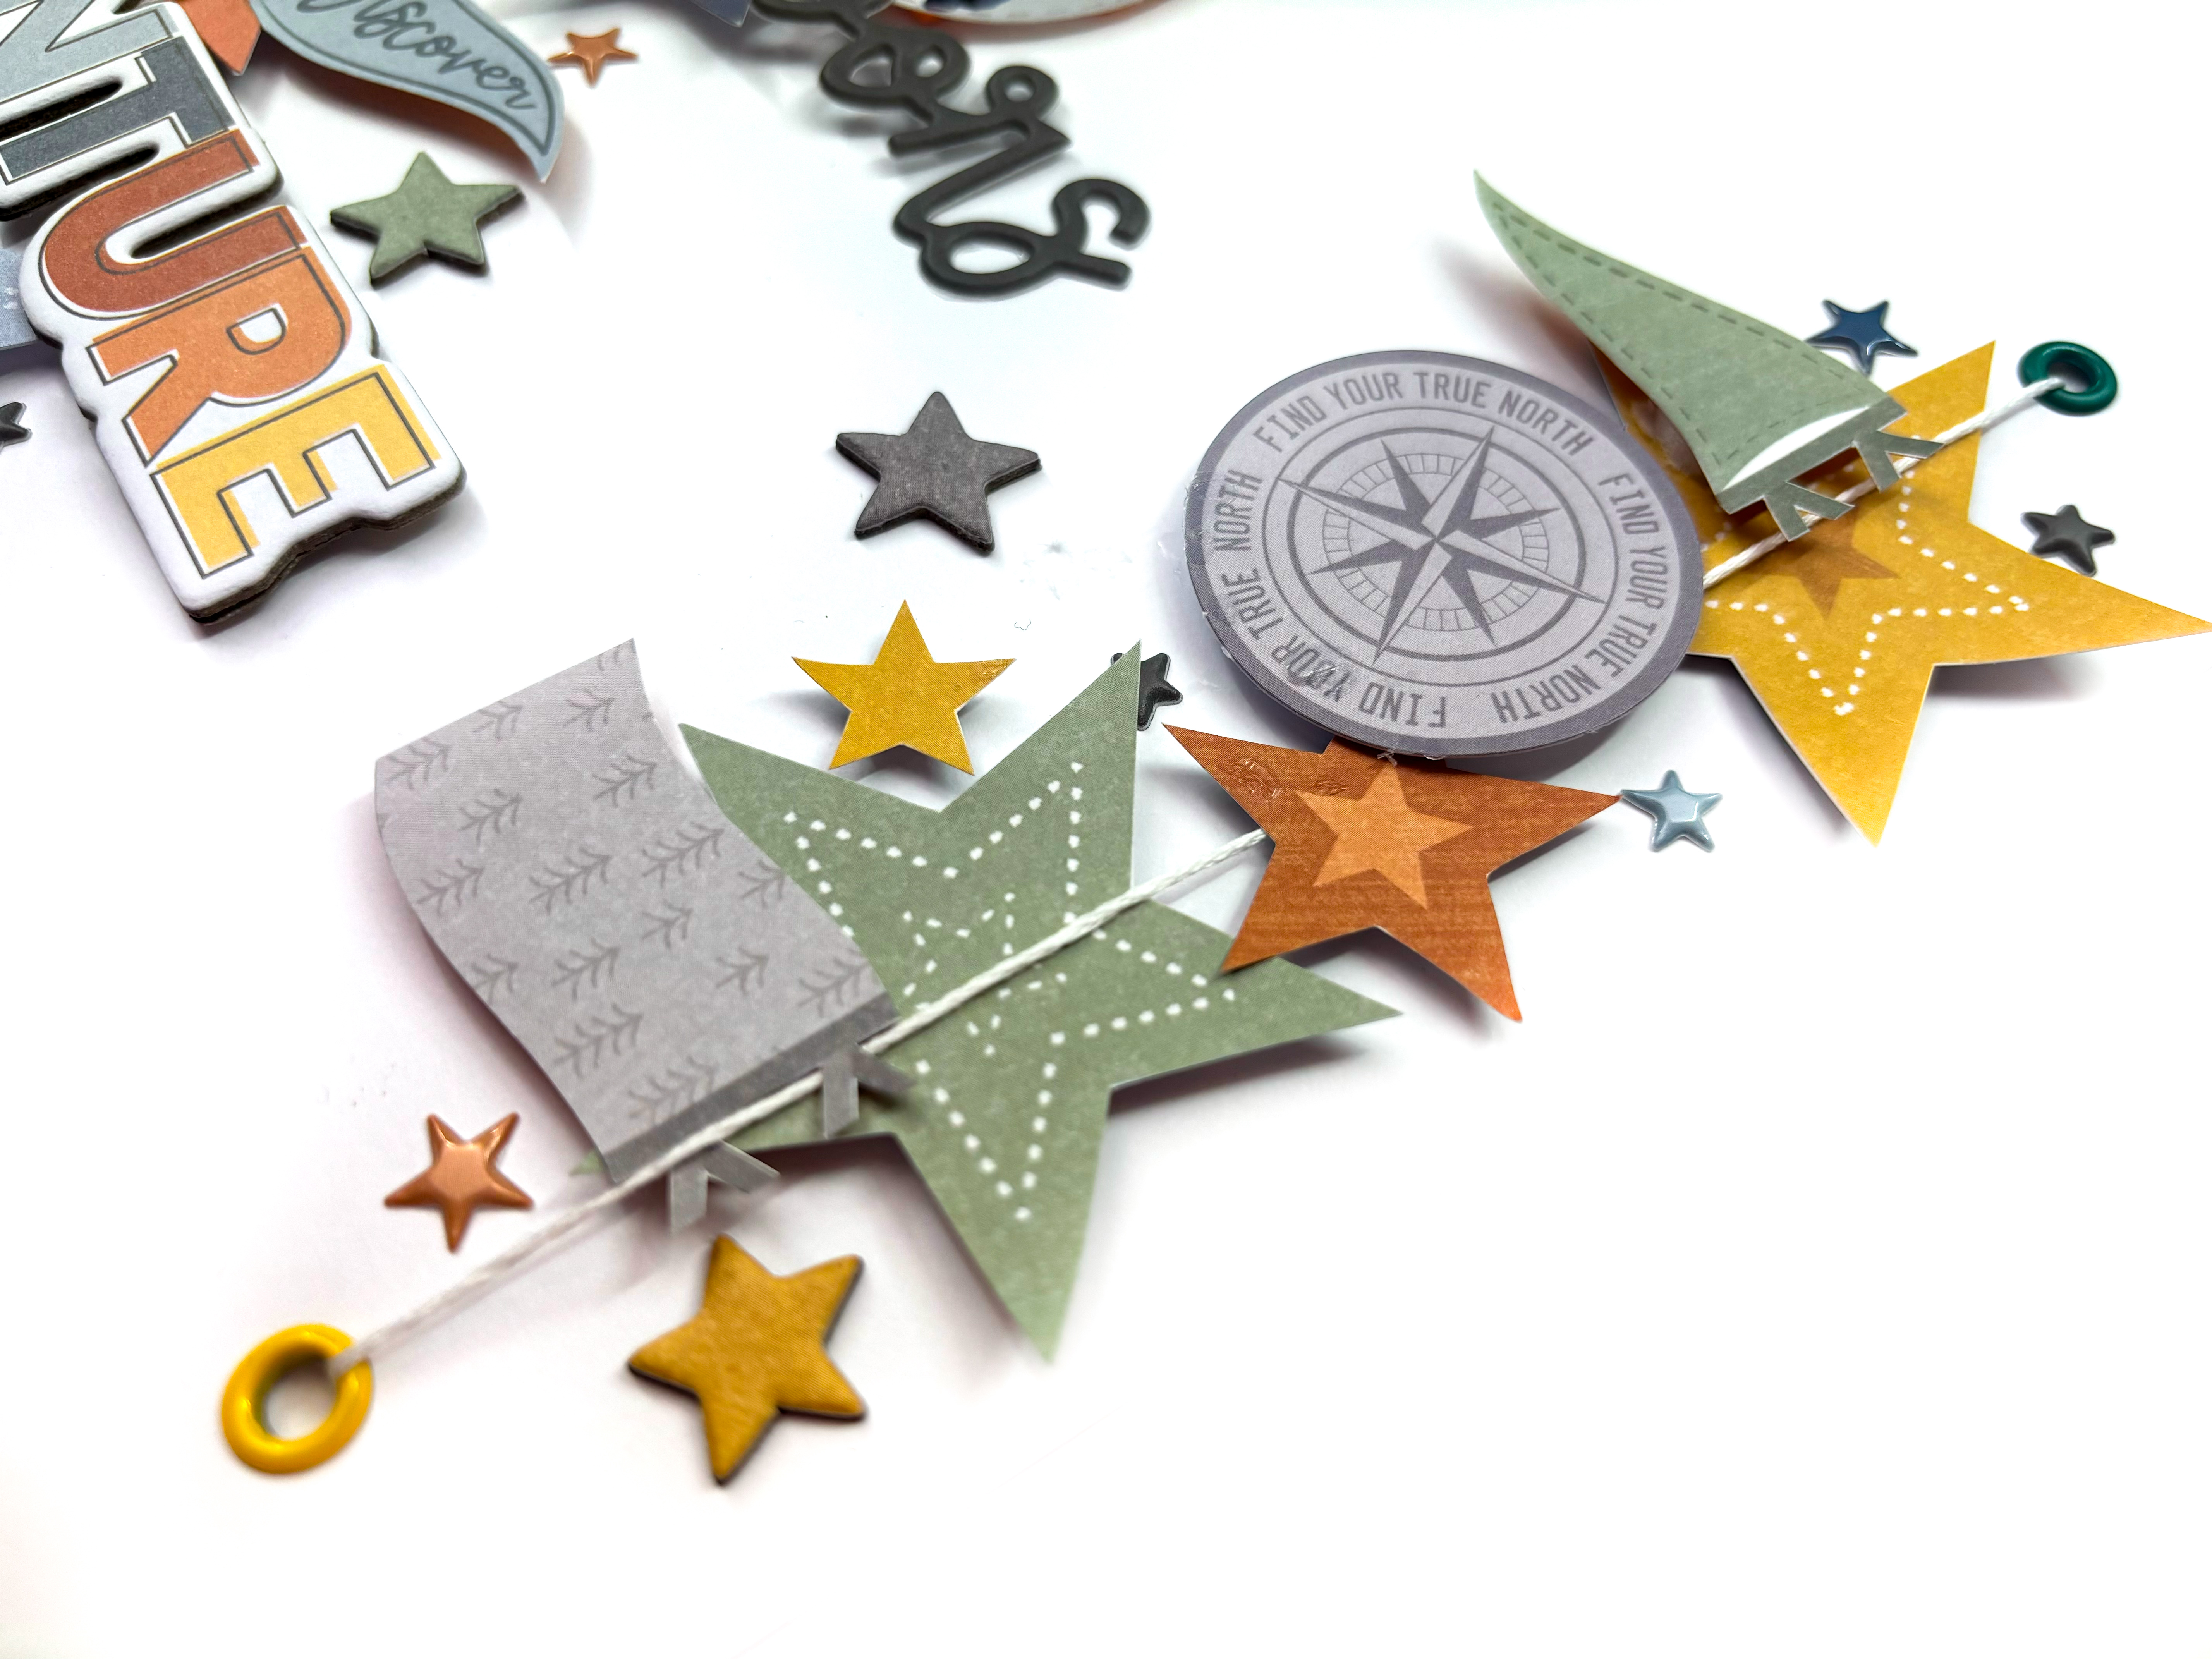
Using my Cutter-Bee scissors, I fussy cut several flags from the Happy Camper paper, and some stars from the Star Gazing paper and positioned them along the line of the embroidery floss. 

To the centre line, I placed a small, circular photo and underneath it, the word 'Outdoors' from the Puffy Title stickers.


I built up the clusters, following the lines of the embroidery floss using pieces from the Die-Cut Ephemera and Chipboard Stickers, making sure to have one circular piece in each line.


To the longer central line, I added the word 'Adventure' from the Chipboard Stickers. I love how this title is mutlicoloured and echos all the colours on the layout.


To finish the layout, I added several of the star Puffy Stickers, keeping them tight to the cluster lines.


I hope you've enjoyed this layout and it inspires you to use the Great Escape collection. 

Until next time, take care!

Rebecca x

@preciouspagespapercraft


Friday, 8 March 2024

Adventure - Cocoa Vanilla Studio - Great Escape

Hi everyone!

It's Rebecca with you today sharing my first layout for March. It feels like forever since I created a proper 'boyish' layout, so this month I've chosen to work with the new Great Escape collection from Cocoa Vanilla Studio. You can always count on CVS to release a cracking 'boy' collection! You can find it in the shop here.


As soon as I saw the grey woodgrain paper (the B side of 'Starry Night'), I was in love! It's a really lovely paper, and it's not too busy so it's perfect for a background! I cut small sections out of two of the edges and after distressing them, backed them with patterned papers from the collection.

Next, I die cut 2 large stars from the same 2 patterned papers (Happy Camper and Journey) and placed them central on the page. On top of these, I added my circular photo. I knew I wanted this layout to be quite minimalistic, so I kept everything clustered tightly in the centre of the page. 

Underneath the photo, I added 2 strips of patterned papers with fishtails cut into each end. I offset these slightly so that they weren't too 'blocky' and on top of these I added one of the Puffy Title Stickers.


Either side of my photo I added elements from the Die-Cut Ephemera. My photo is of my little boy playing in the village park on holiday, and so I've used the 'Fun Times' signpost, a compass and the words 'wild' and 'roam'. 


Underneath my title, I placed one of the Chipboard Stickers. I love this piece because the shape matches the banners I've created under my photo.

Wanting to extend the design down slightly, I've staggered some phrase stickers.


To finish off the layout, I've arranged lots of the star Puffy Stickers around the central cluster, trying to get an even spread of colours, and doodled a black border around the edge of the background.


Thanks for reading! I hope my layout inspires you to create with this fabulous collection.

Take care,

Rebecca x

@preciouspagespapercraft


Wednesday, 5 July 2023

Cocoa Vanilla Studio ~ Happy Days #3 💕

Hi all, it’s Anna here today! 
I’m back to share one final layout with Cocoa Vanilla Studio Happy Days - you can find the collection in the shop here


For my final layout I used the b side of paper ‘Juicy Fruit’ as my background paper. 


I chose to use one of my favourite Disney photos on this layout, which was printed 7x5, along with a magical memories’ title cutfile which was just perfect for this photo. 


The cut file was originally cut in white cardstock. So to make it stand out on my page a bit more, I added some distress ink in the shade of Speckled egg. I then backed the ‘memories’ part of the cutfile with the gorgeous rainbow effect Lollipops paper. 


I mounted my photo with coordinating cardstock from the matchmaker pack and assembled my photo and cut file together on the Juicy Fruit paper. 


I cut out florals from Lush Blooms and some elements from the cut apart paper, Feel Good.
I also chose some stickers from the Accessory Stickers, including a journaling spot and arranged them around my photo and cutfile title. 
I used some of the gold foil images from the specialty paper, including the jar, which was perfect for my photo featuring Tinkerbell. To had some extra fairy magic I dotted a random scattering of white Nuvo Drops coming from the jar. 
Finally, I added a couple of Disney finishing touches from my stash along with some Nuvo Drops around the edges of the page. 


Thanks so much for looking! 
I’ll be back with a new collection soon, see you then. 

Anna 

@acraftylifewithanna

Monday, 19 June 2023

Cocoa Vanilla Studio ~ Happy Days #2 🌈

Hi all, it’s Anna back with you today! 
I’m here to share my second layout with Cocoa Vanilla Studio’s Happy Days Collection. 
It is such a bright, happy and summery collection, I love it! 
You can find it all in the shop here


For this layout I pulled out the Rainbow Bright paper. I decided to trim the rainbow down a little so I had a bit more room on my layout. So I cut the darker pink strip of the rainbow off and trimmed the inner white section of the paper out too. 
I took inspiration from one of the journalling cards and added a sunshine behind the rainbow. To do this I just cut out a circle using yellow cardstock from the matchmaker pack and some thin strips to make the sun rays. 


I cut a couple of the sections of rainbow out and distressed the edges before sticking it back in place again. I then picked a few of the colours to add some stitching to with a matching coloured thread. I used different stitches for each one, matching the patterns on the rainbow. 


I backed my 6x4 photo onto coordinating coloured cardstock from the matchmaker pack and placed it slightly off centre. 
I then fussy cut some florals from ‘Lush Blooms’, some elements from ‘Feel Good’ and some pieces from the ‘accessory stickers’ and tucked them in opposite corners around my photo. 


I fussy cut the word ‘sunshine’ from ‘definitive’ but you can also buy the ‘chipboard stickers’ which are lovely too and mean that you can create your own title. 


To finish, I fussy cut a couple of butterflies from ‘flutterby’ and adhered them to my layout. 


Thanks so much for looking! 
I have one more layout to share with this collection before I move on to a new one.

See you for that soon! 
Anna 
X

@acraftylifewithanna

Monday, 5 June 2023

Cocoa Vanilla Studio ~ Happy Days #1 🦋

Hello! It’s Anna back with you today! 
 This month I’m working with Cocoa Vanilla Studio’s Happy Days collection. You can see it in the Papermaze online shop here

For my first layout, I focused on using the speciality paper with gold foil. A beautiful paper with lots of frames, just crying out to be fussy cut! So that’s exactly what I did! I cut out nine different frames, all of which were the square and rectangle shapes. 


I added my photos behind some of the frames and adhered some patterned paper from the collection to the remaining three frames. 


I cut out a few elements from ‘Feel Good’ including the journalling card. 
I arranged the frames and journal cards on a sheet of white bazzill cardstock, moving them around to try and find the best fit. 


I cut out the word ‘lovely’ from ‘definitive’ and some of the florals from ‘lush blooms


Once everything was starting to come together on my page I adhered everything to the background cardstock. I then started to embellish the frames with the patterned paper. I added a gold foiled butterfly from the speciality paper to one. A butterfly from ‘flutterby’ for another and some phrase stickers from the accessory stickers to another. 
I added the florals and some more accessory stickers to my layout to fill in some of the gaps around the frames. 


Thanks so much for looking! 
I’ll be back later in the month with another layout using this collection. 
See you then! 

Anna
X

@acraftylifewithanna

Wednesday, 31 May 2023

Documenting All The Memories


Hi, Lisa here.

Today we are chatting about telling lots of stories and adding lots of photos, all on the one page.

Remember this journal here?


If you haven't seen it before, I turned this old hardback vintage Disney book into the biggest journal ever!

I have a video here if you'd like to see it being made.

This is the journal that we are working in today and we are using the Happy Day collection from Cocoa Vanilla Studio here. 


Look how fun!!


This journal is seriously so big, even 12x12's are small : )
This is the page I ended up  creating.
The Epcot map pulls out on the left of the page.

I wanted to document the whole day. It was the first day of our trip so was ram packed of stories, so I knew I had lots to journal.

I created a pocket on the front so I could pop lots of bits inside to make it feel less cluttered.


I printed off mini photos to make photo strips and made these photo strips on scraps to pop in the pocket.


And I journaled on the backs too.

A great way to keep a page tidy.


This paper here is my favourite.

I may have to stock up on extras.

Great to use as titles, colour them in too or layer up as I have done here.

You can also see the Rosie's Studio puffy words here

Little Tip! I leave them on the acetate packaging and stick the plastic straight on the page with double sided sticky tape.

It works so well. Helps keeps them secure and in place, all in a straight line and it's so much quicker too.


And then as I has SO many stories to document, I stuck on a flip piece and told the story of our day.

I used quite a few of the coordinating stickers on this page.


Love these!


So that's my finished page. I added some memorabilia from the park that I picked up too.

I hope you like my page and I hope you feel inspired.

If you'd like to see this page being made, here is the video.


Have a great week.

Lisa xx

@lollipopboxclub


Thursday, 6 October 2022

Using Up The Scraps

 Hi, Lisa here again today.

I just can't get enough of this Storyteller collection from Cocoa Vanilla Studio lately.


In case you missed it, I used it to create a new journal, which you can see here.

But I had a few bits left and I was itching to use them.

This could be one of those collections where I need to buy a second set just to hoard.

I'm pretty good at not doing that anymore,  but every now and then there's a collection that I just can not resist hoarding. 

So I was on a crafty zoom with friends and I decided to use up my scraps and create a page in my Disney journal.


I had loads of bit of paper left, but no larger pieces except the one with the navy background and hearts, so I used that as a background and decided to create a flip page.


The smaller pieces with no pattern, I tore into strips as you can see here. These worked so well layering up and using some as journaling spots.


This opened out and I remembered that I had a few frames left from Rosies Studio here.

Seeing as I was using up scraps today, this was perfect. I love that it draws attention to the photo of my son and I.


Using scraps was such a fun way to add more laters and details.

I just kept cutting and layering and building on the contrasting colours.

I love using coloured staples to attach too. Another colour and texture.


Even the smallest of scraps had been kept and were being used today.

I love how when I order from Papermaze I receive everything in a 12x12 zip lock. I always keep my orders together and store them this way so that all the scraps get kept together. 

Then when I come to create another time the scraps are so easy to use and keep like today.

Nothing gets wasted.


I had so much fun working on this page.

It wasn't planned and it was all made from leftover scraps.

It was almost like a little challenge to myself to use up the bits and that's what I did.


I encourage you to do the same and let me know what collections you have that are hoarding worthy.

Lisa x

Friday, 30 September 2022

How To Start A Journal - Part 2

 Hello, Lisa here with more journal chat.


Did you see my post earlier this week where we transformed an unwanted cookbook into a journal?

It went from this.


to this


I have the full process video here if you missed it.

Today we are moving on to the next step.
Starting inside the journal.

It's a question I get asked about a lot.
How to start a journal?


I talk about different ways to start a new journal and show lots of examples.

I then also start working on this new one.

I'm using this lovely collection once again from Cocoa Vanilla Studio - Storyteller.

The reason I called this journal my Storyteller journal : )


I wanted to give this journal an introduction so carried on with the Storyteller collection inside using the papers, die cuts and stickers.

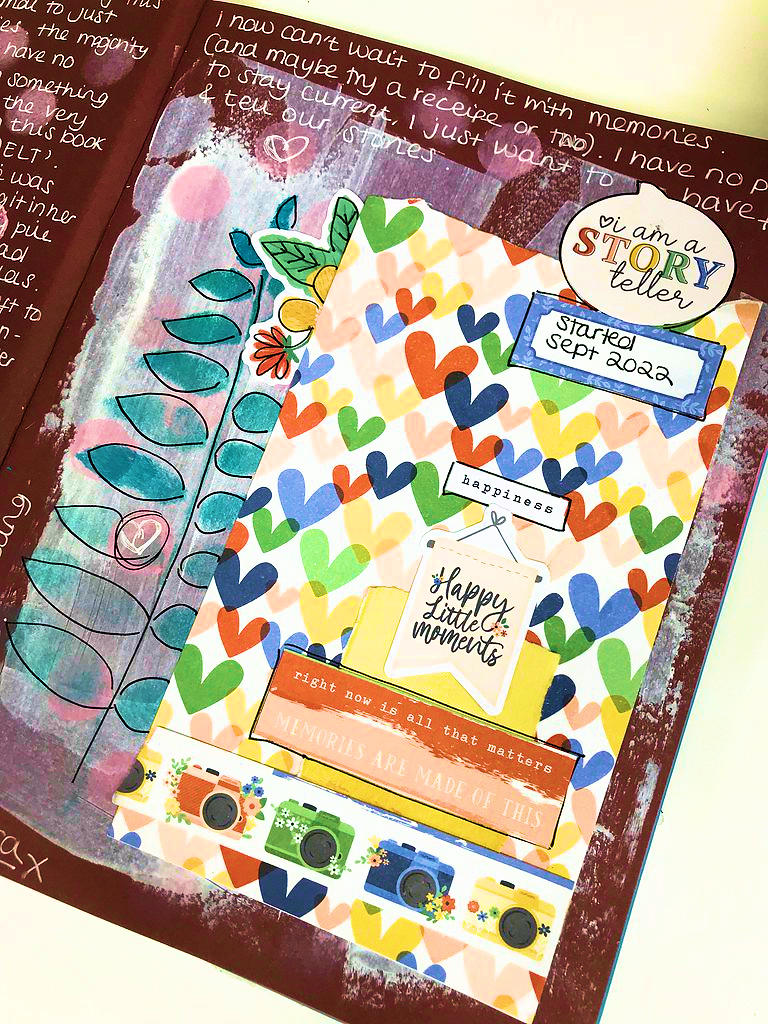
The dark background went so well. I added some gesso and some stencilling too.


And then used a white gel pen to tell my first story. 

The story behind the journal and my intentions for it.

I thought this would be a good start.


I'm so excited to get creating in this new Storyteller journal.

If you love telling stories too, I really encourage you to create one too.


I hope this inspires  you today.

Have fun


Lisa x

Tuesday, 27 September 2022

Let's Start A New Journal Together - Let's Tell Stories - Part 1

 Hello, Fancy starting a new journal with me today?


Lisa here. You know how much I love a journal, especially a DIY journal.

I love the freedom it gives me creating one myself.

Today I'm taking an unwanted cookbook.


My daughter was having a sort out before going back to uni and this was in the charity pile.

I'd recently watched 'Indie Quill' on YouTube and seen that she's used a Jamie Oliver cookbook as a journal and I loved this idea, so decided to do the same with this one.


I do have a video here if you'd like to see how I went about this from start to finish.

And the paper collection that plays such a large roll in this journal is this one here.

Cocoa Vanilla Studio - Storyteller.


I love to tell stories in my journal so I've taken the name of this collection and called this my 'Storyteller Journal'. 

A place to share random stories in any order.

No rules, just fun and stories.


I used the papers from the collection to cover the book. Using Mod Podge worked really well for this. I added paint too and some of the die cuts and stickers and then went over the top with another later of Mod Podge to secure it all in place.


I love the wording 'Melt' on the book so I kept that.

I also used some of the packaging.

The large word 'Storyteller' is actually the packaging of the die cuts.

It works so well : )


I carried on with the decorating on the reverse of the book.

The wording of the papers, die cuts and stickers was such a great fit as you can see.


I added some washi to the spine, also coating in Mod Podge to secure it.


I'm so happy with this new journal and feel very excited for our new storytelling adventures together.


I hope it inspires you to transform a book for your stories.

I'll be sharing Part 2 with you very soon as we'll be moving inside the book.


Lots of love

Lisa x