Friday, 17 April 2020

Some Bunny Loves You....and the Lockdown Bunny!

Hello Again

 I hope you had a lovely Easter, even though I am sure it was very different to any others you can remember! It's Anita here again with you and I thought I would veer away from doing a layout for my post today.
 Originally I had planned these as Easter bunnies, but got my dates all muddled up and realised they would be a little late! I have decorated them with some more of the remnants I have left from my Farmhouse Market by Carta Bella DT kit.


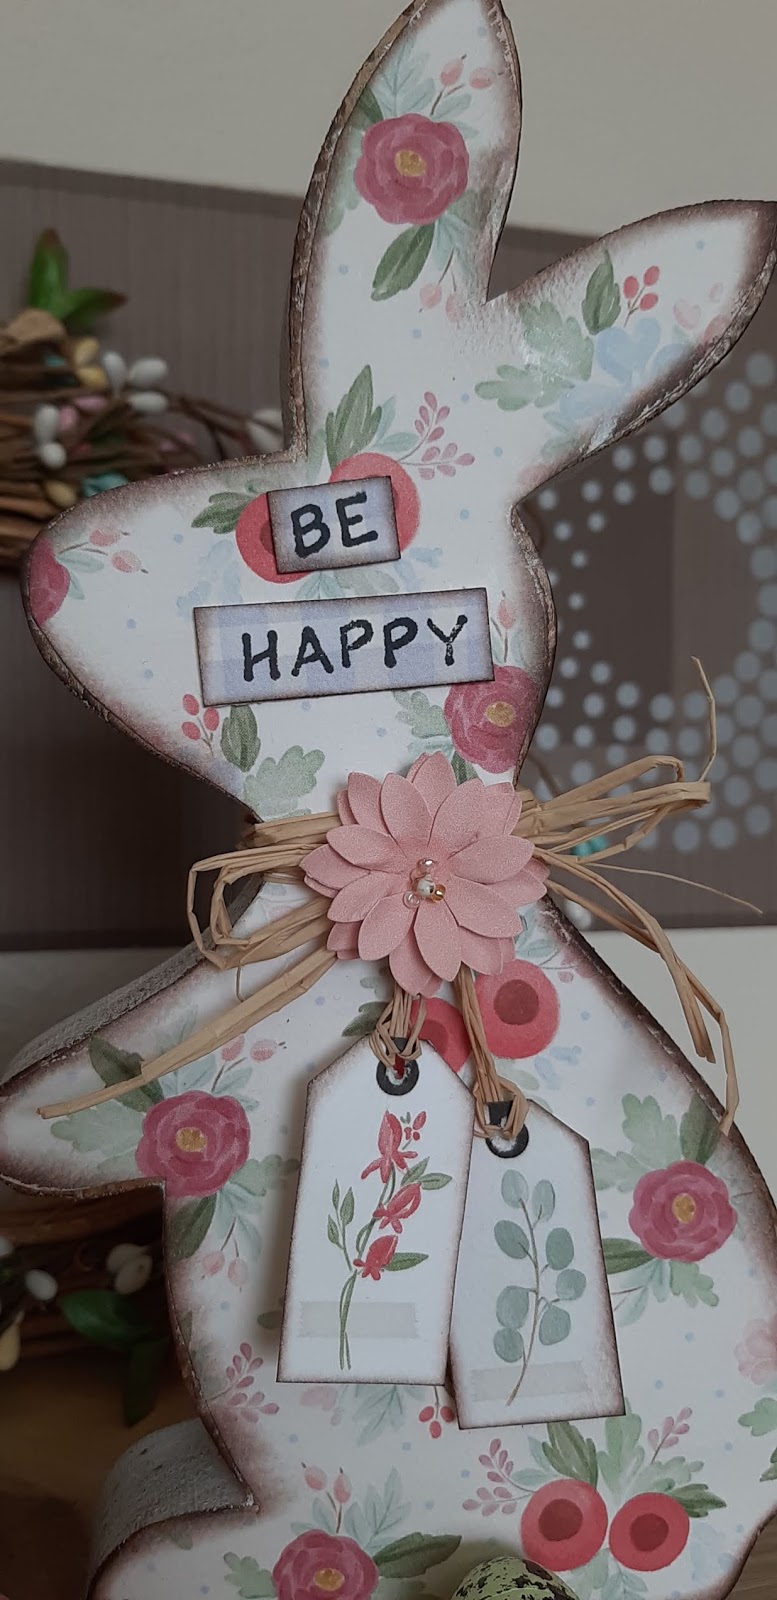
The bunnies started life looking like this....chunky wood with a drybrushed white paint coating. I have only decorated one side so that I can still turn them back to front if I wish and go for the orginal simple style.
    They were super cheap and I only paid less than £2.00 per bunny which i thought was a real bargain!


I drew round the rabbit onto a sheet of Vintage Floral and then cut the shape slightly smaller so that the edges of the wood still showed. When the adhesive had dried, I gently swiped all round the edges of the bunny with an almost dried out, dark brown ink pad.

I cut a couple of teeny tags from the sheet of Timeless Floral , inked the edges and added some raffia to hang them from. A raffia collar was tied round the bunny's neck and the tags hung from that.
 A little blossom from the Prima Apricot Honey Grapefruit Tart range was popped on to finish it off.

It was at this point that I noticed something really rather bizarre about this bunny ( as seen further down this post).... and decided I needed to cover it....so I stamped a couple of strips of paper with the words Be Happy and added them to his face.


The sitting bunny was covered with a piece of the reverse side of 4 x 6 Journalling cards and then inked the same was as the standing bunny and another raffia collar and blossom added. I stamped on some strips of paper to say Some Bunny Loves You.

.


So....this is the reason I had to add the words on the 1st bunny......just look at his face.....those crazy eyes!!! Except they were not meant to be and it happened as a complete fluke! The floral pattern is repetetive on this sheet and I didnt even think about the placement when I cut the shape out! However once I papered him, inked him and prettified him my Hubby was quick to point out his *wonky, crazy looking eyes*!! So I quickly covered them with the words. Rebecca from the DT aptly named him Lockdown Bunny LOL!


At the moment the words are only stuck on with blutac so I can still remove them if wanted.....he does have a sort of unhinged look about him doesn't he....but at the same time cute??

I hope you have enjoyed seeing my post with my Funny Bunnies....... I now have only got some teeny scraps left of my papers.....but who knows, maybe I make a little something with them too.

Happy Crafting and Stay Safe xx

Warmest wishes
Anita xx

Wednesday, 15 April 2020

'Super Star' - 12x12 Layout - Cocoa Vanilla Studio 'Legendary' Collection

Hello, Rebecca back with you today with a colourful mixed media layout using the Cocoa Vanilla Studio 'Legendary' collection and a cut-file.


I decided to back the cut-file using the beautiful rainbow coloured 'Wild One' patterned paper. I think this is my favourite patterned paper from the collection because it's so colourful and bright. I left the star empty and backed it with my photo.

I have used the 'Epic Tales' patterned paper for my background, and seeing as I knew I wanted to add lots of colour to it, I prepped it with gesso first. (I've used clear gesso as I didn't want to lose the pattern on the paper.)

I've used watercolour paints to create the background - trying to colour-match each area to the cut-file. I finished the background off with some large ink splatters created by squeezing a saturated paintbrush from height and letting it drop onto the page.


When I went to sit the cut-file onto the layout, I felt like the edges of the background looked a bit unfinished and bare so I trimmed the page down and mounted it onto a black border, adding a couple of torn areas to the edge to create added interest.

At this point I decided that the cut-file needed some black adding to it somehow to balance out the page. And this is where the butchering of the cut-file began!! I originally had my photo printed in colour, but decided to replace it with a black and white version. I'd stuck the cut-file down using foam and really strong double-sided tape. I had to carefully remove the cut-file from the background to replace the photo. I decided it still needed some more black, so I distressed the edges using a distress ink pad in 'Black Soot'. Next, I replaced all the double sided tape and stuck the cut-file back onto the background.

It still needed more black to balance the layout out. So I removed the cut-file again(!). I poked holes all around the edges of the letters and used black embroidery thread to hand-stitch all around them. In hindsight it would have been much easier to do this before backing the cut-file as I had to punch holes and stitch through two layers of card instead of just the one! As you can see from the photos, the cut-file has seen better days but from a distance you can't tell at all!


I finished the layout by adding a Flair Button with some tangled thread underneath, and some pieces from the die cut ephemera pack. I didn't want to overdo the embellishing as there was already a lot of colour on the page, and I was actually really happy with how the layout looked so I stopped.

I hope you've enjoyed this layout, I'll be back later in the month with another, which I'm pleased to say came together without any butchering!

Take care,

Rebecca x

Friday, 10 April 2020

Happy Easter with Simple Stories Hip Hop Hooray

Hi there, it's Anna back with you today. Since my last post a lot has changed, but I hope you are all staying safe and well and making the most of this time. Scrapbooking and crafting is a great hobby to have at the moment isn't it?
This month I'm going to be working with the Simple Stories Hip Hop Hooray collection, which is a combined Easter and Spring themed collection.
As its Easter weekend, I decided to make some Easter baskets. I've made three different sized baskets and to start, all you need is a square piece of cardstock or patterned paper. My square sizes were 30x30cm for the large basket, 21x21cm for the medium basket and 15x15cm for the small basket.


The next step is to score the card creating nine equal squares...


...and now cut along the lines as shown in the picture, up to the middle lines.


Now you are able to fold the card into the basket shapes. I have used two styles as shown below. Once you have the shape you like, secure it with adhesive.


Now to decorate! I have used a combination of the Simple Stories Hip Hop Hooray patterned papers, chipboard stickers, element stickers as well as cardstock. I made handles for the basket using strips of cardstock and/or patterned paper.


And finally, here are the finished baskets filled with eggs ready for Easter Sunday!


Wishing you all a very Happy Easter, have a lovely weekend!
Take care, stay safe and enjoy your crafting time!
See you soon.
Anna
X

Wednesday, 8 April 2020

Simple Stories Simple Vintage Garden District - Fly

Hello. Hope you are all well and staying safe. Karen C here with a layout using the very pretty new collection 'Simple Vintage Garden District' from Simple Stories. It is described by Simple Stories as a collection full of ".... the scent and sounds of nature with fluttering butterflies, twittering birds, buzzing bees and bouquets of blooms." It's perfect for spring, mothers day and easter projects and I am loving working with it.


For my layout I started with a sheet of the You Can Fly paper and a sheet of Blossom Bazzill cardstock.

I trimmed a quarter of an inch off of each side of the You Can Fly paper and matted this onto the Blossom cardstock which I had gutted. I then machine stitched round the edges of the paper using gold thread and a zig-zag stitch.


I carefully cut around part of the butterfly and one of the flowers printed on the paper and after matting my photo on some pink tissue paper I tucked it underneath the images.


The wings of the butterfly were raised up slightly with some foam squares.


I die cut the word Fly from some gold mirror card and stuck this on top of the photo.


I made two tags from two of the 3x4 elements paper. I added some brown Bakers Twine and some gold foil to the tags before attaching them to the layout with foam squares underneath for added dimension.


I embellished the bottom left corner of the layout with Prima Flowers and Butterfly.


The layout was completed with a scattering of gold sequins and the date was added using mini letter stickers from Pinkfresh Studio.


I hope you like the layout and that I have inspired you to try using the Simple Vintage Garden District collection which can be found in the shop.

Take Care and Stay Safe.

Karen x x

Monday, 6 April 2020

March Papermaze Kit - Part 2

Lynn here today, back with more from the brightly colourful March Papermaze Kit. I have had more fun creating with rainbow colours for these two layouts.


Before the details on making these layouts, here is a reminder of what you get in the kit, but for more details please see March Kit Part 1 post
HERE.


Easter 1998 This photo was taken by a professional photographer who came to the twins club in the Easter holidays when the triplets were 6 years old.
 

I gutted the sheet of Crafty and Happy paper and with the striped side up, I made a frame for my layout. I cut the Pear Bazzil to measure 27cm x 27cm, and the white to measure 28cm x 28cm. I also gutted the white to give me plenty of card to cut my leaves. Then I layered these papers as in the photo.

With a Vicki Boutin stencil I created some daisies on the Pear Bazzill with white texture Paste. Once this was dry I attached the green lace across the middle of the page. I applied my photo with 3D tape, leaving the edges free from adhesive to allow for the leaves to be tucked underneath later.

With a Tim Holtz Sizzix Thinlits die set - Cut Out Leaves, I cut three sets of the leaves. The dies cut the intricate internal patterns of the leaves only, so I then trimmed around each leaf with my scissors. I arranged the leaves around the bottom of the photo.

I die cut my title using more of the Crafty and Happy paper and White Bazzill. I created shadows with the white letters under the coloured letters. Then I drew around the letters with a fine marker.

Centres were added to the daisies with some Nuvo Crystal Drops, then I added random smaller drops in various colours, scattered over the page.

Girl On Tour - My daughter is on tour with PW Productions and The Woman In Black, and they travelled to Washington DC last December, as Stage Manager she had to organise the costume and prop luggage as well as her own!


I was initially inspired by
a layout made by Neftali Zambrano, although she used stitching and I went for paint, making for a very different finished effect.

For this page I chose the sheet of Petalsoft Bazzill. From the sheet of Round Trip paper I cut out a selection of tickets, I wanted a few in each colour of the rainbow. Then I arranged them along the top of the Bazzill. Before sticking them doen I marked in pencil where the colour changes would be, then removed the tickets and started with the paint.

Using acrylic paint I ran drips of each colour from the top of the page, allowing them to take their own path downwards. Once each colour was dry I started the next, and so on ...

The tickets were placed back onto the Bazzill and glued in place. I added two pale pink tickets to the bottom left of the page.

Using a set of Tim Holtz tag dies, I cut come luggage labels, one in White Bazzill, and three in Crafty and Happy paper. I arranged these around my photo, leaving enough room to write my journalling on the white tag and place my title on the larger striped tag.

From the kit I used the
puffy words stickers for the title, one of the chipboard quotes and the two stitched hearts. I made ties for the tags using thin strips of Pear Bazzill.

After making four layouts this month, I still have a complete sheet of Bazzill and one of patterned paper as well a several embellishments, so plenty to make another layout.

Thanks for looking, back with the kit for April later this month.
Lynn x

Friday, 3 April 2020

'Epic Adventure' - 12x12 Layout - Cocoa Vanilla Studio Legendary Collection

Hello, Rebecca back with you with another 12x12 layout created using the Legendary Collection by Cocoa Vanilla Studio. This time I've opted for a grid-style layout.


To create this layout, I've used the 'Epic Tales' patterned paper. I've cut apart all the individual elements and distressed all the edges using the blade of my scissors and Distress Ink Pads in various colours (Mowed Lawn, Chipped Sapphire and Salty Ocean).


I positioned my photos on the page and then decided which of the 3x4 cards I wanted to fill the other three spaces, and which I wanted to use to layer behind them and my photos. I decided to have the 'Epic' and 'Adventure' cards as top layers to form my title. The other card I've used has very faint lines on it which lend themselves perfectly to journalling so there was my 3rd winner! I used the other cards as layers behind, and I also used some of the other patterned papers from the collection to add a burst of colour around the edges.

I cut the smaller 'tabs' from the cut-apart sheet and also used them behind the layers. I fussy cut the 'The best' piece and used it as I would use ephemera, to embellish the corner of my journalling card.


I added a black Flair Button to the layout which says 'Yeah that's my boy'. It sits nicely on the top centre grid.


I then added more sections of the cut-apart sheet to the top and bottom of the layout and embellished with some fussy cut stars from the 'All Star' patterned paper. I distressed the edges of the entire 12x12 cardstock by running a Distress Oxide Ink Pad (Broken China) around them.


I finished off the layout by adding my journalling and some Nuvo Drops in co-ordinating colours.

I hope you've enjoyed this layout. I love how simple grid layouts are to create, and I've managed to use pretty much all of the cut-apart sheet in one layout - a first for me!

Stay safe everybody, and I'll be back again later in the month.

Take care,

Rebecca x


Wednesday, 1 April 2020

Cherish All your Happy Moments ... Carta Bella... Farmhouse Market

Hello again,

 It's Anita here and I am kicking off April with another layout using the lovely Farmhouse Market Collection from Carta Bella.
I  have been sorting back through old packets of photographs, from before I had a digital camera and I found these cute photos of both our girls. Chloe ( with the hoop) had a gorgeous little outfit on with Pooh Bear and the trousers were a coral coloured gingham fabric. They matched the reverse side of the Tags sheet perfectly and made my decision of what photos to scrap an easy one.


I based the page on a sheet of  Cubbies and use the reverse side of it, showing the text patterns.Tearing 12 inch strips from both Tags and Vintage Floral sheets I then layered them and placed at the top and bottom of my layout


Photos and the 'Cherish' panel were matted with Flamingo cardstock and I cut a few flower and leaf clusters from the sheet of Timeless Floral. These were then scattered around the page.


In my DT kit I had a couple of mini frames from Dear Lizzy She's Magic
The one used on the page is holographic and catches the light beautifully as you move.


I cut a couple of different sized tags from the 4 x 6 Journalling Cards and the Tags sheets and strung them with some cotton crochet wool and layered them onto the right hand side of the layout.


And finally I sprinkled on lots of sequins and various sized flat backed crystals.....who doesn't love a a bit of sparkle here and there right??


I hope you like my layout, I really enjoyed making it.

If you pop over to the shop there are lots of lovely new items winging their way in.....and we all need some lovely stash to keep us busy in these uncertain times don't we!

Happy Crafting

Warmest wishes
Anita xx