Saturday, 20 May 2023

Beautiful Life - 49 and Market ART Options Rouge Collection

Hello, Rebecca here and today I’m popping by to share an extra layout I created using the gorgeous ARToptions Rouge collection from 49 and Market. I was really excited to create with this collection as it has a limited colour palette, and I always find collections like this so enjoyable to use. You can find the collection here.


To begin, I tore some strips from two of the patterned papers. I opted for a gorgeous sage green floral paper, and then an ombré pink paper to help balance out the busy-ness of the florals. I layered the papers and placed them across the centre of a sheet of white cardstock.


After layering one of the die cut frames (from the Laser Cut Elements) behind my photo, I placed it on the right hand side of my page with some adhesive foam behind it. 


I was really excited to try out the rub-ons which are available as part of this collection. I used to have some rub-ons in my stash years ago, and they were rubbish! However, these 49 and Market rub-ons are amazing! I was so pleasantly surprised by the quality of them and the ease in which they transfer to my layouts. With this in mind, I took one of the larger floral clusters from the 12x12 Rub-Ons and added half above my photo and half below. 


For my title, I’ve used a dusty attic chipboard piece which reads ‘beautiful’. I have heat embossed it using gold embossing powder to bring some sparkle and texture to the page. Heat embossing chipboard is so easy (and satisfying!). Underneath this, I’ve added one of the small tab frames from the Chipboard Set. I’ve made tiny holes either side of it and threaded some embroidery floss through them. On top of the frame, I’ve added some alphabet stickers from my stash to extend my title to read ‘beautiful life’. 


I’ve then embellished the page using some of the laser cut outs, Wildflower Laser Cut Outs and chipboard pieces, concentrating on the area around my photo, and behind my title. 


To finish the layout off, I added a few sequins in coordinating colours and some gold splatters. 


I hope you’ve enjoyed this layout and it offers you some inspiration. It’s a truly stunning collection and perfect for so many projects and occasions. Don’t forget to head to the website and check it out. 


I’ll be back later in the month!


Take care,


Rebecca x

@preciouspagespapercraft 

Friday, 19 May 2023

American Crafts - Maggie Holmes ~ Woodland Grove 🍃

 Hi all, it’s Anna back with you today. 

I’m working with the latest collaboration between American Crafts and Maggie Holmes - Woodland Grove. You can find the collection in the shop here

My first layout…

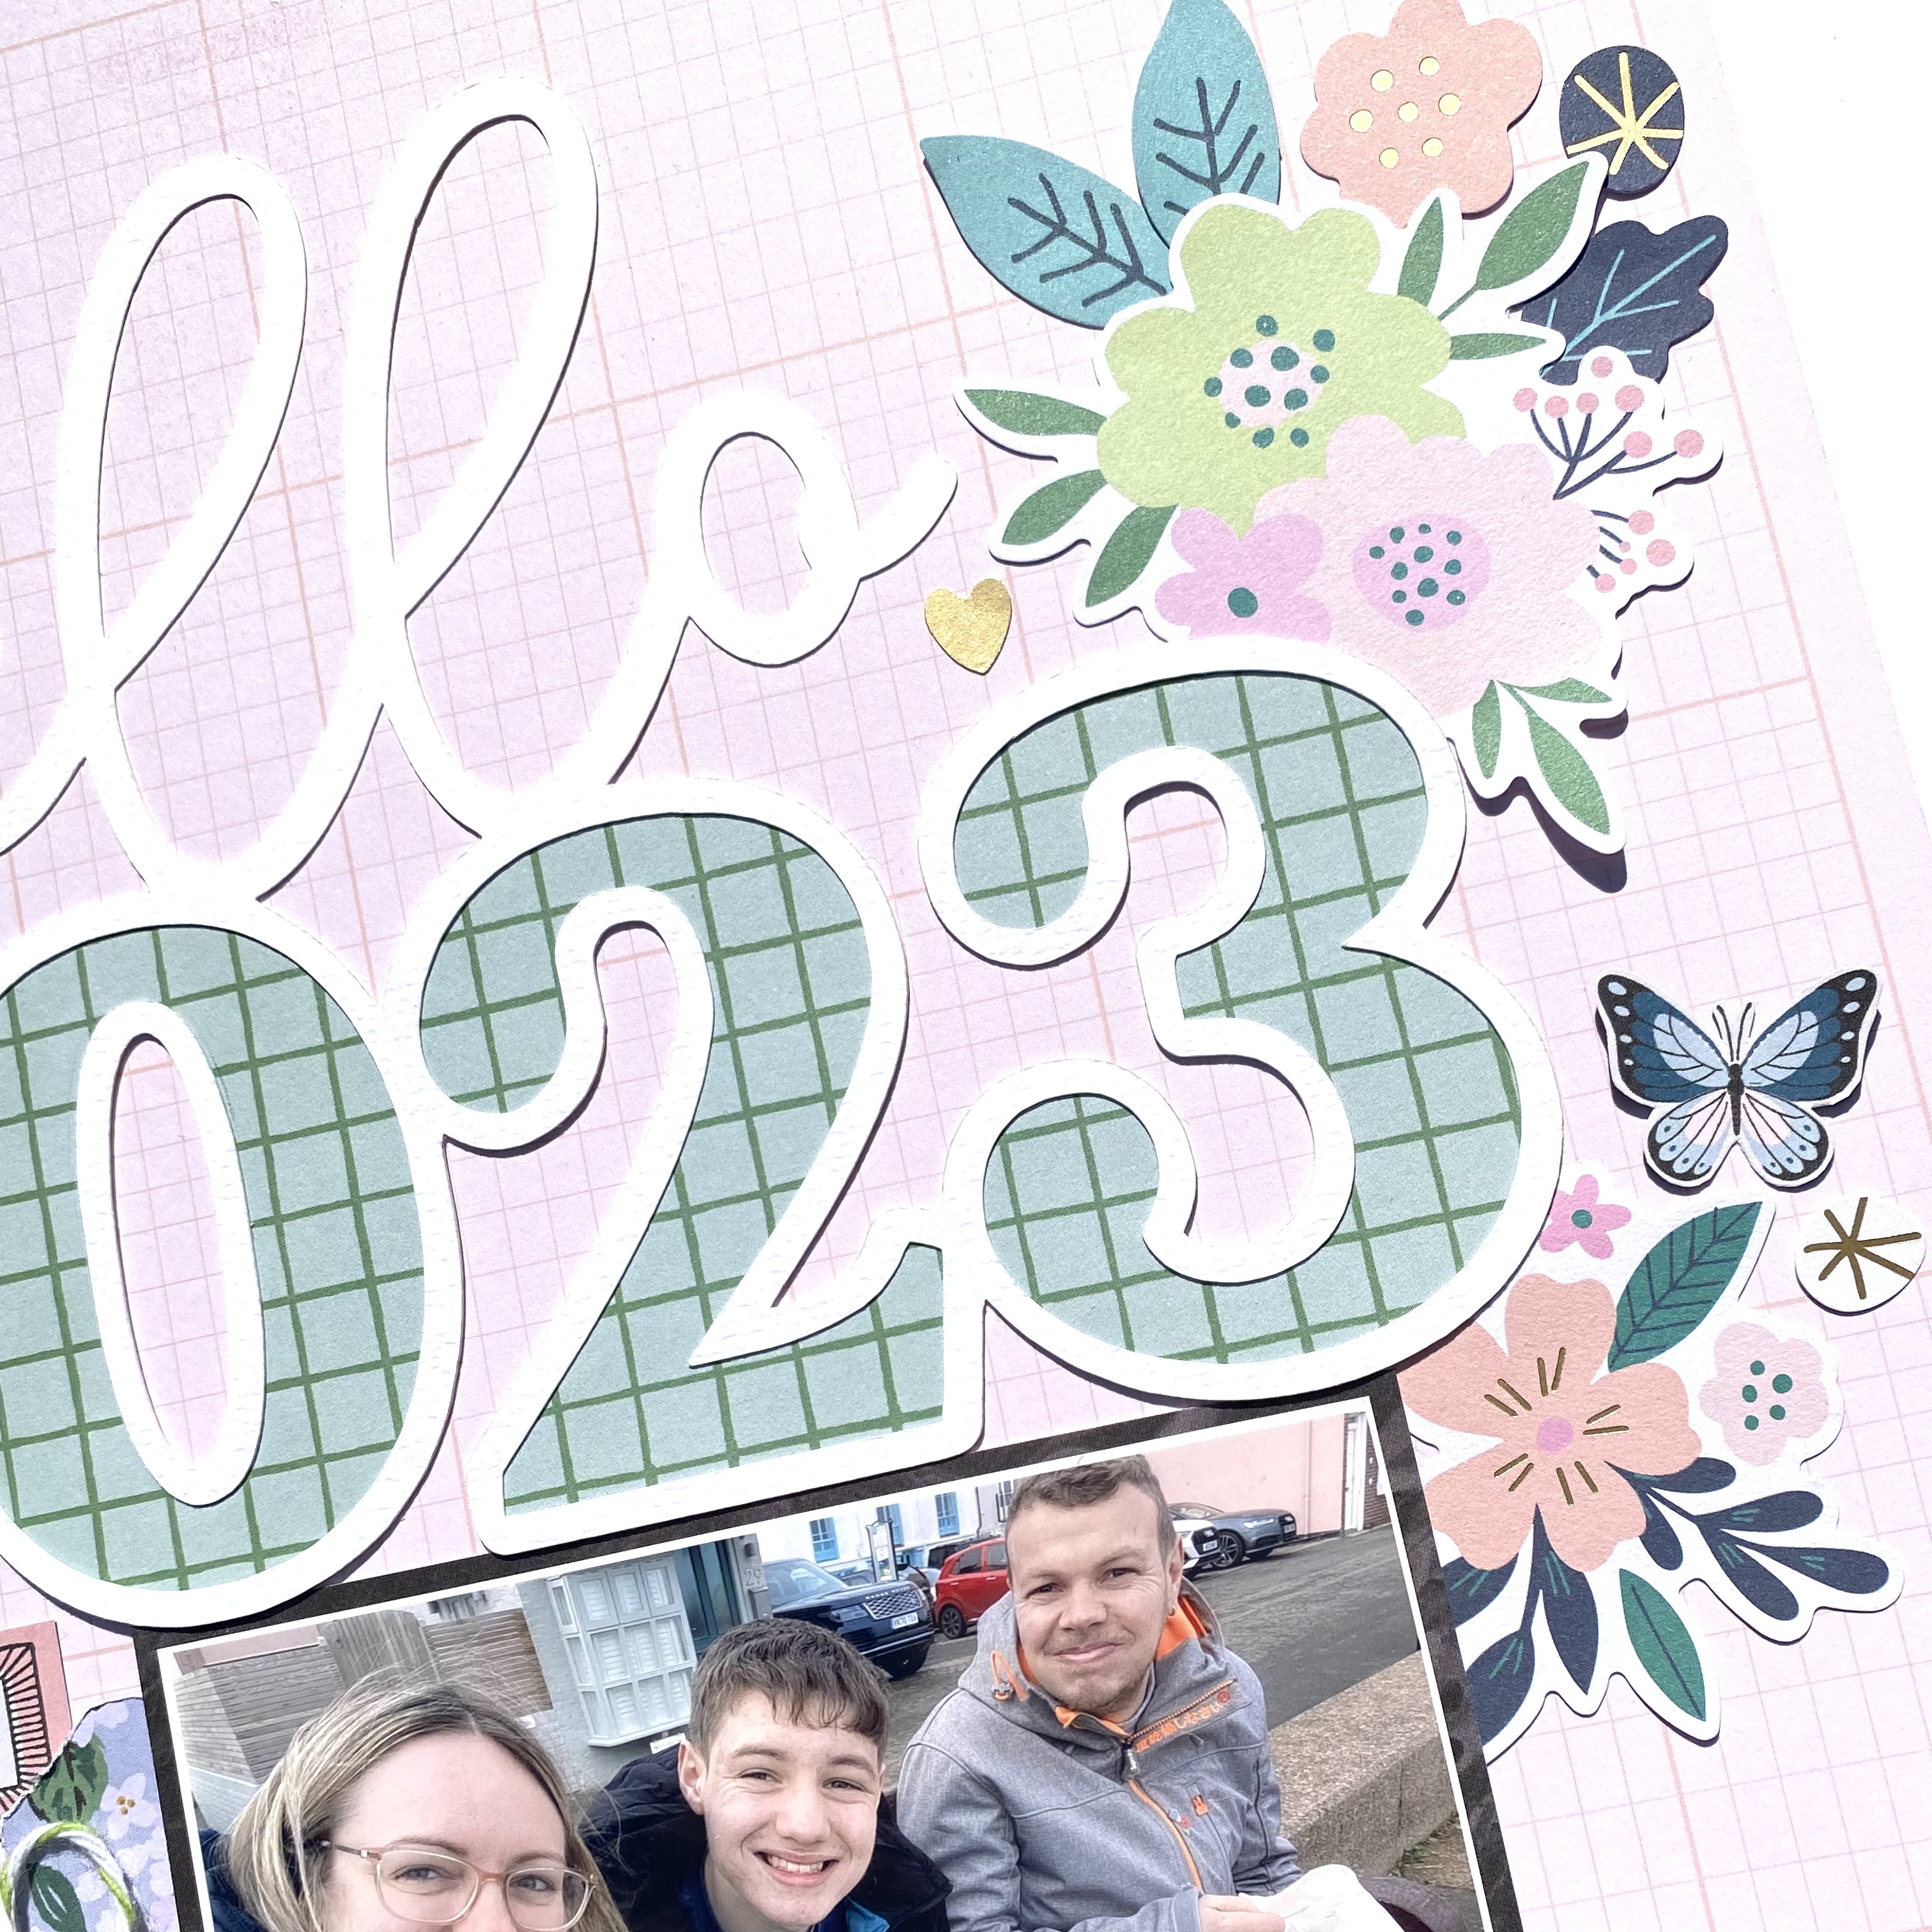
To create this layout I began by using the ‘b’ side of Field Notes as my base. 

I used my silhouette cameo to cut a large 2023 cutfile from white cardstock


I backed the 2023 numbers with the b side of Explorer


I added some florals and various other bits and pieces from the pack. Rosie’s Studio Die Cuts are great value for money, in this particular pack you get 182 pieces and two of each design. I’ll link all the Rosie’s Studio Die Cut Ephemera packs here
I love Rosie’s Studio, there are so many great products that are great for adding extra touches to your projects, I’ll link everything else here!


I mounted my photo with the b side of Uniquely You and cut out one of the tags to use as well. 


I tucked the tag behind the photo, punched a hole and added some twine. I also cut out the butterflies from ‘Uniquely You’ and placed them alongside my embellishment clusters. 
I used the Rosie’s Studio Simply Charming Puffy Alphabet to add a subtitle. 


Thanks so much for looking! I’ll be back soon with another layout using this collection. See you then 😊

Anna

@acraftylifewithanna

Wednesday, 17 May 2023

May Crop Kit

Our May crop is this coming Saturday, the 20th.
This month the kit features a beautiful butterfly paper and has been designed by Janina based on an idea by Rebecca Meadows.


As usual we'll be at Otley Village Hall between 10am and 4pm with delicious cakes and a selection of punches and dies to use. 


Monday, 15 May 2023

May Papermaze Kit - Part 1


Hello, Lynn here today with the brand-new kit for May. It's full of pretty pastel papers, cardstock and embellishments. Here are the first two layouts I have created.


 Before looking at how the layouts were made, here is what you will find in the kit:

 
Patterned papers:

Crate Paper - Gingham Garden collection - Alight & In The Shade
Stamperia - Welcome Home collection - Clocks
P13 - Have Fun collection - #03
American Crafts - Maggie Holmes - Woodland Grove collection - Fresh Blossoms
Heidi Swapp - Set Sail collection - Small Ledgers


Bazzill Basics Cardstock - Coconut Swirl & Coastal


Embellishments:
strip of pearls, P13 chipboard banner, 2 die cut pieces, 2 Rosie's Studio  butterflies, 1/6 sheet Crate Paper Gingham Garden - Happy Life Phrase Thickers, 8 Simple Stories chipboard pieces, 50cm green hemp twine, 2 P13 Decorative Tags ,10 Rosie's Studio puffy hearts.


Extra Bazzill Basics Pack - Pinkini, Aloe Vera, Peach Creme & Twill


A Rainbow of Spring Colour - This layout shows some of the pretty spring blooms that have flowered in the garden this year.

For this layout I selected and printed out four small photos that matched the colours of this beautiful striped paper from the Gingham Garden collection, called 'In the Shade'. I used the Twill Bazzill as the background for this project. 


From the Twill card I tore a strip from the left side of the paper and inked it with Pumice Stone Distress Ink (also used to distress other torn and cut edges). I placed a strip of the paper under this tear, to make the paper 12" x 12" again.  


From the right side of the paper, I cut a piece that was 7" wide at the top and tapered down to 1" at the bottom. The coloured bands were cut out from this, the edges were inked and they were stuck in order onto the right side of the Bazzill. 


I arranged a small white doily and the photos onto the page and stuck them all in place allowing room to tuck elements under the photo edges later. From the scraps of paper, I cut some small tag tops. I applied a small eyelet to each one, in a matching colour. I inked the tags and stuck them to the page, tucking them under the photos slightly.  


From the reverse side of the left-over paper, I fussy cut some flowers and leaves and inked the edges. I arranged them around the photos and attached them with 3D foam tape.

I used two of the Gingham Garden phrase Thickers from the kit. I place one to the top of the doily and another to the top right of the layout.


Finally, I die cut a title using the left-over stripes of colour from the paper and a Tim Holtz, Sizzix Thinlits die set - Alphanumerics Theory.

A Step Back in Time - Last year my friend Anne took me to see Smallhythe Place in Kent, one of her favourite National Trust
properties to visit.


For this layout I picked the Aloe Vera Bazzill as a backdrop. I inked the edges of all cut papers with Tea Dye Distress Ink.

I took the Stamperia Clocks paper, with the wooden planks side up, and tore the top right corner off (approx. 5" across and 3" down. Then I tore the bottom half of this paper away, at an angle (approx. 6" on the left and 3 1/2" on the right).

From the 'Alight' paper, I tore narrow strips from the pink and white side, and placed these under the torn edges of the Clocks paper, to make a tiny trim for the raw edges. The prepared papers were applied to the Bazzill. The photo was placed to the left of centre.


From the remains of the Clocks paper, I was able to cut the clocks shown in this photo:

I arranged the clocks on the layout, tucking the torn ones under the papers already applied. Two of the whole clocks were added with 3D foam to add some dimension. 

I used the chipboard banner from the kit to hang from the top right of the layout. into the open areas I placed the date, using Rosie's Studio - Simply Charming puffy alphabet stickers.


I fussy cut butterflies from the 'Alight' paper, and arranged them along the bottom edge of the torn papers. and scattered a few in other areas of the layout. I selected a few paper blossoms from my own stash and placed these around the clocks. I wrote my journalling between the clocks.


Finally, I cut my title using the Cricut and the Peach Creme Bazzill.

That's all for today, I will be back with more from this kit soon.
Thanks for looking.
Lynn x

Friday, 12 May 2023

Maggie Holmes Woodland Grove Embellishment book

 Hello again, Julie here with a fun embellishment book I made using the gorgeous Woodland Grove collection.  This collection has some gorgeous darker greens as well as some beautiful floral patterns and everyones favourite, butterflies!


I was inspired by a Youtube tutorial by Cutesy Shelf to make the base shell of the book.  The book is 4.25" x 6" once complete. The basic shell of the book requires two sheets of Bazzill cardstock cut to these sizes 10.5" x6", 6.25"x6", 4.5"x6", 4.25"x4.5", 5.75"x4", 5"x3.5", 7.5"x4.75", 5.75"x3.75" and scored.  I have received a book like this before and it was filled with everyday die cuts in golds and pinks that I reach for all the time.  I use the embellishment books I make to store excess die cuts that I make as I like to cut a few at a time.


You can alter these embellishment books to suit your needs, I have previously made one with an extra pocket and flap on a plain page, the beauty of these projects is that you can play around and do what works for you.  Once the base of the book was complete, the fun part started!  I used Walk In The Woods , Menagerie and Bold Beauty and cut the pieces into slightly smaller sizes than the original base pieces to create accent pieces for the pages.  


I couldn't resist stitching all the pieces with gold stitching and adding some acetate on top of some pieces to make shaker pockets too. In some places I have not trimmed the thread to add a bit of texture and interest.


For the front page I made a shake pocket by stitching a piece of acetate to the background paper.  I then added a gold spiral circle I had cut out and began layering the beautiful floral ephemera on top of the circle.  I added a crepe paper and tuille ruffle I made to add height and then layered more ephemera on top.  The sticker book  had a lot of clear phrase stickers in it which I found a little tricky to use, however I layered it on top of a beautiful foiled flower and it worked perfectly.


For the second page I, again, layered lots of ephemera pieces and utilised the gorgeous washi strips and label stickers that were inside the sticker book.  There were so many options which made this project easy.  The floral ephemera also included clear acetate pieces which I added on top of my flower.  The acetate butterfly added a beautiful subtle extra piece of texture.  I also glued some sequin clusters to this page simply by putting a large pool of glue down and then putting sequins on top! 


As we go further into the embellishment book I created a page using a washi strip and some stickers from the sticker book to create a decorated pocket.  I would possibly be stumped to find a use for a peacock sticker but it added a lovely detail to the simple paper in the background.


On another pocket I decided to use the "this is the good stuff" clear sticker, however it didn't stand out very well when placed flat onto the label sticker so I used foam tape and raised it up to add a bit of extra dimension.  I additionally used some crepe paper from my collection to add ruffles to match the pink flowers on this gorgeous paper.


For the final largest pocket I decided to make it a shaker again and used stickers from the sticker book to mirror the paper underneath.  I also added velcro dots to make the pocket close more securely.  


Don't forget to have a look at our Instagram page where I will be showing a flip through of this book so you can see it a bit more clearly. I hope you have a go at making an embellishment book, they are worth the effort and can fit so many die cuts inside!  Later this month I will be back with little gift boxes using Woodland Grove xx


Wednesday, 10 May 2023

Crate Paper Gingham Garden - Remote Working

Hello Karen here today with another layout to share using the lovely Gingham Garden collection from Crate Paper. My last layout was very pretty and girly so this time I challenged myself to create something a bit different.

I started by gutting a sheet of  the Greenhouse paper and then after trimming this down slightly I layered the B side onto a sheet of 12x12 black cardstock leaving a narrow border round the edge. Onto this I then layered the B side of a trimmed down a sheet of the Lovely One paper again leaving a narrow border round the edge.

To add some details I doodled round the edge of the Lovely One paper with a black gel pen and later did the same on some of the other elements.

My two 3½ x 5 photos were matted on white cardstock and then on more of the Greenhouse paper and attached to the right side of the layout.

The Lovely One paper is a ledger paper but it also has a subtle floral design in the corner which I wanted to expand so I took some clear stickers from the sticker book and some velum pieces from the ephemera pack and tucked these underneath and around the photos. 

Using my Silhouette Cameo I cut a title from black cardstock and placed this horizontally across the layout.

Two tags from the Be Kind paper and one from the ephemera pack were threaded with black and white Barker Twine and then placed in the left corner of the layout. I diecut some small alphas from a scrap of the Greenhouse paper and used these to spell out details of where and when the photos were taken on the tags. The tags were outlined in black gel pen and a tab (from my stash) was stapled to the edge.


Journaling strips were printed on the computer, outlined in gel pan and then glued beneath the title.


Finally I scattered a few stars from the sticker book around the layout.

I hope you like this layout and that it shows that pretty, girly collections don't only have to be used for girly layouts.

Take Care
Karen x x

Monday, 8 May 2023

Memories - Simple Stories - Here + There Collection

Hello, it’s Rebecca with you today enjoying the bank holiday and creating with the new Simple Stories Here + There collection. I was initially on the fence about this collection - I adore the earthy colours in it - but it’s a travel themed collection - and I don’t really travel much since having my son! I decided I loved the colours enough that I wanted to have a bit of a play, and I’m so glad I did!! You can find the full collection in the shop here.


For my first layout, I’m making a non-travel themed page. It just goes to show how versatile this collection is! I begun by cutting a strip of patterned paper and tearing along the top and bottom at slight angles for a bit of texture. I distressed all the edges and placed it into the centre of a sheet of premium white cardstock. I took one of the cut apart cards from the 4x6 Elements Paper and cut it in half so that I could place a strip of striped paper peeking out either side. I added my photo to the centre of the page, raised up on foam to introduce some dimension. 


Using the Floral Bits & Pieces, I began to embellish the layout. I created two clusters of florals going diagonally through my photo. To these clusters, I added some of the Bits & Pieces  and Cardstock Stickers. I always like to adhere the stickers to white cardstock before using them so that I can move them around and change my mind without them sticking to other things on the layout. 


To the empty space above and below my photo, I added some of the sentiment stickers (also from the cardstock stickers sheet). I tried to pick these based on their colour, and what they said. 


I always adore the Tag patterned papers in Simple Stories collections and love that they are double sided… so much choice! I selected two based on their colour, and added one either side of my layout. Using my Crop-o-dile I punched metal eyelets through the tags and tied some embroidery thread though them to add some more texture to the layout. 


I finished off with a few sequins in coordinating colours, and placed them following the diagonal line of embellishments. 


Thank you so much for reading. I hope you’ve enjoyed this layout. Don’t forget to check the collection out in the shop! 


I’ll be back later in the month with another ‘Here + There’ layout. 


Take care


Rebecca 

@preciouspagespapercraft