Wednesday, 20 August 2025
Simple Stories ~ Fun Times #2 🎈
Friday, 11 July 2025
Travel Junque- Photoplay
Hi everyone!
I am so excited to be new to the Papermaze design team this month! As a relatively recent scrapbooker since 2019 my scrapbooking style seems to have settled into colourful layouts with a messy or grungy edge, but I still really enjoy to play with pretty pinks and fresh florals too when the mood strikes!
Wednesday, 9 July 2025
Doodlebug Designs ~ Butterfly Kisses 🦋
This month I’m working with Doodlebug designs Butterfly Kisses which you can find in the shop here.
This collection has been out for a little while now, but it caught my attention in the shop recently and I was keen to have a play!
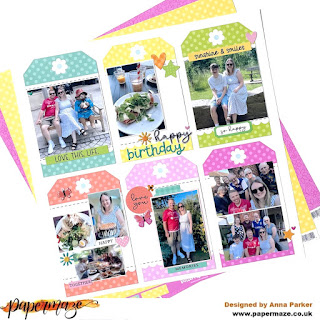
If you’re a regular visitor to the blog, you will know I love a multi photo layout and the tags on ‘Happy Thoughts’ gave me the inspiration to create a multi photo layout to document my birthday!
I had lots of photos from the day and if I used lots of them singularly on a layout, I’d have so many pages of one day. Multi photo layouts are really great for not only telling stories but using less space in your albums.
I began by cutting out all of the tags from ‘Happy Thoughts’. I then adhered them onto a sheet of white bazzill cardstock. I then printed out a selection of photos and began arranging them onto the tags. I mounted some if the onto coordinating bazzill cardstock.
I added some of the This and That stickers and some of the Puffy word stickers to embellish each of the tags.
🏷️ Thanks so much for looking! 🏷️
See you later on in the month for a second layout using this collection.
Anna
@acraftylifewithanna
Monday, 23 June 2025
Great Outdoors Adventure - Simple Stories - Simple Vintage Woodlands Collection
Hi everyone!
It’s Rebecca here, sharing my second layout of the month with you. With the heat this week, it’s been lovely to escape indoors and scrap some cosy autumnal photos using the Simple Vintage Woodlands collection. You can check out the full Simple Stories collection here.
There are so many gorgeous patterned papers in this collection! After picking a few of my favourites, I cut them into 3.5 x 3.5-inch squares. I arranged them slightly off-centre and overlapped them a little to give the page a more relaxed, layered look. I then mounted my photo on white cardstock, followed by a darker patterned paper to create contrast, and placed it on top of the squares.
Next, I fussy-cut a couple of tags from the Tag Elements patterned paper, punched a gold metal eyelet through the top of each, and threaded some gold metallic thread through them for a touch of texture and shimmer.
For my title, I chose a Foam Sticker and placed it just beneath the photo, extending it with a die-cut phrase (from the Bits & Pieces) to read ‘Great Outdoors Adventure.’ I love mixing different textures and materials when building my titles — it adds so much interest and is always fun to experiment with!
I used Floral Bits & Pieces and Element Stickers to create clusters on either side of the photo. I chose several of the toadstool designs since we spotted so many of them on that woodland walk — such a fun way to bring the memory into the layout!
To finish the layout, I added a few fussy-cut butterflies and tore a section on the right side of the background. I backed the torn area with a coordinating patterned paper, which really helped balance the layout and tie everything together.
Thanks so much for stopping by and reading! I’ve really enjoyed working with the Simple Vintage Woodlands collection this month — it’s such a lovely range. It’s available in the shop now, so be sure to grab it while you can!
Take care,
Rebecca xx
@preciouspagespapercraft
Wednesday, 4 June 2025
Photoplay This Happy Life - Loving This
Next, I cut five long tags, each about 2" x 10", from various papers in the collection: It Happened, This Year, Sweet Hello, Everyday, and All My Life papers. To finish the tags, I made reinforcing rings from black cardstock and added them to the holes of each tag.
I also incorporated a black cardstock tag onto the strung tags, using it as a mat for my 6x4 photo. For this one, I created a hole reinforcer from a piece of the patterned paper.
To embellish the layout, I fussy cut flowers from the This Year paper. These were then arranged into clusters on both the photo tag and in the bottom right corner of the page.
Monday, 11 November 2024
Simple Stories - Simple Vintage Yuletide - Seasons Greetings Tag Book
Hello everyone, and welcome back to the Papermaze blog.
It's Claire here with you today, and for this blog post, I have something slightly different.
In every Simple Stories collection, there's usually a sheet of tags, and the Simple Vintage Yuletide collection is no exception. They are exquisite!!
I was so taken with them, that this month I wanted to make a feature of them and so decided to make a tag book.
I typically have lots of photos over the festive season, but not all of them warrant a full 12x12 scrapbook page. So, I decided to make this tag book to capture some of the smaller, more intimate moments that all help to build that wonderful Christmas spirit during the holiday season.
Selecting several tags from the Tag Elements paper, I made sure to include some blank space for journaling, and some more graphical tags, as well as some that I could add extra embellishments to. As it's a festive project, I've added gold and red eyelets from my stash to each tag.
For my front cover, I kept it fairly simple. opting for one of the sentiments from the Bits & Pieces pack, offset against some small gold Nuvo Drops to add that extra touch of festive magic and sparkle.
On the reverse, I added a small photo and a sentiment from the Foam Stickers and a small star from the Sentiment Bits & Pieces.
Next, I added pockets to two tags, using a small piece of the 2x2/4x4 Elements Paper.
This was really easy to do, adhering each piece in place with strong red line tape along each outer edge. These pockets are great for holding little journaling notes, photos or gift messages from the big day. Again I embellished with some Foam Stickers and Bits & Pieces, adding red Nuvo Drops around the edge of each pocket to bring in an extra pop of colour.
The Joy and Ticket inserts are from the Bits & Pieces and Sentiments Bits & Pieces packs.
I was enjoying the interactive elements of these tags, so after making the pockets, I added a small flap to the next, enabling it to open like a book by adhering in place with red line tape. I created the flap with a strip of paper from the 4x6 Elements paper, embellishing with a fussy cut Santa from the 2x2/4x4 Elements paper and Yuletide Bits & Pieces.
Inside, you can slot extra photographs, held in place by the edge of the striped paper that folds around the tag.
To make sure I had space for journaling, I chose two plain tags, adding just a few Nuvo Drops to create a framed border and banners from the Bits & Pieces and Sentiment Bits & Pieces packs.
On the back of the 25 tag, I created a feature photo from the big day itself - tracing around the tag and adhering my photo to it - trimming the edge to make sure it fit exactly to the tag.
A few Foam Stickers was all that was needed to finish this tag as I wanted the photo to shine.
I hope you've enjoyed this blog post and it's given you some extra inspiration for how you may document those precious little moments and smaller stories that make up the joy of the season.
I'll be back later this month with some more projects with this stunning collection. In the meantime you can check it out in full here.
Until then, happy scrapping!
Claire x
@scrappysoulmate
Friday, 23 August 2024
Vicki Boutin's Bold & Bright for American Crafts - Capture it All
Hello, How are you doing? I hope you've had a great summer. Karen here, and today I have a new collection to share with you - Bold & Bright by Vicki Boutin for American Crafts. As the name suggests, the colour palette of this collection is wonderfully colourful and vibrant. It is perfect for so many scrapbook layouts. The layout I have to show you today is a multi photo layout inspired by the Mixed Tags sheet of paper.
Monday, 12 August 2024
Sunkissed - Simple Stories - Summer Snapshots Collection
Hi everyone, it's Rebecca with you today sharing my first layout for August all the way from the Isle of Wight! This month I'm working with the colourful Summer Snapshots collection from Simple Stories. It's a fabulous collection for documenting all those summer memories from holidays on the beach, to eating ice creams in the park. You can find the full collection in the shop here.
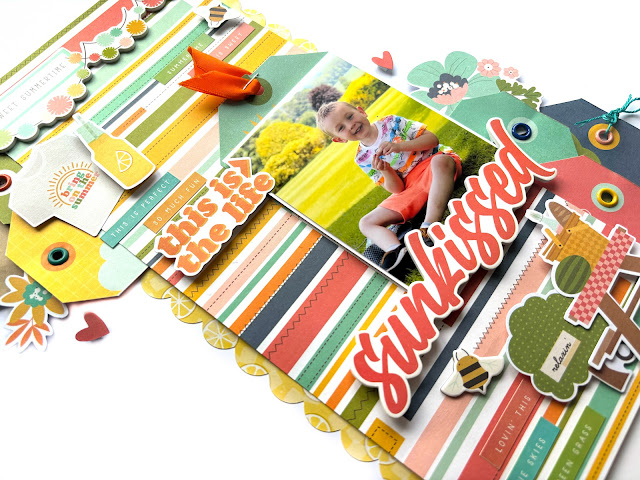
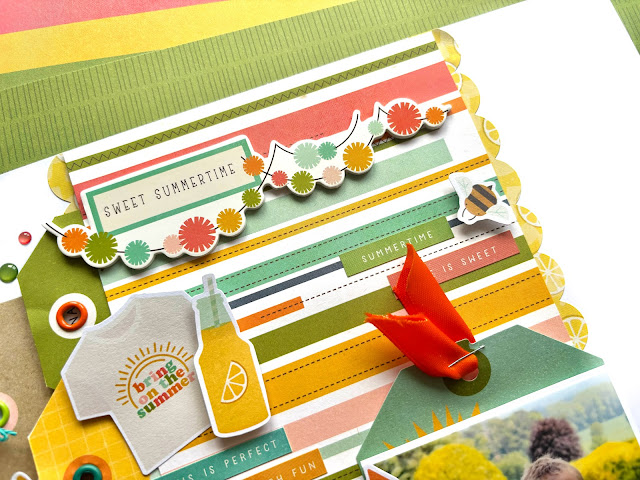
I started this layout by cutting a 5 inch wide strip from the 'B' side of the Journal Elements patterned paper and sticking it vertically on a sheet of white cardstock. I loved all the stripes on this paper, and found it really fun that they were all different widths and lengths. Either side of this strip, I tucked in the long lemon slice border sticker from the Cardstock Stickers (luckily for me, I had 2 sheets of stickers so I had enough to run a strip along both sides!).
Using some tags which I'd fussy-cut from the Tag Elements patterned paper, I created 2 tag clusters. I added 3 tags to the top left and 3 to the bottom right of my patterned paper strip. I added a metal eyelet to all the tags and then to the tags which stuck out the furthest, I threaded some wax twine through the holes.
To the right hand side of the page, I placed my photo with the large tag from the Big Bits & Pieces behind it. To add a big of texture, I added some orange ribbon through the hole at the top of the tag.
I've turned to my favourite Simple Stories product for my title - the Foam Stickers. I chose the word 'Sunkissed' because the orange echoed my son's shorts in the photo. I placed the title underneath my photo, overlapping the tag cluster.
With all the main elements in place, I turned my attention to embellishing. I've used several die-cuts from the Bits & Pieces and built a couple of clusters on the page. I've created a little picnic scene underneath my title, and added a couple of summery bits to the tag cluster at the top left.
To the top of my paper strip, I added another Foam Sticker. This time a colourful banner which reads 'Sweet Summertime'.
To finish the layout, I've added some of the little phrase stickers from the Cardstock Stickers, along with some Glossy Enamel Dots.
Thank you so much for reading. I hope you've enjoyed this layout as much as I enjoyed making it. I'll be back at the end of the month with another Summer Snapshots layout.
Take care
Rebecca x
@preciouspagespapercraft


.jpeg)


