Showing posts with label cardstock tags. Show all posts

Wednesday, 20 August 2025

Simple Stories ~ Fun Times #2 🎈

Hi everyone, it’s Anna back with you today. 
I’m sharing my second layout this month using Simple Stories Fun Times - take a look at the collection in the shop here
You can find my previous double page layout using this collection - here
🙂


To create this layout I focused on the ‘Tag Elements’ paper. I chose 8 that would work well with my photos and cut them out. 
I chose to use mostly the plain side of the tags so that I could add a title, journaling and element stickers to them.
This collection is great for so many things, its main focus is to document theme parks/amusement parks. But with the balloons and other fun elements, I wanted to have a go at using it for a birthday layout.


I printed four pictures and mounted them on to coordinating cardstock. I then lay the tags out on my Bazzil white cardstock, with four along the top and four along the bottom. I left a gap in between the tags and placed the photos in the middle. 


I punched small holes in the tags and then threaded some twine through each tag. 


On one of the tags, which was lined, I added my journaling along with a couple of stickers from the element stickers


With the remaining tags, I added element stickers and a title. 


Thanks so much for looking! 
See you next month. 

Anna 

@acraftylifewithanna 

🙂

Wednesday, 22 May 2024

Simple Stories - Pack Your Bags - Time to Go

Hello

Claire here with you today, sharing my second layout with the fabulous Pack Your Bags collection from Simple Stories. 

I adore scrapping travel photos and this collection is such a fun one to use. Loads of bright colours, fun patterns and fabulous phrases. 

For this layout, I've opted for a circular design which is one of my favourite 'go to' designs.


To create impact, I first drew a circle on a piece of plain white cardstock and cut out the centre using a craft knife. Adding depth, I backed the remaining frame in foam before adhering it to a piece of the Packed and Ready patterned paper which is full of colourful suitcases - the perfect match for my photographs!!

I mounted my two photos in the Let's Go Everywhere and Enjoying the View papers, picking contrasting red and blue patterns to help the photos pop.

Once these were in place, I created small clusters on either side, using elements from the cardstock stickers, foam stickers and Bits & Pieces. I raised some on foam and adhered some flat to the page, building depth, dimension and interest that draws your eye across the page.


Under the photographs I popped two tags - one from the Bits & Pieces ephemera pack and the other fussy cut from the Tag Elements paper. I added eyelets in contrasting colours and twine, both from my stash. 


For my title, I opted for one of the foam stickers - I know I say it every time but these really are my favourite item in Simple Stories collections and these are no exception! 


The phrase 'Time To Go' is a match made in heaven for my photographs and sites nicely along the top curve of the aperture.  As a fun extra touch, I added a plane from the sticker sheet above it which brings the design together and creates a very small third cluster on the page. 

To finish the page and bring all the colours together, I added Novo Drops around the aperture and the page then felt complete! 

I hope you've enjoyed the pages I've made with this collection. They've certainly been fun to make! 

You can check out the collection in full here

Until next month, happy scrapping! 

Claire xx
@scrappysoulmate 


Wednesday, 23 August 2023

Heidi Swapp - Set Sail - Unchartered Escape

Hello everyone,

Claire here, back to share my second layout this month using the beautiful Set Sail collection from Heidi Swapp.

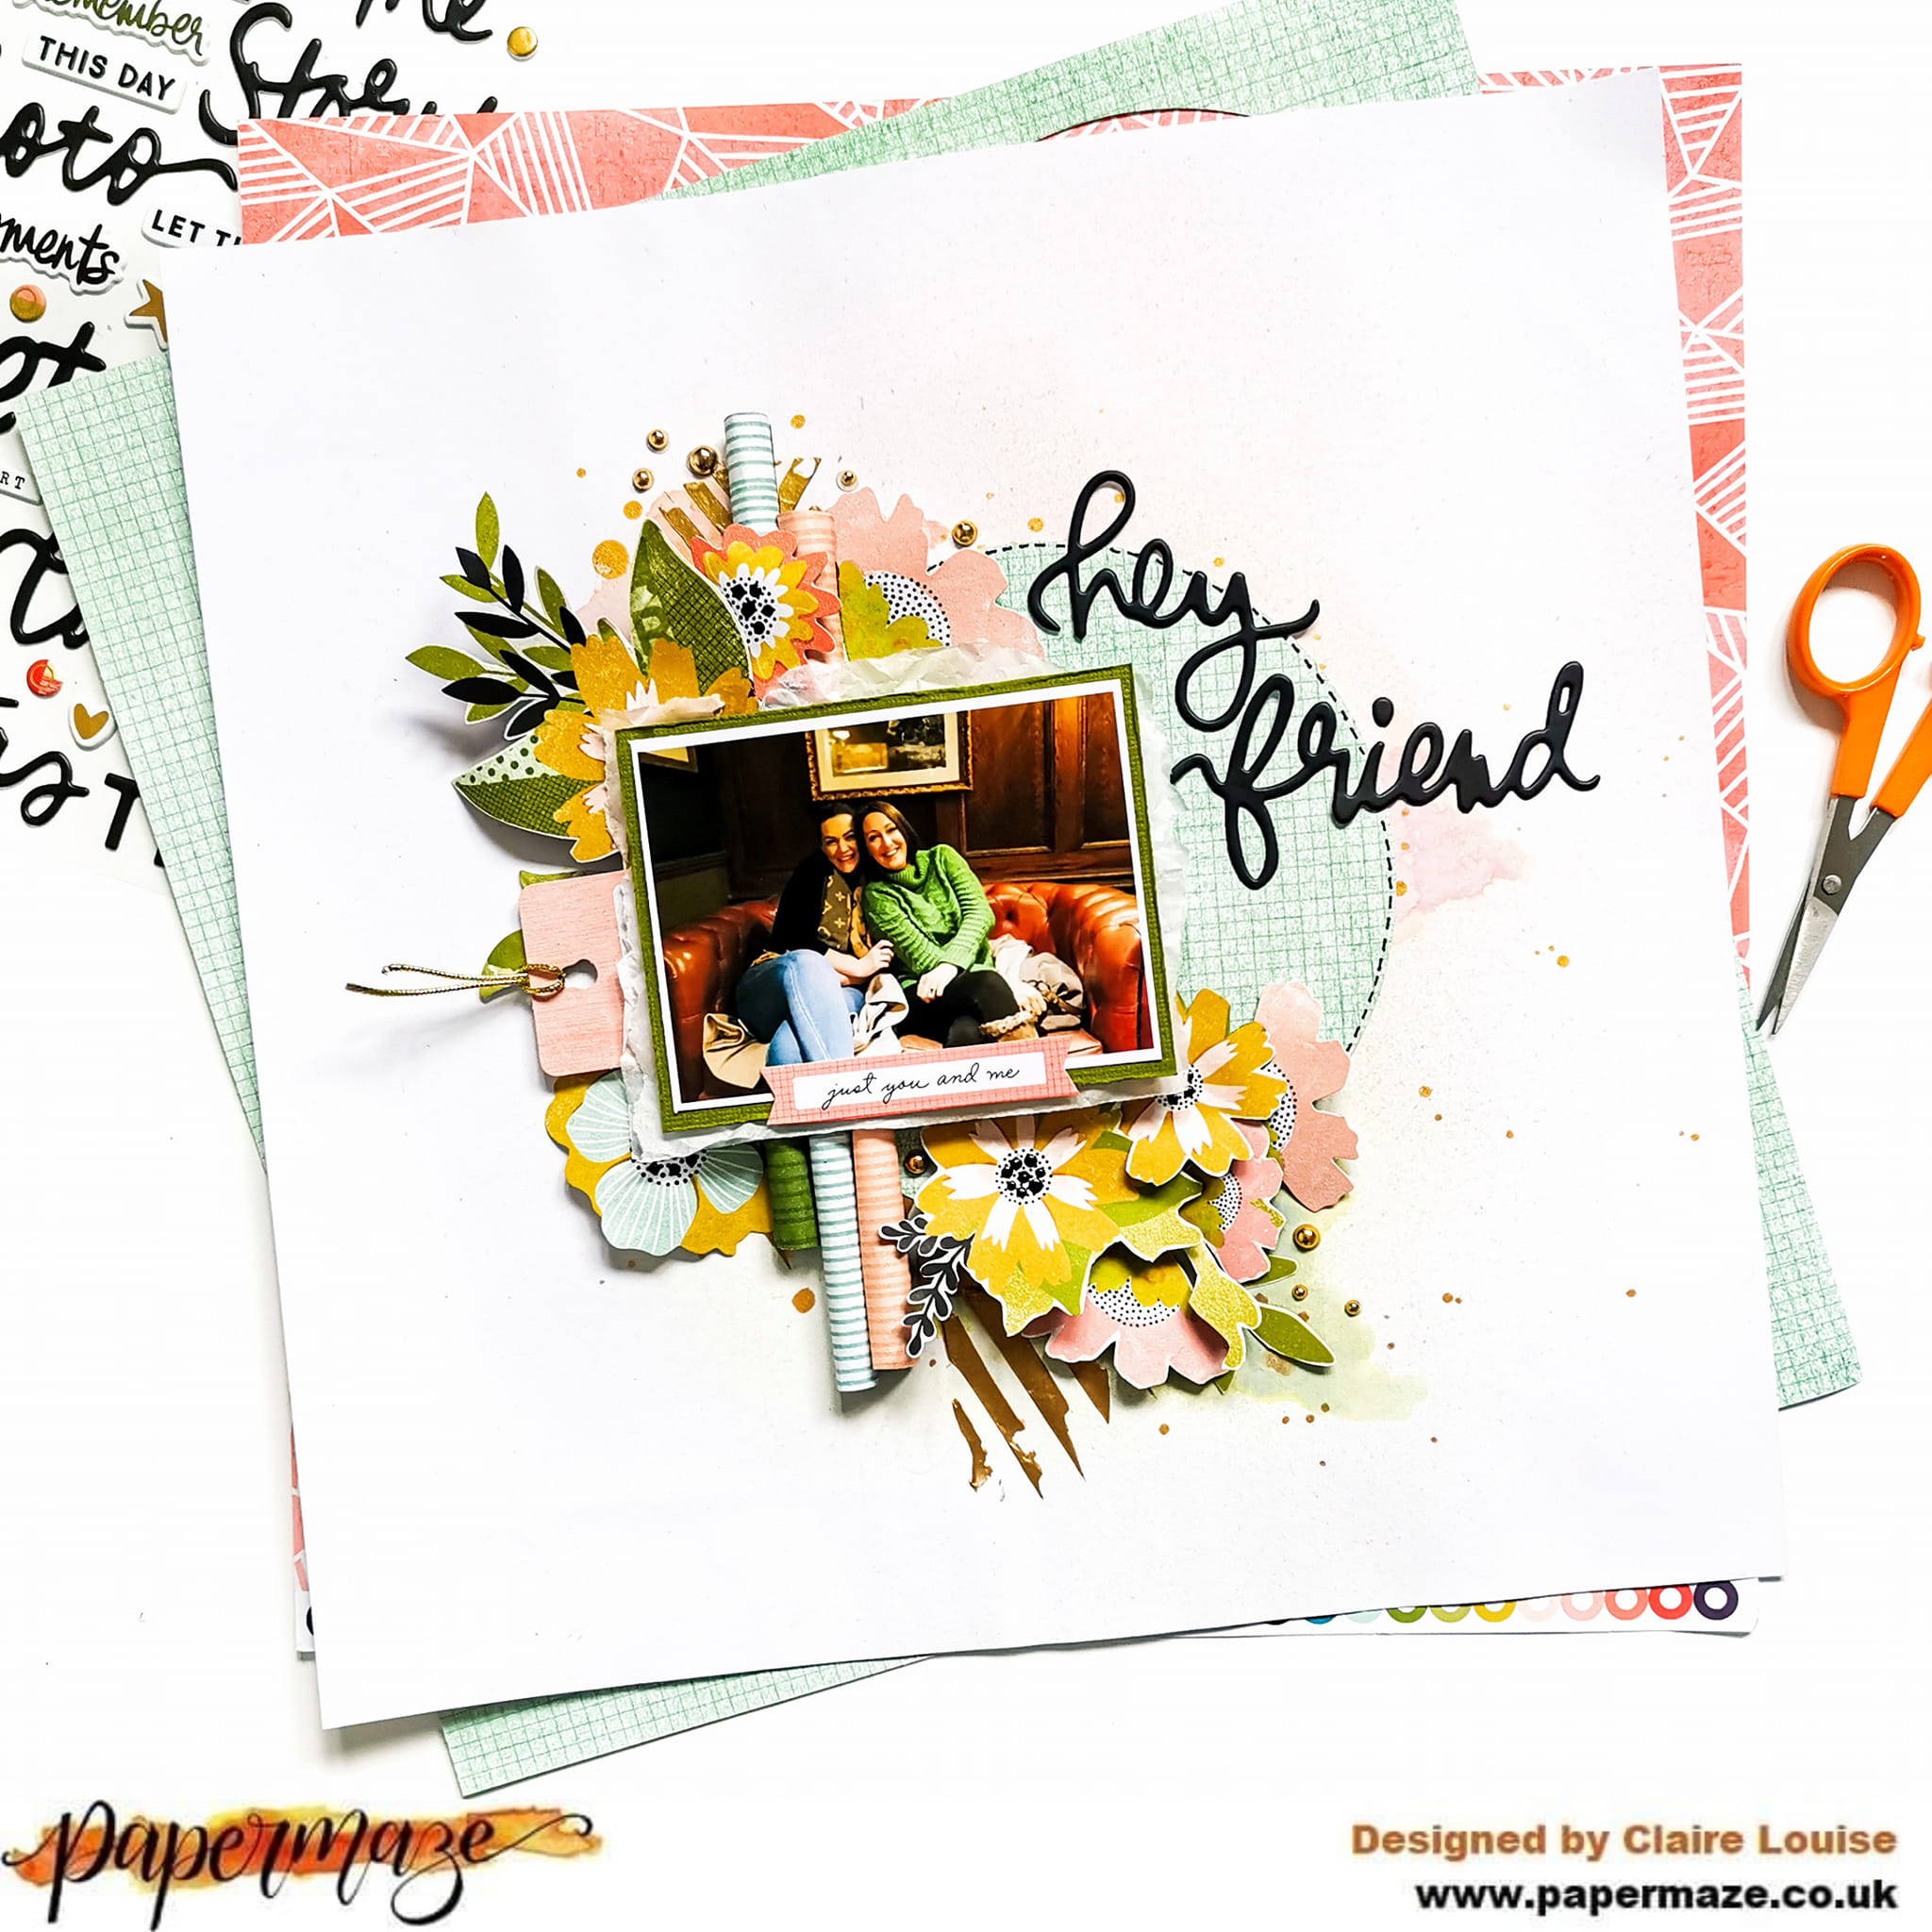
For todays layout, I'm featuring lots of ephemera, offset against a mixed media background.


I took a piece of Premium White Cardstock and applied a generous coat of Gesso all over to help it handle the paints and water I would add to the page.

Once it was dry, I took a large leaf stencil from my stash (similar stencils can be found here and here) and positioned it diagonally, knowing my photo would sit in the middle of the two leaves. I applied some clear embossing paste, leaving to dry.

Using the colours in the collection as a guide, I mixed some blue and peachy watercolours and painted directly onto the paper, using a medium sized paintbrush to guide the paint around the page.

When the paint hits the dry texture paste, it acts as a resist, so you can see the image of the leaf coming through the colour. This is a lot clearer at the top of the page where the paint is darker. When the paint was dry, I added splatters in white and gold to create a bit more interest.

I repeated the paint colours in the top right corner to help balance the page.


I backed my photo using the Strip Page paper and a piece of blue cardstock from the Matchmaker pack. For a bit of extra seaside sparkle, I also added a gold foiled ephemera journaling piece which I used as a layer underneath the top edge of my photo.


To create an anchor for my photo, I tore 2 strips of the Cut Aparts paper as the 'b' side is a sandy coloured paper with a textural pattern. I thought this would look good as sand!

I placed my photo on top, raising on foam and then pulled out all those lovely ephemera pieces to create some clusters.

I used a combination of shells from the Cardstock Stickers and fussy cut from the Logo Cut Apart sheet. I stuck some of these flat, and raised others on foam to create height.

I layered some deco web, art stones and moss around the cluster to create extra interest, and added some small chipboard embellishments from P13 and a ticket, fussy cut from the Tags paper.


To extend the height of my cluster, I pulled out the palm trees form the Ephemera Pack and tucked these into the top of my cluster.


I also added a few small banners just above and of course, one of those lovely seagulls on top.


On the other side of the photo, I extended the ripped paper by adding some strips of coloured paper which I cut form the Strip Page paper. 


I cut the ends into fishtails to create a banner shape, and added some more chipboard pieces from P13.


For my title, I added some of those gold foiled puffy stickers - wow! These are really beautiful, and are such a statement piece for your layouts. They really elevate the page.


To finish, I added some ephemera and a fussy cut ticket into the top cluster, to stretch the design and balance the layout.


I have totally fallen in love with this collection! The colour palette, the ephemera, the gold foiling...really beautiful. 

I hope you've enjoyed seeing the layouts made.

Until next month, happy scrapping!

Claire xx

@Scrappysoulmate


Wednesday, 21 June 2023

Jen Hadfield - Flower Child - Bloomin Lovely

Hi everyone!

How are we passed the middle of June already?! Time is flying by so quickly but i'm definitely a fan of this warmer weather!

I've been spending lots of time outdoors, and of course, scrapping! Today, I'm sharing my second layout made with the new Jen Hadfield collection called Flower Child. You can find it in the shop here.


For this page, i'm focusing on the b side of the Groove Thing paper - I love it! A big statement multicoloured swoosh that makes creating an impactful page effortless!

I fussy cut the stripes picking out only the yellow and orange tones to echo the colours in my photographs.

Before adhering them to my page, I distressed each edge and added a row of machine stitching before raising on foam in a vertical design going from top to bottom.


I wanted my photographs to extend across the stripes, so I chose 3 small photographs and printed them in a single horizontal strip.

To bring in some pink, I double mounted them, using cardstock from the Bazzill Matchmaker Pack and the Fab Flowers paper which echos all the beautiful colours of this collection.


Next, I set about creating two large floral clusters for opposite corners of my photo strip.   To help them stand out, I first applied a small amount of mixed media, adding Distress Oxide in Saltwater Taffy with a dry brush, complemented with a few wet splatters.


Once the mixed media had dried, I started to gather the flowers, using the Ephemera pack and Mini Puffy Stickers to create each cluster.


I added Nuvo Drops to the centres of some of the flowers and punched some small stars from the pink sections of the Groove Thing paper for a little extra interest.


Once the clusters were in place, I felt like I needed something else around the photo. I created some tags using plain white cardstock, colouring them in coordinating Distress Oxide colours to complement the tones of the collection. Here, I used Peacock Feathers and Saltwater Taffy, spritzing with water to create the water marks and adding eyelets and thread from my stash.


As a final touch, I added a few black Nuvo Drops and a Bramble Fox Perspextive for my title.


I hope you've enjoyed the pages I've made with this fun collection - it's certainly been a joy to create with!

See you next month with some more papercraft projects.

Claire xx
@scrappysoulmate

Saturday, 31 December 2022

Simple Stories ~ Hearth and Holiday 🎄

Happy New Year! It’s Anna here with you today,  I’m still in the festive spirit so I’m sharing a layout using the hearth and holiday collection by Simple Stories. You can find it in the shop here
For my first project with the collection, I created a ‘12 days of Christmas’ advent calendar. If you would like to have a read, you can find my previous blog post here. But this time I’m back to a scrapbook layout…


To create this layout I used the Merry Christmas to all patterned paper as my base. I then cut a circle in the middle of the paper and adhered a square of Mistletoe Magic to the reverse, filling in the gap.
I used my silhouette cameo to cut a Christmas trees cutfile by Paige Evans. I cut it using Bazzill white and backed each tree and star with vellum. I then cut out each tree individually as they were originally joined in a row together. I couldn’t quite make that work on my page, so I decided to separate them instead.


I backed my photo with spreading cheer and cut out a selection of florals from the Mistletoe Magic paper. I adhered the florals around the other elements of my page, joining it all together.


I distressed the edges of the circle, before adhering everything down. 
I have also added a tag from the Tags paper and will use it for my journaling.
 I love these tags sheets by simple stories, they provided journaling options on one side and coordinating patterns and images on the other. You can find various examples from different collections here


I selected various stickers from the combo sticker sheet to embellish my page, adding lots of extra little details. 


Thanks so much for looking! 
See you in 2023!
Anna
X


Wednesday, 26 October 2022

Vicki Boutin - Print Shop - Hey Friend!

Hi everyone,

Claire here with you today, sharing my second layout with the wonderful Vicki Boutin Print Shop collection. 

I mentioned in my first post that this collection is incredibly versatile, and true to form, my second layout is completely different to my first.

This time I am focusing on the soft pinks, teals and yellows to create this beautiful floral layout.


As usual, I started with Premium White Cardstock and applied a generous coating of gesso as I planned to add ink to my background.

I left it to dry overnight before applying Distress Oxide Spray in Tattered Rose and Bundled Sage. I also added some gold splatters to the background before building the layout.

I love the stencils in this collection, and used one that almost has chevron lines to create extra texture by applying gold texture paste on to of the distress oxides.


Next, I cut a circle of patterned paper from the b side of the Star Gazer paper. It's a beautiful soft teal colour with a grid pattern on top. 


I stuck this flat to my page on top of the mixed media to act as an anchor. To help give it more definition, I added a dotted black line in black pen to the outer edge.

Next, I made three paper rolls using strips cut from the Etched paper, adhering them to the patterned paper circle with Glossy Accents.


I mounted my photo using Bazzill cardstock from the Matchmaker Pack and some tissue paper from my stash. I lay the photo on top of the paper rolls, adhering with glossy accents to ensure a strong hold.


Around the photo, I created a diagonal line of florals. I picked out any yellow and pink flowers from the Floral Ephemera Pack, a cut some extras from the Flourish paper. To create extra dimension, I curled the petals of the flowers before sticking them down just in the centre.


For an added touch, I added some black Nuvo Drops to the centre of some of the flowers, giving them a high gloss look. I also used a beautiful pink tag under my photo for extra interest. This is from the Journaling Pack.

To my photo, I wanted to add a small tab from the Journaling Ephemera Pack, drawing on the pink tones from the flowers.


For my title, I used one of the Perfect Day Phrase & Accent Stickers. These are a real 'Must Have' as they do all the hard work for you. Such a great part of Vicki's collections.


As a final touch, I added some Pinkfresh Studio Essential Jewels in gold and that was the page done!


Hope you've enjoyed this layout, and it has shown how versatile this collection can really be! I have tons of papers and embellies left over so there's plenty of ideas still to try :)

Take care,

Claire

@scrappysoulmate

Friday, 23 September 2022

Simple Stories ~ Say Cheese at the Park #4 🐭

Hi it’s Anna back with you today! 
I have another layout to share with you using Simple Stories Say cheese at the Park - I have had a whale of a time with this collection, it’s been perfect for documenting magical Disney memories. 
You can find all of the collections as part of this release in the shop here.. 

For this layout, I have used the Say Cheese at the Park part of the release and in particular the ‘Tags’ paper. 


I began with a 12x12 piece of white bazzill cardstock. I then selected 8 tags that I wanted to use. 
I decided that something was needed on the background, so I added some Distress Ink in the shade of Fossilised Amber. I then used a stencil to apply some more Distress Ink in the shade of faded jeans


I arranged the tags on my layout and added my photos to some of them, mounting them with cardstock first. 


I used stickers from the Combo Stickers and Sticker Book to embellish the tags. 

I added a few finishing touches, by randomly adding some Nuvo Drops. 


I used the alpha stickers from the sticker book for my title. 


I finished the layout off by adding some twine, tying it between each of top and bottom tags. 


Thank you so much for looking! 
See you again soon. 
Anna 
X