Friday, 13 November 2020

Good For The Sole - Simple Stories - Cozy Days Collection

Hello, Rebecca here with you today sharing another layout using the Cozy Days Collection by Simple Stories. I'm really enjoying working with this collection because it's full of autumnal goodness! 

I wanted to use a cutfile on this layout to act as my title, and I cut it from a sheet of 'Stonehenge' Bazzill Cardstock from the Matchmaker Pack. I backed the individual letters of the cutfile with the 'B' sides of both the 'Sweaters and Boots' and 'Happy Falliday' patterned papers. I love how these papers look next to each other, and they go really well with the stoney-coloured cardstock of the cutfile. Next I selected the floral 'B' side of the '2 x 2 Elements' patterned paper and used this to back the walking boots in the cutfile.

I knew I wanted my cutfile title to sit to the right of my layout, with my two photos to the left of it. I marked out roughly where they would all sit on my background cardstock and then set about creating a mixed media background. 

I kept my mixed media quite simple - I used a brown watercolour pen and added the colour to a scrap of bubble wrap and then pressed it down onto my background to create an impression. This reminded me of mud splatters - and there were a lot of these the day these photos were taken! I finished my background with some paint splatters using the same watercolour pen, and also two cosmic shimmer watercolour paints, which have a beautiful iridescent shimmer.

I matted both of my photos first onto white cardstock, and then matted one with the 'Sweaters and Boots' patterned paper and the other with the 'Happy Falliday' paper to bring the blue and yellow tones over to the left hand side of the layout. I raised my cutfile and both photos up using craft foam to add dimension to the layout.

To embellish my layout, I fussy-cut a number of leaves from the 'Harvest Wishes' patterned paper. This paper is amazing and will go a long way as it is full of beautiful leaves in various Autumnal colours. I also selected a number of elements from the Journal Bits & Pieces pack. I used the larger elements to create some layers above my photos and cutfile, and distressed all the edges with my scissors. I've added a couple of the tiny word ephemera pieces on top of my cutfile to bring some additional colour to the title.


I also fussy-cut a couple of the adorable woodland creatures from the 'Comfy Cozy' patterned paper and added them to the layout with some leaf clusters around them. 


As a last minute decision, I created a small cluster in the top right hand corner of my layout. I used one of the tags from the 'Tags' patterned paper and 'hung' it upside down. I also used a couple of elements from the Journal Bits & Pieces. I initially added some thick gardeners twine through the two tags on the layout, but decided it was too bulky and so I replaced it with some brown embroidery thread, which I think works so much better with the colours on the page.


I finished my layout with some gold paint splatters and Nuvo Glitter Drops in 'Golden Sunset', and my very final step was to add some torn washi tape to the top and bottom of my layout.


If you'd like to watch the layout come together and see the step-by-step process, I have a process video on my YouTube channel here

Thank you for reading, I hope you've enjoyed this layout. The Cozy Days collection is already available in the shop for purchase so head over to take a look!

See you later in the month with more Autumnal goodness!

Take care,

Rebecca x


Wednesday, 11 November 2020

Happy - Simple Stories - Cozy Days Collection

Hi everyone, Rebecca with you today - November already! I really don't know where this year has gone. Suddenly the dark nights have crept in and the temperature has dropped. I'm finding we are needing an extra layer to go out these days and when we get home we are needing a nice hot chocolate to warm us up! It hasn't stopped us getting out for our fun woodland walks though - and that's what I'm scrapping today.

I'm working with the beautiful 'Cozy Days' collection by Simple Stories this month. It's full of warm autumnal colours and all the things that make us feel warm and fuzzy on a chilly day!


I started this layout by tearing strips from the  'Comfy Cozy' patterned paper. I didn't worry about them being neat or even - I just tore randomly making sure I had a white edge on each strip. I wanted my layout to have lots of texture as the forest floor is full of texture at this time of year and this photo of my son was taken in the forest a few weeks ago. I then stuck the strips to the top section of a sheet of 'Natural' bazzill cardstock from the Matchmaker Pack, making sure they were overlapping slightly.

My photo is matted onto white cardstock and again onto green bazzill basics cardstock from the matchmaker pack. I placed my photo to the right of my layout, with a layer of craft foam behind it to add a bit of dimension.

The Journal Bits & Pieces has lots of larger elements that would be great for adding journalling - but I selected a couple and used them as added layers on my layout. I've used one behind my photo, and another to the left on my photo. I distressed the edges of both before raising them up onto foam pads. I've cut one of the tags from the 'Tags' paper and used that to add a pop of grey to the page. I did this because I knew I was going to use grey alphabet stickers for my title so wanted to make sure that the colour appeared on the layout.


I fussy-cut a number of the gorgeous small leaves from the B-side of the 'Harvest Wishes' patterned paper, and also a couple of adorable forest creatures from the B-side of the 'Comfy Cozy' paper and arranged them around my photo. I added a round cardstock element which says 'Fall' with a grey thread tangle behind it, and fussy-cut the envelope bursting with florals from one of the Jounal Bits & Pieces. 


I popped a few acrylic pieces on the page - some leaves and some acorns which match the collection perfectly. I used the Aria Puffy Alphabet Stickers by Bella Blvd for my title. It took me a while to decide on my title but I decided to go with 'Happy' because my son is so happy in the photo - and he was in his element running through the forest and jumping in all the muddy puddles. I then added the word 'together' underneath from the Journal Bits & Pieces and a couple more fussy cut elements.


I finished my layout by adding some journalling and gold paint splatters using gold acrylic paint mixed with a tiny amount of water.


This layout actually came together really quickly considering I didn't really have a plan when I sat down at my desk! If you'd like to watch the process of the layout coming together I have a process video up on my YouTube channel here

I'll be back later in the month with more Cozy Days layouts - if you'd like to see more of the collection then it is now available in the shop.

Take care

Rebecca x

Monday, 9 November 2020

Doodlebug Designs ~ Pumpkin Spice #1

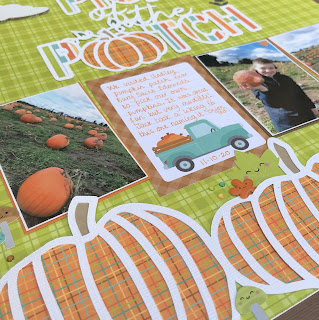
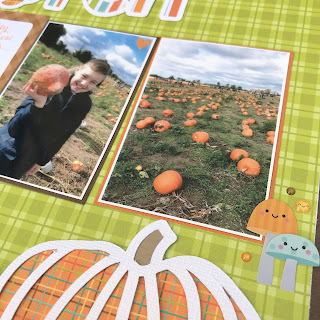
Hello! It's Anna back with you today to share the first layout that I have made using the new Autumnal collection from Doodlebug Designs - Pumpkin Spice. You can see the whole collection here.


I began by using some brown bazzill cardstock as my base, followed by a layer of the green side of, Pumpkin Chocolate Chip trimming a couple of cm's from each side.

I then used two cut files - pumpkins by Paige Evans and 'Pick of the Patch' from Peartree cut files.


I backed the pumpkins using Autumn weave and pick of the patch using Cutie Pie. I cut out one of the journaling boxes from the Harvest Berries and adhered them alongside my pumpkin patch photographs.


I embossed two chipboard clouds using embossing powder and adhered them to the top of my layout along with some cloud stickers from the icon sticker sheet. I also added some more of the icon stickers around the layout as well as some doodlebug sprinkles.

Thanks for looking!
Have a great week, I'll be back with another layout soon!
Anna
X

Friday, 6 November 2020

Simple Stories - Winter Cottage - Making Memories

Hello there and Happy November!

It's Claire here and this month I am designing with the Winter Cottage collection by Simple Stories. You can view the whole collection in the shop here.

For my first page, I wanted to make a wintery themed layout - capturing a trip we took to Devon last December for Mr Claire's birthday.  I fell in love with the pink, blue and green tones on the papers which set the colour theme for my page.


I made a watercolour wash for my background using a brayer and once dry, used some oxides and a scripty font stencil from my stash to add an extra layer to the background.  

You may have noticed by now that I have a love for stars so added some glittery gold stars on top of my colour wash using the Echo Park Summertime Seashell stencil - perfect as this pic was snapped at the beach - If only we'd had the summer weather to match!

Next came those gorgeous papers! I've wanted to have a go at making 3D stars for a long time now and I decided today was the day! I used the B sides of the  Let It Snow, the 2x2 Elements and the Winter Wonderland papers. The stars were made using a template on my Cricut and adhered using a glue gun. There are lots of ways to make the stars - you don't need an electronic die cutting machine. If you have a 5 point star die (like the Technique Tuesday Nested Stars one in the shop) they are quite easy to make by creating your own score lines. There are lots of tutorials on YouTube should you fancy giving it a go.

I mounted my photo on a piece of the Winter Wonderland paper and an offset piece of vellum and then created a cluster for it to sit on.  For the cluster, I knew as soon as I saw this cute to do list from the Journal Bits & Pieces that it has to feature on my page. 

I paired it with some tags I fussy cut from the Tags paper - my absolute favourite - definitely a must have item!! I decided to add eyelets to each tag from my stash but they really didn't need it. I just seemed to have the corresponding colours so went for it.


Next, I fussy cut the snow globe from the 3x4 Elements paper and the mittens from the 2x2 Elements paper and tucked these in next to the tags, raising the mittens on foam pads.


To echo the gold stencilling, I added the 'Making Memories' title from the Pebbles 2nd Ave Puffy Phrase Stickers. These are the nicest I have seen in a while - they have a really beautiful but delicate sheen to them which is just gorgeous!


To tie all the elements together, I used the Floral and Brrrrrr stickers from the Combo Stickers and added a small bird and some hearts to the to do list. I also made a small rip at the top which I backed with the pink Bazzill cardstock from the Matchmaker Pack.


Finally, I punched a few tiny stars and placed them up on foam pads for a bit of extra dimension.

I really enjoyed making this page and can see this collection being really versatile to use for all my winter and Christmas layouts.  Look forward to bringing you some more pages with this later this month.

Until then, take care.
Claire 
xxx


Wednesday, 4 November 2020

Paige Evans Go The Scenic Route - Girls Just Wanna Have Fun (Hand Stitching)

Hello. Karen C here again with another layout using Paige Evans latest collection called Go The Scenic Route

My layout today is inspired by, and based entirely on paper #9. This pretty pale lilac sheet of paper reminded me of an old fashion embroidered sampler and I immediately knew I wanted to do some hand stitching on my layout.

I started by machine stitching with white thread round the edge of the layout. Then, using 6 strands of embroidery thread in pink, orange and navy blue I stitched detached chain stitches (also called lazy daisy stitch) on top of some of the printed leaves. This added texture to the layout and emphasised the design. The stitching didn't take too long and was quite relaxing to do.


I then matted my four photos onto white Bazzill cardstock and attached these to the layout with 3D foam underneath to add depth. Before gluing down the photos I carefully fussy cut some of the flowers from the base paper, which would have been hidden by the photos, and added these to the corners of the layout, again with foam beneath them.

I tucked a few die cuts from the Journal Ephemera Pack behind the top two photos ....


...and added a few pieces on top of the bottom two photos. Bakers Twine was added to the Magical tag .


I dug into my stash and found some pink puffy alpha stickers from Pinkfresh Studio for the title and date. The title was added in an arc to follow the design on the paper.


To finish off the layout I added some sequins to the centres of some of the flowers and on a sheet of Doodlebug Shape Sprinkles I found some teeny tiny navy blue dots (like enamel dots) which I dotted about the layout.


I hope you like the layout and may feel like trying some stitching to your own layouts. The Go The Scenic Route collection can be found in the shop and I hope to be back soon with another layout using this collection.

Take Care,
Karen x x


Monday, 2 November 2020

October Papermaze Kit - Part 2

Lynn here today, with the second pair of layouts created with the October Papermaze kit.  This brightly coloured kit has been great fun to play with. Vanessa carefully selects patterned papers, cardstock and embellishments each month. It certainly challenged me to use some strong coloured papers.


Before looking at how I made the layouts - here is what the kit contains, for full details please check the first October Papermaze Kit post HERE.


A Room With A View
-  This layout features a photo I have had on my desk for a while, I found it whilst sorting out some old photos. Late on the night triplets were delivered at St. Thomas' Hospital, they were transferred to SCBU. I was moved to a post natal ward and woke to this amazing view the next morning.


For this layout I used the sheet of Ocean Bazzill as the base and I inked all the cut edges of the papers with Salty Ocean Distress Ink.

With the
Pinkfresh Studio - Let's Stay Home collection - Better Things Are Ahead paper, I used a 4.5cm cirlce punch and used it to create one circle from each of the 36 squares on the paper. The with a scrap of card I made a square template 3.5cm x 3.5cm.

I placed the square centrally over the each circle, the folded the curved sides over the straight edges of the square. I kept the blue floral side down, so this showed when folded over, all around the coloured centres of the pieces. The template was then removed and used for the next circle.


The finished shapes were arranged in rows of nine, three rows for the bottom of the page and one for the top. They were arranged in rainbow order, but each row had different shades of each colour and some had more of one colour than another so they were not too uniform. I like the way the shadows from the folds, cast across the squares to create further shading. The finished effect reminds me of the pans in a box of artist's water colours. Once sorted I glued them to some scrap paper to hold them in the desired arrangement, before sticking them to the layout.

My photo was mounted onto a scrap of '
#17' paper. The title was created on a piece of white card which I die cut with an unknown die from my collection. The lettering was cut using Sizzix Thinlits Alphanumeric Shadow Upper die set, and scraps of 'Pillow Fight' paper. The smaller letters are from three different sets of Pinkfresh Mini Puffy Alpha Stickers. 

The journalling was written across the three mini tags. I removed the strings, and attached the tags to the page with 3D Foam Tape. Then I looped some blue and white Baker's Twine through the holes, attaching a tiny charm from my stash.

Finally I scattered the
Pebbles puffy dots and the puffy camera stickers over the page.


A Dream Is A Wish Your Heart Makes - The lovely big wooden word included in the kit seemed ideal as a title for this photo of Cinderella from a parade at Disneyland Paris.

With the exclusive wreath cut file presented with the kit, I backed the open areas with scraps of Whirlpool, Petunia and African Daisy Bazzill. Then I arranged the cutfile onto the base of Pinkfresh Studio - Let's Stay Home collection - Kind Hearts paper. Some areas of the cut file were glued in place and others were raised up on 3D foam pads.

The photo was trimmed with Whirlpool Bazzill and placed inside the cut file wreath, tucked under the flowers towards the bottom left. I added the two blue paper roses from the kit together with some gold roses from my own stash.

I added some Nuvo Glitter Drops (Gold Coast) to the leaves to make them sparkle and Nuvo Jewel Drops (Limoncello) to the flower centres to give some gloss.

Finally I made the title with the wooden word and some Pinkfresh Studio - Indigo Hills 2 Mini Puffy Alpha Stickers. 

That's it for today, but not the end of the kit, I still have more left and an idea for the remaining pieces.


Thanks for looking.
Lynn x

Saturday, 31 October 2020

Happy Halloween (2) - Simple Stories - Boo Crew Collection

Hello, it's Rebecca here - I couldn't resist popping by to say HAPPY HALLOWEEN and to share another layout I've created using the Simple Stories 'Boo Crew' collection. I am still really enjoying this collection, and think I'll be creating layouts with it for weeks to come!


I started this layout with a sheet of 12x12 textured ivory cardstock, and added some mixed media by colouring my texture paste with distress inks, and pressing it through a stencil by Echo Park (the stencil can be found here). This has given me a gorgeous orange and black star background to build my layout upon. I also mixed the two distress inks with a little water and added paint splatters using a paintbrush. The background did't take very long at all, and it was very simple - but its added a lot more interest to my layout. If you are new to trying out mixed media, using texture paste and a stencil is a really great way to dip your toes in!

I mounted my photos first onto white cardstock, and then onto black to help frame them and placed them in the centre of my page towards the top. I selected four tags from the 'Tags' patterned paper, distressed the edges and added some embroidery thread and placed two just peeking out either side of my photos.


For my title, I've used the 'B' side of the 'Happy Haunting' patterned paper. I hand-drew the letters to spell 'Halloween' and cut them out. I drew a black border on each of the letters using a black fine liner pen to help give them a more defined edge, which I think helps them to pop off the page a little more. I adhered the letters under my photos using foam pads to add dimension. I then placed the word 'happy' from the Bits & Pieces pack above to complete my title.

I felt like my layout needed something dark at the top and bottom as it was looking a little stark with just the ivory cardstock. So I tore some strips of the 'Happy Haunting' patterned paper - using both the 'A' and 'B' sides. I layered these on top of each other with the darker 'A' side being more dominant, and the orange 'B' side just peeking out from behind it.


Next, I set about embellishing my layout. I still had the female skeleton left over from my last layout so she finally found a home on this page! She's from the Bits & Pieces ephemera pack. I am really impressed with this pack- I don't think I've ever had an ephemera pack with so much in it, and I love every single bit! The little cat riding the broomstick is also from this pack, as is the 'Hey Pumpkin' banner flag at the bottom. I also fussy-cut a little dancing skeleton from the 'Tags' patterned paper.

The Combo Cardstock Stickers sheet in this collection is just as amazing as the 'Bits & Pieces' and is jam-packed with so much! I've used several stickers on this layout - The 'A Wicked Good Time' sign at the top left, the male skeleton, the banner under my title, the pumpkin and also the word stickers at the bottom! And I still have soooo much left on the sticker sheet! It's a bit like Mary Poppin's handbag... never ending!


I finished my layout by adding a male skull face from the Chipboard Stickers and several thread clusters in orange and black. 


When I started this layout I had no plan other than wanting to have the orange and black texture paste stars on my background! And from those stars, the layout just grew and came together really quickly.

If you'd like to watch how my layout came together, there is a process video up on my YouTube channel which you can find Here

Wow, that's me done for October! I can't believe how fast this month has gone. I still have loads of this collection left so I'm sure there will be more layouts here and there once we have some photos from this evening! Can you tell I love Halloween?!

I'll be back next month with some more layouts. I'm sticking with Simple Stories and working with the 'Cozy Days' collection so I can't wait to get creating some Autumnal layouts.

I hope you all have a fabulous weekend, and if you celebrate Halloween then I hope you have a wickedly spooky night, and stay safe.

Take care,

Rebecca x