Showing posts with label Doodlebug sprinkles. Show all posts

Monday, 7 March 2022

Doodlebug - Great Outdoors - Breathtaking Nature Hike

Hi everyone!

Claire here with you today, and this month, I am pushing myself right out of my comfort zone with lots of bright colours, patterns and mixed media - and I am having so much fun!!

During March, I'm using Doodlebug's Great Outdoors collection which you can find in the store here.

Doodlebug is a brand that's new to me, and I have been completely blown away.  The collections are bursting full of the most fabulous patterns with colours that immediately inspire creativity.  The ephemera packs are unlike any I have come across before - they contain so many different elements, I could make a dozen pages and still have product left over to play with!  

For my first page, I'm documenting a hike to the top of Howth Hill in Dublin. The views from the top are exquisite. 


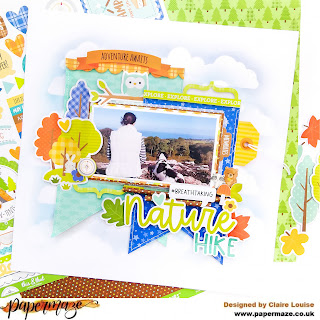
I used two shades of Distress Oxide in Stormy Sky and Tumbled Glass, brushing them across a cloud cutfile from Cricut Design Space.

Once the background was done, I cut two rectangles (one slightly smaller than the other) from the b sides of the Happy Camper and Wild Things paper, and cut in fishtails to form two banners.

I sticthed around the edges in white thread and raised these on foam pads before adhering to my page. Along the top of each banner, I added some trim from the This and That Stickers, along with an orange 'Adventure Awaits' banner from the Odds & Ends Chit Chat pack.


Next, I positioned my photo, backing this with the Colors of Nature and Wildflowers papers along with some tissue paper for extra texture.


I built clusters around my photo using those beautiful coloured trees from the Odds & Ends friendly Forest pack - a real must have with this collection!


I also clustered some leaves from the same pack around my title and added a few of those super cute forest critters from the Campground Critters Shape Sprinkles pack - the cutest things you'll ever see!


The Breathtaking Nature Hike title is made from the Odds & Ends Chit Chat pack. It's full of statement pieces that make titles super easy. I stitched through the Nature Hike , folding them over for extra texture before sticking to my page.


This was soooo much fun to create - and I'll let you into a secret - Once I had created this one, I just kept going, making multiple pages one after the other!! The possibilities with this collection are endless and so enjoyable to play with.


You can explore everything this collection has to offer here, and I'll be back with another layout (or 2 or 3 or 4!) in a few weeks time.

See you soon!


Claire

@scrappysoulmate

Wednesday, 12 May 2021

Echo Park ~ Welcome Spring #2

 Hello! Welcome back to the Papermaze blog! It’s Anna here again with my second layout using the Echo Park Welcome Spring collection. But for this layout, I’ve also added in a couple of extra elements from the Pinkfresh Studio Keeping it Real Collection. 

For my second layout, I have taken inspiration from a Paige Evans layout and used her Cutfile - 165 flowers. The cutfile alongside the patterned papers were perfect for these photographs I had been wanting to scrap for a while now.  


I used the b side of the bumblebee breeze patterned paper as my base and began by adding a few coordinating shades of distress ink; shabby shutters, tumbled glass, milled lavender and dried marigold under the cutfile using the packaging technique. 

I then mounted my three photographs. The larger one, I double mounted - first onto African daisy cardstock and then to the b side of the 3x4 journaling cards. I used 3D foam pads to adhere this photograph and kept the other two flat. I mounted the two smaller photographs on to the b side of the sunny spring day paper. 


I used the pinkfresh studio keeping it real floral cardstock die cuts, tucking them in and around the cutfile and between my three photographs, rather than backing it with any papers.


From the same collection, I used the Pinkfresh Studio Keeping it real mini puffy alpha stickers for my title. 


To finish, I added a few stickers from the element stickers sheet, tucking them around my central cluster of flowers, as well as some Doodlebug sprinkles


Thanks so much for looking! See you next time!

Anna 

X

IG ~ adisneycraftylifewithanna


Monday, 26 April 2021

Echo Park ~ Welcome Spring #1

Hello all, it’s Anna back with you today to share my first layout using Echo Park’s Welcome Spring collection. You can find the collection in the shop here!

For my first layout, I began with a white bazzill cardstock base. I added a strip of the ‘b’ side of the 6x4 journaling cards to the left hand side of the page, tearing the edge, I also added a strip of bazzill ‘African Daisy’ alongside it and also tore the edge of this piece. I added a few spatters of shimmerz paint in bubble gum blast and Christmas cheer and waited for it to dry. 

Meanwhile, I backed two Paige Evans pinwheel Cutfiles using the b side of the journaling cards patterned paper as well as some bazzill cardstock in the shades of ‘romance’ ‘African daisy’ and ‘lagoon’. I also made two of my own pinwheels from the ‘sunny spring days’ patterned paper. To make these two pinwheels, I cut one square measuring 4x4cm and the other 5x5cm. I centred my pinwheels with enamel dots by Pinkfresh Studio. 


To create my title, I fussy cut the sun, clouds and word ‘hello’ from the 6x4 journaling cards and selected ‘sunshine’ from the element sticker sheet. I mounted the clouds/hello title using 3D foam pads to slightly raise it from the page. 
 I mounted my photograph with a thin boarder of the ‘romance’ bazzill cardstock and added a second layer with the ‘sunny spring days’ patterned paper. 


I embellished my layout with stickers from the element stickers sheet. There are so many stickers on this sheet, images and wording in various sizes. I like having the option of smaller stickers too as you sometimes only need a little something. 


To finish I added a few shape sprinkles by doodlebug. 

Thanks so much for looking, I’ll be back with another layout from this collection soon! Have a great week!

Anna

IG ~ adisneycraftylifewithanna

X


Friday, 12 February 2021

Celebrate - Carta Bella - Let's Celebrate Collection

Hello, it's Rebecca with you today and I'm sharing my first layout using Carta Bella's ‘Let’s Celebrate’ collection. This collection is full of bright colours and perfect for documenting birthday photos so I'm using the collection to scrap photos from my son's 4th birthday last month.

I was really drawn to the ‘Bunches of Balloons’ patterned paper - it's definitely my favourite from the collection. I wanted to use it in it's entirety but it was a little too 'busy' for me to use as a background paper so I needed to create some white space to work with. I decided to trim 1 inch from one edge of a sheet of Premium White Cardstock. This would allow me to have the balloon paper showing as a border around the edge of my page. I then tore two sections from the cardstock to place on the top and bottom of my background. This meant I ended up with a section of the patterned paper showing in the centre of my layout, and around the edge. 


I selected three photos for this layout, of my little one stood with his birthday balloons, and decided to display them in a small film strip style on the left of my page. I then used a hand drawn template to cut three balloons from the patterned papers. I've used the B side of ‘Party Palooza’ and both sides of the ‘One Year Older’ Paper. I made sure to centre my balloon over a number '4' on the 'One Year Older' paper so that I had a green number 4 on the balloon.


I doodled around the edge of the balloons with a black pen, and also drew on some strings to ground my balloons so they weren't just randomly floating. I've used foam pads behind the balloons to bring some dimension to the page. I've also doodled a border around the outside edge of the white cardstock to bring the layout all together and to match the black strings in the 'Bunches of Balloons' patterned paper. I've also used the red and green papers to add some layers behind my photos - of course with distressed edges!

I then worked on the opposite corner of my layout to balance out the page. I've used two of the larger stickers from the Element Stickers sheet - the 'celebrate' sticker will act as the title for this layout. 


I've used my star punch to create some embellishments for my layout - I've punched 5 stars in total (3 from the 'One Year Older' patterned paper and one from the ‘Hip Hip Hooray’ paper, to bring some navy blue into the layout). These also have a doodled black border on them for consistency. I also used a tiny star punch to add a sprinkling of smaller stars around the page. 


I further embellished my layout with some of the smaller stickers from the 'Element Stickers' sheet, and added some green ink splatters. 

This left the top right hand corner of my layout free to add my journalling. I wanted to say quite a bit, so I typed my journalling and printed it in small strips. I backed the strips onto the B side of the 'Party Paloozer' paper to help them stand out a bit better, and raised them up with foam.


I finished my layout with a few Matte Sprinkles by Doodlebug. I've never used these before but I love the texture of them so will definitely be featuring them on future layouts!

If you'd like to watch how the layout came together, I have a process video up on my YouTube channel which you can find here.

I'll be back a bit later in the month with my second layout with this collection, but in the meantime you can shop this collection and lots more goodies here.

Take care,

Rebecca x


Monday, 23 November 2020

Doodlebug Designs ~ Pumpkin Spice #2

Hello everyone! Welcome back to the Papermaze blog, I hope you're keeping well?
Today I'm sharing my second layout using the Pumpkin Spice collection by Doodlebug Designs. Take a look at the full collection in the shop here.


For this layout, I have used a Paige Evans cutfile, which I have backed using a selection of the patterned papers from the Pumpkin Spice collection as well as some coordinating cardstock. Some of the patterned papers that I used were 'Autumn Weave', 'Cutie Pie' and 'Forest of Friends'.

I mounted the finished cutfile onto a circle of teal cardstock, which made it stand out more.


I mounted my photograph onto the reverse side of 'Harvest Berries' and centred it in the cutfile.


I then had so much fun dotting a variety of the very cute stickers around the leaf wreath cutfile, I used the 'Icon Stickers' as well as the 'Happy Fall Shape Sprinkles' to do this.


Lastly I added a simple 'hello' title using the 'Doodlebug Sunshine Alphabet Stickers'.


Thank you so much for reading!
Take care, I'll see you next month for some Christmas fun!
Anna
X

Monday, 9 November 2020

Doodlebug Designs ~ Pumpkin Spice #1

Hello! It's Anna back with you today to share the first layout that I have made using the new Autumnal collection from Doodlebug Designs - Pumpkin Spice. You can see the whole collection here.


I began by using some brown bazzill cardstock as my base, followed by a layer of the green side of, Pumpkin Chocolate Chip trimming a couple of cm's from each side.

I then used two cut files - pumpkins by Paige Evans and 'Pick of the Patch' from Peartree cut files.


I backed the pumpkins using Autumn weave and pick of the patch using Cutie Pie. I cut out one of the journaling boxes from the Harvest Berries and adhered them alongside my pumpkin patch photographs.


I embossed two chipboard clouds using embossing powder and adhered them to the top of my layout along with some cloud stickers from the icon sticker sheet. I also added some more of the icon stickers around the layout as well as some doodlebug sprinkles.

Thanks for looking!
Have a great week, I'll be back with another layout soon!
Anna
X

Friday, 18 September 2020

Two layouts using Simple Stories 'Bro & Co' Collection

 Hello, Rebecca joining you today! What a turn-around - last week I was wearing my winter coat and this week the flip flops have been back out! 

I'm popping by today to share two final layouts which I've created using the 'Bro & Co' collection by Simple Stories. Both of these layouts would be great for busting those final scraps we all have leftover from various collections as I've used really small pieces on both of them. I definitely feel like less is more with both of these layouts!

'Epic'


I took the '2x2 Elements' patterned paper and cut all the squares out. I knew I wanted to create a 3x3  grid design, using 5 small photos so I selected 4 of the squares to use and arranged them onto a sheet of 'Natural' Bazzill cardstock from the Bazzill Plain Matchmater Pack


I trimmed my photos ever so slightly and backed them onto some of the leftover 2x2 elements. I marked up where I wanted them to sit on the layout and then used my sewing machine and black thread to stitch vertical and horizontal grid lines.

I adhered the 9 squares with craft foam behind them to add some dimension to the page. I then trimmed the edges of my layout by 1/4 inch and added a border using the B side of the 'It's All Good' patterned paper and stitched around the entire layout. I had major arguments with my sewing machine over this as it insisted on eating my layout!! My straight stitch wasn't very neat, so I went over it again with a zig-zag stitch to try and disguise it!

I then concentrated on embellishing the layout.


I used the word 'Epic' from the Foam Stickers for my title. I really like these foam stickers - they make for perfect titles and also have lots of other smaller bits on the sheet. I've used the word 'cool' from the same sheet on the opposite side of the layout.


I added a couple of tabs and stickers from the Combo Stickers sheet and finished the layout with some fussy cut stars from the 'It's All Good' paper and the phrase 'killing it' from the 'Totally Legit' patterned paper.


'My Boy My Dude'

I focused on squares for my first layout, so for the second I decided to use circles.


I used a selection of different sized punches to create circles and stars from both the A and B sides of the  'It's All Good''Level Up!' and 'So Rad!' patterned papers. I also used some of the leftover squares from the '2x2 Elements' paper and punched the stars out with a circle punch.

I arranged my circles and stars on the page, raising some up with foam dots, and sat my photo on top. I created my title by using some of the foam stickers and just a couple of thickers from my stash.


I then added some raw chipboard chevrons by Dusty Attic which I painted using black acrylic paint, and a scattering of Doodlebug 'Star-Fetti' shapes.


I finished the layout by trimming the edges of the layout by 1/4 inch, distressing the edges with my scissor blade, and adding a border using the B side of the '4x6 Elements' patterned paper. This layout came together really quickly and was really simple to create. I love how the colours of the patterned papers pop against the crisp white cardstock I've used for the background.

I hope you've enjoyed these layouts and they've inspired you to try and bust some of your scraps! You really can make a little go a long way.

I'll be back later in the month with another layout created using the new 'Daydream Collection' by Cocoa Vanilla Studio.

Until then, let's hope this hot weather continues!

Stay safe and take care,

Rebecca

x