Showing posts with label Nuvo Drops. Show all posts

Monday, 28 July 2025

Mintay Papers - Bon Voyage - Doha Days

Hello,

Claire here today creating with the Bon Voyage collection from Mintay Papers.

I love scrapping my travels and this collection is just perfect for adventures great and small. When I saw it, I immediately fell in love with the map papers, and there are several to choose from in this collection. They show different parts of the world so you can completely tailor them to wherever your photos are based - home or away!


To start, I grabbed a piece of Kraft Cardstock and tore Paper 3 across the middle, adhering flat to my cardstock.

Next,  I backed my photos using the neutral card from the Matchmaker Pack, positioning these in the centre of my layout, slightly offsetting one against the other and raising on foam to give separation from the background paper.


Now, you may know I love a striped paper and find them hard to resist, so when you see Paper 2, it'll come as no surprise that I just had to use it!!  I cut a strip a few inches tall, cut it in half and cut fishtails into each end. I outlined the edges with black fineliner pen and slid these under each side of my photos, allowing those gorgeous stripes to provide an extra pop of colour and pattern.


Then came the embellishing! There are some fabulous travel icons in this range, so I used a mixture of florals paired with globes, cars, suitcases, planes, cameras and signs from the Paper Die Cuts to create fun clusters around my photos.


To soften the harsher lines created by the paper layers, I used a spare circle of cardstock as a guide to draw a circle with a light pencil line around the centre of my design, adding a dotted line in White Nuvo Drops to draw you eye into the middle of the layout. Love how this turned out. That extra pop of white adds a lovely bit of detail.


I used small foam alphas from my stash to add my title directly to my photos, before returning to the map paper to create extra tears and rips to mimic a used map. Once ethe edges were rolled back, I added Finnabair Art Stones and Mini Art Stones to add a desert effect to echo the photos (It was a hot one!)

I hope you've enjoyed this blog post, and you have fun documenting your own summer adventures!


Until next time, Happy Scrapping!!

Claire xx

@scrappysoulmate


Friday, 27 June 2025

Simple Stories - Sunny Days - Cool

Hello,

Claire here today with my second layout using the Sunny Days collection from Simple Stories. Check it out in full here.

I'm thoroughly enjoying this collection - Summer in all its bright, bold and colourful glory! It's perfect for days out, lazing at the beach, ice cream and all the fun of summer adventures!


In this page, I'm documenting the biggest milkshake I've ever seen - found on a recent holiday to Singapore. It came with hundreds and thousands, a huge lollipop and a mountain of candy floss on top!!

The patterns and colours in this collection were just perfect - they really helped convey the fun of the photographs.

On to a piece of plain white cardstock I cut a 10" circle from the Sunny Times paper and distressed the edges with my scissors before adhering to the page. Next, I cut a strip of the 4x6 Elements patterned paper cutting fishtails into each end to create a banner. Again I distressed the edges and before adhering to the page, I added a small strip of the green Happy Days paper and a pop of yellow cardstock from the Matchmaker Pack layered on either side of the banner for that extra pop of colour.


I mounted my three photos with the 2x2/4x4 Elements paper and positioned these across the centre of the banner, raised on foam for dimension.

Then the fun part - the embellishing! As the papers are relatively busy, I kept the embellishing to three small clusters to help draw your eye across the page.

I layered florals and icons from the Bits & Pieces and Floral Bits & Pieces packs, laying some flat and some raised on foam to create depth in the design.


I of course used the Cool title from the Foam Stickers which I just love in Simple Stories collections and it seemed especially fitting for these photos!


And for one more fun element - a bright pop of yellow Nuvo Drops for that extra hint of sunshine!

I hope you've enjoyed this blog and it's inspired you to get all your Sunny Days experiences documented :)

Until next time, Happy Scrapping!

Claire xx

@scrappysoulmate


Monday, 10 February 2025

Paris - Carta Bella - I'll Meet You in Paris

Hi there

Claire here today sharing my first layout with the Paris collection by Carta Bella. 

I have a few photos from trips to Paris and have never really documented them so was excited to get stuck into this collection and it didn't disappoint! 

To start, I cut out a large circle from my white cardstock and added foam to the back before adhering a piece of Explore Paris paper to the back, letting the pretty blue B side pop through the aperture.


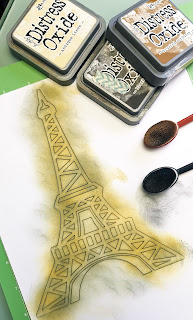
Next, I cut a large Eiffle Tower on my cricut, using a file from the Cricut library. I inked the file whilst still on the mat, adding depth and shade with three different Distress Oxides and some blending brushes.


To mount my photos, I cut up and layered some of the 3x4 Journalling cards paper picking different colours to frame my photos.

I used a selection of the Element Stickers around my photos to bring the page to life.

I also used these for my title, creating a small cluster at the top of my circular design. 

As a final touch, and to bring an extra pop of red, I framed the aperture with nuvo drops. 

This has been a fun collection to use and a great prompt to get those older holiday snaps documented! 

I'll be back later this month with a second project to share. 

Until then, happy scrapping! 

Claire x

@scrappysoulmate 

Wednesday, 27 November 2024

Echo Park ~ Christmas Joy #1 🎅🏻


 Hello, it’s Anna back with you today. For my final post this month I’m sharing an advent calendar that I have created using Echo Park ~ Christmas Joy. 

You can find the collection {here}

I used a pre made paper advent bunting from Hobbycraft as my starting point…


I then cut 24 squares of coordinating cardstock from the matchmaker pack and adhered them on to each of the bunting pouches. 


I used the Simple Vintage Holly Jolly Number Bits to add a number to each of the bunting squares. I placed them on to start with and then gradually began embellishing each one.


I used stickers from the Element Stickers to embellish some of my pockets. 
I also fussy cut some florals and candy canes from patterned paper in the collection -


I also used Nuvo Drops to add some extra detail to some of the pockets. 


I added some chocolate coins to each of the pockets and then strung it across my mantle piece and now it’s all ready to go for the 1st of December. 

Why not have a go yourself? 

For everything you need to document and create for Christmas, Papermaze has a dedicated Christmas section on the website which you can find here


Thanks so much for looking! 

🎄See you next month 🎄

Anna 

@acraftylifewithanna

Friday, 22 November 2024

Simple Stories - Simple Vintage Yuletide - HoHoHo!

Hello,

It's Claire here again today, sharing a second layout with the Simple Vintage Yuletide collection. I have to say this has been an absolute joy to create with - such a stunning collection. You can find it all in the shop here, and I'd strongly recommend you check it out - it's so pretty!


Using a piece of Premium White Cardstock as my base, I applied a light coat of watered down black Distress Oxide ink with a brayer, helping to create a distressed look to anchor my design.


I drew half a tree on to scrap cardstock to use as a template, and used this as a guide to cut out a tree shape from the Comfort & Joy paper.

Layering this on foam to add separation from the mixed media background, I cut some smaller pieces of the Holiday Wishes and 4x6 Elements papers, as well as a very small strip of the 3x4 Elements paper. I distressed all the edges and layered these on top of the tree, curling some of the edges for extra texture and depth.


Next, I chose this beautiful red frame from the Chipboard Frames to house my photo. Before adhering this to the page, I layered two fussy cut tags from the Tag Elements paper underneath. 


Then came the clusters and oh my - you are spoilt for choice with this collection! So many different option and all are equally gorgeous. I used a combination of the Bits & Pieces and Floral Bits & Pieces, layering them around the design.


I opted for pieces with pops of red to help lift the colour and adhered some flat with others on foam helping to create extra dimension.


Of course, I couldn't have an empty tree, so I added a big red bow to the top and embellished each branch with gold and red Nuvo Drops for that extra bit of sparkle.


For my title, I used the fun HoHoHo phrase from Bits & Pieces and that brought the layout to completion.


I hope you've enjoyed this blog post. It was really a great layout to make with these gorgeous products. See the collection here in full. 

Happy scrapping! 
Claire x
@scrappysoulmate 

Wednesday, 13 November 2024

Wild Life - P13 Paper Products - Into the Woods Collection

Hi everyone, 

It's Rebecca with you today sharing my first layout created with the stunning 'Into the Woods' collection by P13. It's been a long time since I've created with a P13 collection and I'd forgotten how much I love them! You can find the full collection in the shop here, but be quick - I have a feeling this one will sell fast!


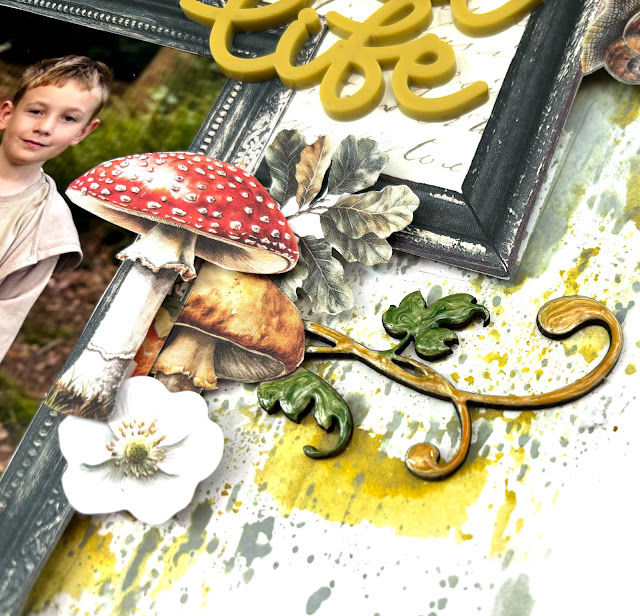
Paper #02 immediately caught my eye with it's triple frame design. I knew instantly that I wanted to use the frames to house my photos, but I didn't want the frames to sit flat on the page. For this reason, I decided to fussy-cut the frames, including the toadstools and snails and centre them on a sheet of Premium White Cardstock with adhesive foam behind them. This helps to create some dimension on the page and makes layering elements a little easier and more aesthetically pleasing.

I gutted the centre of the top and bottom frames and then backed them with my photos. We took a recent walk through Parkhurst Forest on the Isle of Wight, which is well known for red squirrel sightings and so I was able to get some cute photos of my (not-so-little anymore!) little one who has an obsessive fondness for red squirrels! This collection was perfect to document this memory as not only is it wood themed and perfect in colour, it also has some really sweet little squirrel images - albeit grey not red!

I left the centre frame as is as it has a light coloured script paper so it offered a nice contrast with the darker colours of the frames and the photos. On this frame I placed my title - an acrylic piece from Bramble Fox which matches the colour of some of the toadstools in the collection perfectly.


As with all P13 collections, Paper #07 is full of individual elements which can be fussy-cut. I cut out several leaf clusters, toadstools and a squirrel to use as embellishments. I created several clusters, and then added to these using some florals from the Ephemera - Flowers and Leaves and some stickers from both Sheet #1 and Sheet #3


I knew before I started this layout that I wanted some mixed media on my background so I made sure to stick all the embellishments to the frames, and not to the actual background cardstock. This meant that I could move everything on and off the page in one piece, until I was happy with the mixed media.

I reached for two Distress Oxide Ink Pads in the shades 'Iced Spruce' and 'Forest Moss'. I watered down some of the ink on some plastic packaging and then applied them to my background using a small brayer

Once this was dry, I adhered the embellished frames to the centre of the page. In some areas, I slotted in some chipboard elements by Dusty Attic. I opted for leafy elements to match my woodland theme. These chipboard elements come raw, which make them fab for colouring and putting your own stamp on. Two of my favourite ways to use chipboard is to either heat emboss them, or as I've done here, cover them with Crystal Nuvo Drops.

I finished off the layout by cutting away small sections of the background paper on either side, and then backing this area with Paper #04 to add a bit of darker colour to the outer edges.

Thank you for reading. I hope you've enjoyed reading about my layout and it offers you some inspiration.

I'll be back later in the month with my second 'Into the Woods' layout.

Take care,

Rebecca x 

@preciouspagespapercraft 


Monday, 11 November 2024

Simple Stories - Simple Vintage Yuletide - Seasons Greetings Tag Book

Hello everyone, and welcome back to the Papermaze blog.

It's Claire here with you today, and for this blog post, I have something slightly different.

In every Simple Stories collection, there's usually a sheet of tags, and the Simple Vintage Yuletide collection is no exception.  They are exquisite!! 

I was so taken with them, that this month I wanted to make a feature of them and so decided to make a tag book.


I typically have lots of photos over the festive season, but not all of them warrant a full 12x12 scrapbook page. So, I decided to make this tag book to capture some of the smaller, more intimate moments that all help to build that wonderful Christmas spirit during the holiday season.

Selecting several tags from the Tag Elements paper, I made sure to include some blank space for journaling, and some more graphical tags, as well as some that I could add extra embellishments to. As it's a festive project, I've added gold and red eyelets from my stash to each tag.


For my front cover, I kept it fairly simple. opting for one of the sentiments from the Bits & Pieces pack, offset against some small gold Nuvo Drops to add that extra touch of festive magic and sparkle. 


On the reverse, I added a small photo and a sentiment from the Foam Stickers and a small star from the Sentiment Bits & Pieces.


Next, I added pockets to two tags, using a small piece of the 2x2/4x4 Elements Paper.


This was really easy to do, adhering each piece in place with strong red line tape along each outer edge. These pockets are great for holding little journaling notes, photos or gift messages from the big day. Again I embellished with some Foam Stickers and Bits & Pieces, adding red Nuvo Drops around the edge of each pocket to bring in an extra pop of colour.

The Joy and Ticket inserts are from the Bits & Pieces and Sentiments Bits & Pieces packs.

I was enjoying the interactive elements of these tags, so after making the pockets, I added a small flap to the next, enabling it to open like a book by adhering in place with red line tape. I created the flap with a strip of paper from the 4x6 Elements paper, embellishing with a fussy cut Santa from the 2x2/4x4 Elements paper and Yuletide Bits & Pieces.


Inside, you can slot extra photographs, held in place by the edge of the striped paper that folds around the tag.

To make sure I had space for journaling, I chose two plain tags, adding just a few Nuvo Drops to create a framed border and banners from the Bits & Pieces and Sentiment Bits & Pieces packs.


On the back of the 25 tag, I created a feature photo from the big day itself - tracing around the tag and adhering my photo to it - trimming the edge to make sure it fit exactly to the tag.


A few Foam Stickers was all that was needed to finish this tag as I wanted the photo to shine.

I hope you've enjoyed this blog post and it's given you some extra inspiration for how you may document those precious little moments and smaller stories that make up the joy of the season.

I'll be back later this month with some more projects with this stunning collection. In the meantime you can check it out in full here.

Until then, happy scrapping!

Claire x

@scrappysoulmate