Showing posts with label Basic Grey. Show all posts

Monday, 20 January 2025

January Papermaze Kit - Part 1

Lynn here today, with a new kit for the new year. The January kit is now available in the shop or on the website. Plenty of wintery papers, embellishments and cardstock to create Christmas, new year and winter themed layouts. I have used several die sets to make embellishments for these two layouts.
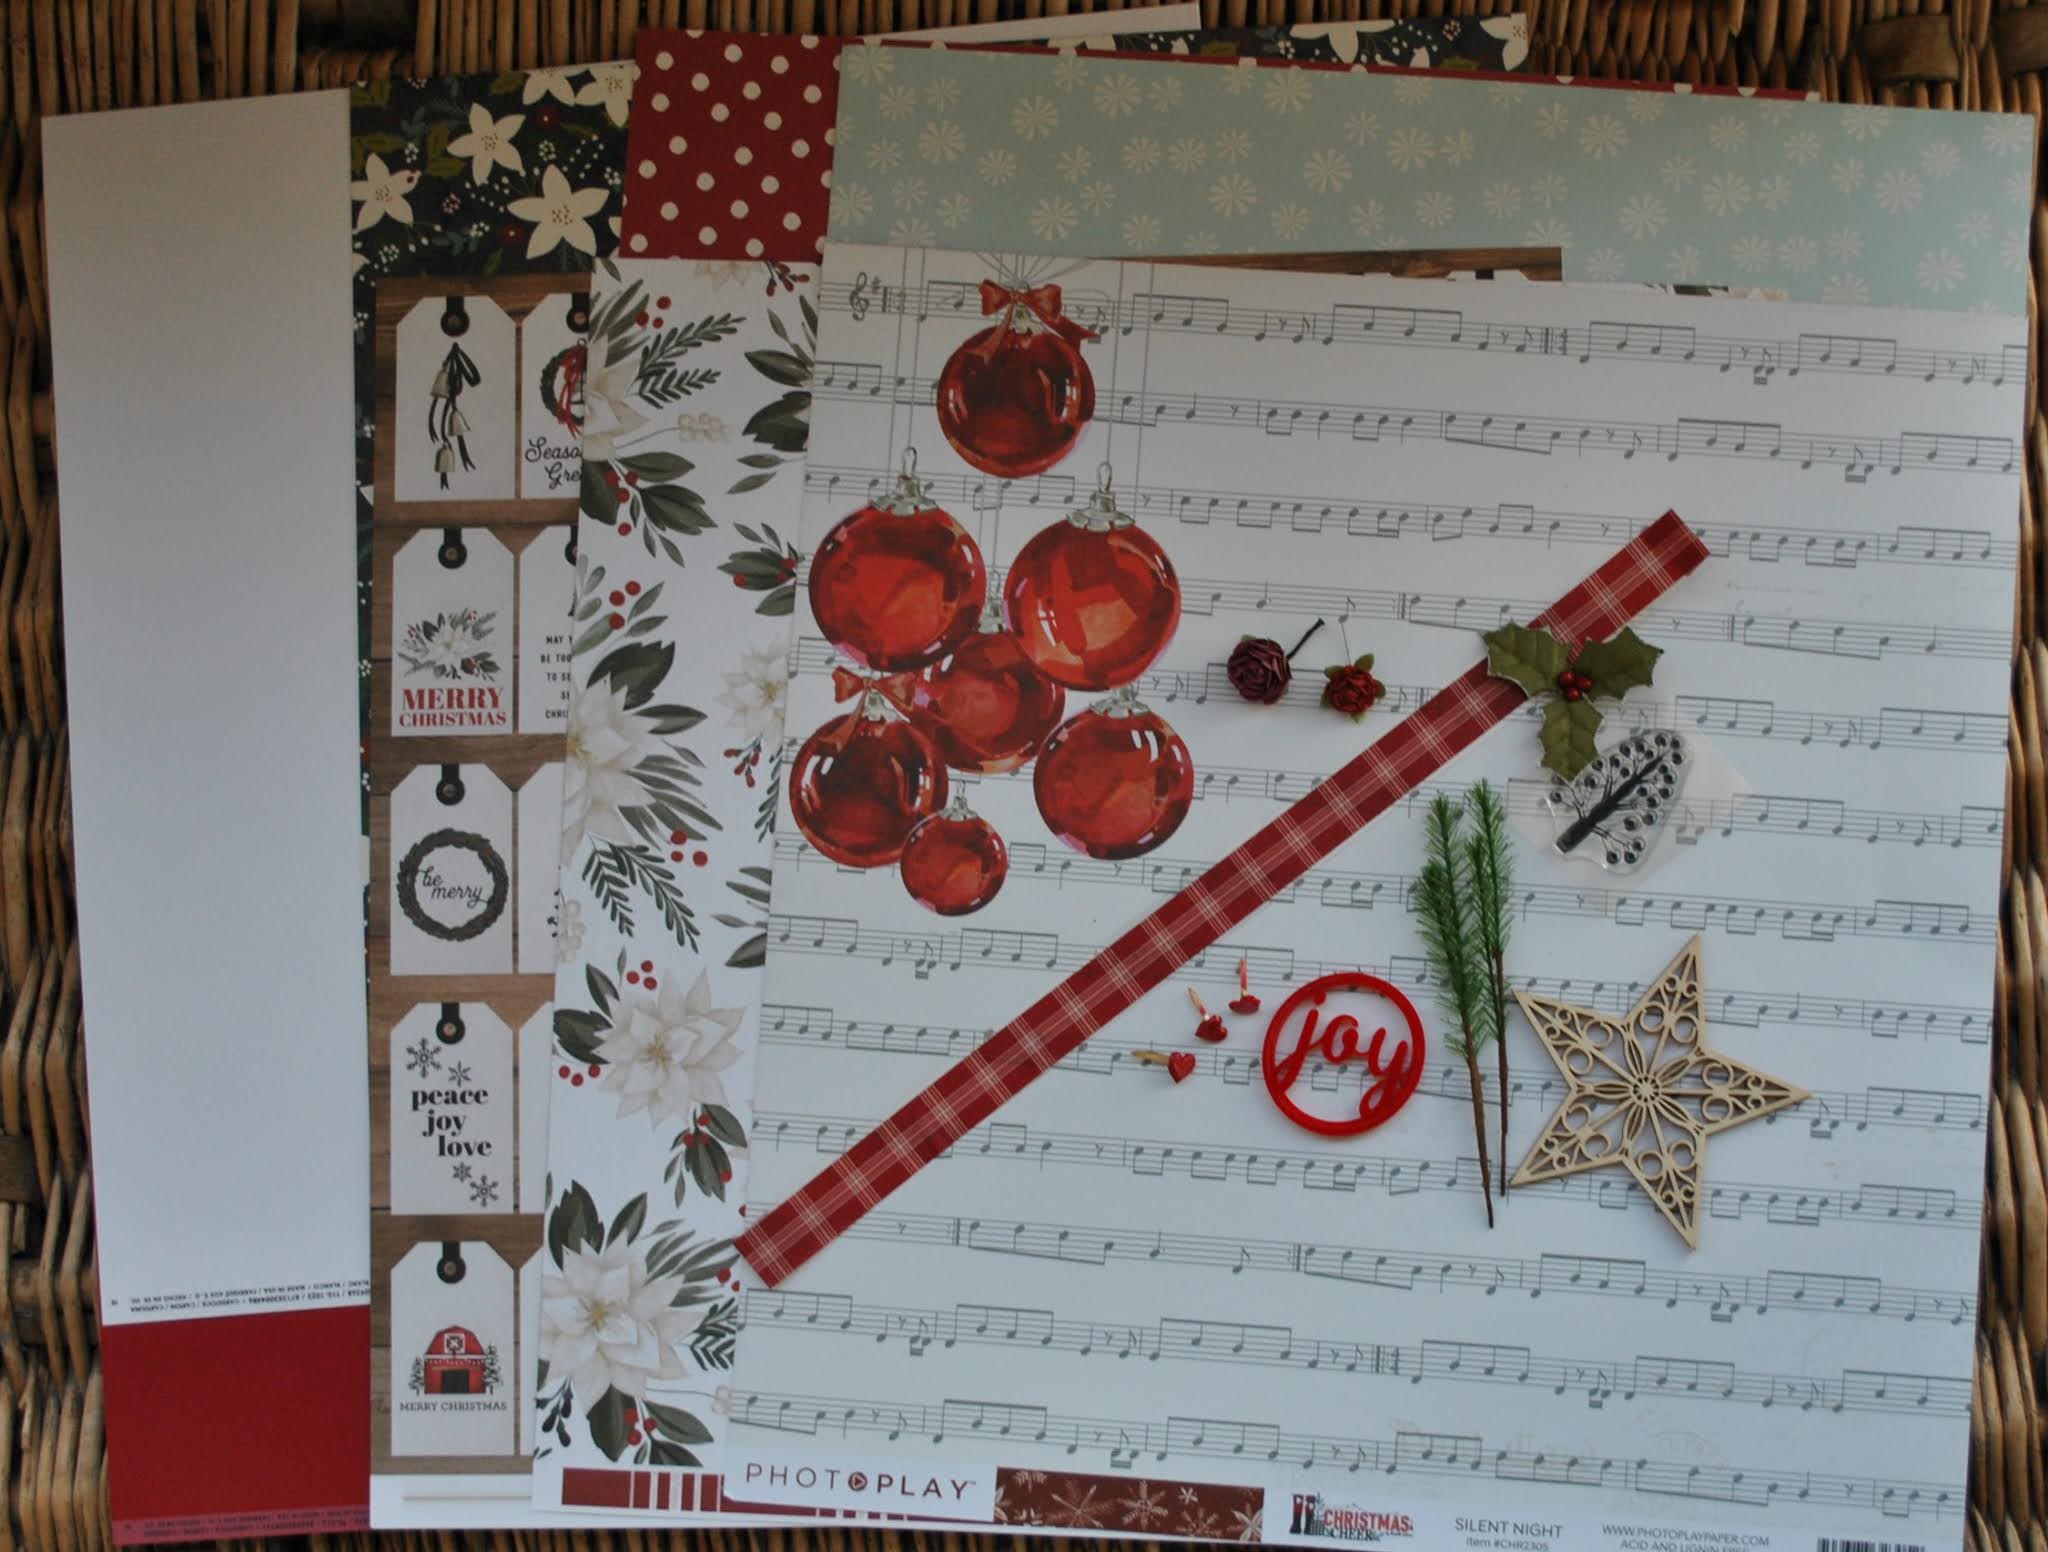
Before looking at how the layouts were made, here is what you will find in the kit:


Patterned Papers:
49 and Market - Cottagecore - Moments
Carta Bella - Winter Wonderland
- Snowy Swirls
Echo Park - Cool Wood Grains - Pale Wood Grain
Mintay - By The Lake - #05
Simple Stories - Simple Vintage Fresh Snow - Cabin Fever & Chasing Snowflakes

The photo below shows both sides of the papers:


Embellishments: 6 x 6" Mintay Snowflake Vellum, 2 Craft Consortium - It's Gnome Time 2 x snowflake charms, 7 x 49 & Market Color Swatch Inkwell - Ticket Essentials, Simple Stories Simple Vintage Fresh Snow - 7 x Floral Bits & Piece, 25cm navy organza ribbon, Prima - the Home Baker 1 x rose, Crate Paper silver glittery acrylic heart, Carta Bella 12" Winter Wonderland  Washi Tape and 49 and Market Moonlight Garden strip of Wishing Bubbles and Baubles.


Bazzill Basics Cardstock: Rain Forest and Pigment (in kit). Moody Blue, Bark, CS White and Pear (in extra matched Bazzill Pack).


Winter Wishes - My first layout for this month features my daughter and her baby girl in Greenwich Park, on a wintery day in December. Lots of work with Tim Holtz Sizzix Thinlits dies on this layout.


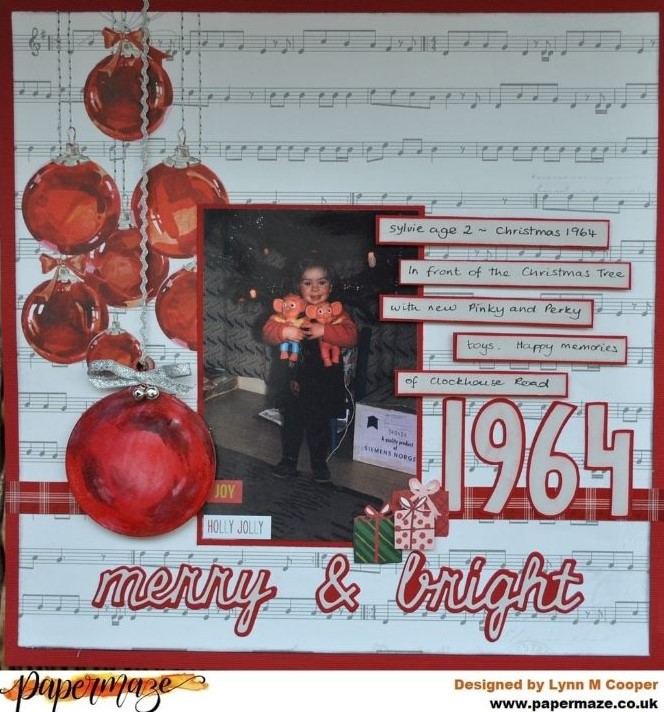
I selected the SS, Cabin Fever paper for this layout and used the whole sheet as the backdrop.


Using the Vault Winter Wishes die set, I cut a lot of snowflakes from a pearlised cream cardstock, and placed them randomly over the page. From the same die set, I cut the parts to make up a pair of ice-skates, using some of the Bazzill from the kit and other colours and some metallic silver, from my own stash. I inked the cardstock with some Distress Inks. I threaded some DMC cotton thread through the holes to make boot laces. I tied two tiny bells to the boots, and hung them from a brad placed near the top of the page. The boots were stuck in place with some foam pads.


The Photo was mounted onto more of the pearlised card, and then again onto Moody Blue Bazzill. I tied some raffia around the base of the photo and attached one of the snowflake charms from the kit.


For the bottom right corner of the page, I created a sledge using the Vintage Sled die set. Again, I used more of the same cardstock, bells and metallic card. I made extra foliage using this die set to add to the ice-skates, sled and a small cluster under the photo.


My title was created with more dies - the Bold Text - Christmas set, together with more of the Moody Blue Bazzill and cream pearlised card. I mounted one set of letters over the other to create a shadow. I added embellishment with some SS Simple Vintage Fresh Snow Cardstock Stickers from my stash and Floral Bits & Piece from the kit.

Capital Yacht Club - The photos on this layout were taken in Washington DC at the yacht club on the bank of the Potomac River. A very cold, crisp but sunny winter day.


I cut two strips from the EP
Pale Wood Grain, 12" wide and 3" deep. These were stuck to the top and bottom of a 12" x 12" sheet of scrap paper. The centre was filled with a 12" x 6" piece of SS Chasing Snowflakes paper, with the snowflake side up.


The join between the papers was decorated, by cutting several pieces of scalloped edging (Funky Nordic Sizzix Thinlits die set), with
Pigment and Moody Blue Bazzill. My photos were also mounted onto both these sheets of cardstock and arranged onto the layout, I raised one photo up with foam.


I made a small tag with the Tag Collection Sizzix Thinlits die set and the Pigment Bazzill. I added a little Baker's twine to the tag and tied this into a bow. My journalling was written onto this tag.


In an effort to use some of my older stickers, I found a few sheets of alphabet stickers from Basic Grey to match my papers and photos. I embellished the layout with the tickets from the kit, a few more stickers from my stash.


Finally, I scattered water droplets and pinkfresh Studio Jewels over the page.


That's all for today, I will be back with another pair of layouts from the January kit soon.
Thanks for looking,
Lynn x

Friday, 11 December 2020

December Papermaze Kit

Hello, Lynn here today with the Christmasy December Kit. Although the papers are all from winter or Christmas collections, at least one side of most of them can be used to create non-Christmas layouts.

Here are the first two layouts I have made with a Christmas flavour.


 This is what you will find in the kit.

Patterned Papers:
Carta Bella - Farmhouse Christmas collection - Gift Tags & Poinsettia Floral
Simple Stories - Winter Cottage collection - Season of Wonder & Let it Snow
Simple Stories - Jingle All The Way collection  - December Details
Photo Play - Christmas Cheer collection - Silent Night
Bazzill - White OP & Ruby Slipper

Reverse sides of papers

Embellishments
12" Washi tape, wooden star, 3 heart heart brads, Prima holly, tree stamp, 2 paper roses,
exclusive acrylic shape & Crate paper pine branches.


Extra Bazzill Cardstock Pack - Aspen, Fig Swirl, Jetstream & Walnut


Merry & Bright - I found this colour slide picture of my sister by the Christmas tree with new Pinky and Perky toys - Christmas 1964. Brought back memories of our childhood home and Christmases.


I chose the Ruby Slipper Bazzill as a border for the layout and gutted it making a frame of 2.5cm. Then I trimmed the 'Silent Night Paper to measure 28cm x 28cm (I cut the two edges away from the baubles). I hand stitched over the bauble strings with some silver embroidery thread. Then I inked the edges of the paper before mounting it over the red frame.

The washi tape was applied across the page, about 7cm up from the bottom. I mounted my photo onto some of the Ruby Slipper Bazzill.

I found an MDF bauble and with some acrylic paints, I made it look like the baubles on the paper. Then added a coat of Glossy Accents. Once dry I attached a length of silver ric-rac, a silver ribbon bow and two tiny silver bells. This was stuck into position with 3D foam tape, the ric-rac is taken to the top and it held in place on the back with some tape.


I wanted to use the Fig Swirl Bazzill for my title and journalling, but I needed most of this for the next layout so I cut a piece 23cm x 23cm and set this aside for later. I also used scraps of Ruby Slipper for title and journalling. I cut the Words 'Merry & Bright' using Sizzix Thinlits - Shadow Script Christmas die set. The date was cut using my Cricut and the journalling strips were hand written.

Before cutting three tiny parcels from the 'Season of Wonder' paper, I gutted it to make a frame 4cm deep, and set this aside for the next layout too. Then I fussy cut the parcels and added them to the bottom right of the photo. 


Nutcracker Lego - Last year we purchased and made this Christmas Lego to add to our collection. 


For this page I have already trimmed the Fig Swirl Bazzill and the wide, red and white spotty border form the 'Season of Wonder' paper. Next I trimmed the Aspen Bazzill to 24cm x 24cm, and gutted this to make a 2cm frame. Then all three were mounted onto one another.

My photo was mounted onto some Walnut Bazzill, but again most of this was required for another layout, so first I gutted the whole sheet to give me a 2cm frame, then with a piece trimmed to 26cm x 26cm I gutted it to make another 2cm frame. I set both these frames aside for later.

I cut two fir trees using the Sizzix Thinlits Woodlands die set, and set these to the left of the photo.

By placing all the embellishments onto the papers and re-arranging them until I was happy, I added a few light pencil marks where they would be glued in place later. Then I removed them and using the tree stamp from the kit (upside down) I stamped fronds in green so they would hang down from under the embellishments. 

To embellish I used a some bits from the kit - the wooden star, and the two paper flowers. I added a few more red and white flowers, some fabric holly leaves and a twig wreath from my own stash. I fussy cut two poinsettia blooms from the 'December Details' paper and added a few dots of Nuvo Crystal Drops (Dandelion Yellow) to the flower centres.

I wanted to use some of the tags from the 'Gift Tags' paper, but again needed the wooden plank side for another layout, so I cut a 25cm x 25cm piece and set this aside. From what was left I cut four tags and punched holes in the top of each one. These were threaded onto narrow red ribbon and placed along the layout weaving them in among the other embellishments.


Finally I used some of my Basic Grey letter stickers to create the title and the year. 

That's all for part one. I will be back with two more layouts in a few weeks.
Have a good Christmas
Thanks for looking
Lynn x

Monday, 30 November 2020

November Papermaze Kit - Part 2

 Lynn back today with part two of the November Papermaze Kit.The lovely soft colours in this collection are ideal for creating layouts displaying photos of russet, wind swept foliage, fallen fir cones, berries and fields of pumpkins. With this in mind here are my second pair of layouts.

Before looking at the processes involved in making these layouts, here is what is in the kit:

Patterned papers:
Cocoa Vanilla - Day Dream - Daisy Days and Sweet Serenity
Pebbles - Jen Hadfield - The Avenue - 2nd Avenue and 3rd Avenue
Vicki Boutin - Story Teller - Memoir
Pinkfresh Studio - Days of Splendor - My
Favourite

Bazzill Basics - Coconut Swirl and Blackberry Swirl

The reverse side of the papers:

Embellishments:

Tando Creative Mini Tags pack, 6 dew drops, mini black doily, strip wooden dots, Cocoa Vanilla Puffy Heart, 5 paper flowers, 24" Twine and Prima layered heart sticker

Extra Bazzill Pack:

Fawn, Guacamole, Coral Cream and Sea Water.

Autumn Leaves - This photo shows Emily during her red hair phase. She was visiting Hall Place, Bexley to do an autumn photo shoot together with a fellow A level photography student. The photo reminds me of the line about autumn leaves from the 'Windmills of your Mind' song. Although I slightly changed the words for my long title, otherwise it would have been even longer!

For this page I cut pieces from two sheets of patterned paper, cutting a piece at an angle from the top of '2nd Avenue' (before cutting I chose a few images from the flip side for later). I set aside the floral heart for this page and the little house for the next layout.

I dripped some Antique Bronze Distress Paint along the angled edge of the
'2nd Avenue' (fawn side), and allowed it to dribble down the page. Once dry this was placed onto a spare piece of 12" x 12" paper, then I cut a piece from 'Sweet Serenity' to fill the gap at the top of the page.

With the Sizzix 'Vintage Lace' Sizzlit die I created some lace from the Black Bazzil, and placed this along the join between the two papers. Then I added two strands of the twine from the kit.

The kit contains a whole pack of Tando leaves, and after coating these with Gesso, I dipped them into a mix of autumn shades of Distress Oxide Inks. Once dry I decorated with patches of Gilding flakes to give them some shimmer.


I chose a selection of frames from the 'My Favourite' paper. These were carefully cut out and arranged in clusters above and below where the photo would be and also on the bottom right of the page. 

My photo was backed with Black Bazzill, raised with foam and stuck into position. The leaves were scattered, cascading down from the photo, saving one for the frames at the top of the photo and another for the cluster at the bottom of the layout. 

I added the paper flowers from the kit to each area where the frames had been placed. For the cluster at the bottom I added the heart saved earlier, and a tiny bow made from left over twine. I added some journalling in this area too. 

I raided my box of letter stickers and from many different packs I put together my long title.


Finally the Dew Drops from the kit were placed among the leaves. 

The Prior's Pumpkin Patch - For my last page I selected this photo of my little niece. She is sitting on the doorstep proudly showing off the carved pumpkins the family picked and carved the day before.  


This layout makes good use of the patterned paper left over from the previous three layouts. The base is the sheet of Fawn Bazzill. Then I did a lot of layering by cutting the scraps of papers as listed below.

Horizontally:
27xm x 11cm Sweet Serenity (colour wash side)
16cm x 15cm My Favourite (candy stripe section)
30cm x 4.5cm 3rd Avenue (Wood panel side including the manufacturer's strip with houses)
17cm x 4cm 3rd Avenue (houses side)
13cm x 2cm and 12cm x 4 cm Daisy Days (daisy side)

Vertically:
30cm x 8cm Sweet Serenity (dotty side)
28cm x 3cm Memoir (orange side including manufacturer's strip with script)
10cm x 3cm 2nd Avenue (fawn side)

I mounted my photo onto white card and placed it over the layers of paper, without sticking the edges down, to allow me to tuck elements underneath. 

I cut a few more of the frames from 'My Favourite' paper and used these in various places, including one for a little journalling. The black mini doily was tucked under the corner of the photo with a circular frame and the puffy heart layered on top.

I added in some phrases from the '2nd Avenue' paperwith the wooden dots and the layered heart sticker from the kit. 

My title was made from several different Basic Grey alphabet sticker sheets. I made them pop by outlining them with a fine black pen.

Finally I placed some paper leaves from my stash around the photo.

That's all for the November kit, although there is still plenty left over as usual. I'll be back with the December kit later in the month.

Thanks for looking
Lynn x

Monday, 16 November 2020

November Papermaze Kit

Hi Crafters, Lynn here today with the new Papermaze kit for November. Beautiful soft autumnal colours this time. Here are my first two layouts using the kit.


Just before looking at the processes involved in making these layouts, here is what is in the kit:

Patterned papers:
Cocoa Vanilla - Day Dream - Daisy Days and Sweet Serenity
Pebbles - Jen Hadfield - The Avenue - 2nd Avenue and 3rd Avenue
Vicki Boutin - Story Teller - Memoir
Pinkfresh Studio - Days of Splendor - My Favorite

Bazzill Basics - Coconut Swirl and Black

The reverse side of the papers:

Embellishments:

Tando Creative Mini Tags pack, 6 dew drops, mini black doily, strip wooden dots, Cocoa Vanilla Puffy Heart, 5 paper flowers, 24" Twine and Prima layered heart sticker

Extra Bazzill Pack:

Fawn, Guacamole, Coral Cream and Sea Water.

Grateful - This layout features a photo I scanned from an old photo of the children just off to Harvest Festival Service, with their decorated mushroom baskets filled with fresh fruit and vegetables. They are standing infront of the house and the row of potted giant sunflowers we grew that year.

The base of this page is the sheet of Coconut Swirl Bazzill from the kit. I splattered some Distress Paint (acrylic paint) lightly diluted with water over the page; I used Black soot and Spiced Marmalade.

Using the 'Daisy Day' paper, I gutted a frame 2cm deep and set this aside for the next layout. Then I fussy cut the wreath, which is quite fiddly as some pieces are very fine and you end up with three different sections. Using 3D foam pads I added two thirds of this onto the card in a circular formation. The photo was positioned, before applying the last piece of wreath upside-down at the base of the photo.


With the Funky Floral #2 Sizzix Thinlits die set, I cut some fronds with scraps of white cardstock and some of the
Guacamole and Sea Water Bazzill, these were tucked in around the wreath.

My title and the heart are stickers from a set of Thickers Puffy Phrase and accent stickers - Truly Grateful.

I embellished the larger flowers in the wreath with Nuvo Glitter Drops. Then added tiny drops of Nuvo Glitter Drops and Crystal Drops scattered on and around the wreath. 

Happy Halloween - This page shows my nephew and his family at Tulley's Farm, up to their ankles in mud picking out pumpkins for halloween.


With the frame cut earlier (daisy side up), I added a piece of 2nd Avenue paper measuring 27.5cm x 27.5 cm with the wood planks running horizontally, centrally over the top. I gutted a piece from this paper from the position and just less than the size of the photo. Set this aside as it will be used for another layout. Then I cut two strips of loosely woven burlap and stitched them in place with some DMC embroidery thread.

I used the black Bazzill and a cut file from Handipaper to cut out some pumpkins. I backed the hollows with Bazzill in
Guacamole (leaves) and Sea Water (flowers), with some tiny scraps of Kraft for the stalks. I used paper scraps left over from Daisy Day and some of the Memoir paper for the Pumpkins. 

After mounting the photo onto more of the Black Bazzill and placing into position raised on 3D foam tape, I tucked a cluster of pumpkins under the top right of the photo, and more over the bottom left.  

With a paint brush and a little Vintage Photo Distress Ink, I painted in some shading on the Pumpkins, leaves and flowers.


My title and date were made with a selection of old Basic Grey letter stickers from my stash.

that's all for today, but I will be back with two more layouts from the November kit in a few weeks.

Thanks for looking.
Lynn x

Monday, 18 July 2011

Relaxing...with Basic Grey

Hello everyone, it's Kim here again with another layout using the Basic Grey Lauderdale collection.

**click on the picture to enlarge - this will also sharpen the image **

There are some papers within this collection, which I found at first glance a little overwhelming such as the Beach Towel. I usually shy away from papers with stripes, as I have no idea how best to use them.


But as Basic Grey is double sided, I simply focused on the flip page, which has a nice hue of blues and some cool retro rectangles. I quickly decided that I wanted to create a page that somehow involves water/sea and the picture of my Mum taken on her first ever voyage on board Queen Mary 2 just screamed to be used :)

First off I wanted to tone the blue down a little, so I added some Gesso with the help of a few stencils and finally added Cosmic shimmer in Blue Ice to create the base of my background.

I hand cut a few flowers from the Coastline paper and layered them around the edges of the photograph. The picture itself was matted with some more of the fantastic Lauderdale - Element Stickers.

Products used:
Papers - Basic Grey: Lauderdale collection
Stickers - Basic Grey; Jenni Bowlin
Mist - Cosmic Shimmer
Pearls - Mark Richards