Showing posts with label Cutfiles. Show all posts

Wednesday, 10 September 2025

Photoplay - Lucky Cat - Time to Get Away

Hi Guys,

Claire here, and this month I'll be creating with the fabulous Lucky Cat collection from Photoplay.

Surprisingly, this is not a pet themed collection, but is Japanese and Asian inspired - perfect for scrapping those takeaway nights, meals out and far flung trips to the Far East! The possibilities are endless!

I've been lucky enough to travel to a few destinations across South East Asia and have so many photos, but I find them notoriously difficult to scrap as no typical collections really suit the photos or convey the feeling I'm looking for so I'm super excited to get some of these stories documented.

My first layout is bold and dramatic - capturing pictures from a photography night tour in Tokyo.


Because this took place late at night, I chose a piece of Premium Black cardstock for my base. I cut a strip of the Cherry Blossom paper about 2" wide, and layered smaller strips of the yellow and red card from the Matchmaker Pack underneath along with a small strip of black for extra depth.


Using the Red cardstock from the Matchmaker Pack, I cut a dragon from a design I found in my Cricut library.  I added extra light and shade to the dragon by brushing Black Soot Distress Oxide around some of the edges, and spritzed with gold ink for an extra bit of sparkle.


I cut the dragon in half and tucked it underneath the paper strips, and then added a row of Gold Nuvo Drops along the top of the paper strip to enhance the richness of the page.

I mounted my photos with the b side of the Lucky Cat paper and then embellished on either side using stickers from the Element Stickers.


Thank you for joining me on the blog today. I hope it's shown you can make an impactful, bold layout with just a few key pieces. 

Join me again on the 24th when I'll share my second layout with this collection, which is going to go from bold and dramatic to peaceful and serene.  I'll see you then!

Happy scrapping!

Claire xx
@scrappysoulmate 


Friday, 3 January 2025

December Papermaze Kit - Part 2

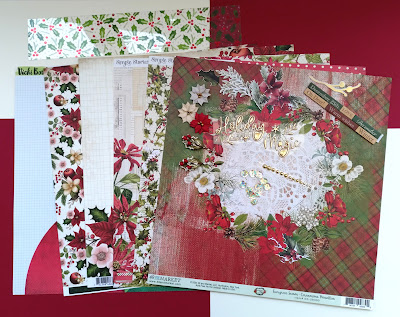
Lynn here today, wishing you a happy new year! Christmas may be over, but if you want to scrap this year's photos, here are two more layouts using the December Papermaze kit. The pack is full of traditional Christmas colours - papers, embellishments and Bazzill cardstock.

Here is my second pair of layouts:


Before we look at how the layouts were made, here is what you will find in the kit.

Patterned Papers:
49 and Market - Evergreen Season collection - Ceremonious Poinsettias
Simple Stories - Simple Vintage Yuletide collection - Holiday Wishes and Filled with Wonder
Carta Bella - A Vintage Christmas collection - Holiday Floral and 3x4 Journalling Cards
Vicki Boutin - Wrapped in Ribbons collection - #5

The photo below shows both sides of the papers:


Embellishments:
Vicki Boutin - Wrapped in Ribbons Acetate 6cm strip, Prima - From The North Pole 2 lines of chipboard phrases, 2 Holly Berry stems, 6 ephemera pieces and 3 flowers, Rosie's Studio - All Wrapped Up - Puffy Word Stickers, Strip of gold pearls, 12 sequins.


Bazzill Basics Cardstock - Natural and Pomegranate Splash (in Main Kit). Aspen, Quartz, Parakeet and Grenadine (in extra Bazzill pack).


Nativity - Here are the children all dressed up for the annual Christingle service.


I gutted the sheet of Pomegranate Splash Bazzill to make a frame 1", then trimmed the Filled with Wonder, paper to measure 11.5" x 11.5", then made two tears into the paper one from the top and the other from the bottom. I used the holly side of the Holiday Wishes paper to fill the gaps.  All the edges were distressed and inked with Festive Berries Distress Ink. I placed the paper centrally over the Bazzill.


I matted the photo with cream and more Pomegranate Splash Bazzill. With 3 of the cards cut from the 3x4 Journalling Cards paper (I chose those which gave me room for journalling), placed to the right of the layout, overlapping one another. I added the photo to the centre of the page.


I used some old stickers from my stash - (Holiday Traditions, die cut alphabet stickers from K and Co.) and used them to add a title and a date. My journalling was one of the cards. I added image stickers from the same collection, to embellish the page.


With two lengths of seam binding ribbon in a deep red, I placed a short length near the top left and a longer length running from the bottom right. I added a bow in the same ribbon at the end of the longer piece.


Finally, using the Tim Holtz, Sizzix Thinlits Seasonal Sketch set, metallic gold card and Aspen and Pomegranate Splash Bazzill, I made three clusters of flowers to add to the layout.

Holiday Magic - This super photo shows a professional photo of my great nieces, Christmas 2023.


For this layout I chose the sheet of Holiday Floral paper for the background. Then from the Natural Bazzill, I cut the Winter Berries Peartree Cutfile.


I backed the cutfile using scraps of Bazzill, then highlighted the leaves and berries with marker pens in darker shades of the same colours.


The wreath was placed the centre of the layout using 3-D foam pads to give some dimension. I placed the photo onto the page in the middle of the wreath.


From the kit embellishments, I chose the All Wrapped Up - Puffy Word Stickers, as my title, together with the strip of gold pearls which I scattered over the page.


In keeping with the gold embellishments, I used some Doodlebug Designs Alphabet Soup stickers to add the date.


Finally I covered the photo, and splattered a little white acrylic paint over the whole page.

That's all from me for the December kit, I'll be back later with the January kit.
Thanks for looking.
Lynn x

Wednesday, 17 April 2024

April Papermaze Kit - Part 1

Lynn here with the pretty Papermaze kit for April. There is a lovely range of colours, purples, pinks, greens and blues in this month's selection. I have been experimenting with Distress Watercolour Pencils and Distress Oxide Inks.


 Here are the details of what is in the kit:


Patterned Papers (photo below shows both sides of each of the papers)
49 and Market - Colour Swatch Teal - Teal Paper 2
49 and Market - Spectrum Gardenia collection - Classics - Floral Serenade
American Crafts - Dreamer collection - Floral & Stamped Hearts
Pebbles - Cool Girl collection - Petals
Pebbles - Cool Boy collection - Tie Dye


Embellishments: 4 American Craft Puffy Icon Stickers, 2 paper tie on tags, 2 - 49 and Market acetate-filmstrips, 3 wooden butterflies, strip of pearls, 12" lace, 1 Woodware label clear stamp, 4 pieces Rosie's Studio floral ephemera


Bazzill Basics Cardstock - Coconut Swirl and Blue Calypso included in kit. Twilight and Jade, Romance and Juneberry included in extra Bazzill pack.


Blinky the Owl - A photo from a trip to Hall Place Gardens and the Jamb Owl Centre.


On my most recent visit to Papermaze, I treated myself to a tin of Distress Watercolour Pencils (set 2). I was keen to try these out, so I selected the colours, I felt complimented the papers in this kit - Mermaid Lagoon, Prize Ribbon, Kitsch Flamingo, Seedless Preserve and Iced Spruce. I scribbled some rays radiating from the centre of the sheet of Coconut Swirl Bazzill, Mixing two or three colours in each ray. Then I took a water brush and ran it along the length of the rays, and the colours blended beautifully. Once dry I trimmed this cardstock to measure 11" x 11".


I cut nine wedge shaped pieces from 'Petals' and 'Floral' papers. I distressed all the edges, and inked them with Black Soot Distress Ink. These were attached, over the rays, radiating out from the centre. With black thread and the sewing machine, I stitched around the outside of the cardstock. Then I stitched along the centre of each of the wedge shaped pieces. I used a combination of zig-zag and straight stitches. 


The white cardstock was mounted over the Juneberry Bazzill from the kit, this was gutted first. I placed my photo into the centre of the photo. With a set of Memory Box feather dies, I cut six feathers from scraps of papers already used. I inked the edges with more Black Soot. The feathers were scattered around the photo, using 3D foam pads.


Using my Cricut and a scrap of the Juneberry Bazzill I created my title, and stuck this to the bottom right of the photo. Then I added journalling with a black marker pen.


Finally, I added the pearls from the kit, in clusters of three, all over the page.


Caught on Film - My daughter on The Great Orme, trying out the video camera.


This layout uses a combination of cutfiles and Distress Oxide Inks. First, I cut the 'Filmstrips Background' Peartree Cutfile from some scrap cardstock. This was placed onto a sheet of smooth white cardstock, to be used as a stencil.


With a combination of Distress Oxide Inks (Villainous Potion, Shaded Lilac, Salvaged Patina and Salvaged Patina), I worked the ink over the stencil with a blending tool. Once the stencil was removed, I spritzed a little water over the page.


My photos were mounted onto white card and placed in the centre of the page. Then I cut the 'Caught On Film' Peartree Cutfile using the Jade Bazzill. I backed the cutfile with one tiny image, and white card. I wrote my journalling onto the card with a black marker pen. The date was created with Doodlebug Designs Alphabet Soup puffy stickers in Swimming Pool.


I added the three wooden butterflies from the kit, adding some DMC embroidery thread through the holes and tying it to create antenna. I also place the Rosie's Studio flower ephemera around the photos using some 3D foam pads. I punched some leaves using more of the scrap papers and tucked these around the flowers.


I finished off with some Nuvo Glitter Drops to highlight the leaves and flowers. Dots of Nuvo Crystal Drops were added to the background of the layout.

That's all for today, back with more layouts from this kit soon.
Thanks for looking.
Lynn x

Wednesday, 25 May 2022

Bella Blvd ~ Time to Travel 🌎

Hi all, it’s Anna back on the blog today! 
For my next few blog posts I will be working with a new collection from Bella Blvd - Time to Travel! This was perfect for me as we’ve recently returned from a very much long awaited holiday! 
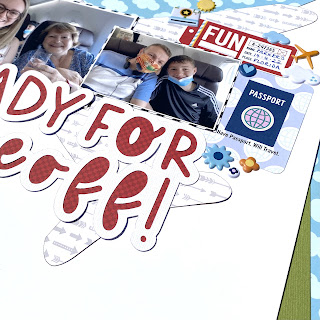
My first layout documents a couple of pictures of a few of us ‘ready for takeoff’.


Starting with a sheet of white bazzill, I cut the b side of ‘love this place’ paper diagonally adhering it to the left side of the layout. I then used my cameo to cut out an aeroplane cutfile using the b side of ‘baggage claim’ paper. 

I then cut a title cutfile by Bella Blvd and backed it with the b side of the ‘photo op’ patterned paper. I fussy cut a few of the tickets from the ‘baggage claim’ paper and mounted two photographs on to the b side of  the ‘road trip’ paper.


I fussy cut the passport and little aeroplane from the ‘daily details’ paper and tucked them in either side of my photos. I completed my layout by adding some of the puffy stickers from the collection. 


Thanks so much for looking! See you soon with another layout using this collection.
Anna
X


Wednesday, 17 November 2021

P13 Time To Relax collection - 'Loved' by Meg

Hey hey everyone, 

I'm swinging by today to share my second layout using P13s stunning floral Time To Relax collection. I've absolutely loved playing with these beautiful colours, they are so rich and vibrant! 

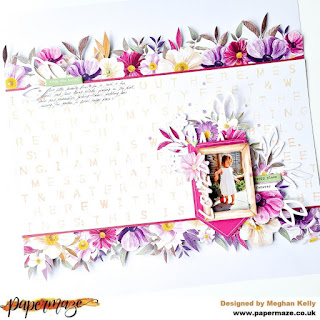
So with this page my main drive was just to create a cluster around my photo and layer up some of those beautiful fussy cut flowers. P13 flowers layered together just create such a soft pretty effect! I began by fussy cutting a few clusters from Paper #01, Paper #7 and thought about what sort of background I wanted on my page. 

I decided I wanted a long quote to go with my photo - I found it on Pinterest and it says 'I am happy out here. Messy hair, dirty feet and water on my skin. Out here with the wild things; this is where I belong'. It fits perfectly with how I think of my toddler and it goes so well with my photo of her in the garden doing some digging! 

I used my We R Memory Keepers Punch Board to cut out the quote, which I used as a stencil. I used a Zig Brushables Pen in the Fawn colour to draw in the quote on a wide strip of Bazzill Coconut Swirl cardstock and used this as a background in the middle of my page. 

I matted the white cardstock with Bazzill Sweetheart (which matches the pinks in this collection SO incredibly well, including B side colour of Paper #03) and I fussy cut two borders from the Time to Relax Paper #4, which I tucked in on the top and bottom of the wide strip. 

Next I began to create the cluster around my photo - using a wooden frame fussy cut from Paper #7, the fussy cut florals, a pink banner from the packet of Banner Die Cuts and some white leaf sprigs that came from a wreath cutfile by Paige Taylor Evans. 

I used foam to pop up parts of the cluster and add some dimension, before adhering to the right lower side of my page. I journalled in the opposite corner and finished my page with a few more pieces of foam to pop up parts of the floral borders, some puffy phrase stickers, the 'Loved' puffy title from my stash and lots of flat back gems from Little Things From Lucys Cards to add some sparkle! 

And there we have it, my second page complete! I hope you liked it and that it's possibly inspired you in some way! 


I'll be back again soon with another layout, but in the meantime I hope you stay well and scrappy, 

Meg x 


Friday, 26 March 2021

Echo Park ~ Magical Birthday Boy #2

 Hi all, it’s Anna here, happy Friday! The days are getting longer and the sun is starting to shine, phew! It’s been a long winter, but scrapbooking has certainly helped me through it! 

With my DT kit this month I have been playing with the Echo Park Magical Birthday Boy collection, you can find the collection in the shop here

Today I’m going to share two layouts with you. But first, here are some direct links to the supplies that I have used for these pages. 

Birthday Fun, Make a WishBazzill Matchmaker Pack (cardstock), Let’s Party, Tags, Element Stickers, Stix2 3D foam pads , Thickers, Nuvo Drops, Bazzill cardstock scraps, twine, doodlebug alphas


For my first layout I used the red bazzill cardstock from the matchmaker pack as my base. I then used a Paige Evans floral Mickey cut file as the main feature on my layout. This took a long time to back! I used a selection of scraps of different coloured coordinating cardstock. The collection doesn’t feature any pink, purple or dark blue, but I wanted to incorporate these colours to match my photo. So I used these colours in my cutfile to make it work. I also used some vellum and glitter cardstock, as well as patterned papers from the collection to back the cutfile. I added some Nuvo drops around the edges of the flowers. I placed this to the left of my layout and trimmed off the edge. 


I had a few photos of my 30th birthday cake that I wanted to include, it was Disney themed and decorated beautifully, with lots of little details. But to add them all on the page itself would’ve been far too much, as the cutfile is really quite busy. So I made a mini book, which just tucks in behind the main photograph - I used some 3D foam pads behind the main photo to create a space for the mini book to slot in. I made this by trimming a strip of Let’s Party paper and scoring two measured equal sections wide enough for my photos. This also allowed me to add in some journaling. 


To the left of my layout I added just a few of the element stickers and that’s all that was really needed. 

Moving on to my second layout for today...


I used the blue cardstock from the matchmaker pack for my base. For this layout I used some pictures from a Disney party that we had for my son’s 3rd birthday, this paper collection was perfect for this! 


I used a strip of Let’s Party patterned paper behind a large ‘Disney’ title. I used one of the tags from the ‘tags’ paper for a journaling spot. 


Something was missing at the top right hand corner so I ripped a tear at the top of the paper and backed it with the make a wish patterned paper, along with some element stickers. 


To finish, I added some more element stickers around the layout. 

Thanks so much for looking, I have one more layout to share with you using this collection, so I will be back with that soon! 
Have a great weekend! 
Anna 
X
@adisneycraftylifewithanna