Showing posts with label Florals. Show all posts

Wednesday, 9 April 2025

Blue Skies - Simple Stories - Simple Vintage Flower Shoppe Collection

Hi Friends! 


It’s Rebecca here on the blog today. I absolutely loved working with the Simple Vintage Flower Shoppe collection last month, so much so that I decided to continue creating with it this month! It’s the perfect collection for this time of year, and I’m having so much fun with it. It’s a stunning spring collection from Simple Stories, and you can find it in the shop here.


For today’s layout, I started by cutting several circles from patterned papers using a set of metal nesting dies. I arranged four circles horizontally across the centre of a sheet of Premium White Cardstock, leaving a gap in the middle for my photo. Since I had cut the circles from the patterned papers, I wanted my photo to be circular as well. To help it stand out, I backed it with a larger circle of patterned paper and raised it up using foam.


Once the circles and photo were in place, I picked two words from the Foam Stickers for the title. I placed one above and one below the photo for added interest.


Next, I added a few florals from the Floral Bits & Pieces, creating three small, subtle clusters on the page.


To extend the layout vertically, I fussy cut several butterflies in different colours and sizes from the 'Dreamer' patterned paper and arranged them cascading down the page through the photo.


Feeling that the layout was a little top-heavy, I decided to tear the bottom section of the white cardstock, and back the area with patterned paper to bring some colour to the bottom of the layout.

I finished the layout with a couple of Cardstock Stickers, raised up on foam pads. I love the simplicity of this design and how beautifully the butterflies flow down the centre of the page.

Thank you so much for reading! I hope you like my layout and that it inspires you to start creating.


Take care,


Rebecca xx
@preciouspagespapercraft


Monday, 24 March 2025

Big Moments - Simple Stories - Simple Vintage Flower Shoppe Collection

Hi everyone,

It’s Rebecca here, and today I’m excited to share my second layout of the month using the gorgeous Simple Vintage Flower Shoppe collection from Simple Stories. With the first signs of Spring finally upon us, it feels like the perfect time to showcase this beautiful collection. You can find it in the shop here.


For this layout, I was drawn to the Polaroid frames from the Captured patterned paper. I decided to fussy cut a few in a variety of colours and arranged them in a vertical design, slightly overlapping, on a sheet of Premium White Cardstock. To extend the design horizontally, I added the scalloped border sticker from the Cardstock Stickers and a similar one from the Ephemera pack, positioning them across the Polaroid frames.


The space in the centre of the frames was the perfect spot for my photo, so I mounted it using a patterned paper from the 6x8 Paper Pad. To add extra detail, I tucked a few elements from the Ephemera pack behind the photo for more texture and dimension.

As someone who absolutely loves viewfinders, I was thrilled to find a few on the papers in this collection. I fussy cut one from the corner of the Treasure paper and placed it to the left of my photo, which helped add visual interest to that side of the layout. Since I planned to position my title on the right, the viewfinder was the perfect touch to balance the overall design.


For the title, I chose an element from the Bits & Pieces pack. After raising it up with foam pads for dimension, I placed it beneath my photo.


To further enhance the page, I added a few clusters of florals from the
Floral Bits & Pieces and fussy cut some butterflies from the Dreamer patterned paper. Fussy cutting is such a fantastic way to stretch a collection and create additional embellishments!


Thank you so much for stopping by! I hope you’ve enjoyed seeing my layouts this month. I have a couple more to share, so be sure to keep an eye out for those! This collection is selling quickly, so don’t miss your chance to grab it in the shop before it's gone!

Take care,


Rebecca xx
@preciouspagespapercraft

Friday, 21 March 2025

49 & Market - Birdsong - Together

Hi everyone,

Claire on the blog today and I'm sharing another layout with the Birdsong collection from 49 & Market.


I wanted to create a vertical, floral design with lots of fresh spring colours, so on top of my Premium White Cardstock, I cut a strip of the Blue Solids 1 paper, texture side up to create a kind of hessian vibe.


On top of this I created layer after layer to bring colour and depth to the design.  I adhered the printed Washi Tape Sheet to some of the yellow solids paper and curled the edges. Then I selected multiple elements from the Ephemera Bits and Laser Cut Elements before housing my photo on top.


Once these layers were in place, I chose two florals from the Essential Rub On Transfer Sheet and positioned thee on either side on the paper strips.


To add more interest, I layered some florals from the Wildflower Laser Cuts , adhering these in between the layering pieces.

I also added a few extra bits from the Laser Cut Elements to give an extra pop of colour.

Finally, for my title, I again reached for the Laser Cut Elements choosing the bold blue Together Forever sentiment and the smaller favourite moment stitched label. I love the stitched effect 49 & Market use in their collections. It adds so much detail.


I hope you've enjoyed this layout and it has inspired you to get creative.

Claire x
@scrappysoulmate

Wednesday, 12 March 2025

Beautiful - Simple Stories - Simple Vintage Flower Shoppe Collection

Hi Friends!

Rebecca here, sharing my first layout of March with you today. With Spring just around the corner and the weather starting to warm up, it felt like the perfect time to create with one of the latest collections from Simple Stories—Simple Vintage Flower Shoppe. It’s a stunning collection that truly captures the essence of Spring! You can find the full collection in the shop here.


I was immediately drawn to several of the journal card images on the ‘Journal Elements’ patterned paper, so I decided to cut them out and layer them behind my photo. To add texture and depth, I distressed all the edges—one of my favorite techniques to elevate a page. I matted my photo with a soft pink patterned paper from the 6x8 Paper Pad and arranged these elements in the centre of a sheet of Bazzill White Cardstock.

At this stage, I still felt like something was missing, so I knew I needed to add a little more behind the photo. I chose two patterned papers—the B side of the '2x2 / 4x4 Elements' and the B side of ‘Memories’—and cut them down to 7x5 inches. I then used a paper punch to add a notebook edge along the tops. Once I arranged these elements at angles behind my photo, I was much happier with the layout.


With the larger pieces in place, it was time to move on to embellishing. I selected some beautiful floral pieces from the Floral Bits & Pieces and layered them around my photo, allowing some to peek out from behind the patterned papers. 


I also added a couple of tin buckets filled with flowers from the Cardstock Stickers sheet to bring in more texture and detail.


For the title, I chose the word “beautiful” from the Foam Stickers and placed it just beneath my photo for a balanced look.                                                                                                                                   


To add the finishing touch, I fussy cut a couple of butterflies from the 'Dreamer' paper and adhered only the centres, letting the wings flutter freely. This gives the impression that the butterflies have just landed on the layout, adding a bit of movement.


Thank you so much for stopping by to check out my layout. I hope it inspires you to create something beautiful of your own! This collection is absolutely perfect for Spring, so be sure to head over to the website and grab it before it’s gone!

Take care, 


Rebecca xx 
@preciouspagespapercraft

Monday, 24 February 2025

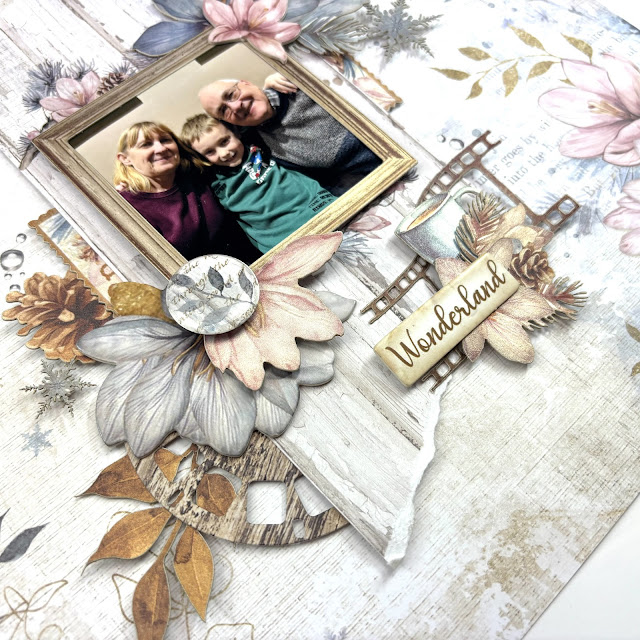
Wonderland - Stamperia - Create Happiness Dewdrops Collection

Hello Friends!

It’s Rebecca here on the blog today, and I’m excited to share my second layout of the month, created using the beautiful Create Happiness Dewdrops collection by Stamperia. I’m so glad I stepped outside my comfort zone and experimented with this collection—it’s been such a joy to work with! You can find the full collection in the shop here.


I’m absolutely smitten with the patterned papers in this collection. Many of them feature exquisite details along the edges, making them perfect for backgrounds. For this layout, I chose the Flower Corner paper, which has stunning florals and text running down the sides. It left a perfect open space in the center, giving me just the right area to build a central design.

I began by tearing a strip of the same paper—this time, using the beautiful woodgrain design on the reverse. I positioned this strip vertically down the centre and placed my photo (framed with one of the die cuts from the Adhesive Paper Ephemera) right on top.


To add some extra flair, I used a metal die to cut out a viewfinder shape from the Wood paper. After cutting it in half, I positioned the two halves on either side of the woodgrain strip. From there, I began building clusters around these elements, using florals from both the Adhesive Paper Ephemera and the Die Cuts. I also added a third cluster beneath my photo with a filmstrip die cut, a coffee cup die cut, and a floral piece. For the title, I selected one of the chipboard words and placed it on top of the cluster. I absolutely love how the little coffee cup is nestled in—perfectly fitting, since the photo was taken in a Starbucks coffee shop!


To finish the page, I couldn’t resist adding a few of the Pinecones and Flowers Rub Ons. I placed tiny bubbles on the background and created my own epoxy flair by applying a rub-on to some patterned paper, then punching it out with a 1-inch circle punch. I topped it off with a domed epoxy sticker for extra dimension.


Thank you so much for stopping by! I hope these layouts inspire you to step outside your comfort zone and try something new.

Take care,
Rebecca x 

@preciouspagespapercraft

Wednesday, 12 February 2025

Think Big - Stamperia - Create Happiness Dewdrops Collection

Hello everyone, 

It's Rebecca here, and I’m so excited to be sharing my first layout of the month with you. This time, I’m working with a brand I’ve never used before—Stamperia. To be honest, I’ve always found Stamperia a bit intimidating, so I’ve shied away from it in the past. But not this month! I’m so glad I decided to embrace it and dive in. It’s really exceeded my expectations and has reminded me of both the 49 and Market collections as well as the vintage collections from Simple Stories.

For this layout, I chose to work with the Create Happiness Dewdrops collection. The soft colours and beautiful patterns in the papers immediately drew me in. You can find the collection in the shop here.


As soon as I saw the B-side of the Bird patterned paper, I was captivated by its subtle, soft details. I decided to use this as my background paper. I then selected a couple of shimmering gold frames from the Adhesive Paper Ephemera to frame my photos, which created a central focal point for the layout.


To embellish around the photos, I pulled elements from both the Adhesive Paper Ephemera and the Die Cuts, choosing some gorgeous floral pieces. The Die Cuts really surprised me—made from a thin chipboard-like material, they’re sturdy and easy to layer. I even used foam pads to raise some of the embellishments, adding extra dimension to the layout.


To enhance my background, I added some rub-ons from both the Bird Rub-Ons and the Pinecones and Flowers Rub-Ons. I applied them around the edges of the photos, filling in the gaps created by the floral ephemera.


For the finishing touch, I added my title using a chipboard piece from the Die Cuts and completed the layout with a few Prima Paper Flowers from the Meadow Walk set. The colours in these flowers match the collection perfectly!


Thank you so much for reading! I hope my layout inspires you to try something new or different.

Take care,
Rebecca x

@preciouspagespapercraft

Monday, 1 July 2024

American Crafts ~ Rainbow Avenue 🌈

Hello! It’s Anna here sharing my final layout using American Crafts Rainbow Avenue. 

You can find the collection in the shop here


I’ve picked out lots of the bright colours in this collection for this layout. 
I used a white bazzill cardstock background and then picked up ‘My Rainbow’ which I trimmed into strips and then weaved together on the top left hand side of the layout. 
I tore the edges, making them different lengths. 


I then selected my photos, I wanted to try and squeeze on three to document my birthday, so I used different size pictures to accommodate this. I mounted the photos with ‘Pink Dreams’. 


To fit in with my birthday themed layout, I have also used  ‘Birthday Sparkle’ element stickers by Photoplay. I added the ‘celebrate’ sticker to serve as my title and a few of the words and a candle to tie in with the birthday theme. 


I cut out one of the cut apart pieces from ‘Dreamy Day’ to use as a journalling box. I also used some of the ‘cardstock stickers’ including some florals, hearts and stars. 


Thanks so much for looking! See you later in the month where I’ll be working with Simple Stories Say Cheese Magic

Anna
X

@acraftylifewithanna

Friday, 19 April 2024

Simple Stories - Noteworthy - Smile

Hello,

It's Claire here and today I have another layout to share with you using the Noteworthy collection from Simple Stories.

Earlier this month, I made a page focusing on the writing/documenting elements of the collection, whereas today, I'm all about the florals!


To the white cardstock included in the Matchmaker Pack, I cut two pieces of the June paper (roughly 4" and 5.5") and adhered these flat to the page with the smaller piece at the top and larger piece at the bottom, leaving about 2" of white space on either side of the page. For texture, I distressed the edges before sticking each piece in place.

Next, I took a 3" photo and printed it twice, offsetting these one on top of the other to create a stacked photo look - an effect I really enjoy.


Before adhering to the page, I wanted to pull in some of the green and brown tones of my photograph, so I added a scalloped woodgrain border from the Cardstock Stickers and a strip of the April paper.

Raising the photos on foam, I them began to embellish using more stickers and florals from the Floral Bits & Pieces pack.


I also pulled in some of the more documenting themed elements Cardstock Stickers to build out the floral cluster.


Underneath, I added some of the phrases from the Cardstock Sticker sheet, raising on foam to draw the eye into this main cluster.


For my title, I oped for one of those gorgeous Foam Stickers - they're definitely one of my favourite elements of Simple Stories collections.


I 'framed' the title at each end with flowers from the Floral Bits & Pieces pack and added a camera sticker on foam from the Cardstock Stickers to balance the design.


I scattered a few white Nuvo Drops across the page and my page was complete!

This design came together very quickly and I love the bold bright colours against some of the softer florals.  I hope you've enjoyed it. Please do take a moment to check out this beautiful collection in the shop. You can find it right here.

I'll be back next month with some more layouts. Until then, happy scrapping!


Claire xx

@scrappysoulmate

Friday, 12 April 2024

Echo Park ~ Telling Our Story #2 📷

 Hi all! 

Happy Friday and welcome back to the Papermaze blog. 

It’s Anna back today sharing my final layout with Echo Park - Telling Our Story. You can find the collection here

This collection is so versatile, it is suitable for your everyday scrapbooking, with lots of florals, cameras and frames, it’s great to document the everyday moments. 


For my second layout using this collection I began by using Storyteller Pages as my background. I had searched the internet to find a camera cutfile to match some of the cameras in the collection and I found this one by Cut to You. I cut it in bazzill powder blue cardstock and backed it with patterned paper and coordinating cardstock from the matchmaker pack


I mounted my photographs on to the b side of ‘Frame our Story’ and tucked them to the right of my cutfile. I also fussy cut a frame from this paper too, which I have tucked in ready to add a tiny bit of journalling to. 


I added some enamel dots to some of the pre printed florals on the patterned paper. 


I used some of the element stickers to finish the layout, I used ‘snapshots of our life’ as my title. 


And that was the layout completed! 


Thanks so much for looking! 
See you next month, when I’ll be sharing layouts using Simple Stories Just Beachy.
See you then. 
Anna
X

@acraftylifewithanna