Showing posts with label Doodlebug. Show all posts

Saturday, 26 July 2025

Doodlebug Designs ~ Butterfly Kisses #2 💖

 Hi everyone, it’s Anna here today and I’m sharing my second layout using Doodlebug Designs Butterfly Kisses. You can find this collection in the shop here

To create this layout I began with a sheet of 12x12 bazzill cardstock as my base. I used my silhouette cameo to cut out a free floral cutfile by Paper Issues on white card - and I just backed the centre of the flowers with ‘sunny days’. I adhered the cutfile to the centre of the page. I then trimmed two pieces of  ‘Rainbow’s End’ and placed them either side of my layout, slightly covering the cutfile each side. 

I printed my three pictures and mounted them onto ‘sunny days’. Once these were positioned roughly where I wanted them I began to add my embellishments. 

I added a title using the Puffy Word Stickers and Bella Blvd Luna Alphabet Puffy Stickers

I added extra details using the ‘This and That Stickers’ including tabs, arrows and word sentiments. I also used some mini hearts from the puffy word stickers to add to the centre of the flowers. 

Thanks so much for looking! 

See you next month, when I’ll be working with a new Simple Stories collection! 

Anna 

@acraftylifewithanna

Wednesday, 9 July 2025

Doodlebug Designs ~ Butterfly Kisses 🦋

 Hi everyone! 

This month I’m working with Doodlebug designs Butterfly Kisses which you can find in the shop here

This collection has been out for a little while now, but it caught my attention in the shop recently and I was keen to have a play! 

If you’re a regular visitor to the blog, you will know I love a multi photo layout and the tags on ‘Happy Thoughts’ gave me the inspiration to create a multi photo layout to document my birthday!


I had lots of photos from the day and if I used lots of them singularly on a layout, I’d have so many pages of one day. Multi photo layouts are really great for not only telling stories but using less space in your albums. 


I began by cutting out all of the tags from ‘Happy Thoughts’. I then adhered them onto a sheet of white bazzill cardstock. I then printed out a selection of photos and began arranging them onto the tags. I mounted some if the onto coordinating bazzill cardstock. 


I added some of the This and That stickers and some of the Puffy word stickers to embellish each of the tags. 

🏷️ Thanks so much for looking! 🏷️ 

See you later on in the month for a second layout using this collection. 

Anna 

@acraftylifewithanna

Wednesday, 2 July 2025

June Papermaze Kit - Part 2

Lynn here today, sharing my next two creations using the delightful Papermaze kit for the month of June!  The kit is comprised of six double-sided patterned papers, two sheets Bazzill Basics cardstock and a whole bunch of co-ordinating embellishments. There is also a pack of four extra Bazzill Basics matching available to purchase to compliment the kit. Two  new layouts featuring baby Florence. this time I added some non-traditional elements to the layouts, in the form of cake toppers and playing cards.


Patterned Papers:
49 and Market - Vicki Boutin - The Flower Emporium - Starters Paper 3 & Starters Paper 9
Echo Park - Firefly - Bright Floral & Shining Daisies
Simple Stories - Sunny Days - Happy Days & Soak It Up!


The photo below shows both sides of the papers:


Embellishments:
Pretty Little Studio - Love is Kind - Friends Forever Die Cut Titles
Pinkfresh - Chrysanthemum - Chipboard Flair
Rosie's Studio - Keeping Cool - Puffy Stickers & Frames
Cocoa Vanilla - Storyteller - Wood Button
Doodlebug Designs - puffy hearts - Bumblebee
Washi Tape


Bazzill Basics Cardstock - Coconut Swirl, Patch (included in Kit), Petunia, Powder Blue, Tangelo & Yukon Gold (in Extra pack).

Happy Beeday - A few days after Florence's first birthday, she came to stay and we celebrated with a cake. 

The background for this layout is the Powder Blue Bazzill from the kit. Distress Oxide Inks (Faded Jeans, Wild Honey & Mustard Seed), were stencilled using a Vicki Boutin honeycomb stencil from her 'Art for Everyone' set. I sprinkled a little water over this to oxidise the inks. 


I cut a selection of 1.24" hexagons using a Memory Box die set. I used both sides of Bright Floral & Shining Daisies for the hexagons, I inked the edges and arranged them over the layout. 


I cut a piece of Soak It Up! 3.25" x 9", with the orange side up, and mounted my three small photos onto this. My photos were placed to the right side of the page, just over half way down.


For the title I used the cake topper I had for the cake, I also used bees from some cupcake toppers.

From the kit, I used the Rosie's Studio - Keeping Cool - Puffy Stickers and the Cocoa Vanilla - Storyteller - Wood Button


My journalling was added directly to the Bazzill with a fine black marker pen. The date was added using Doodlebug Designs Sunshine Alphabet Stickers - Bumblebee.


Daddy's Girl - Happy Families - Florence went to visit Daddy at work at the Butcher's in Blackheath. 


For this layout I used both sheets of 49 and Market - Vicki Boutin - The Flower Emporium - Starters Paper 3 & Starters Paper 9. I started by using the #3 paper as the base, and I cut apart #9 paper into the seperate sections to be used as photo mats and a journalling spot.


I trimmed my photos to fit within two pieces selected and cut from #9 paper, I rounded the corners using a punch, and inked the edges with Distress Ink. I also chose the postcard piece and treated this as before. I used some bronze alphabet stickers for a sub-title and added journalling to the postcard.


I cut my title using a Sizzix Bigz XL Alphabet die and some fine corrugated cardboard. I inked the edges and fronts of the letters. 


I found a children's 'Happy Families' card game, and selected the butcher family, I arranged these down the right side of the layout, together with some smaller traditional playing cards for the back view. 


Once all arranged, I stuck the pieces in place and added a date to the little banner flag on one of the photo mats, using a Sizzix Alphanumeric Tiny Type upper and lower die set. 


That's all for the June kit, I'll be back with the July kit soon. 
Thanks for looking.
Lynn x

Wednesday, 14 June 2023

June Papermaze Kit - Part 1

The new Papermaze kit for June is now available in the shop, and online. An amazing collection of travel and floral papers in a selection of blues and oranges. Plenty of embellishments and Bazzill cardstock. There are two sheets of card stock in the kit, and a pack of four colour matched sheets in the extra pack. Here are the first two of my four layouts made using this kit, both with a summery vibe.

Before looking at how the layouts were made, here are the details of what you will find in the kit.


Patterned Papers:
49 & Market - Vintage Artistry collection - Everywhere - Ticket Montage
49 & Market - Colour Swatch Inkwell collection - Paper 3
Heidi Swapp - Set Sail collection - Ledger Peach & Circles
Jen Hadfield - Flower Child collection - Keeping Tabs
Prima Marketing - The Plant Department collection - Fleur
Bazzill Basics Cardstock - Pigment & Typhoon

Reverse side of papers


Embellishments: 7 Rosie's Studio puffy stickers, 2 49 & market frames, 10 water droplets, 10 Crate Paper enamel dots, 2 Prima tickets, 3 Prima tags, 4 lines of Pretty Little Studio stickers, 50cm peach twine.

 Extra Bazzill Basics pack - Bazzill White, Quartz, Powder Blue & Pear

Family Reunion - This photo was taken when we met up with family rediscovered through Ancestry. We took the opportunity to share a meal when visiting Harrogate recently.


To make a base for this layout, I stared with a spare sheet of 12" x 12" paper. This meant I could use both sides of the patterned paper. All my cut papers were inked with Saltwater Taffy Distress Ink. I cut two panels 4" x 12" from the wooden plank side of the Heidi Swapp Set Sail - 'Ledger Peach' paper. I placed these either side of the base paper.

I then cut a flowery panel from Jen Hadfield's Flower Child - 'Keeping Tabs' paper, this was 5" x 12". I placed the floral panel in the centre of the page. I cut 2 pieces 1" x 12" from the ledger side of the Set Sail Paper, I used a border punch to create a pattern along the length of the strips and tucked them just under the centre paper.


My photo was mounted onto a piece of Powder Blue Bazzill. I cut two of the ledger pieces from the other side of the Flower Child paper, and all three pieces were arranged to the left side of the layout.


With two more smaller pieces from the Flower Child paper, I wrote my journalling on one and mounted it onto the other. These were placed to the right bottom area of the layout. I made a small tag with more of the same paper and added the date to my journalling with some Doodlebug Designs Alphabet Soup puffy stickers in Mint.


The title was made with more puffy alpha stickers from my stash - Pink Paislee Happy Life Thickers and Pinkfresh The Best Days.

I added a heart phrase embellishment I had left over from a previous Papermaze kit to the top right. A Peartree Flair was positioned near the journalling.


Finally, I added clusters of paper roses in four different colours, together with some leaf fronds cut using a Tim Holtz - Sizzix Thinlits Funky Floral die set. To cut the leaves I used Powder Blue and Pigment Bazzill.

 
Life is Good - Photo taken at the start of our two-week Greek Island sailing trip.


I used the beautiful 'Ticket Montage' paper as the backdrop for this layout. Then I tore a panel from 'Circles' paper 12" x approx. 5 1/2" and placed this, stripe side up, across the centre of the page. I tore two more narrow strips and with the circle side up, I placed these above and below the centre panel.

I cut two wreaths using Tim Holtz Sizzix Thinlits set - Funky Wreaths and Pigment Bazzill. I plaited three lengths of jute twine and tied the finished plait into a circle. The three circles were placed to the left of the page so they would peek out from under the photo.


The photo was placed to the left of the layout on foam to give it dimension and allow it to sit over the jute twine.


I placed four acrylic seagulls from Bramble Fox at the top of the layout. A Peartree acrylic title was placed to the right of the stripe paper to make the title.


The date was made with Doodlebug Designs Alphabet Soup puffy stickers in Lily White. I cut the words 'Set Sail' from the detail strip of the patterned paper and placed it just under my title.


My journalling was written to the bottom right of the layout, and embellished with the enamel (heart) dots from the kit. I also added a Rosie's Studio puffy sticker, to my photo (also from the kit).

That's all for today, I have two more layouts to share soon.
Thanks for looking.
Lynn x

Friday, 2 June 2023

May Papermaze Kit - Part 2


Lynn here today with two more layouts made using the Papermaze Kit for May. A collection of pretty pastel papers, embellishments and cardstock. There is stitching on both layouts, hand stitching and machine stitching. Here are my layouts followed by what's in the kit and how I made them.


 This is what you will find in the kit:

Patterned papers:

Crate Paper - Gingham Garden collection - Alight & In The Shade
Stamperia - Welcome Home collection - Clocks
P13 - Have Fun collection - #03
American Crafts - Maggie Holmes - Woodland Grove collection - Fresh Blossoms
Heidi Swapp - Set Sail collection - Small Ledgers
Bazzill Basics Cardstock - Coconut Swirl & Coastal
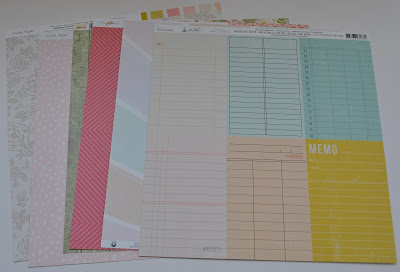
Reverse side of papers


Embellishments:
strip of pearls, P13 chipboard embellishments, 2 diecut pieces, 2 Rosie's Studio  butterfly embellishments, 1/3rd sheet Crate Paper Gingham Garden - Happy Life Phrase Thickers, 9 chipboard pieces, green twine, 2 P13 Decorative Tags,strip puffy heart stickers.


Extra Bazzill Basics Pack - Pinkini, Aloe Vera, Peach Creme & Twill


Tea Cups - This photo of the children enjoying a spin in the teacups on the seafront at Lowestoft.

For this layout I flicked watered down, Distress Paint over some white Bazzill. Then, I tried something new, a Paige Evans Cutfile for Stitching. It cuts tiny stitch holes in the shape of the design, ready to stitch. I then stitched all the circles in chain stitch, using different shades of pink DMC thread, using all 6 strands. I trimmed this piece of card to measure 11 1/4" x 11 1/4". The edges were inked with Distress Ink in Kitsch Flamingo.


I made a frame from the floral side of 'Fresh Blossom' paper, I cut this 1" deep, and mounted the prepared stitched card over the frame.


The photo, together with two Doodlebug Designs Cupcake paper doilies and two mats cut from scraps of the 'Alight' paper, were arranged onto the layout.


I added the date and title using Doodlebug Designs Alphabet Soup stickers in Bubblegum and Cupcake.


Further embellishment was created with the Rosie's Studio butterfly embellishments and the puffy heart stickers from the kit.


Finally, I used Nuvo Glitter Drops - Sherbet Shimmer to add a little pink sparkle to the page.


Look At You Two - A photo from a trip to Los Angeles for a dance competition with my girls.


My base for this layout was the sheet of Coastal Bazzill. I used the paper called 'Have Fun' from P13. I cut through the white spaces between the radiating stripes of colour, Distressed and inked the edges (using Iced Spruce Distress Ink). Then I stitched them in position on the Bazzill with the sewing machine. I sprayed a little Iced Spruce Distress Oxide Spray over the finished background.


From the 'Small Ledgers' Heidi Swapp paper, I selected and cut three of the document style prints, I printed my photo to the same size as these pieces and arranged them in a fan across the layout.


I used several embellishments from the kit to decorate. The strip of pearls, the diecut pieces, Crate Paper Gingham Garden - Happy Life Phrase Thickers, some of the chipboard pieces, and the P13 Decorative Tags. I applied the little label plate with a couple of brads from my stash. I added journalling to one of the decorative tags. With Rosie's Studio Simply Charming Puffy Letter stickers, I placed the date and added to the title.


That's all from the May kit, I'll be back with the June kit soon.
Thanks for looking.
Lynn x