Hi All, Lynn
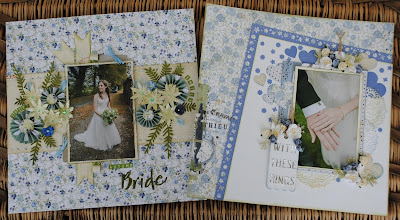
here with a pair of layouts I made using the July Papermaze Kit
which goes on sale today. Both my layouts will be part of my daughter's
wedding album, as the papers were ideal for my photos.
This month's kit is packed with goodies as always - Six double-sided sheets of patterned paper:
Kaisercraft
- Wandering Ivy, Panelling & Blue Posy
Jillybean Soup – 2 Cool for School, Wild Child
Bo Bunny – Once Upon A Lifetime, Namesake
Simple Stories – Travel Notes, Adventure Awaits
Graphic 45 – Sun Kissed Collection, Sand Dollars
Jillybean Soup – 2 Cool for School, Wild Child
Bo Bunny – Once Upon A Lifetime, Namesake
Simple Stories – Travel Notes, Adventure Awaits
Graphic 45 – Sun Kissed Collection, Sand Dollars
Two
sheets of Bazzill Basics - Splash & Hilary
There is an extra Bazzill Basics pack available containing four carefully matched sheets - Typhoon, White, Rain & Boogieboard.
There is an extra Bazzill Basics pack available containing four carefully matched sheets - Typhoon, White, Rain & Boogieboard.
This photo shows the embellishments included in the kit - They are:
Jillibean mini alpha, 12" Freckled Fawn washi tape, 2 Dusty Attic word circles, 1 wooden arrow, 4 paper flowers, 1 strip green jewels, 40cm ribbon, 7 Pretty Little Studio leaf die-cuts, 1 Freckled Fawn arrow clip, 1 exclusive chevron stencil.
My first
layout is called 'Autumn Bride'. I was pleased to see papers from Kaisercraft's
Wandering Ivy in the kit as I had already used this for several of the layouts
in the wedding album.
To create
this page I took the scrap sheet of 12" x 12" paper from my stash to
'build' my layout onto, as I needed to cut the paper up. I took the blue Posy
paper and cut off two strips 10cm deep. These were stuck to the top and bottom
of the base card. I cut a band of Travel Notes paper 13cm deep and trimmed the
long edges with a Martha Stewart Punch Around the Page border punch.
The
Travel Notes paper was used to mount the photo and to make some banner
strips which were laid down before the photo. I found a couple of labels from
clothing which I trimmed and tucked behind the photo, adding some narrow white
ribbon from my stash.
Then
I created two large clusters of flowers on either side of the photo, over the
band of Travel Notes paper. I created two large and two small rosettes from the
left over Blue Posy Paper and the Tim Holtz, Decorative Strip Sizzix Sizzlit
die. The flowers were cut from scraps of Blue Posy, Travel Notes and some white
card, using the Tim Holtz Thinlits Die Set - Funky Florals #3. This die set was also used to
cut the fern leaves, using the Hilary Bazzill from the kit. Other
embellishments from the kit added to these clusters were the green jewels and
the paper flowers. I added more loops of blue ribbon from my own stash
too.
For a
title 'Bride' I used some Sizzix Sizzlits alphabet dies (Boxed Brush) and the
Hilary Bazzill, this was given a shine with Glossy Accents. For the words
'Autumn', 'Emily' and '2017' I used the Jillybean Mini Alpha Stickers which are
included in the kit.
My second
layout for today is called 'With These Rings' and uses the professional photo
of Emily and Jack's Wedding Rings.
This time
I inked all my edges with Distress Inks - Peeled Paint and Stormy Sky.
I used another sheet of scrap 12" x 12" paper to make an unseen base for this layout, meaning I could cut up the papers and keep some for other pages and my die cutting etc.
I used another sheet of scrap 12" x 12" paper to make an unseen base for this layout, meaning I could cut up the papers and keep some for other pages and my die cutting etc.
The first
stage was to cut an interesting part from the Namesake paper. I liked the
detail on the left side and wanted to include this. I used another sheet of
card to mark the position to cut (see photo below).
Then I
stuck this to my base card (see photo below).
The next
step is to trim two adjacent sides of the sheet of Boogieboard Bazzill, with
another Martha Stewart Punch Around The Page punch set (see photo below).
Next
place the white Bazzill close to the trimmed edge and stick into place, onces
stick you can trim off the excess, so you end up with a 12" x 12"
base for you layout (see photo below).
I cut a white
card mount for my photo. Then using the reverse side of the Namesake paper
scrap (spotty side), I cut a wider mat including the printed blue lace, which I
positioned on the left of my photo (this was cut at 13.5cm x 16.5cm).
To
embellish I cut some doilies, hearts and tags using some Crafter's Companion dies. I used scraps of
Boogieboard and white Bazzill asn well as the leftovers of Namesake and Travel
Notes papers. Once they were all in position I added a sprinkling of tiny
flowers from the border punch waste.
Jute
twine was added to the tags. Then a selection of small paper flowers from my
stash were clustered around the tags and in the bottom right of the photo. I
added a few fronds punched from scraps of patterned papers with a Martha
Stewart punch.
Finally I
cut a title using silver card and some more Crafter's Companion dies.
Back with
more from this kit early in August.
Thanks for looking.
Lynn x
Thanks for looking.
Lynn x


2 comments:
Such pretty layouts and I love how you stretched the patterned papers with some clever cutting.
Beautiful work as always Lynn, these are such delicate and pretty page. You absolutely rock these monthly kits....such inspirational pages xx
Post a Comment