Showing posts with label Martha Stewart. Show all posts

Friday, 17 May 2024

May Papermaze Kit - Part 1

Lynn here today, with the pretty spring Papermaze kit for the month of May. The kit is available from the store and online from today.

Here are my first two layouts.
I have worked with some recent photos, a hen party and a spring garden outing.


Here is what you will find in the sunny kit:


Patterned Papers:
Simple Stories - Simple Vintage Spring Garden collection - Scatter Sunshine
Simple Stories - Simple Vintage Essentials Colour Palate - Yellow & Green Tags
P13 - Naturalist collection - #04
Mintay Papers - Spring is Here collection - #05
American Crafts - Cedar House collection - Headliners
Carta Belle - Here Comes Easter collection - Pretty Plaid


Embellishments:
Doily, Prima flower, Divine Twine, 3 postage washi stamps, 6 Simple Stories Floral Bits & Pieces, Vicki Boutin Layered paper clip, 1 strip Prima Say it in Crystals, selection of Pinkfresh Studio Chipboard Frame Stickers and 2 Pretty Little Studios Die cut labels


Bazzill Basics Cardstock:
Yukon Gold & CS White (in kit). Lily Pond, Blossom, Rosewood & Coffee Roast (extra Bazzill pack).


Hen Party - Photos from a recent hen party my daughter attended, at a spa in Norfolk.


I love both sides of the delightful 'Scatter Sunshine' paper from the Simple Stories, Simple Vintage Spring Garden collection; so, I decided to divide it in half diagonally and use both sides. With the floral edge, along the base, I glued both pieces to a scrap piece of 12" x 12" paper.


With three photos arranged along the join between both papers, I continued to cover the join with the Floral Bits & Pieces ephemera from the kit (and a few from my own stash).  I curved the pieces with the scissor blade and attached them with 3D foam pads.


I added my main title using Doodlebug Designs Sunshine Cardstock Alphabet Stickers in Bumblebee. Then with Doodlebug Designs Teensy Type Alphabet Stickers also in Bumblebee, I added the date and a mini title.  These last two details were placed onto the Pretty Little Studio die cut labels from the kit. To make the letters pop from the background, I drew a fine black line around each letter.


My journalling was typed onto white card, then cut into fine strips, inked with fossilized Amber Distress Ink and glued to the page.


Spring Blossom - These photos were taken on a recent trip to Bressingham Gardens in Norfolk.


I used the Cedar House Headliners paper as the base for this layout. Then with the Spring is Here #05 paper, I cur around the clouds, creating two pieces 12" wide, and added these to the top of the page to create sky! I overlapped the two layers with some foam in-between to raise the top layer over the lower one.


I trimmed my photos into 3.5" squares and mounted them onto some white card. Then arranged all three in a row onto a strip of the Coffee Roast Bazzill. This was placed to the right side of the photo. I placed more foam under the bottom half of the cardstock, to match the higher level of the cloud paper.


With more of the Coffee Roast cardstock, I cut two branches using the Sizzix Tim Holtz, Thinlits set - Mini Tattered Florals set. Then I made blossom using a Martha Stewart punch and scraps of the Romance Bazzill. I arranged all the die-cuts onto the page to look like falling blossom. A small dot of Nuvo Crystals Drops (Metallic Caramel Cream), to the centre of each bloom.


For my title I used two different sets of glitter Thickers - Lindsay and 'Be Kind'.


That's all for today, there will be more from this kit in a few weeks.
Thanks for looking.
Lynn x

Monday, 3 May 2021

April Papermaze Kit - Part 2

I'm here today with the next post showing you what I have created with the April Papermaze Kit. This kit is full of spring & Easter, pretty pastel papers, card and embellishments. This time I have created a double page layout, inspired by a Page Maps Sketch.

As always, let's find out what is included in the kit:

Patterned papers:
Simple Stories - Bunnies + Blooms collection - Tags
Echo Park - Welcome Spring collection - Bumblebee Breeze
Echo Park - Welcome Easter - Pastel Petals
Echo Park - Welcome Baby Girl collection - Dreamer Floral
Kaisercraft - Flower Shoppe collection - Conservatory
American Crafts - Paige Evans - Go The Scenic Route - #12
Bazzill Basics - Avalanche & African Daisy

Embellishments:
Large doily, 4 buttons, 12" washi tape, 5 paper flowers, 1 resin rose, diecut polaroid frame, 3lines gold puffy phrase stickers, 3 large pearls, clear stamp, exclusive acrylic phrase.

Extra Bazzil Pack - Quartz, Wisteria, Hillary & Jetstream


Easter Bonnets - As a base for these pages I used two sheets 12"x12" scrap paper, this enabled me to cut up and make the most of the patterned papers and cardstock from the kit.

To prepare the pages, I cut the following:
Jetstream Bazzill - 20.5cm x 30.5cm & 10cm x 30.5cm
Bumblebee Breeze - 10cm x 30.5cm (Bee side), 8cm x 15cm & 23cm x 15cm (yellow side)
Pastel Petals - 20cm x 30.5cm (floral side) & 6.5cm x 21cm (green trellis side)
Go The Scenic Route #12 - 7.5cm x 22.5cm
I inked the edges with Shaded Lilac Distress Ink.

These pieces of paper were then arranged onto the base paper (for placement see the sketch), when sticking into place I allowed some edges to be free of glue so I could tuck the tags in place later.

April 2021 Page Maps Sketch

I mounted all the photos onto African Daisy Bazzill, then made a second mount for the portrait photo using Quartz Bazzill. The photos were arranged across the yellow check patterned paper on the layout. I raised the portrait photo on foam pads, and the other three were glued to the page. 

With scraps of Avalanche Bazzill I trimmed two strips with the Mini Daisy Fan Martha Stewart Border Punch.

From the remainder of the 'Tags' paper I cut 12 tags, inked the edges, punched holes and added large white eyelets from my stash. I arranged them around the page tucking them under some of the other papers, leaving enough white space for my journalling.

I had some pretty pale blue silky twine in my stash and threaded this through the eyelets in the tags. Arranging in loopy fashion and gluing in place onto the page.

I used the washi tape in the kit to trim various areas on the pages.


To embellish I made some flowers from the Bazzill scraps, using the Tim Holtz - Sizzix Thinlits set - Funky Floral Large.


My title was created with some Thickers Alpha Stickers.

For more detail here is a closer look at each page:


That's all for the April kit, Back with the May Kit soon.
Thanks for looking
Lynn x

Monday, 15 February 2021

February Papermaze Kit

Hello!  Lynn here today with the new Papermaze kit for February. Another kit full of inspiration with it's patterned papers, Bazzill cardstock and a selection of embellishments. A wide mix of colours in this months selection. There is, as always, a pack of four colour matched sheets of Bazzill available.


Before looking at how the layouts were made, this is what you will find in Februarys kit:


Patterned papers:
American Crafts - Vicki Boutin - Storyteller collection - Bohemian, Fresh Cut & Narrative
Simple Stories - Apron Strings collection - Live Love Eat & What's For Dinner
Echo Park Coffee and Friends collection - Letterboard
Bazzill - Vanilla & Blackberry Swirl

Reverse side of papers:


Embelliehments:

Exclusive 'Beautiful' cut file, 12" lace, 2 chipboard buttons, 4 pearl brads, prima flower, Webster's Pages tiny alpha sticker sheet, strip of gems, 8 dew drops.

Extra Bazzill pack - Sunflower, Lava, Capers & Blue Oasis


Twirling Carousel - For this page I used photos of my sister and me on the fairground carousel horses, back in the 1960's.


I started with the 'Live, Love, Eat' paper and made a border 4cm deep. Over this I mounted a piece of Sunflower Bazzill cut to 25 x 25cm and inked with Candied Apple Distress Ink (all other papers were edged with the same ink). I splattered some black ink over this card.

I cut two panels with 'What's for Dinner' paper, one 21 x 12cm floral side up and the other 7 x 22.5 cm dotty side up. Both were mounted onto Lava Bazzill, making very fine red borders. These were placed on the page one over the other as seen in the photo.

From the Blue Oasis Bazzill I cut a trim with a Martha Stewart Daisy Border Punch. this was attached under the dotty panel.


Also from the Blue Oasis Bazzill I punched a scalloped circle for the journalling spot, and the word 'Carousel' created and cut on the Cricut. I stamped the lines for my journalling and cut them to fit within the scalloped circle. 

Once all was cut, inked and placed into position, I added the word 'twirling' to the title with Doodlebug Designs alphabet stickers. I decorated the trim with some multifacited self-adhesive dots from my stash.

I scattered some flower shaped sequins over the page and added a dot of Nuvo Crystal Drops to the centre of each one. I used more Nuvo drops around my journalling circle.


Crafty Girl - My niece, Jess saved her Christmas and birthday money to buy this sewing machine last month.

Using the Capers Bazzill as a base, I cut a piece from under where the patterned paper will go later, this is to use for the title and photo mount.

I painted the two chipboard buttons from the kit with acrylic paint to match the Bazzill, I then coated them with Glossy Accents and tied some cream ribbon through the holes and finished them off with a small bow.


I cut the 'Fresh Cut' paper to represent a garment being buttoned together. I then machine stitched and distressed all around these pieces. I mixed some gold paint into texture paste and worked it through the Vicki Boutin Wild Soul stencil to add some texture to the background paper.


To build the page, I used some wide lace from my stash, tucked under where the two patterened paper pieces join. Then I added the buttons and some tape measure ribbon were all added to the page. I attached a couple of decorative pins through the lower button.


I cut a title using the Cricut from the Capers Bazzill to add to the top of the layout. 

I finished off with some typed journalling wrapped with thin twine and a charm.

This completes part one of the February kit, back with part two soon.
Thanks for looking
Lynn x

Monday, 5 October 2020

September Papermaze Kit - Part 2

Lynn here today, back with the second pair of layouts using the Papermaze September Kit. The travel destination themed papers inspired me to stick with my continental theme from before, and create two more Parisian layouts featuring the artwork of the Metro station kiosks.


Before looking at how the layouts were made, here is a reminder of what you will find in the kit. For full details, please see earlier Blog post PART 1.


Metropolitan - This layout shows a photo of the entrance to the Art Nouveau style metro entrance designed by Hector Gumard. I wanted to pick out the colour and style of the cast iron kiosk to the Rome Station and so I used embossing enamel, and a font and to create the title.


To make this page I started by gutting the sheet of Ciao Bella - The Sound of Summer collection - Coastal Wood. Then I trimmed the Natural Bazzill down to 28cm x 28cm and inked the edges with Gathered twigs Distress Ink (I treated all the cut edges of the layout with the same ink), this was placed over the wood frame.

From the sheet of
Simple Stories - Simple Vintage Coastal collection - Paradise Found I fussy cut the palm tree and flowers and set them aside. Then from the rest of the sheet I punched two rows of Daisy fans using the Martha Stewart deep border punch. Then I cut three rows of fans from the Quartz Bazzill and two rows from the Mocha Divine Bazzill. These were trimmed to different lengths and arranged on the page. I divided the washi tape into three pieces and added two of them to the page between rows of punched Bazzill (saving the last piece of washi tape for the next page). 

I typed my journalling and printed it out, then mounted it and the photo onto the pink map side of the Paradise Found paper. I arrange these onto the page together with the palm tree and flowers. and glued them in place, the photo and journalling were glued flat and the tree and flowers were mounted with 3D foam tape.

Next the title - I chose an Art Nouveau style font and adjusted the size of the letters so they were larger at the beginning and end and faded to smaller in the centre. I used some of the Mocha Divine Bazzill to cut the title, then embossed the letters with Stampendous Frantage Aged Teal Embossing Enamel. I arranged the letters across the top of the layout.

I embellished the page with some large flat-backed pearls and some pink gems. I also used the two thought tokens, tied with some of the twine from the kit and placed at them base of the tree.

Palais Royal - Kiosque des Noctambules - For this page, I chose a photo of the Palace Colette entrance to the Palaise Royal Station where we alighted for the
MuÅ›ee de Louvre.  This amazing structure designed by Jean-Michel Othaniel is made of blown glass beads threaded onto an aluminum structure. It is called 'The Kiosk of the Night Walkers' and has two cupolas - one representing day, the other night.


First I gutted the Blue Bazzill to make a frame 2.5cm deep. Over this I mounted the
Bo Bunny - Boulevard collection - De Versailles paper trimmed to 29cm x 29cm, print side up. I distressed the edges and inked them with Gathered Twigs Distress Ink. (the same ink was used to ink all the paper and card edges for this layout.) A piece 22cm x 17cm was gutted from the De Versailles paper and saved for later (for cutting position, see photo and gut under trimmed Blue Bazzill).

I cut remaining Blue Bazzill to measure 26cm x 21cm and trimmed the two long edges with a border punch (I used a Martha Stewart punch). This was placed over the gap on the paper. I flipped the piece of De Versailles paper harlequin side up and attached this over the trimmed Blue Bazzill.

I used some scraps of Stonehenge Bazzill and cut a 15.5cm scalloped circle and two scalloped strips 28cm x 3cm. I punched holes along the strips and laced them together with some cream seam binding ribbon. This was attached down the right side of the page with 3D foam tape. The scalloped circle was decorated with a 13.5 cm circle of
Ciao Bella - The Sound of Summer collection - Coastal Wood paper, music side up. The whole scalloped circle was mounted over the scalloped strips 9cm down from the top of the page.  

I mounted the photo onto a scrap of the Coastal Wood paper and this was placed onto the left of the layout, again I used 3D foam tape.

To represent the day cupola I used red and yellow gems in a line above and below the photo on the harlequin points of the De Versailles paper. I used blue and aqua gems on the scallops to represent the night cupola.  

For the title I used Pinkfresh Puffy Studio Puffy Alpha Stickers - Joyful Day. The subtitle was created with Pinkfresh Studio Mini Puffy Alpha Stickers - Everyday Musings and Just a Little Lovely. 
 
I typed the journalling and mounted it onto Blue Bazzill, then I attached it to the circle. 
I used the blue flower from the kit, with a few fronds punched from scraps of patterned paper using a Martha Stewart punch. 

Finally I used the last piece of washi tape and ran this along the bottom of the layout. 

That's all for the September kit, I will be back with October's kit soon.
Thanks for looking.
Lynn x


Wednesday, 20 May 2020

May Papermaze Kit

Hi, Lynn here today with the first post using the pretty spring colours of the May Kit. The kit includes papers and embellishments in a selection of geometric patterns, hearts, rainbows and shells.

Here are my first two layouts:

 Here is what you will find in the kit:


Patterned Papers:
Pink Paislee - Paige Evans - Bloom Street collection - #06 & #10
American Crafts - Heidi Swapp - Art Walk collection - Artsy
American Crafts - Dear Lizzy - She's Magic collection - Feeling Fine
Pink Fresh - My Favourite Story collection - Joyful Heart
Prima Marketing Inc. - Surfboard Collection - All The Shells
Bazzill Cardstock - Avalanche and Ocean Breeze


This shows the flip side of the papers:


Embellishments: 30cm washi tape, heart doily, 5 wooden heart buttons, charm, 50cm ribbon, 10 Prima flowers, spiral paper rose, Paige Evans Puffy Phrase Thickers, 1 strip Dear Lizzy Enamel Stickers, 1 strip pearls, Pinkfresh Studio Flair Stickers.


Optional extra Bazzill Pack: Limeade, Heather, Desert Sun and Blossom.


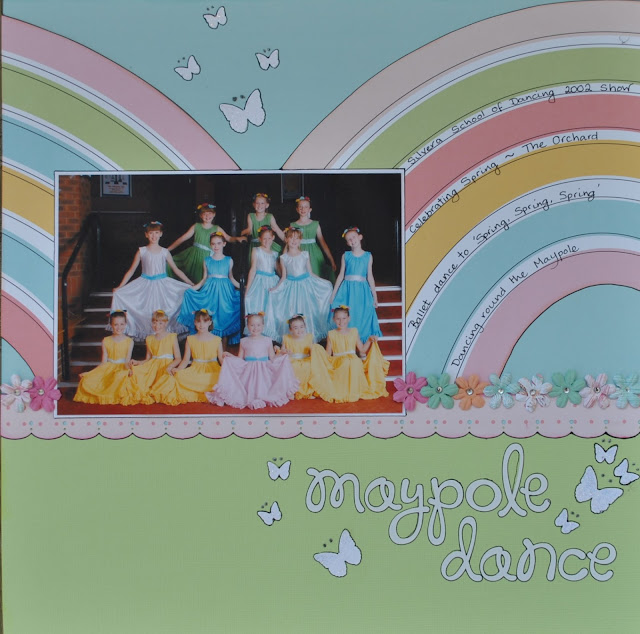
Maypole Dance - I have been sorting out some photos from the children's dance shows and thought it this one was perfect for the rainbow paper. Having the two arcs reflecting the ribbons on a maypole. 


I took two sheets of Bazzill to start with, cutting the Ocean Breeze to 8" x 12" and the Limeade to 4" x 12". With a scrap piece of 12" x 12" paper, I placed the blue at the top and the green as the base. 


From the Joyful Heart paper, I trimmed off the manufacturers strip plus 1" of the paper from the bottom. This strip was then shaped along one side with a Martha Stewart border punch. With the pink dotty side up, I glued this across the green card at the join. I then cut the rainbows from the sheet and arranged them onto the blue card, overlapping them in the centre.


I mounted my photo onto some of the white area of the Joyful Heart paper. I then attached this to the page towards the left side.

With some old Doodlebug Design cardstock letter stickers I created my title. Then I added some butterflies made with the Martha Stewart 3 in 1 butterfly punch and more of the white paper. 

To reflect the fine black lines on the rainbows, I took a fine marker pen and drew lines around the edges of the rainbows, the letters and butterflies. I also did my journalling on the white areas of the rainbow.


The Prima flowers from the kit were added to the join across the layout. The butterflies were embellished with Stickles and Liquid Pearls

Happy Birthday - These photos are from Scarlett's 2nd birthday she was fascinated with this wooden birthday cake and it keeps her entertained for hours! 


This layout was based on a sketch from Pagemaps.
 

For this layout I used the
Bloom Street #10 paper, wanting to use both sides I gutted the paper to give me a 2.5cm frame. I then trimmed the Avalanche Bazzill to 26.5cm x 26.5cm and mounted this over the frame. From the remainder of the #10 paper I flipped it over and cut a piece 13cm x 20cm and arranged it in the centre of the page. 

I cut one of my photos into a 10cm diameter circle. Then both photos were placed into position.

With some Gesso I prepared a selection of Tando Creative Balloons and a chipboard bird branch from my stash. I painted these chipboard pieces with some Distress Paints. These were glued into position on the page and strings were added to the balloons with a fine marker pen. 

I cut my title with a Sizzix Bigz Die - Handmade, from leftover pieces from the first layout and #10 paper. Once all this was glued in place I used Stickles on the letters and Glossy Accents on the chipboard pieces. 

Finally I scattered the
Dear Lizzy Enamel Stickers over the layout. 

I'll be back with more from this kit soon.
Thanks for looking.
Lynn x