Showing posts with label Kaisercraft. Show all posts

Friday, 1 October 2021

September Papermaze Kit - Part 2

Hello, Lynn here today, back with my second DT post and the versatile September Papermaze Kit - with a mix of papers and embellishments in soft neutral colours. Ideal for many different themes.

I have used chipboard in all four of my layouts, from three different companies, all available from Papermaze. Today I'm sharing some layouts with recent photos, whereas last time I made two heritage layouts.


Before we start making the pages - here is a reminder of what you will find in the kit. For full details, please see my previous post.
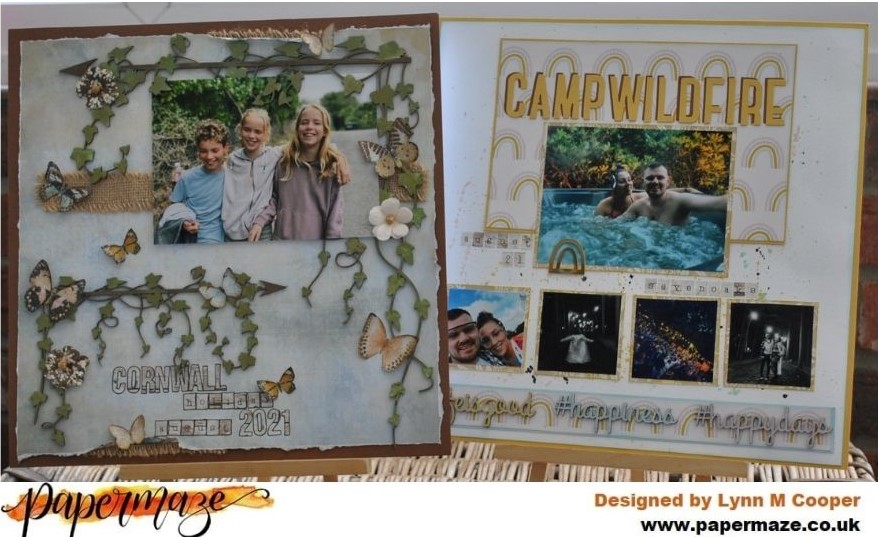

Cornwall 2021 - Our niece's triplets returned to Cornwall for a holiday this summer after covid19 put a stop to their family reunions last year.


I made a frame for the page by gutting the Truffle Bazzill. The main piece is the sheet of 
'Roam' paper from Kaisercraft. I trimmed this by tearing the edges and set it into the centre of the frame.

With the Dusty Attic - Ivy Corners - I painted the pieces with a coat of Gesso, then painted them with Bundled Sage and Walnut Stain Distress Paints.


With a strip of burlap across the page I mounted my photo before adding the painted, chipboard pieces. I also used a little burlap where I had curled back some of the the paper edges. 


My title was created using the
Simple Stories Colour Vibe Alphabet Sticker sheet from the kit. With a fine marker pen I highlighted the edges of each letter.

I embellished the layout with fussy cut butterflies from the 'In Flight' paper. These were shaped and made to sparkle with some Nuvo Glitter Drops - Gold Coast. I also used the three Prima flowers from the kit.


Camp Wildfire - Catherine and George took an adventurous, bank holiday weekend break to Camp Wildfire in Sevenoaks this year.

I made a narrow border for this layout by gurring the Yukon Gold Bazzill. I trimmed the White Bazzill to 29.5cm x 29.5cm and inked the edges with Tumbled Glass Distress Oxide Ink.


I splattered Distress Oxide inks over the page using Tumbled Glass, Fossilized Amber, Worn Lipstick and a little Black Soot.


From the Rainbow side of 'Over The Rainbow' paper, I cut a piece 21cm x 13.5cm and mounted it over some Yukon Gold Bazzill. This was placed centrally near the top of the layout. I cut another piece from this paper 28cm x 2.5cm, this was mounted onto Powder Blue Bazzill and was attached to the bottom of the page.


I trimmed and mounted my photos onto some of the gold side of 'Over The Rainbow' paper. They were arranged as shown in the photo of the layout. I tucked the gold rainbow clip onto my large photo.


The main title was cut from Yukon Gold and Truffle Bazzill using the Society - Tim Holtz - Sizzix Bigz XL die.


I added the date and place using more of the
Simple Stories Colour Vibe Alphabet Sticker sheet from the kit.

Finally I used more Dusty Attic Chipboard pieces. This time I chose three pieces from the  Hashtag Sayings #1 pack. I coated these with Gesso, then coloured them with more Distress Oxide inks. I applied these along the paper strip at the base of the page.


That's all from the September kit, although I still have enough to make at least one more layout.
Thanks for looking, back with the October kit later this month.
Lynn x

Wednesday, 14 April 2021

April Papermaze Kit - Part 1

Lynn here today with the first of two posts showing you what I have created with the April Papermaze Kit. This kit is full of spring & Easter, pretty pastel papers, card and embellishments, including an exclusive acrylic treat!

Here are my layouts:

As always, let's find out what is included in the kit:

Patterned papers:
Simple Stories - Bunnies + Blooms collection - Tags
Echo Park - Welcome Spring collection - Bumblebee Breeze
Echo Park - Welcome Easter - Pastel Petals
Echo Park - Welcome Baby Girl collection - Dreamer Floral
Kaisercraft - Flower Shoppe collection - Conservatory
American Crafts - Paige Evans - Go The Scenic Route - #12
Bazzill Basics - Avalanche & African Daisy

Embellishments:
Large doily, 4 buttons, 12" washi tape, 5 paper flowers, 1 resin rose, diecut polaroid frame, 3lines gold puffy phrase stickers, 3 large pearls, clear stamp, exclusive acrylic phrase.

Extra Bazzil Pack - Quartz, Wisteria, Hillary & Jetstream


Bloom Where You Are Planted - For this layout I used a professional photo of the children taken at a Twins Club event Easter 1998.


The base for this layout is the Echo Park Baby Girl 'Dreamer Floral' paper. I cut an egg shape from the Quartz Bazzill - this is roughly 23cm tall x 16cm wide. I worked around the edge with an eyelet tool making holes about 0.5cm in from the edge and 1cm apart. With some DMC Petra cotton and a 2.5cm hook - I croched around the outer edge of the egg. I only made the stitches where they would show, there are no stitches under the photo.

The large photo was mounted onto some foam and applied over the egg. I chose two tags from the Simple Stories Bunnies & Bloom 'Tags' paper. I inked the edges with Forest Moss Distress Ink. I punched a hole in the top of each tag and applied a large coloured brad through each hole. These were arranged at the top left of the layout, tucked under the egg and photo. A ribbon bow was attached to the top tag.

Using two sets of Tim Holtz Sizzix Thinlits dies (Funky Nature and Feathered Friends), I cut three eggs, two birds and a selection of leaf fronds. I used Bazzill Hillary, Quartz and African Daisy. I inked the pieces with Forest Moss, Worn Lipstick and Mustard Seed Distress Inks

The birds were attached with foam tape to add dimension. The leaves were tucked behind the large bird in the bottom right corner. The eggs with some left over fronds from the leaves were added to make a nest bottom left. The small bird was placed top left of the photo. 


With alpha letter stickers from my stash I added the word 'Easter' and the year to the tags.

Finally I applied the exclusive acrylic phrase from the kit to the top of the egg, and the resin rose to the tags.


Hello Fabulous - A photo of my daughter, delighted with a new sun hat!


For this layout I distressed the edges of the card and paper and inked them with Shaded Lilac Distress Ink. The border of this layout is the Paige Evans - Go the Scenic Route #12 paper, I gutted this to give me a pink floral border 4cm deep. Over this I placed Wisteria Bazzill trimmed to 24.5cm x 24.5cm, and gutted to make a frame 2.5cm deep. Then I topped this off with the Avalanche Bazzill trimmed to 23.5cm x 23.5cm.

Before attaching the Avalance Bazzill I used a floral stencil from my stash and worked some Shaded Lilac Distress Oxide through with a brush. I splattered this with some drops of water to create some oxidation. I also flicked over some Shimmerz Inklingz (Corny Flower Blue) and Shimmerz Spritz (Cotton Candy).

I mounted the photo onto Wisteria Bazzill. I then cut four pieces from the Kaisercraft - Flower Shoppe - Conservatory paper; these were the same size as the photo. I arranged them under where the photo will lay fanned out across the page, with two pieces window side up and two pieces floral side up. The doily from this kit was placed over these and then the matted photo on top.

I cut another tag from the 'Tags' paper, added a brad to the top and strung two lengths of twine through the hole, tying them in a bow. This was tucked under the photo on the right of the layout. My journalling was added to the tag.

I placed a flair badge bottom right to the photo, and flowers from the kit over the page. I added a title using the gold puffy word stickers. Finally I scattered some sequins and sparkly bits over the multi-media on the page. 


That's all for today, back with more soon.

Thanks for looking.
Lynn x

Friday, 2 April 2021

Papermaze March Kit - Part 2

Lynn here today with the second post using the very pretty March kit from Papermaze. Both these layouts feature photos from my daughter's wedding.

Before we look at the process of making the pages, here is a reminder of what you will find in the kit - please see this post for more details.


Celebrate Together
- The photo for this layout shows 18 month old Scarlett, with her Mum and Dad at the wedding.

I started by building up the background with patterned papers from the kit. I used the stripe side of 'Rainbow' paper left over from a previous layout. This is roughly 8cm wide and cut with a wavy curve along one edge. With 'It's A Girl Floral' I followed the shape of the wave and cut a narrow strip about 3cm wide and used this floral side up, I tucked this up closely to the stripe paper. Then I flipped the 'It's A Girl Floral' paper over and used the pink ombre side to cover the rest of the page.

I flicked some Cosmic Shimmer Mist in Rich Gold and some white Distress Paint over the ombre paper. 

I set the sewing machine to blanket stitch, and with dark green thread, worked around the outside and along the wavy edges of the papers.

I gutted the Rain Forest Bazzill, to made a 2.5cm frame and set this aside for later. Then my photo was mounted onto white card and then Rain Forest. I raised this with foam and arranged it onto the page. 

I created two floral clusters with flowers fussy cut from the scraps of the floral paper. I added Rain Forest Bazzill fronds, cut using Sizzix Tim Holtz, Funky Floral Thinlits die sets. To this I added the two prima flowers from the kit together with a few tiny flowers from my own stash. The curio from the kit was placed on the lower cluster. 


The title is made from a Paige Evans Ephemera word and a die cut word using Blossom Bazzill and Simple Stories Say Cheese 4 Happy Words metal die set.

Finally I added a sprinkling of sequins. 

Welcome - This layout features the three pallets I decorated for my daughter's wedding, Welcoming and giving the day's information to our guests.


I used the 2.5 deep gutted rainforest Bazzill from earlier, as a border for this layout. I trimmed the 'All is Calm' paper to 29cm x 29cm and from the centre I cut a 20cm circle. The pink side was placed over the border and the circle was flipped over and popped back into position to show the floral side.

My photos were trimmed with white and then Rain Forest Bazzill, and arranged onto the page.


I trimmed the diameter of the circle with glittery white zic-rac. Then the title was arranged in place with glittery white foam alpha stickers.


Thats all for today, back soon.
Thanks for looking.
Lynn x

Thursday, 21 January 2021

Papermaze January Kit - Part 1

Lynn here today - A big welcome to 2021 and a new Papermaze Kit for January. This month's kit is full of wintery papers and embelishments, however they could be used for other themes too.

In the kit you will find:

Patterned Papers
American Crafts - Vicki Boutin Stroyteller collection - Stardust
Kaisercraft - Whimsy Wishes collection - Snowfall
Stamperia - Winter Tales - Poinsettia
Bo Bunny - Family Heirlooms collection - Traditions
Echo Park - Winter Magic collection - 4 x 4 Journalling Cards
Studio Light - Jenine's Mindfull Art Collection -
Bazzill Cardstock - White and Bazzill Bling - Blind Date

Reverse side of papers:

Embellishments - Simple Stories Sn@p alpha stickers, 3 wooden butterflies, pinch of sequins, 12" jute twine, Tango tag, 3 paper roses, 3 Tim Holtz stamen, Crate paper silver heart, pearl swirl, 12" lace and 3 lines of puffy word stickers. 

Extra Bazzill Pack - Vanilla, Date Swirl, Ivy and Admiral


Winter Solstice - This photo may appear black and white but is infact in full colour. Lack of light during the winter day time in the north of Iceland, the black volcanic beaches and the snow covered black mountains, create a dramatic effect. 

For this layout I used the Date Swirl Bazzill as the base. I cut three banners from the B side of Echo Park's 4" x 4" Journalling Cards paper. These were cut to measure 3" x 10" each, inked with Chipped Sapphire Distress Ink and they were arranged across the Bazzill.

My photo was mounted onto some of the Admiral Bazzill and attached to the left side of the page. I added a bobble trim across the layout under the photo.

The title is a cut file (PearTree Cutfiles), I cut it twice - in white and Admiral Bazzill. I filled the white outlines with the solid blue letters. This was attached to the base of the photo, raised on 3D foam squares.The blue part of the letters had a layer of Glossy Accents to make it shine. The snowflakes had Nuvo Crystal Drops - Silver Moondust to add sparkle.

For the journalling I used my own handwriting, but emphasised a few words with letters cut from white and silver glitter foam, Admiral and White Bazzill. The Sizzix Thinlits I used are Tim Holtz Alphanumeric Label die set.

Finally I added some sequins from the kit and snowflake stickers from my stash. 

Frozen - This photo was taken in 2015 on a trip to Euro Disney. 


I wanted to use both sides of the Snowfall paper, so I made a frame using the foiled script side by gutting the sheet to make a 1" frame. I then flipped the gutted centre (grey with snowflakes) over and distressed the edges of both pieces. Once prepared I glued them to a spare sheet of 12" x 12" scrap paper. 

I used a Carta Bella stencil - Let It Snow and a mix of texture paste mixed and ultra fine white glitter to create snow on the background. This was set aside to dry.

I backed the large photo with some silver paper from my stash.

I cut a variety of snowflakes using the Cricut from White Bazzill and some scraps of vellum in white and aqua. Some of these were inked with Tumbled Glass Distress Ink. The title was cut in four layers using Bazzill cardstock and the Cricut.

With some white ribbon and a selection of fibres tied across the layout, I set about applying the photo, title and the snowflakes to the page.

There is a subtle sparkle added by dusting the lettering and snowflakes with some Cosmic Shimmer Shimmer Shaker powders.

The layout was embellished with a variety of gems from my stash and some Nuvo Crystal Drops.

That's all for part one, back with more soon.
Thanks for looking
Lynn x