Showing posts with label distress oxide spray. Show all posts

Wednesday, 27 December 2023

December Papermaze Kit - Part 2

Lynn back today with my second two design team layouts made using the festive December Papermaze Kit. This year's Christmas kit includes a mix of traditional and contemporary and designs.

Before looking at how the layouts were made, here is what you will find in the kit.


Patterned Papers:
Vicki Boutin - Peppermint Kisses collection - Winter Magic & Christmas Jammies
Echo Park - Happy Holidays collection - Festive Lights & Under The Tree
Echo Park - Have A Jolly Christmas collection - Holly Jolly Holly
Paige Evans - Sugarplum Wishes collection - #2

Image below shows both sides of the six sheets of patterned paper.


Bazzill Basics: Peacock & Coconut Swirl (included). Aqua, Bottle Green, Bazzill Red & Blossom (Extra co-ordinated Bazzill pack)


Embellishments: 2 red doilies, selection of Puffy Rosie's Studio Phrases, 3 Rosie's Studio vellum star diecuts, 1 Woodware Postmark stamp, Pinkfresh chipboard frames, 5 Pinkfresh title ephemera pieces, 3 glittery snowflakes, pinch of Pinkfresh jewels, 2 Prima flowers.

Joy - My great niece visiting the garden centre last Christmas.


I wanted this lovely tartan as a border for this layout, so I gutted the 'Sugarplum Wishes #2' paper to make a frame 1" deep.

The Coconut Swirl Bazzill was trimmed to 10.5" x 10.5", I used a 49 & Market - Gabi's Line Stitch stamp and Rustic Wilderness Distress Ink to stamp faux stitching in a square roughly 8" x 8".


I used Distress Oxide Spray Ink in Lumberjack Plaid and Peeled Paint to lightly spray over the Bazzill - This was concentrated where the photo and the small cluster of embellishments would go later.


I arranged my photo, together with the velum stars from the kit and my own embellishments made by die cutting. I used Sizzix Thinlits sets from Tim Holtz - Big Tidings (for the title, holly and stars) and Santa Greetings (for the smaller letters and numbers). I cut these from green glitter card, gold metallic card and scraps of cardstock from other layouts. 


Using the stamp from the kit I stamped the postmark greeting several times onto scraps of the white cardstock, cut them out and tucked them under the left side of the photo.


Finally, I scattered some star shaped gems and a few old stickers from my stash, around the other embellishments.


Sprout Racing - One Christmas I found some crackers containing little wind-up sprouts in party hats, for racing and we had fun with them after dinner, racing them along the table!

This time I selected the Red Bazzill and made a frame 0.5" deep, over this I placed the Aqua Bazzill, trimmed to 11.5" x 11.5". 


I used an envelope die from a Sizzix Tim Holtz Thinlits set - Postale, and cut nine envelopes. I cut these from several different papers from the kit:
both sides of 
Christmas Jammies
both sides of Festive Lights
both sides of Under The Tree
both sides of Sugarplum Wishes #2
and the red side
of Holly Jolly Holly.


These were arranged in three rows of three over the layout. Then I cut seven tags from scraps of white card, using the Tim Holtz, Sizzix Framelits Tag Collection. I printed my photos nine to an A4 photo paper sheet, and trimmed them to fit the tags. Seven of these were portrait format so they were stuck straight to the tags.


 The two landscape photos were mounted onto white card with a space for journalling under each photo. I added the reinforcement rings cut from scraps, using the Tag Collection die set. Each tag had Baker's Twine threaded through the top and tied into a bow. 


Each photo was slotted into an envelope, the embellishments were added. I used the foam snowflakes and puffy phrase stickers from the kit. 


I added some old Simple Stories Sn@p stickers, some of which were used for journalling the date. The title was made with some puffy letter stickers from a previous Papermaze kit.


That's all for today, I'll be back with part three soon.
Thanks for looking.
Lynn x

Friday, 20 January 2023

Simple Stories - Simple Vintage Christmas Lodge - Hello 2023

Hi there,

Claire here and today I'm sharing my final layout with the Simple Stories Simple Vintage Christmas Lodge collection.

You may remember, this month I'm challenging myself to use up all the scraps and see how versatile a Christmas collection can be.

For this layout, I'm focusing on the green and woodgrain elements of the collection to create a wintery layout with no sense of Christmas in sight! (apart from a very small amount of Holly, but I hope you'll let me off!)

Here's how it turned out.


I prepped my 12x12 Premium White Cardstock with clear gesso, leaving it to the side to dry.

In the meantime, I cut the Leafy Frame Trio cutfile by Pinkfresh Studio, sized to about 9" wide. You can download the file for free in their Facebook group.

I backed the square frames with the Jolly St Nick paper, making sure to include some of the white holly and distressed pattern for extra interest.

Next, on to the leaves which I backed with a combination of the Christmas Wishes Paper and some Parakeet Bazzill Cardstock.


Once all the leaves were backed and the gesso dry, I added quite a lot of water to the background before spraying Distress Oxide Spray in Bundled Sage and Antique Linen. This helped to dilute the ink, resulting in a light colour wash rather than bold mixed media.

Whilst waiting for the ink to dry, I set about printing my photo. I resized it to 2.5" (including the white border), mounting it on a piece of the b side of the Boughs of Holly paper with a layer of white tissue paper behind. 


For extra interest, I also added a tag from the Bits & Pieces pack.


Next, I created some clusters on top of the file, mainly using the Bits & Pieces Ephemera and Woodland Bits & Pieces.


Alongside the cardstock ephemera pieces, I added extra dimension by using some of the foam pieces from the Foam Stickers which have really helped lift the layout.


For my title, I again reached for the Foam Stickers. Remembering this was not going to be a Christmas layout, I needed to find something more generic. Luckily, there is a sticker saying Hello which provided me with lots of options to create my title.  As this was one of the first layouts I made this year, I reached for some older gold Thickers from my stash and added 2023.


I scattered some heart ephemera pieces, raising some on foam and some flat for extra dimension, and added a few splatters of gold ink to finish the page.


I'm really pleased with how this turned out. I don't feel like it says Christmas at all and has a much more wintery feel. I hope it will inspire you to get more from any Christmas collections you have and push the boundaries to see what else you can create. 

Have fun!!


Claire xx

@scrappysoulmate

Wednesday, 26 October 2022

Vicki Boutin - Print Shop - Hey Friend!

Hi everyone,

Claire here with you today, sharing my second layout with the wonderful Vicki Boutin Print Shop collection. 

I mentioned in my first post that this collection is incredibly versatile, and true to form, my second layout is completely different to my first.

This time I am focusing on the soft pinks, teals and yellows to create this beautiful floral layout.


As usual, I started with Premium White Cardstock and applied a generous coating of gesso as I planned to add ink to my background.

I left it to dry overnight before applying Distress Oxide Spray in Tattered Rose and Bundled Sage. I also added some gold splatters to the background before building the layout.

I love the stencils in this collection, and used one that almost has chevron lines to create extra texture by applying gold texture paste on to of the distress oxides.


Next, I cut a circle of patterned paper from the b side of the Star Gazer paper. It's a beautiful soft teal colour with a grid pattern on top. 


I stuck this flat to my page on top of the mixed media to act as an anchor. To help give it more definition, I added a dotted black line in black pen to the outer edge.

Next, I made three paper rolls using strips cut from the Etched paper, adhering them to the patterned paper circle with Glossy Accents.


I mounted my photo using Bazzill cardstock from the Matchmaker Pack and some tissue paper from my stash. I lay the photo on top of the paper rolls, adhering with glossy accents to ensure a strong hold.


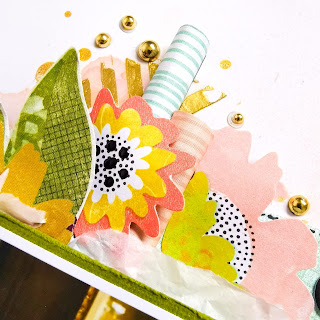
Around the photo, I created a diagonal line of florals. I picked out any yellow and pink flowers from the Floral Ephemera Pack, a cut some extras from the Flourish paper. To create extra dimension, I curled the petals of the flowers before sticking them down just in the centre.


For an added touch, I added some black Nuvo Drops to the centre of some of the flowers, giving them a high gloss look. I also used a beautiful pink tag under my photo for extra interest. This is from the Journaling Pack.

To my photo, I wanted to add a small tab from the Journaling Ephemera Pack, drawing on the pink tones from the flowers.


For my title, I used one of the Perfect Day Phrase & Accent Stickers. These are a real 'Must Have' as they do all the hard work for you. Such a great part of Vicki's collections.


As a final touch, I added some Pinkfresh Studio Essential Jewels in gold and that was the page done!


Hope you've enjoyed this layout, and it has shown how versatile this collection can really be! I have tons of papers and embellies left over so there's plenty of ideas still to try :)

Take care,

Claire

@scrappysoulmate

Monday, 26 September 2022

P13 - Hit the Road - Summer Days

Hi everyone!

I know we're all now officially in Autumn mode, but I'm kicking off this new week with a little bit of summer scrapping - reminiscing, documenting all the fun adventures we had over the last few months.

Today I'm using the Hit the Road collection from P13. It's hugely versatile, and would certainly translate across the seasons to document any outdoor adventure.


I have to say, P13 have knocked it out of the park with this collection. The addition of all the different ephemera packs, tags, tickets, stickers and phrases has been so much fun to create with - the possibilities are endless and I still have plenty left over for several more layouts. I'd highly recommend them.

I started with some Premium White Cardstock and applied clear gesso as I planned to create a mixed media background.

Once the page was dry, I added a bit of water and used Distress Oxide Sprays in Scattered Straw, Bundled Sage and Tumbled Glass. I love the combination of these colours and they are the perfect match to this collection so grab them whilst you can!


To create the sun rays, I used a dry brush and some Distress Oxide in Squeezed Lemonade through a sunburst stencil. This really helped to anchor my page and provides a central focal point to build the layout on top of.


I tore two strips of paper (Paper 4 and Paper 6) to echo the sunny blue and yellow tones. These papers are so beautiful in real life - the colours are absolutely gorgeous!

On top of the paper strips, I built my layout, starting with the frames from the Ephemera Frames and Words pack.


Around the frames, I build my forest using trees from the Ephemera Bits & Pieces pack and fussy cut from Paper 7.


At the left end, I added an embellishment cluster comprising elements again taken from the Ephemera Bits & Pieces pack and Paper 7.


I also tucked in some moss from my stash for extra texture.

On the right hand side, I created a secondary cluster to balance the page, using the Ephemera Bits & Pieces.


For my title, I used an acrylic piece from the Papermaze August Kit. There are a few still in stock if you want to add this gorgeous title to your stash :) 


As a finishing touch, I added a subtitle just above the acrylic piece, using the 'Pure Happiness' title from the Ephemera Frames and Words and tied some bakers twine across the bottom to reinforce the rustic feel of the countryside.

Hope you've been inspired by the pages I've created - I have certainly enjoyed making them.

I'll be back next month with a new collection. Until then, take care.

Claire xx
@scrappysulmate  


Monday, 29 August 2022

Just Beautiful....... Mintay Papers....Joy of Life pt 2

Hello again

It's Anita here with you today and I have my 2nd layout using Mintay's Joy of Life Collection.

I wanted to scrap this photo of my eldest daughter that I absolutely adore. It was captured on the day that should have been her wedding day, but due to covid and lockdown etc it was all postponed. We couldn't let the original date pass without doing something special for them and so we had a 'Nearly Weds Day', complete with flowers, cake, decor and getting dressed up nicely.


The page is based on a sheet of white cardstock that I trimmed 1cm from the top and also the same down one side. it was then laid onto a gutted out sheet of 04 to create a slim patterned frame around the outside edge. The large square that I gutted from the centre was full of the hot air balloon design so I cut out as many as I could from this.
These were then folded gently in half from top to bottom and layered on top of each other starting with the largest at the bottom and I made 2 stacks.
 I bent up the sides to create some dimension to each stack and then popped them to one side to use later.

Once again I used the Tim Holtz Distress Oxide Spray in Spun Sugar, I misted some patches but also spattered some drops too. I was fascinated watching the drops dry because the ink and the paint in them separated and when they had completely dried they ended up looking like small blossoms across the page ( well in my eyes they did lol)

Lots of fussy cutting came next from the sheet of 09 with a mix of flowers, birds, a cottage and a record player!
I used some of the scrappy bits to cut out some small triangles and added some twine to create a little string of bunting that I hung between the balloon stacks

The other birds and flowers were raised up on foam pads to add some more dimension to the page and the whole thing was then finished with the addition of Icicle Stickles and some AB flat backed crystals to bring a bit more sparkle.

Not sure how this last photo ended up down here..... but this is to show how the Distress Oxide Spray dried and separated...and how it looks like little blossoms ( to me anyway ;) )


I have really enjoyed creating with these Mintay papers and am really looking forward to seeing their new releases...I wonder what they will be.


Happy Crafting!

Warmest wishes

Anita xx

Monday, 23 May 2022

Heidi Swapp - Sun Chaser - So Happy

Hi everyone,

Claire back with you today sharing my second layout using Heidi Swapp Sun Chaser.

If you've taken a look at this collection in the store already, you'll know there are some absolutely stunning papers to choose from, and this week, I have decided to focus on making the paper the star of the show.


It's called Chillax and it is absolutely gorgeous!

Because the paper is so colourful, I have reverted to my standard Premium White Cardstock, and have cut the paper to fill a cutfile (Peartree Cutfiles, Pinwheel Mandala).

I considered placing the design centrally, but thought it would be more fun to cut the design into two unequal pieces. I've positioned these off centre on either edge of my page, leaving space for my photograph in between the two sections.


Where the photograph would be placed, I created a mixed media backdrop for it to sit on.  Having prepped the paper first with Gesso, I added Distress Oxide Sprays in:

 - Abandoned Coral

 - Fossilized Amber

 - Squeezed Lemonade

And also some Shimmerz Vibez in Love Ocean #9.

Although I've had Distress Oxides for many years, I am new to Distress Oxides Sprays - I LOVE them!! I find them so much easier to work with as they swish around the page much easier once a few splashes of water have been added. I'm definitely hooked!

Once the ink was all dry, I took the Sun Chaser Clear Stamp Set and selected the phrase "so happy". It's the perfect sentiment for how we always feel when we manage to get away from it all.

I repeated the stamping across the whole section, ignoring any gaps which would be covered by my picture.


The stamp set also contains a small heart - perfect for filling smaller spaces in between stamping.

Once all the mixed media elements were dry, I placed my cutfile on ether side, raising on foam pads for dimension.


Next, the photo and the clusters.


I mounted my photo on a piece of Be Bold black scripty paper, along with some polka dot tissue paper from my stash. I layered it on top of a tag from the Ephemera Pack and a small sun sticker from the Sticker Book.


Next, I created a small pull out that sits under the photo, using another piece form the Ephemera Pack. This holds some hidden journaling.


A small cluster to the bottom left of my photo created balance. Using black ephemera pieces helped tie in with the stamping and bring some grounding to this very colourful page. 

I used a circular tag, again from the Ephemera Pack, alongside some hearts from the Mini Puffy Stickers which feature in each cluster.


I decided, that with my repeated stamping, I didn't want a separate title, so ran with 'So Happy' as the title for my page. I used the remaining paper, left over from the cutfile, to cut some small 1" hearts, which I folded and scattered across the page along with some Pinkfresh Studio Jewels in Stargazer and Glacier.

As a final finishing touch, I felt like the page needed a little bit of foliage - in the photograph, we are in the Dominican Republic - so I cut a few leaves from the Juicy paper and added underneath my tag.


I really love how this page turned out.  These statement papers really do a lot of the work for you and need only minimal embellishing - especially with a splash of mixed media in the background.

I hope you've enjoyed these pages with Heidi Swapp Sun Chaser - It really is a beautiful collection to create with, and I hope it's inspired you to get your stories documented.


See you next month!

Claire xx

@Scrappysoulmate