Showing posts with label Grid. Show all posts

Monday, 13 January 2025

Simple Stories ~ For the Record 🗒️ #1

Hello everyone - it’s Anna back with you today. 
I am working with Simple Stories For the Record for my blog posts this month. You can find the whole collection in the shop here.

I love to create an end of year page for my albums each year to highlight some of the memorable moments of the year. So this is my version for the end of 2024…
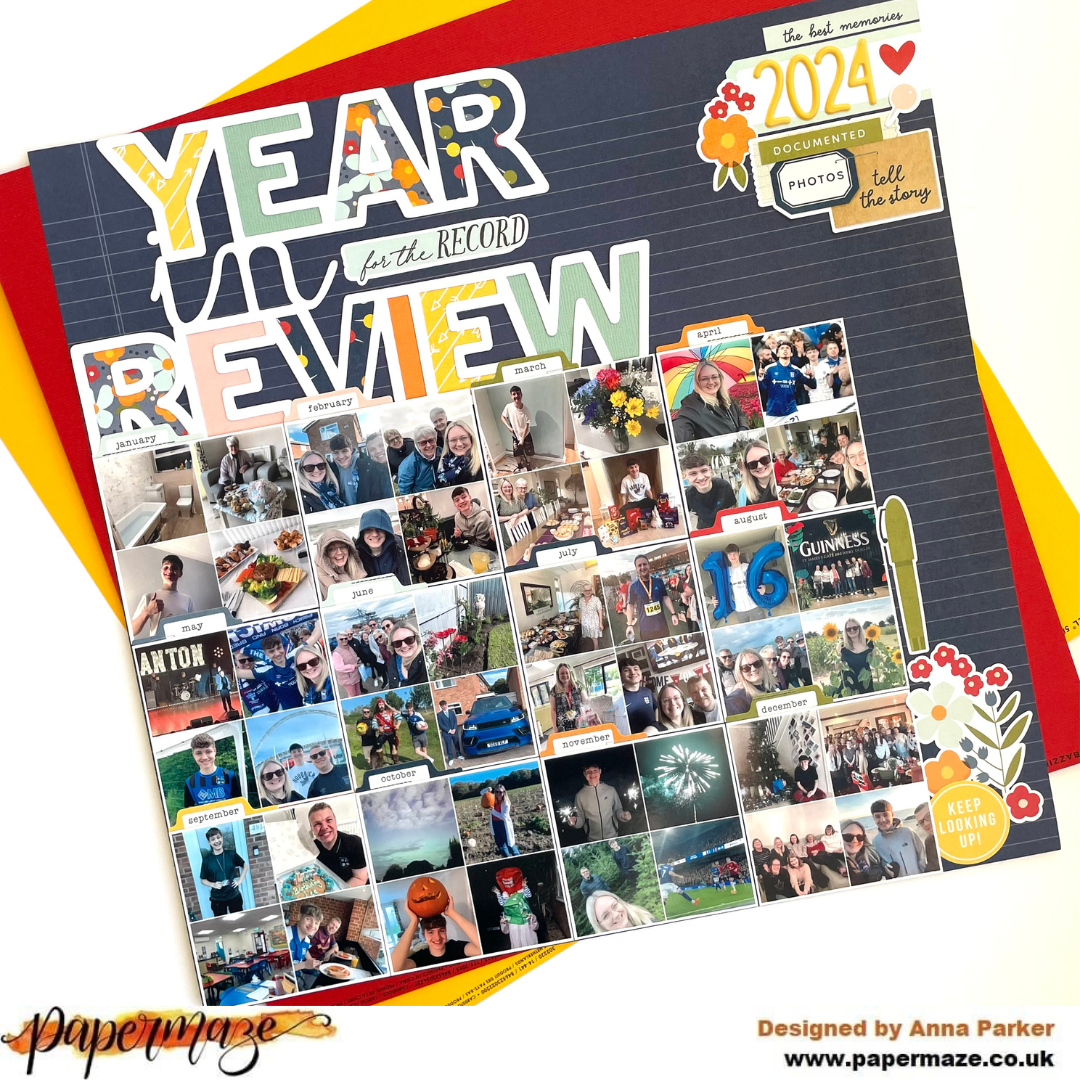

I used an app on my phone to create a collage of photos, I did one collage for each month of the year. I then printed these out and adhered in month order on to ‘Keep Looking Up’. 


I used various patterned papers and some coordinating cardstock from the matchmaker pack to back a cutfile by Paige Evans. I then adhered this to the top left of my layout. 


In the top right corner I used Bella Blvd Luna Alpha stickers to add the year and then I clustered some cardstock stickers around it. 


I added the monthly tab stickers from the ‘Monthly Cardstock Stickers’ to each photo, just tucking them in. 
I added a cluster of cardstock stickers in the bottom right corner and that was my layout complete! 


Thanks so much for looking! See you later on in the month with a second layout using this collection. 

Anna

@acraftylifewithanna

Friday, 16 August 2024

Echo Park ~ Sunny Days Ahead #1 🏖️

Hello! 
It’s Anna back with you today and for the month of August I am working with Echo Park - Sunny Days Ahead. You can find the collection in the shop here. 

For this layout I have created one of my favourite style layouts, a grid…


To create this layout, I began with a sheet of white 12x12 bazzill cardstock and the 3x4 journalling cards
I used some Shimmerz Ink Spray to spray onto my white background. 


I trimmed down the 3x4 journaling cards and selected 6 in different colours to use and laid them out in a 3x3 grid. 


I printed four photos and mounted them on to the journalling cards. I left two as they were, one for my journaling and another for a sentiment. 


I added a boarder sticker from the Element Stickers along the bottom of the journalling cards and also dotted several other stickers around my layout.   


I added a title ‘Summer Fun’ from the Pebbles Fun in the Sun Puffy Phrase Thickers


Thanks so much for looking! 
I’ll be back soon with another layout using this collection. 
See you then! 
Anna 


@acraftylifewithanna

Wednesday, 19 July 2023

Echo Park ~ Wizards & Company #1 🧙‍♀️

Hi all, it’s Anna back with you today. 
I’m working with Echo Park Wizards and Company for my next few blog posts…
You can find the collection in the shop here
I was keen to get my hands on this new collection to document some of my Harry Potter photos from our Orlando holiday last year. 


For my first layout, I have created a grid page. This style of page is definitely my go to page design - especially when I want to include lots of photographs. I had lots of pictures from the Wizarding World of Harry Potter as there’s so many little details to take note of. 

I used the 2x2 squares on the 6x4 journaling cards paper combined with my photos to create my grid. I used a large square punch to cut out my photos which were printed 3x4 and just trimmed them down slightly to measure the same size as the 2x2 squares.


I arranged my grid in the centre of white bazzill cardstock. I decided that a boarder was needed so I gutted the ‘Lets Fly Away’ paper and mounted my cardstock with the boarder. 


I added some stickers from the element stickers around my layout, mostly in clusters at the sides of the grid, but also dotted around on the grid between the photos. 


I added a few Pinkfresh Studio Jewel Essentials around my layout too. 


Thanks so much for looking! 
I’ll be back again in August with more from Wizards & Company

Anna 

@acraftylifewithanna

Monday, 7 February 2022

Echo Park - Day in the Life - Smile!

Hi everyone,

Claire here sharing my first layout for February!

I'm still thoroughly enjoying the Day in the Life collection by Echo Park which you can find in the shop here. This collection offers endless possibilities - it's perfect for pocket life pages with cut apart sheets and the months of the year, whilst also providing beautiful colours and patterns for more generic themed scrapping.

I've opted to create with the b sides of the collection, focussing on pretty spring colours.


I opted for come colour blocking, creating a mixed media background behind each of my 4" squares. For the mixed media, I used art crayons, but you could just as easily use Distress Oxide inks to create the same effect.

I used a cut apart from the February Paper saying 'Hello Sunshine'. The beautiful striped colours inspired my colour scheme and design.


I cut the same sized squared from the April, June and October papers, and machine stitched around each square, distressing the edges for additional texture.


I matted my photos on some white tissue paper and positioned these to overlap the squares. They are slightly smaller at just under 3".

To embellish, I fussy cut some flowers from the January paper and rained these on foam pads around my photographs.


Next, I took the Element Stickers, mounting the camera on foam to pull all the colours together and create some extra dimension.


I also used some banners, word phrases, tabs and clips from the sticker sheet, adding extra interest across the page.


As a final touch, I added some large white Alpha Thickers from my stash to create my title ' Smile' - perfect for our selfie photos and happy vibe of this layout.


And that was the page done! Hope you like it and it gives you some inspiration on how to use this versatile collection.

See you soon.

Claire xx


Saturday, 8 January 2022

'Deck the Halls' Holly Days, Simple Stories by Meg

Hey hey all you scrappy friends! I hope you had some fantastic festive celebrations and that you had a chance to wind down time over Christmas and New Year! 

Today I'm sharing another Christmas page using Holly Days by Simple Stories - I realised I haven't EVER tried out a classic green and red Christmas combo and this was the perfect opportunity to get one done, while it's still cold outside! 

So I started this page by pulling out the Tis The Season paper and the Mistletoe Memories paper. These two compliment each other so well, especially since the floral print is a large pattern and the polka dots on Mistletoe Memories are much smaller and contrast nicely. I cut them into wide strips, as well as a third strip from the Let's Get Cozy paper scraps I had left over from my previous projects. 

Originally I thought I might use the strips across the page horizontally, but I decided to cut the strips into thirds to create a 3x3 grid across my page. I realised I could use the 'Holly Days' and 'Comfort + Joy' elements from the 3x4 Elements paper, which matched the papers I'd chosen perfectly and added a little extra interest to the page. I trimmed the 3x4 Elements and arranged on the left and the right and used my photo on the lower right to create a sort of triangle around the page and keep the eye moving. 

After distressing and adhering the squares, I began creating a large cluster around my photo. I backed my photo with tags from the cut apart Tags paper and used 3D foam to pop up the photo and add dimension. The sweet little Christmas tree and polar bear were both fussy cut from the Tags paper too. 

I created a little banner using Bazills red cardstock, edging it with a white pen and using some little alphabet stamps with white paint to add the date to the banner. 

I finished the page with some puffy stickers, including the Vicki Boutins Warm Wishes Puffy Phrase 'Deck the Halls' thicker and hanging bauble, some fussy cut flowers from the Mistletoe Memories paper and some white and gold watercolour splatters peeking out each side. I really love this effect as it mimics the twinkling lights in my photo - I added quite a lot of little flat back gems and Bright Gold Nuvo Drops on top to really emphasise those twinkles! 

And there we have it, another paper made with the fun and festive Holly Days collection. I really enjoyed using these papers and I love how not a lot of product has ended up in a page just bursting with colour. 

Thank you so much for joining me today and I hope you have a wonderful start to the New Year! 

Stay safe, 

Meg x 

Monday, 27 September 2021

Simple Stories - Vintage Costal #3 - Sun, Sea & Sand

Hello! Happy Monday!

ScrappyAdam back with you at Papermaze today, finishing up September with my third Vintage Costal layout!  

I did bring in a couple of elements from 49 + Market's Beached Collection and the older release of Vintage Costal because it all works together so well!


I started with a sheet from the Basic Kit which have a lovely slight distressed look. Using a mix of scraps and 6x8" Paper Pads from both collections, I cut 9 squares at 4" to make a grid. I also inked the edges with some blank ink

I added two photos - matting them on a 6x8" sheet, cutting the photos down to slightly less than 6x4"s and set about creating some clusters around the page and photos. I wanted each square to be a little feature without overshadowing the photos. 


I am a big fan of dimension on my pages - it does mean bulky layouts and bulky albums but I love the dimension and different textures! So, I am a fan of the very dimensional layered stickers, the foam stickers and the chipboard - so they all feature on my layout here!

Of course, more is more with me and so I also brought in the adhesive brads, sticker book and element stickers. I also used a netting style die cut piece from Beached. 

I used a combination of foam and flat stickers for my Sun, Sea and Sand title and finished off with some flair from Dotty About Flair. 


Thanks so much for joining me today - I hope you have a brilliant week and look out for lots more inspiration coming up!

Stay safe, take care.

Adam x