Saturday, 16 July 2022

July Papermaze Kit - Part 1

Greens, blues and a touch of yellow is the colour scheme of this delightful Papermaze Kit for the month of July. Some wonderful patterned papers, Bazzill cardstock and a selection of embellishments including an exclusive honeycomb piece cut from chipboard.

Lynn here today with my first pair of layouts using this kit. 

 Before looking at how these layouts were made, here is what you will find in the kit:


Patterned Paper:
American Crafts - Vicki Boutin - Sweet Rush - Garden Variety & Sprinkles
American Crafts - Paige Evans - Splendid - #10 & #16
American Crafts - Maggie Holmes - Round Trip -  Documented

49 & Market - Spectrum Sherbet - Cotton Candy
Bazzill Basics Cardstock - Parakeet & Arctic

Reverse side of papers
Embellishments:
Sheet of petite type alphas, reel of mini washi tape, Prima flower, strip pearls, 2 - P13 tags, 5
Doodlebug heart sprinkles, exclusive hexagon honeycomb chipboard piece


An extra Bazzill Basics cardstock pack to match is also available with Jetstream, Whirlpool, White & Pollen

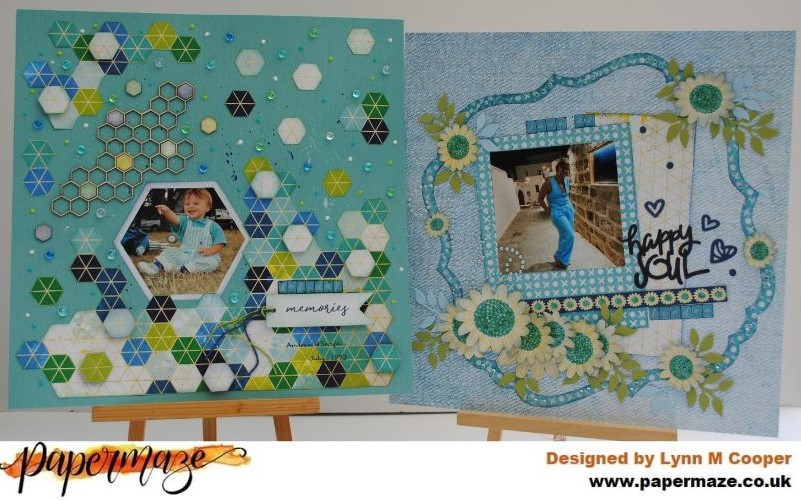
Holiday Memories - an early outing to Snape when my son was little. The colours were perfect for his outfit!

For inking the edges of the papers, tag, mats and chipboard I used Blueprint Sketch and Twisted Citron Distress Ink.

I used the Whirlpool Bazzill as the base for this layout. To add some interest to the cardstock I used some diluted Distress Paints, to flick over the surface - I matched the colours from the papers - Cracked Pistachio, Blueprint Sketch, Picket Fence and Twisted Citron.


With the 'Sprinkles' paper, I selected a large area and cut around the hexagons to create a piece for the lower area of the page. Then I cut smaller groups of hexagons to arrange elsewhere on the page and some single hexagons to superimpose over those already selected.


I used the Hexagon Layers dies from Memory Box to cut my photo and a photo mat from a scrap of white card. Once all this was ready, I placed everything into position together with the exclusive chipboard honeycomb piece and the tiny drop out hexagon pieces. I stuck everything in place, layering up some of the hexagon paper shapes with 3D foam pads. 


I made my title with the Authentique Petite Type alpha stickers and one of the tags from the kit. I tied two lengths of hemp twine to make a tie for the tag. 


I scattered a selection on Dew Drops (Clear, Aqua and Green) and some Nuvo Crystal Drops (Simply White Gloss, Apple Green Gloss and Caribbean Ocean) to finish off.


Happy Soul - My daughter on holiday in Lindos this summer for a friend's wedding.

For this design I used a mix of papers - choosing the denim side of Paige Evans Splendid '#16' paper as the backdrop.

I used both sides of Vicky Boutin 'Garden Variety' paper. I trimmed off the detail strip and saved this for later. With a template I drew the large frame shape onto the OXOX side and cut this out with my craft knife.


Stormy Sky Distress Ink was the colour of choice here to ink all the edges of my cut papers, I also distressed the straight edges of cut papers.

The large photo mat was cut from the OXOX side of the paper too, this measures 12.5cm x 16cm. I trimmed my photo to a square shape 10cm x 10cm and mounted it near the top of the mount.


From the scraps of 'Sprinkles' paper, used above, I cut a piece 9cm x 19cm. The frame, photo and papers were arranged and stuck to the '#16' paper. I cut a length from the detail strip, and ran this along the page under the photo.


I fussy cut some flowers form the remains of the 'Garden Variety' paper, curved the petals with the scissor blade and arranged them around the frame. I found a pearl swirl from my stash and placed this to the left of the photo.


For title and details I used the Authentique Petite Type alpha stickers and a phrase and hearts from my VB Storyteller Puffy Phrase Stickers


I used a die and the Parakeet and Whirlpool Bazzill, to add leaves to my flowers. I decorated the frame with aqua gems and the flower centres with Nuvo Glitter Drops - Blue Lagoon.


That's all for part 1, I'll be back with more soon
Thanks for looking
Lynn x

Friday, 15 July 2022

July crop

 It's our July crop tomorrow - fortunately before the temperatures really start to climb!  Our crop kit used a mix of Simples Stories, Mintay Papers and Vicki Boutin collections... 


If you'd like to join us tomorrow, we're at our usual venue of Otley Village Hall, a two minute drive from our shop.  There'll be tea & coffee, home-made cakes, and a variety of dies and punches for you to use, as well as the discount on anything you buy.

Tuesday, 12 July 2022

Always Be Your Awesome Self..... Cocoa Vanilla Studio - No Limits

 Hello

 it's Anita here with my 2nd layout using the No Limits Collection from Cocoa Vanilla Studio.

I really love a woodgrain paper and thankfully lots of collections include a sheet somewhere. No Limits is no exception and I used it for the base of my layout about my niece and nephew


I used the reverse side of the sheet of Big Bang for the base of this layout and cut a 6" x 12" strip from a sheet of  Stardust to lay horizontally across the centre of the page.

I didn't really like the straight cut edge on the centre, so I tore a couple of thin strips of Stardust, turned it over and used the blue reverse sides and edged both sides of the centre strip.

The photo was also matted using the reverse side of that sheet.


I really like the sheet called Nebula , covered in various sized stars, so I fussy cut several out and scattered them all about the page. Some of them were only part stars but these can still be used to good effect by tucking them slightly under other edges ( no one would ever know they were incomplete).....seems a shame to waste them!


The Universal sheet has lots of different elements on it, so I chose the ones I wanted to use and cut some and tore the edges on the largest one. On the bottom of the Universal sheet is a rainbow striped section, so I sliced this in 2 long lengths and added to the top and bottom of the page.


The page was finished with a liberal splattering of ivory acrylic paint....I do love to splatter!

There are lots of lovely new items in the SHOP ....why not pop over and have a good look about.


Warmest Wishes

Anita xx

Friday, 8 July 2022

On Island Time - Simple Stories - Simple Vintage, Vintage Seas Collection

Hello, it's Rebecca with you today and I am super excited to be sharing my first layout using the new Simple Vintage collection from Simple Stories - and it's a stunner - Vintage Seas. It's full of lovely blues and reds with a hint of rustic and it is right up my street! I adore anything nautical so this collection is perfect for me.


I started by cutting circles from some of the patterned papers. My circles are cut approx 2 1/4 inches across (about 5.5cm) and I've used a metal die to cut them. I picked some of my favourite papers - By The Sea (B side), Gone Coastal (both sides) and Sandy Shores. Once cut, I arranged the circles into 5 rows across a sheet of Premium White Cardstock and stitched them in place using my sewing machine.


With my circles in place, I then turned my focus to my photo - my little boy sat on the beach on the Isle of Wight last Summer. I was really drawn to one of the Chipboard Clusters and decided to cut the centre out and use it as a frame for my photo.


For my title, I've used one of the Combo Stickers - it was perfect considering my photo was taken on an Island which is renowned for having a slower, more relaxed pace of life. I've also added a sailboat from the Combo Stickers as my son's top has little lighthouses and sailboats on it.


I really didn't need to heavily embellish this layout because the patterned papers add so much beautiful detail all by themselves! I've added a few chipboard pieces from the Chipboard Clusters pack, and some die cuts from the Page Pieces.


To stretch my embellishing further out on the page, I've added some phrase stickers from the Sticker Book to two of the corner circles. I've raised these up using craft foam to introduce some dimension to the outer parts of the design.


I finished off the layout with a couple of acrylic seagulls from Bramble Fox, and some white splatters. For the splatters, I have watered-down some white gesso and as opposed to using white paint as I find the white stays whiter and doesn't soak into the patterned papers.


I hope you've enjoyed this layout and you find it inspiring. This collection is truly stunning and I can't wait to create more layouts with it. If you'd like to watch this layout come together, you can find a process video up on my YouTube channel here.


Thanks for reading! See you next time.


Rebecca x

@preciouspagespapercraft


Wednesday, 6 July 2022

Simple Stories ~ Into the Wild #1 🐘

 Hi! Anna here, this month I’m working with Simple Stories - Into the Wild. This collection this themed around safaris and zoos, focusing on wild animals and adventure! You can find it in the shop here. As with every Simple Stories collection, you can find a variety of patterned papers, chipboard, bits and pieces, page pieces and the relatively new chipboard frames - always such great variety! 

So this collection was perfect for me to document my visit to Animal Kingdom this year. One of my favourite parts of the park is the safari. So that’s what I decided to document for my first layout…

I began by cutting out the 2x2 squares from the centre of the 2x2 and 4x4 elements paper. I decided to create a grid, so printed out my pictures to fit on 2x2 pieces of cardstock. I also cut out some squares from coordinating cardstock and other pieces of patterned paper from the collection. 

I arranged the grid as I wanted and began to adhere them onto a sheet of white bazzill. I always find grid layouts in any form great for using multiple photos.  

I trimmed down my white cardstock to bring in another coordinating colour behind. So I mounted it on to a sheet of  bazzill mocha divine. 

My layout was now starting to come together. But I needed to fill some of my blank squares. I fussy cut a few animals from the going on safari and welcome to the jungle. I also punched out a few Martha Stewart butterfly’s, lifted their wings and added some enamel dots to the centres. I added a few puffy stickers by Bella Blvd which added a few extra details…

I finished by adding my title using Doodlebug Sunshine alphabet stickers

Join me next time for another scrapbook layout using this collection. 

Thanks so much for looking. 

Anna x

Monday, 4 July 2022

Echo Park Endless Summer - The Year of The Pineapple Cake

Hello, Karen here again with a final layout using the Endless Summer collection from Echo Park. The layouts I've previously created using this collection were both summer themed but today's layout isn't, and hopefully shows that themed collections can easily be used for layouts totally unrelated to the theme of the collection. My layout today is about a birthday cake that was made in the winter and the inspiration for the layout was the B side of the sheet of multi journalling cards which features a pineapple design.


Onto the yellow pineapple paper I layered rectangles cut from the Beach Days and Sun Rays papers that I had left over from my previous layouts. I matted the papers with black cardstock before attaching them to the layout as I really wanted the colours to pop. I played around with the positioning of the rectangles for quite a while until I was happy with them.


I also created a tag from more of the Beach Days paper and black cardstock and on the tag I mounted a smaller photo and some journalling. I added a black reinforcing ring to the hole in the tag and tied the tag with black & white bakers twine.


My 5x7 photo was double matted with black and white cardstock and then placed on the layout. I left the right side of the photo unstuck so that I could tuck my tag behind the photo. The photo is hidden but the journalling is visible. White paper doilies were also tucked underneath the photo to soften some of the hard edges. I always think paper doilies are a prefect addition to food themed layouts!


I printed more journalling onto a journalling card from my stash and tucked this underneath the bottom left corner of the photo.


I chose a chipboard word from the sheet of chipboard accents and added this as an embelishment.


Some very old puffy stickers from my stash and some newer foam Thickers from American Crafts were used to create the title which was placed at the bottom of the layout nestled into the paper rectangles. 

Finally a scattering of black sequins were added.

I do hope you like the Endless Summer collection as much as I do. It is such a bright and happy collection and perfect for so many layouts and is available in the shop here .

I'll be back soon with another project but until then, take care.

Karen x x

Friday, 1 July 2022

June Papermaze Kit - Part 2

Lynn here today with my second pair of Design Team layouts using the Papermaze June Kit.  The kit is available in the store or online, and is a lovely collection of pretty summery coloured papers and embellishments. Both my layouts feature photos taken on a day out to Kew Gardens last month.


Here is a reminder of what you will find in the kit, before moving on to how the layouts were created. Please see full details of the kit HERE.


When Flowers Dream - This amazing exhibition was on display at Kew Gardens when we visited, and the colours were perfect for the papers in this kit.

I separated the bands of colour from the Happy Days paper and distressed the edges.  Then I placed them down the left side of the sheet of white Bazzill. I lightly marked the gap where each strip of colour finished, then set aside the papers for later. With a selection of Distress Oxide Inks (picked to match the colours in the paper), I flicked wet ink over the white Bazzill, in bands to correspond with the paper colours.


The bands of coloured paper were replaced in the right order and I arranged the photos to the right side of the layout, tucking them under the papers. Once happy with the placement I stuck them all in place. 


For the title I used some old Pinkfresh Studio mini puffy alpha stickers for the first line. Then with Tim Holtz Sizzix Thinlits - Alphanumeric Bold die set I cut the next three words. I cut them once in scraps from the Happy Days paper and then again from some thin white card. I layered the letters up before sticking them to the layout.


From the kit I selected the strip multicoloured puffy dots, and selected a colour to match each of the paper colours and stuck these to the left side of each strip.


I used the circular sticker from the
Heidi Swapp phrase thickers and the Rosie's Studio puffy stickers, arranging them down the right side of the strips of paper.


My journalling about the sculpture was written on the bottom three bands of coloured paper.
The photos were decorated with pink pop pom trim.


Finally I added Nuvo Crystal Drops, gems, sequins and pearls in matching colours.


Afternoon Tea - My daughter treated me to a day at Kew Gardens for my birthday, which included a lovely afternoon tea. 

For this layout I selected the 'Full Bloom' paper to make a deep border. I created this by gutting the sheet to make a frame of 2.5cm. I trimmed a sheet of white Bazzill to 26.5cm x 26.5cm, and distressed the edges.

I wanted to make four colour blocked areas so sorted some embellishments and paper scraps from the kit and my own stash, sorting them into the colours I wanted to use picked from the floral frame. I decided on yellow, turquoise, pink and peach. Then I matched these colour groups to four Distress Paints. The paper was divided into quarters before flicking a little paint into its corresponding area.


Once the paint was dry, I hand stitched around the edges of this cardstock using some rainbow embroidery thread. I arranged my embellishments, papers and card onto the layout. I used the following from the kit: elements from the Sun Chaser Colourful Phrase Thickers, Doodlebug camera shape sprinkles, Pinkfresh Studio chipboard frames and multicoloured puffy dots.

From my stash I added pearls, d
ecorative pins and Pinkfresh Studio - My Favourite Story enamel dots


I created paper layering using both sides of papers from the kit - (Full BloomPerfect Day Plaid and Happy Days). And made tags made from the Bazzill in the kit and some from my own stash. I added some jute twine to a hole punched into the top of each tag. I also used the same twine to wrap around tags and papers. 


I cut flowers and butterflies from Beautiful Moments paper scraps, and placed them onto the arrangements with some 3D foam pads.

My four little titles were cut from more scraps of the Happy Days paper, selecting colours to match my arrangements. I used the Tim Holtz Sizzix Thinlits Alphanumeric - Label die set.


That's all from the June Kit, I'll be back with the July kit soon.
Thanks for looking.
Lynn x